Replace the boot media - AFF A700s
 Suggest changes


Replace the failed boot media on an AFF A700s controller module. This procedure includes removing the controller module from the chassis, locating the failed boot media using the lit LED indicator, physically replacing the boot media component, and restoring the system to normal operation.
The AFF A700s system supports only manual boot media recovery procedures. Automated boot media recovery is not supported.
Step 1: Remove the controller module
You must remove the controller module from the chassis when you replace the controller module or replace a component inside the controller module.
-
If you are not already grounded, properly ground yourself.
-
Loosen the hook and loop strap binding the cables to the cable management device, and then unplug the system cables and SFPs (if needed) from the controller module, keeping track of where the cables were connected.
Leave the cables in the cable management device so that when you reinstall the cable management device, the cables are organized.
-
Unplug the controller module power supply from the source, and then unplug the cable from the power supply.
-
Remove the cable management device from the controller module and set it aside.
-
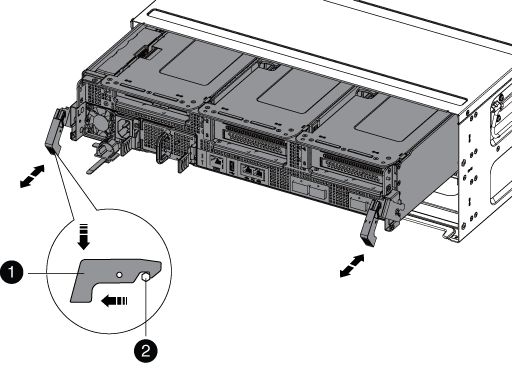
Press down on both of the locking latches, and then rotate both latches downward at the same time.
The controller module moves slightly out of the chassis.

|
Locking latch |
|
Locking pin |
-
Slide the controller module out of the chassis.
Make sure that you support the bottom of the controller module as you slide it out of the chassis.
-
Place the controller module on a stable, flat surface, and then open the air duct:
-
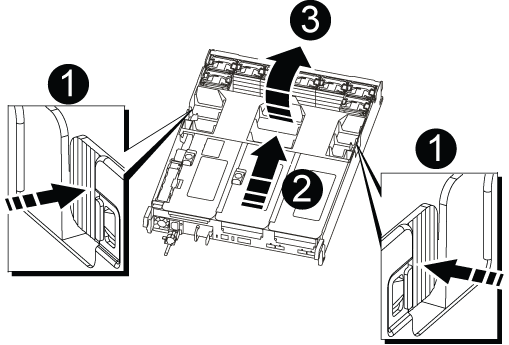
Press in the locking tabs on the sides of the air duct toward the middle of the controller module.
-
Slide the air duct toward the fan modules, and then rotate it upward to its completely open position.
-

|
Air duct locking tabs |
|
Risers |
|
Air duct |
Step 2: Replace the boot media - AFF A700s
You must locate the failed boot media in the controller module by removing the middle PCIe module on the controller module, locate the failed boot media, and then replace the boot media.
You need a Phillips head screwdriver to remove the screw that holds the boot media in place.
-
If you are not already grounded, properly ground yourself.
-
Locate the boot media:
-
Open the air duct, if needed.
-
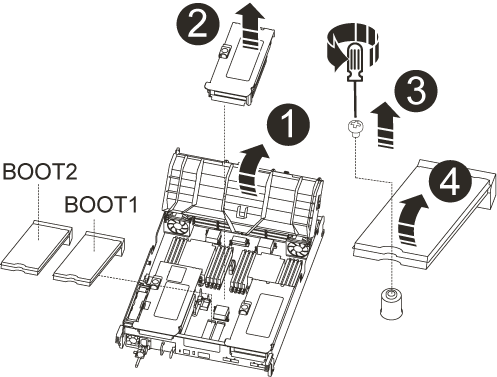
If needed, remove Riser 2, the middle PCIe module, by unlocking the locking latch and then removing the riser from the controller module.


Air duct

Riser 2 (middle PCIe module)

Boot media screw

Boot media
-
-
Locate the failed boot media.
-
Remove the boot media from the controller module:
-
Using a #1 Phillips head screwdriver, remove the screw holding down the boot media and set the screw aside in a safe place.
-
Grasping the sides of the boot media, gently rotate the boot media up, and then pull the boot media straight out of the socket and set it aside.
-
-
Align the edges of the replacement boot media with the boot media socket, and then gently push it into the socket.
-
Check the boot media to make sure that it is seated squarely and completely in the socket.
If necessary, remove the boot media and reseat it into the socket.
-
Rotate the boot media down until it is flush with the motherboard.
-
Secure the boot media in place by using the screw.
Do not over-tighten the screw. Doing so might crack the boot media circuit board. -
Reinstall the riser into the controller module.
-
Close the air duct:
-
Rotate the air duct downward.
-
Slide the air duct toward the risers until it clicks into place.
-


