Replace the chassis - ASA A250
 Suggest changes


Replace the chassis in your ASA A250 system when a hardware failure requires it. The replacement process involves removing the controllers and power supply units (PSUs), removing the drives, installing the replacement chassis, and reinstalling the chassis components.
To replace the chassis, you move the power supplies, hard drives, and controller module from the impaired chassis to the new chassis, and swap out the impaired chassis from with the new chassis of the same model as the impaired chassis.
Step 1: Remove the controller modules
To replace the chassis, you must remove the controller modules from the old chassis.
Use the following video or the tabulated steps to replace the chassis; it assumes the removal and replacement of the bezel:
-
If you are not already grounded, properly ground yourself.
-
Unplug the controller module power supplies from the source.
-
Release the power cable retainers, and then unplug the cables from the power supplies.
-
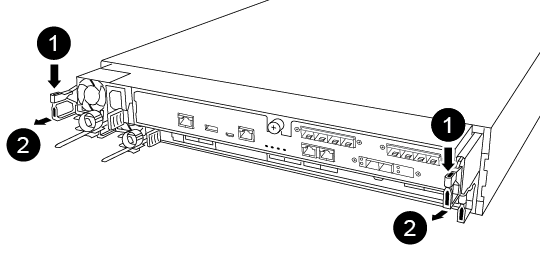
Insert your forefinger into the latching mechanism on either side of the controller module, press the lever with your thumb, and gently pull the controller a few inches out of the chassis.
If you have difficulty removing the controller module, place your index fingers through the finger holes from the inside (by crossing your arms). 

Lever

Latching mechanism
-
Using both hands, grasp the controller module sides and gently pull it out of the chassis and set it on a flat, stable surface.
-
Set the controller module aside in a safe place, and repeat these steps for the other controller module in the chassis.
Step 2: Move drives to the new chassis
You need to move the drives from each bay opening in the old chassis to the same bay opening in the new chassis.
-
Gently remove the bezel from the front of the system.
-
Remove the drives:
-
Press the release button at the top of the carrier face below the LEDs.
-
Pull the cam handle to its fully open position to unseat the drive from the midplane, and then gently slide the drive out of the chassis.
The drive should disengage from the chassis, allowing it to slide free of the chassis.
When removing a drive, always use two hands to support its weight. Drives are fragile. Handle them as little as possible to prevent damage to them.
-
-
Align the drive from the old chassis with the same bay opening in the new chassis.
-
Gently push the drive into the chassis as far as it will go.
The cam handle engages and begins to rotate upward.
-
Firmly push the drive the rest of the way into the chassis, and then lock the cam handle by pushing it up and against the drive holder.
Be sure to close the cam handle slowly so that it aligns correctly with the front of the drive carrier. It clicks when it is secure.
-
Repeat the process for the remaining drives in the system.
Step 3: Replace a chassis from within the equipment rack or system cabinet
You must remove the existing chassis from the equipment rack or system cabinet before you can install the replacement chassis.
-
Remove the screws from the chassis mount points.
-
With two people, slide the old chassis off the rack rails in a system cabinet or equipment rack, and then set it aside.
-
If you are not already grounded, properly ground yourself.
-
Using two people, install the replacement chassis into the equipment rack or system cabinet by guiding the chassis onto the rack rails in a system cabinet or equipment rack.
-
Slide the chassis all the way into the equipment rack or system cabinet.
-
Secure the front of the chassis to the equipment rack or system cabinet, using the screws you removed from the old chassis.
-
If you have not already done so, install the bezel.
Step 4: Install the controller modules
After you install the controller modules into the new chassis, you need to boot the system.
For HA pairs with two controller modules in the same chassis, the sequence in which you install the controller module is especially important because it attempts to reboot as soon as you completely seat it in the chassis.
-
Align the end of the controller module with the opening in the chassis, and then gently push the controller module halfway into the system.
Do not completely insert the controller module in the chassis until instructed to do so. -
Recable the console to the controller module, and then reconnect the management port.
-
Insert the controller module into the chassis:
-
Ensure the latching mechanism arms are locked in the fully extended position.
-
Using both hands, align and gently slide the controller module into the latching mechanism arms until it stops.
-
Place your index fingers through the finger holes from the inside of the latching mechanism.
-
Press your thumbs down on the orange tabs on top of the latching mechanism and gently push the controller module over the stop.
-
Release your thumbs from the top of the latching mechanisms and continue pushing until the latching mechanisms snap into place.
The controller module should be fully inserted and flush with the edges of the chassis.
-
Plug the power cords into the power supplies, reinstall the power cable locking collar, and then connect the power supplies to the power source.
The controller module begins to boot as soon as power is restored. Be prepared to interrupt the boot process.
-
-
Repeat the preceding steps to install the second controller into the new chassis.
After you have replaced the impaired ASA A250 chassis and reinstalled the components, you need to complete the chassis replacement


