

Attach VMDKs to a VM
 Suggest changes
You can attach one or more VMDKs from a backup to the parent VM, or to an alternate VM on the same ESXi host, or to an alternate VM on an alternate ESXi host managed by the same vCenter or a different vCenter in linked mode.
This makes it easier to restore one or more individual files from a drive instead of restoring the entire drive. You can detach the VMDK after you have restored or accessed the files you need.
You have the following attach options:
-
You can attach virtual disks from a primary or a secondary backup.
-
You can attach virtual disks to the parent VM (the same VM that the virtual disk was originally associated with) or to an alternate VM on the same ESXi host.
The following limitations apply to attaching virtual disks:
-
Attach and detach operations are not supported for Virtual Machine Templates.
-
When more than 15 VMDKs are attached to an iSCSI controller, the virtual machine for SnapCenter Plug-in for VMware vSphere cannot locate VMDK unit numbers higher than 15 because of VMware restrictions.
In this case, add the SCSi controllers manually and try the attach operation again.
-
You cannot manually attach a virtual disk that was attached or mounted as part of a guest file restore operation.
-
Attach and restore operations connect VMDKs using the default SCSi controller. VMDKs that are attached to a VM with a NVME controller are backed up, but for attach and restore operations they are connected back using a SCSi controller.
-
In the VMware vSphere web client GUI, click Menu in the toolbar, and then select Hosts and clusters from the drop-down list.
-
In the left navigation pane, right-click a VM, then select NetApp SnapCenter in the drop-down list, and then select Attach virtual disk in the secondary drop-down list.
-
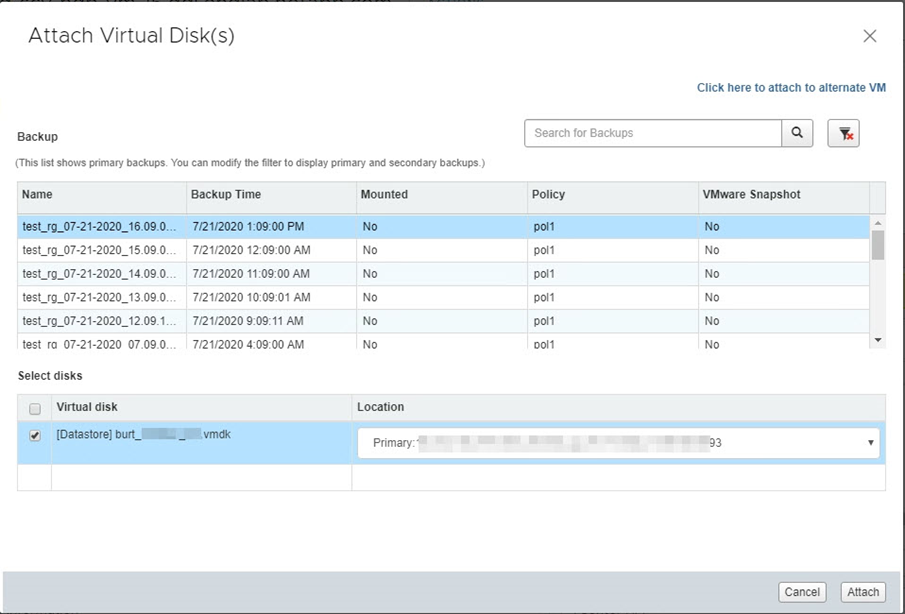
On the Attach Virtual Disk window, in the Backup section, select a backup.
You can filter the backup list by clicking the
 filter icon and selecting a date and time range, selecting whether you want backups that contain VMware Snapshot copies, whether you want mounted backups, and the location. Click OK.
 -
In the Select Disks section, select one or more disks you want to attach and the location you want to attach from (primary or secondary).
You can change the filter to display primary and secondary locations.
-
By default, the selected virtual disks are attached to the parent VM. To attach the selected virtual disks to an alternate VM in the same ESXi host, click Click here to attach to alternate VM and specify the alternate VM.
-
Click Attach.
-
Optional: Monitor the operation progress in the Recent Tasks section.
Refresh the screen to display updated information.
-
Verify that the virtual disk is attached by performing the following:
-
Click Menu in the toolbar, and then select VMs and Templates from the drop-down list.
-
In the left Navigator pane, right-click a VM, then select Edit settings in the drop-down list.
-
In the Edit Settings window, expand the list for each hard disk to see the list of disk files.

The Edit Settings page lists the disks on the VM. You can expand the details for each hard disk to see the list of attached virtual disks.
-
You can access the attached disks from the host operating system and then retrieve the needed information from the disks.