

Manage SnapCenter Plug-in for VMware vSphere
 Suggest changes
You need to use the SnapCenter Plug-in for VMware vSphere management GUI to stop, disable, or enable the SnapCenter Plug-in for VMware vSphere appliance.
Access the maintenance console
You can manage your application, system, and network configurations by using the maintenance console for SnapCenter Plug-in for VMware vSphere. You can change your administrator password, maintenance password, generate support bundles, and start remote diagnostics.
Before stopping and restarting the SnapCenter Plug-in for VMware vSphere service, you should suspend all schedules.
-
The defaults are “maint” as the username and “admin123” as the password to log in to the maintenance console for SnapCenter Plug-in for VMware vSphere.

After deployment, modify the default login credentials. -
You must set a password for the “diag” user while enabling remote diagnostics.
To obtain the root user permission to execute the command, use the sudo <command>.
-
From the VMware vSphere web client, select the VM where the SnapCenter VMware plug-in is located.
-
Right-click the VM, then on the Summary tab of the virtual appliance click Launch Remote Console to open a maintenance console window.
The logon defaults for the SnapCenter VMware plug-in maintenance console are as follows:
Username:
maint
Password:admin123
-
You can perform the following operations:
-
Option 1: Application Configuration
Start or stop SnapCenter VMware plug-in service
Change login username or password
Change MySQL password
Configure MySQL backup
List MySQL backups
Restore MySQL backup -
Option 2: System Configuration
Reboot or shutdown virtual machine
Change 'maint' user password
Change time zone
Change NTP server
Enable/Disable SSH Access
Increase jail disk size (/jail)
Upgrade
Install VMware Tools -
Option 3: Network Configuration
Display or change IP address settings
Display or change domain name search settings
Display or change static routes
Commit changes
Ping a host -
Option 4: Support and Diagnostics
Generate support bundle
Access diagnostic shell
Enable remote diagnostic access
Generate core dump bundle
-
Modify the SnapCenter VMware Plug-in password from the maintenance console
If you do not know the admin password for the SnapCenter Plug-in for VMware vSphere management GUI, you can set a new password from the maintenance console.
Before stopping and restarting the SnapCenter Plug-in for VMware vSphere service, you should suspend all schedules.
You must use the default “maint” as the username and “admin123” as the password to log in to the maintenance console of the SnapCenter VMware plug-in.
-
From the VMware vSphere web client, select the VM where the SnapCenter VMware plug-in is located.
-
Right-click the VM, then on the Summary tab of the virtual appliance click Launch Remote Console to open a maintenance console window.
The logon defaults for the SnapCenter VMware plug-in maintenance console are as follows:
Username:
maint
Password:admin123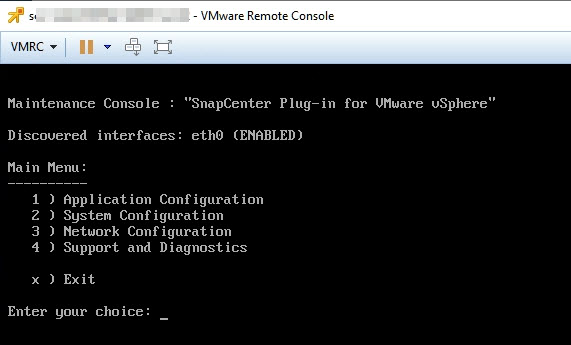
-
Enter “1” for Application Configuration.
-
Enter “4” for Change username or password.
-
Enter the new password.
The SnapCenter VMware virtual appliance service is stopped and restarted.
Create and import certificates
The SnapCenter VMware plug-in employs SSL encryption for secure communication with the client browser. While this does enable encrypted data across the wire, creating a new self-signed certificate, or using your own Certificate Authority (CA) infrastructure or a third party CA ensures that the certificate is unique for your environment. See the KB article: How to create and/or import an SSL certificate to VMware plug-in for SnapCenter.
Unregister SnapCenter Plug-in for VMware vSphere from vCenter
If you stop the SnapCenter VMware plug-in service in a vCenter that is in Linked Mode, resource groups are not available in all the linked vCenters, even when the SnapCenter VMware plug-in service is running in the other linked vCenters.
You must unregister the SnapCenter VMware plug-in extensions manually.
-
On the linked vCenter that has the SnapCenter VMware plug-in service stopped, navigate to the Managed Object Reference (MOB) manager.
-
In the Properties option, select Extension Manager to display a list of the registered extensions.
-
Unregister the extensions
com.netapp.scvm.webclientandcom.netapp.aegis.
Disable and enable SnapCenter Plug-in for VMware vSphere
If you no longer need the SnapCenter data protection features, you must change the configuration of the SnapCenter VMware plug-in. For example, if you deployed the plug-in in a test environment, you might need to disable the SnapCenter features in that environment and enable them in a production environment.
-
You must have administrator privileges.
-
Make sure that no SnapCenter jobs are running.
When you disable the SnapCenter VMware plug-in, all resource groups are suspended and the plug-in is unregistered as an extension in vCenter.
When you enable the SnapCenter VMware plug-in, the plug-in is registered as an extension in vCenter, all resource groups are in production mode, and all schedules are enabled.
-
Optional: Back up the SnapCenter VMware plug-in MySQL repository in case you want to restore it to a new virtual appliance.
-
Log in to the SnapCenter VMware plug-in management GUI using the format
https://<OVA-IP-address>:8080.The IP of the SnapCenter VMware plug-in is displayed when you deploy the plug-in.
-
Click Configuration in the left navigation pane, and then unselect the Service option in the Plug-in Details section to disable the plug-in.
-
Confirm your choice.
-
If you only used the SnapCenter VMware plug-in to perform VM consistent backups
The plug-in is disabled, and no further action is required.
-
If you used the SnapCenter VMware plug-in to perform application-consistent backups
The plug-in is disabled and further cleanup is required.
-
Log in to VMware vSphere.
-
Power down the VM and then delete the VM.
-
In the left navigator screen, right-click the instance of the SnapCenter VMware plug-in (the name of the
.ovafile` `that was used when the virtual appliance was deployed) and select Delete from Disk. -
Log in to SnapCenter and remove the vSphere host.
-
-
Remove SnapCenter Plug-in for VMware vSphere
If you no longer need to use the SnapCenter data protection features, you must disable the SnapCenter VMware plug-in to unregister it from vCenter, then remove the SnapCenter VMware plug-in from vCenter, and then manually delete leftover files.
-
You must have administrator privileges.
-
Make sure that no SnapCenter jobs are running.
-
Log in to the SnapCenter VMware plug-in management GUI using the format
https://<OVA-IP-address>:8080.The IP of the SnapCenter VMware plug-in is displayed when you deploy the plug-in.
-
Click Configuration in the left navigation pane, and then unselect the Service option in the Plug-in Details section to disable the plug-in.
-
Log in to VMware vSphere.
-
In the left navigator screen, right-click the instance of the SnapCenter VMware plug-in (the name of the
.ovafile that was used when the virtual appliance was deployed) and select Delete from Disk. -
Manually delete the following files in
/etc/vmware/vsphere-ui/vc-packages/vsphere-client-serenity/com.netapp.scvm.webclient-4.5.0.5942045/pluginsfolder of the vCenter server:vsc-httpclient3-security.jar
scv-api-model.jar
scvm_webui_service.jar
scvm_webui_ui.war
gson-2.5.jar -
If you used the SnapCenter VMware plug-in to support other SnapCenter plug-ins for application-consistent backups, log in to SnapCenter and remove the vSphere host.
The virtual appliance is still deployed but the SnapCenter VMware plug-in is removed.
After removing the host VM for the SnapCenter VMware plug-in, the plug-in might remain listed in vCenter until the local vCenter cache is refreshed. However, because the plug-in was removed, no SnapCenter VMware vSphere operations can be performed on that host. If you want to refresh the local vCenter cache, first make sure the appliance is in a Disabled state on the SnapCenter VMware plug-in Configuration page, and then restart the vCenter web client service.