

Creating groups for an S3 tenant
 Suggest changes
You can manage permissions for S3 user groups by importing federated groups or creating local groups.
-
You must be signed in to the Tenant Manager using a supported browser.
-
You must belong to a user group that has the Root Access permission.
-
If you plan to import a federated group, you have configured identity federation and the federated group already exists in the configured identity source.
-
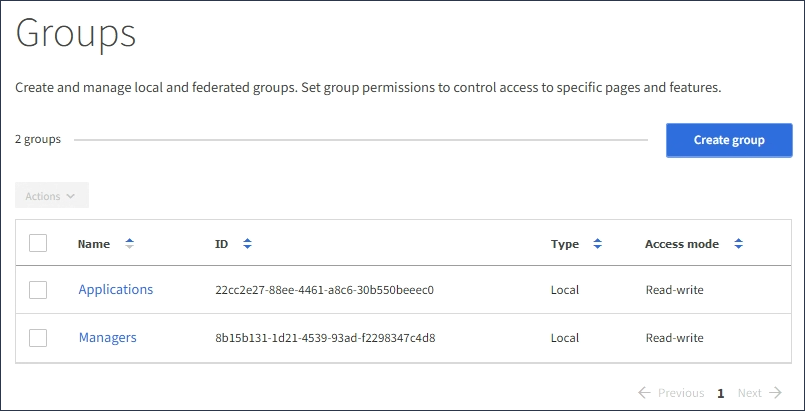
Select ACCESS MANAGEMENT > Groups.
-
Select Create group.
-
Select the Local group tab to create a local group, or select the Federated group tab to import a group from the previously configured identity source.
If single sign-on (SSO) is enabled for your StorageGRID system, users belonging to local groups will not be able to sign in to the Tenant Manager, although they can use client applications to manage the tenant's resources, based on group permissions.
-
Enter the group's name.
-
Local group: Enter both a display name and a unique name. You can edit the display name later.
-
Federated group: Enter the unique name. For Active Directory, the unique name is the name associated with the
sAMAccountNameattribute. For OpenLDAP, the unique name is the name associated with theuidattribute.
-
-
Select Continue.
-
Select an Access mode. If a user belongs to multiple groups and any group is set to Read-only, the user will have read-only access to all selected settings and features.
-
Read-write (default): Users can log into Tenant Manager and manage the tenant configuration.
-
Read-only: Users can only view settings and features. They cannot make any changes or perform any operations in the Tenant Manager or Tenant Management API. Local read-only users can change their own passwords.
-
-
Select the Group permissions for this group.
See the information about tenant management permissions.
-
Select Continue.
-
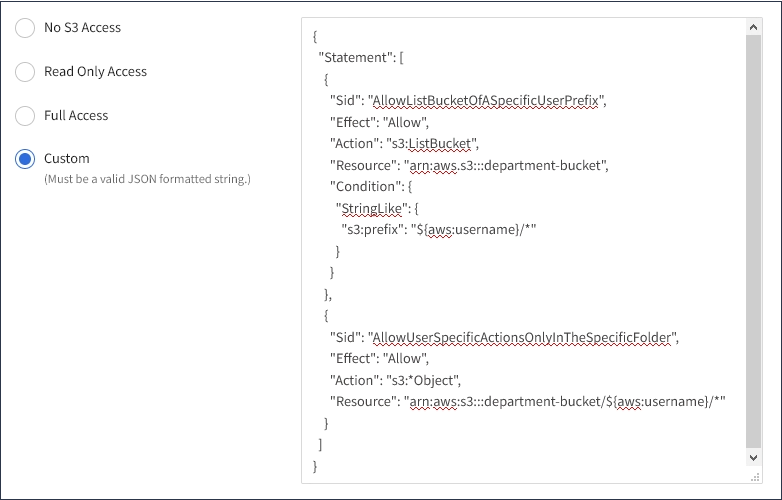
Select a group policy to determine which S3 access permissions the members of this group will have.
-
No S3 Access: Default. Users in this group do not have access to S3 resources, unless access is granted with a bucket policy. If you select this option, only the root user will have access to S3 resources by default.
-
Read Only Access: Users in this group have read-only access to S3 resources. For example, users in this group can list objects and read object data, metadata, and tags. When you select this option, the JSON string for a read-only group policy appears in the text box. You cannot edit this string.
-
Full Access: Users in this group have full access to S3 resources, including buckets. When you select this option, the JSON string for a full-access group policy appears in the text box. You cannot edit this string.
-
Custom: Users in the group are granted the permissions you specify in the text box. See the instructions for implementing an S3 client application for detailed information about group policies, including language syntax and examples.
-
-
If you selected Custom, enter the group policy. Each group policy has a size limit of 5,120 bytes. You must enter a valid JSON formatted string.
In this example, members of the group are only permitted to list and access a folder matching their username (key prefix) in the specified bucket. Note that access permissions from other group policies and the bucket policy should be considered when determining the privacy of these folders.
-
Select the button that appears, depending on whether you are creating a federated group or a local group:
-
Federated group: Create group
-
Local group: Continue
If you are creating a local group, step 4 (Add users) appears after you select Continue. This step does not appear for federated groups.
-
-
Select the check box for each user you want to add to the group, then select Create group.
Optionally, you can save the group without adding users. You can add users to the group later, or select the group when you add new users.
-
Select Finish.
The group you created appears in the list of groups. Changes might take up to 15 minutes to take effect because of caching.