

Configure VLAN interfaces
 Suggest changes
You can create virtual LAN (VLAN) interfaces on Admin Nodes and Gateway Nodes and use them in HA groups and load balancer endpoints to isolate and partition traffic for security, flexibility, and performance.
Considerations for VLAN interfaces
-
You create a VLAN interface by entering a VLAN ID and choosing a parent interface on one or more nodes.
-
A parent interface must be configured as a trunk interface at the switch.
-
A parent interface can be the Grid Network (eth0), the Client Network (eth2), or an additional trunk interface for the VM or bare-metal host (for example, ens256).
-
For each VLAN interface, you can select only one parent interface for a given node. For example, you can't use both the Grid Network interface and the Client Network interface on the same Gateway Node as the parent interface for the same VLAN.
-
If the VLAN interface is for Admin Node traffic, which includes traffic related to the Grid Manager and the Tenant Manager, select interfaces on Admin Nodes only.
-
If the VLAN interface is for S3 or Swift client traffic, select interfaces on either Admin Nodes or Gateway Nodes.
-
If you need to add trunk interfaces, see the following for details:
-
VMware (after installing the node): VMware: Add trunk or access interfaces to a node
-
RHEL or CentOS (before installing the node): Create node configuration files
-
Ubuntu or Debian (before installing the node): Create node configuration files
-
RHEL, CentOS, Ubuntu, or Debian (after installing the node): Linux: Add trunk or access interfaces to a node
-
Create a VLAN interface
-
You are signed in to the Grid Manager using a supported web browser.
-
You have the Root access permission.
-
A trunk interface has been configured in the network and attached to the VM or Linux node. You know the name of the trunk interface.
-
You know the ID of the VLAN you are configuring.
Your network administrator might have configured one or more trunk interfaces and one or more VLANs to segregate the client or admin traffic belonging to different applications or tenants. Each VLAN is identified by a numeric ID or tag. For example, your network might use VLAN 100 for FabricPool traffic and VLAN 200 for an archive application.
You can use the Grid Manager to create VLAN interfaces that allow clients to access StorageGRID on a specific VLAN. When you create VLAN interfaces, you specify the VLAN ID and select parent (trunk) interfaces on one or more nodes.
Access the wizard
-
Select CONFIGURATION > Network > VLAN interfaces.
-
Select Create.
Enter details for the VLAN interfaces
-
Specify the ID of the VLAN in your network. You can enter any value between 1 and 4094.
VLAN IDs don't need to be unique. For example, you might use VLAN ID 200 for admin traffic at one site and the same VLAN ID for client traffic at another site. You can create separate VLAN interfaces with different sets of parent interfaces at each site. However, two VLAN interfaces with the same ID can't share the same interface on a node. If you specify an ID that has already been used, a message appears.
-
Optionally, enter a short description for the VLAN interface.
-
Select Continue.
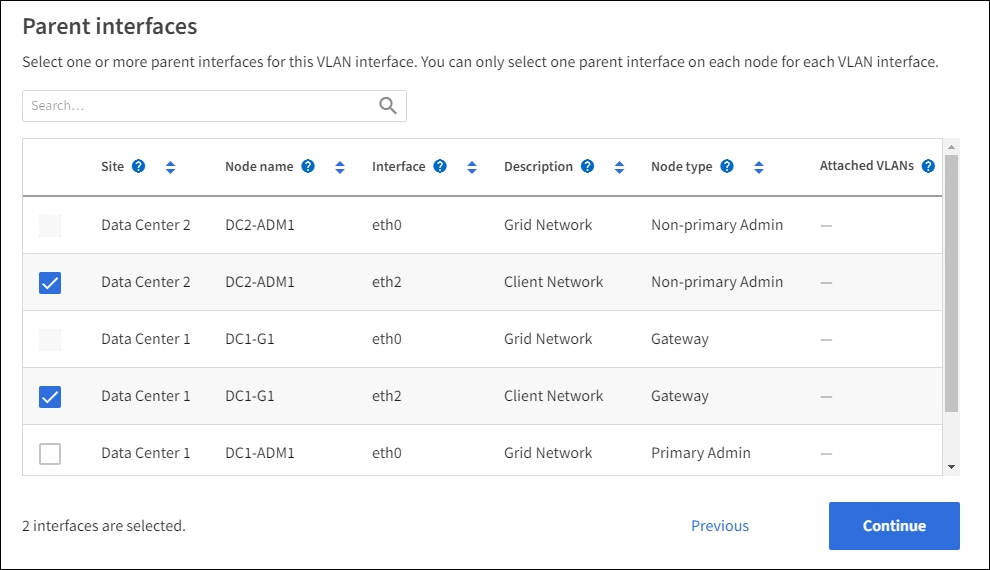
Choose parent interfaces
The table lists the available interfaces for all Admin Nodes and Gateway Nodes at each site in your grid. Admin Network (eth1) interfaces can't be used as parent interfaces and aren't shown.
-
Select one or more parent interfaces to attach this VLAN to.
For example, you might want to attach a VLAN to the Client Network (eth2) interface for a Gateway Node and an Admin Node.
-
Select Continue.
Confirm the settings
-
Review the configuration and make any changes.
-
If you need to change the VLAN ID or description, select Enter VLAN details at the top of the page.
-
If you need to change a parent interface, select Choose parent interfaces at the top of the page or select Previous.
-
If you need to remove a parent interface, select the trash can
 .
.
-
-
Select Save.
-
Wait up to 5 minutes for the new interface to appear as a selection on the High availability groups page and to be listed in the Network interfaces table for the node (NODES > parent interface node > Network).
Edit a VLAN interface
When you edit a VLAN interface, you can make the following types of changes:
-
Change the VLAN ID or description.
-
Add or remove parent interfaces.
For example, you might want to remove a parent interface from a VLAN interface if you plan to decommission the associated node.
Note the following:
-
You can't change a VLAN ID if the VLAN interface is used in an HA group.
-
You can't remove a parent interface if that parent interface is used in an HA group.
For example, suppose VLAN 200 is attached to parent interfaces on Nodes A and B. If an HA group uses the VLAN 200 interface for Node A and the eth2 interface for Node B, you can remove the unused parent interface for Node B, but you can't remove the used parent interface for Node A.
-
Select CONFIGURATION > Network > VLAN interfaces.
-
Select the checkbox for the VLAN interface you want to edit. Then, select Actions > Edit.
-
Optionally, update the VLAN ID or the description. Then, select Continue.
You can't update a VLAN ID if the VLAN is used in an HA group.
-
Optionally, select or clear the checkboxes to add parent interfaces or to remove unused interfaces. Then, select Continue.
-
Review the configuration and make any changes.
-
Select Save.
Remove a VLAN interface
You can remove one or more VLAN interfaces.
You can't remove a VLAN interface if it is currently used in an HA group. You must remove the VLAN interface from the HA group before you can remove it.
To avoid any disruptions in client traffic, consider doing one of the following:
-
Add a new VLAN interface to the HA group before removing this VLAN interface.
-
Create a new HA group that does not use this VLAN interface.
-
If the VLAN interface you want to remove is currently the active interface, edit the HA group. Move the VLAN interface you want to remove to the bottom of the priority list. Wait until communication is established on the new primary interface and then remove the old interface from the HA group. Finally, delete the VLAN interface on that node.
-
Select CONFIGURATION > Network > VLAN interfaces.
-
Select the checkbox for each VLAN interface you want to remove. Then, select Actions > Delete.
-
Select Yes to confirm your selection.
All VLAN interfaces you selected are removed. A green success banner appears on the VLAN interfaces page.