Configure SANtricity System Manager (SG6000 and SG5700)
 Suggest changes


You can use SANtricity System Manager to monitor the status of the storage controllers, storage disks, and other hardware components in the storage controller shelf. You can also configure a proxy for E-Series AutoSupport that enables you to send AutoSupport messages from the appliance without the use of the management port.
Set up and access SANtricity System Manager
You might need to access SANtricity System Manager on the storage controller to monitor the hardware in the storage controller shelf or to configure E-Series AutoSupport.
-
You are using a supported web browser.
-
To access SANtricity System Manager through Grid Manager, you have installed StorageGRID, and you have the Storage appliance administrator permission or Root access permission.
-
To access SANtricity System Manager using the StorageGRID Appliance Installer, you have the SANtricity System Manager administrator username and password.
-
To access SANtricity System Manager directly using a web browser, you have the SANtricity System Manager administrator username and password.

|
You must have SANtricity firmware 8.70 or higher to access SANtricity System Manager using the Grid Manager or the StorageGRID Appliance Installer. You can check your firmware version by using the StorageGRID Appliance Installer and selecting Help > About. |

|
Accessing SANtricity System Manager from the Grid Manager or from the Appliance Installer is generally meant only for monitoring your hardware and configuring E-Series AutoSupport. Many features and operations within SANtricity System Manager such as upgrading firmware don't apply to monitoring your StorageGRID appliance. To avoid issues, always follow the hardware installation and maintenance instructions for your appliance. |
There are three ways to access SANtricity System Manager, depending upon what stage of the installation and configuration process you are in:
-
If the appliance has not yet been deployed as a node in your StorageGRID system, you should use the Advanced tab in the StorageGRID Appliance Installer.
Once the node is deployed, you can no longer use the StorageGRID Appliance Installer to access SANtricity System Manager. -
If the appliance has been deployed as a node in your StorageGRID system, use the SANtricity System Manager tab on the Nodes page in Grid Manager.
-
If you can't use the StorageGRID Appliance Installer or Grid Manager, you can access SANtricity System Manager directly using a web browser connected to the management port.
This procedure includes steps for your initial access to SANtricity System Manager. If you have already set up SANtricity System Manager, go to the configure hardware alerts step.

|
Using either the Grid Manager or the StorageGRID Appliance Installer enables you to access SANtricity System Manager without having to configure or connect the management port of the appliance. |
You use SANtricity System Manager to monitor the following:
-
Performance data such as storage array level performance, I/O latency, CPU utilization, and throughput
-
Hardware component status
-
Support functions including viewing diagnostic data
You can use SANtricity System Manager to configure the following settings:
-
Email alerts, SNMP alerts, or syslog alerts for the components in the storage controller shelf
-
E-Series AutoSupport settings for the components in the storage controller shelf.
For additional details on E-Series AutoSupport, see the NetApp E-Series Systems Documentation Site.
-
Drive Security keys, which are needed to unlock secured drives (this step is required if the Drive Security feature is enabled)
-
Administrator password for accessing SANtricity System Manager
-
Do one of the following:
-
Use the StorageGRID Appliance Installer and select Advanced > SANtricity System Manager
-
Use the Grid Manager and select NODES >
appliance Storage Node> SANtricity System Manager
If these options aren't available or the login page does not appear, use the IP addresses for the storage controllers. Access SANtricity System Manager by browsing to the storage controller IP. -
-
Set or enter the administrator password.
SANtricity System Manager uses a single administrator password that is shared among all users.

-
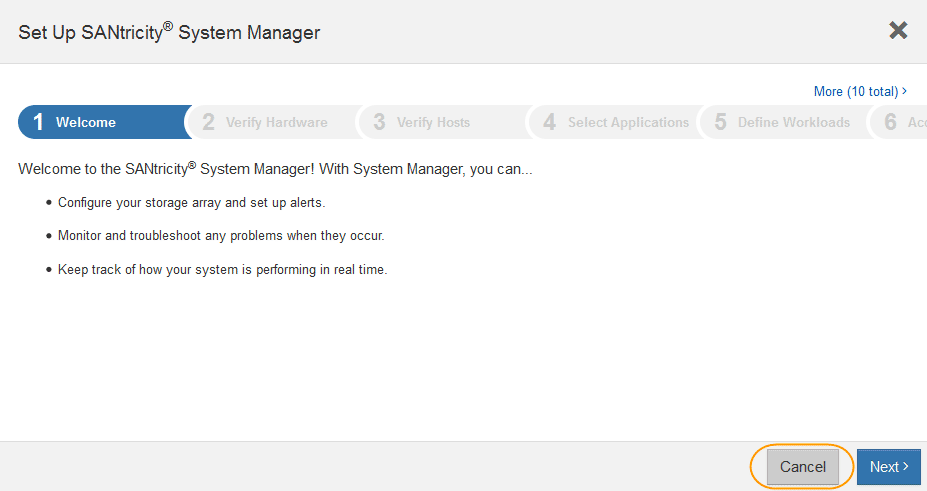
Select Cancel to close the wizard.
Don't complete the Set Up wizard for a StorageGRID appliance. 
-
-
Select Help to access the online help for SANtricity System Manager.
-
Use the Settings > Alerts section of the online help to learn about alerts.
-
Follow the “How To” instructions to set up email alerts, SNMP alerts, or syslog alerts.
-
-
Manage AutoSupport for the components in the storage controller shelf.
-
Select Help to access the online help for SANtricity System Manager.
-
Use the SUPPORT > Support Center section of the online help to learn about the AutoSupport feature.
-
Follow the “How To” instructions to manage AutoSupport.
For specific instructions on configuring a StorageGRID proxy for sending E-Series AutoSupport messages without using the management port, go to the instructions for configuring storage proxy settings.
-
-
If the Drive Security feature is enabled for the appliance, create and manage the security key.
-
Select Help to access the online help for SANtricity System Manager.
-
Use the Settings > System > Security key management section of the online help to learn about Drive Security.
-
Follow the “How To” instructions to create and manage the security key.
-
-
Optionally, change the administrator password.
-
Select Help to access the online help for SANtricity System Manager.
-
Use the Home > Storage array administration section of the online help to learn about the administrator password.
-
Follow the “How To” instructions to change the password.
-
Review hardware status in SANtricity System Manager
You can use SANtricity System Manager to monitor and manage the individual hardware components in the storage controller shelf and to review hardware diagnostic and environmental information, such as component temperatures, as well as issues related to the drives.
-
You are using a supported web browser.
-
To access SANtricity System Manager through Grid Manager, you have the Storage appliance administrator permission or Root access permission.
-
To access SANtricity System Manager using the StorageGRID Appliance Installer, you have the SANtricity System Manager administrator username and password.
-
To access SANtricity System Manager directly using a web browser, you have the SANtricity System Manager administrator username and password.

|
You must have SANtricity firmware 8.70 or higher to access SANtricity System Manager using the Grid Manager or the StorageGRID Appliance Installer. |

|
Accessing SANtricity System Manager from the Grid Manager or from the Appliance Installer is generally meant only for monitoring your hardware and configuring E-Series AutoSupport. Many features and operations within SANtricity System Manager such as upgrading firmware don't apply to monitoring your StorageGRID appliance. To avoid issues, always follow the hardware installation and maintenance instructions for your appliance. |
-
Enter the administrator username and password if required.
-
Click Cancel to close the Set Up wizard and to display the SANtricity System Manager home page.
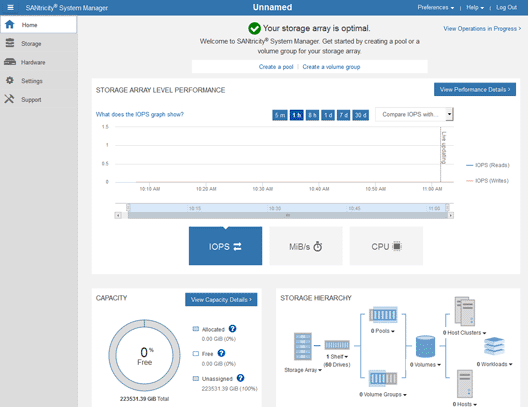
The SANtricity System Manager home page appears. In SANtricity System Manager, the controller shelf is referred to as a storage array.

-
Review the information displayed for appliance hardware and confirm that all hardware components have a status of Optimal.
-
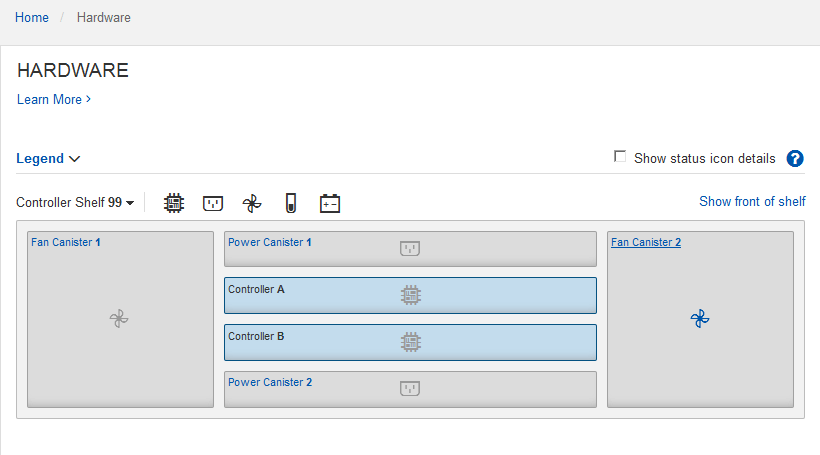
Click the Hardware tab.
-
Click Show back of shelf.

From the back of the shelf, you can view both storage controllers, the battery in each storage controller, the two power canisters, the two fan canisters, and expansion shelves (if any). You can also view component temperatures.
-
To see the settings for each storage controller, select the controller, and select View settings from the context menu.
-
To see the settings for other components in the back of the shelf, select the component you want to view.
-
Click Show front of shelf, and select the component you want to view.
From the front of the shelf, you can view the drives and the drive drawers for the storage controller shelf or the expansion shelves (if any).
-
If the status of any component is Needs Attention, follow the steps in the Recovery Guru to resolve the issue or contact technical support.
Set IP addresses for storage controllers using StorageGRID Appliance Installer
Management port 1 on each storage controller connects the appliance to the management network for SANtricity System Manager. If you can't access SANtricity System Manager from the StorageGRID Appliance Installer, set a static IP address for each storage controller to ensure that you don't lose your management connection to the hardware and the controller firmware in the controller shelf.
-
You are using any management client that can connect to the StorageGRID Admin Network, or you have a service laptop.
-
The client or service laptop has a supported web browser.
DHCP-assigned addresses can change at any time. Assign static IP addresses to the controllers to ensure consistent accessibility.

|
Follow this procedure only if you don't have access to SANtricity System Manager from the StorageGRID Appliance Installer (Advanced > SANtricity System Manager) or Grid Manager (NODES > SANtricity System Manager). |
-
From the client, enter the URL for the StorageGRID Appliance Installer:
https://Appliance_Controller_IP:8443For
Appliance_Controller_IP, use the IP address for the appliance on any StorageGRID network.The StorageGRID Appliance Installer Home page appears.
-
Select Configure Hardware > Storage Controller Network Configuration.
The Storage Controller Network Configuration page appears.
-
Depending on your network configuration, select Enabled for IPv4, IPv6, or both.
-
Make a note of the IPv4 address that is automatically displayed.
DHCP is the default method for assigning an IP address to the storage controller management port.
It might take a few minutes for the DHCP values to appear. 
-
Optionally, set a static IP address for the storage controller management port.
You should either assign a static IP for the management port or assign a permanent lease for the address on the DHCP server. -
Select Static.
-
Enter the IPv4 address, using CIDR notation.
-
Enter the default gateway.

-
Click Save.
It might take a few minutes for your changes to be applied.
When you connect to SANtricity System Manager, you will use the new static IP address as the URL:
https://Storage_Controller_IP
-


