

Upgrade SG5700 drive firmware using SANtricity System Manager using offline method
 Suggest changes
Use the SANtricity System Manager online method to upgrade the firmware on the drives in your appliance to make sure you have all the latest features and bug fixes.
-
The storage appliance has an Optimal status.
-
All drives have an Optimal status.
-
You have placed the StorageGRID appliance into maintenance mode.

While the appliance is in maintenance mode, I/O (input/output) activity to the storage controller is stopped to make disruptive storage operations safe.

|
Don't upgrade the drive firmware on more than one StorageGRID appliance at a time. Doing so might cause data unavailability, depending on your deployment model and ILM policy. |
The drives are upgraded in parallel while the appliance is in maintenance mode. If the pool or volume group does not support redundancy or is degraded, you must use the offline method to upgrade the drive firmware. You should also use the offline method for any drive associated with flash read cache, or any pool or volume group that is currently degraded. The offline method upgrades firmware only while all I/O activity is stopped on the drives to be upgraded. To stop I/O activity, place the node into maintenance mode.
The offline method is faster than the online method and will be significantly faster when many drives in a single appliance need upgrades. However, it requires that nodes be taken out of service, which might require scheduling a maintenance window and monitoring progress. Choose the method that is the best fit for your operational procedures and the number of drives that need to be upgraded.
-
Confirm that the appliance is in maintenance mode.
-
Access SANtricity System Manager using one of these methods:
-
Use the StorageGRID Appliance Installer and select Advanced > SANtricity System Manager
-
Use the Grid Manager and select NODES > Storage Node > SANtricity System Manager
-
Use SANtricity System Manager by browsing to the storage controller IP:
https://Storage_Controller_IP
-
-
Enter the SANtricity System Manager administrator username and password, if required.
-
Verify the drive firmware version currently installed in the storage appliance:
-
From SANtricity System Manager, select SUPPORT > Upgrade Center.
-
Under Drive Firmware upgrade, select Begin Upgrade.
The Upgrade Drive Firmware page displays the drive firmware files currently installed.
-
Note the current drive firmware revisions and drive identifiers in the Current Drive Firmware column.
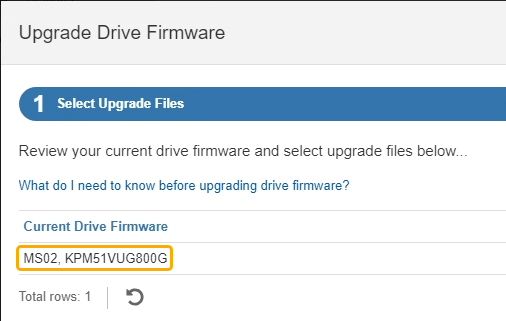
In this example:
-
The drive firmware revision is MS02.
-
The drive identifier is KPM51VUG800G.
-
-
Select View drives in the Associated Drives column to display where these drives are installed in your storage appliance.
-
Close the Upgrade Drive Firmware window.
-
-
Download and prepare the available drive firmware upgrade:
-
Under Drive Firmware upgrade, select NetApp Support.
-
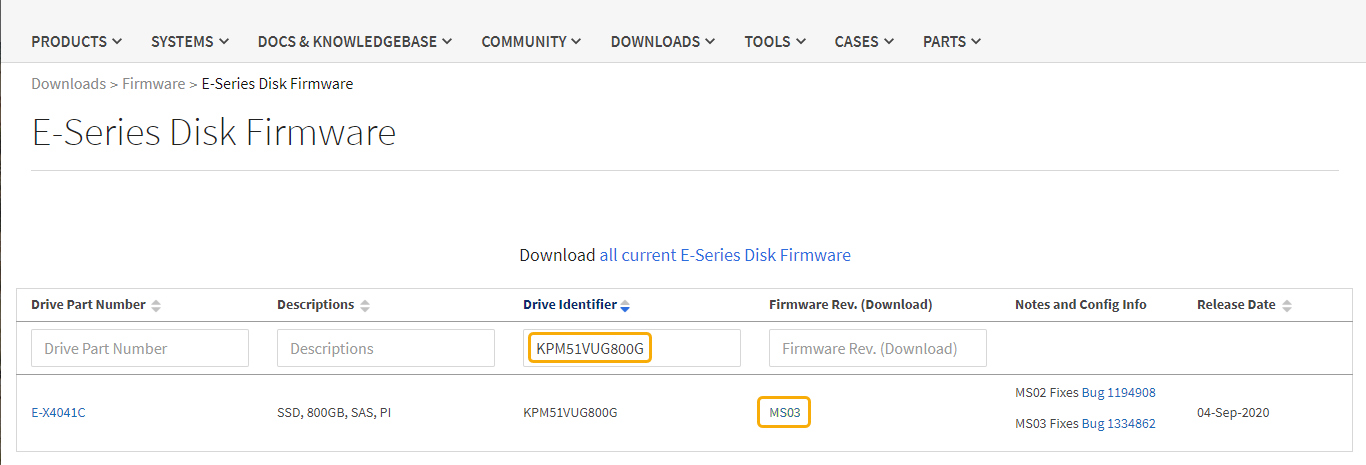
On the NetApp Support Site, select the Downloads tab, and then select E-Series Disk Drive Firmware.
The E-Series Disk Firmware page displays.
-
Search for each Drive Identifier installed in your storage appliance and verify that each drive identifier has the latest firmware revision.
-
If the firmware revision is not a link, this drive identifier has the latest firmware revision.
-
If one or more drive part numbers are listed for a drive identifier, a firmware upgrade is available for these drives. You can select any link to download the firmware file.
-
-
If a later firmware revision is listed, select the link in the Firmware Rev. (Download) column to download a
.ziparchive containing the firmware file. -
Extract (unzip) the drive firmware archive files you downloaded from the Support site.
-
-
Install the drive firmware upgrade:
-
From SANtricity System Manager, under Drive Firmware upgrade, select Begin Upgrade.
-
Select Browse, and select the new drive firmware files that you downloaded from the Support site.
Drive firmware files have a filename similar to
D_HUC101212CSS600_30602291_MS01_2800_0002.dlp.You can select up to four drive firmware files, one at a time. If more than one drive firmware file is compatible with the same drive, you get a file conflict error. Decide which drive firmware file you want to use for the upgrade and remove the other one.
-
Select Next.
Select Drives lists the drives that you can upgrade with the selected firmware files.
Only drives that are compatible appear.
The selected firmware for the drive appears in the Proposed Firmware column. If you must change this firmware, select Back.
-
Select Upgrade all drives offline (parallel) — Upgrades the drives that can support a firmware download only while all I/O activity is stopped on any volumes that use the drives.
You must place the appliance into maintenance mode before using this method. You should use the Offline method to upgrade the drive firmware.
If you want to use the Offline (parallel) upgrade, don't proceed unless you are certain that the appliance is in maintenance mode. Failure to place the appliance into maintenance mode before initiating an offline drive firmware update might cause data loss. -
In the first column of the table, select the drive or drives you want to upgrade.
The best practice is to upgrade all drives of the same model to the same firmware revision.
-
Select Start and confirm that you want to perform the upgrade.
If you need to stop the upgrade, select Stop. Any firmware downloads currently in progress complete. Any firmware downloads that have not started are canceled.
Stopping the drive firmware upgrade might result in data loss or unavailable drives. -
(Optional) To see a list of what was upgraded, select Save Log.
The log file is saved in the downloads folder for your browser with the name
latest-upgrade-log-timestamp.txt.
-
-
After the procedure completes successfully, perform any additional maintenance procedures while the node is in maintenance mode. When you are done, or if you experienced any failures and want to start over, go to the StorageGRID Appliance Installer and select Advanced > Reboot Controller. Then select one of these options:
-
Reboot into StorageGRID.
-
Reboot into Maintenance Mode. Reboot the controller and keep the node in maintenance mode. Select this option if there were any failures during the procedure and you want to start over. After the node finishes rebooting into maintenance mode, restart from the appropriate step in the procedure that failed.
It can take up to 20 minutes for the appliance to reboot and rejoin the grid. To confirm that the reboot is complete and that the node has rejoined the grid, go back to the Grid Manager. The Nodes page should display a normal status (green check mark icon
 to the left of the node name) for the appliance node, indicating that no alerts are active and the node is connected to the grid.
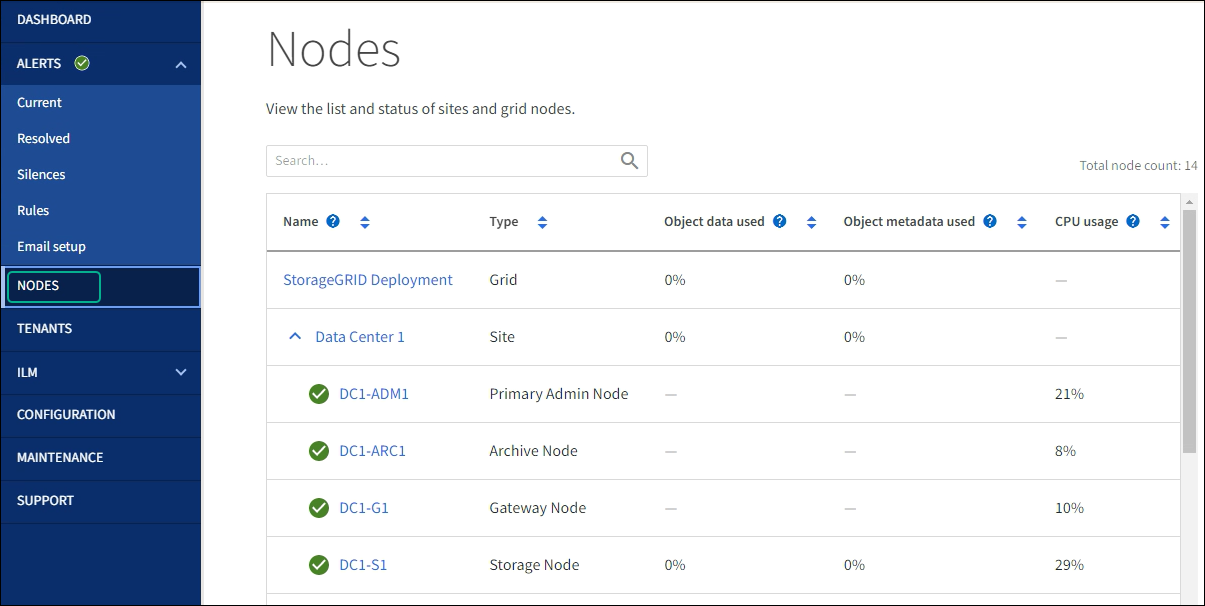
-