

Configure high availability groups
 Suggest changes
You can configure high availability (HA) groups to provide highly available access to the services on Admin Nodes or Gateway Nodes.
-
You are signed in to the Grid Manager using a supported web browser.
-
You have the Root access permission.
-
If you plan to use a VLAN interface in an HA group, you have created the VLAN interface. See Configure VLAN interfaces.
-
If you plan to use an access interface for a node in an HA group, you have created the interface:
-
Red Hat Enterprise Linux (before installing the node): Create node configuration files
-
Ubuntu or Debian (before installing the node): Create node configuration files
-
Linux (after installing the node): Linux: Add trunk or access interfaces to a node
-
VMware (after installing the node): VMware: Add trunk or access interfaces to a node
-
Create a high availability group
When you create a high availability group, you select one or more interfaces and organize them in priority order. Then, you assign one or more VIP addresses to the group.
An interface must be for a Gateway Node or an Admin Node to be included in an HA group. An HA group can only use one interface for any given node; however, other interfaces for the same node can be used in other HA groups.
Access the wizard
-
Select CONFIGURATION > Network > High availability groups.
-
Select Create.
Enter details for the HA group
-
Provide a unique name for the HA group.
-
Optionally, enter a description for the HA group.
-
Select Continue.
Add interfaces to the HA group
-
Select one or more interfaces to add to this HA group.
Use the column headers to sort the rows, or enter a search term to locate interfaces more quickly.
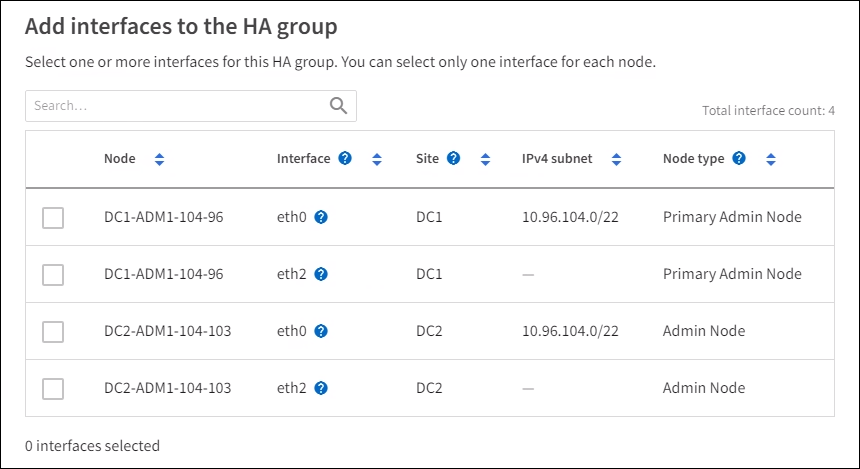

After creating a VLAN interface, wait up to 5 minutes for the new interface to appear in the table. Guidelines for selecting interfaces-
You must select at least one interface.
-
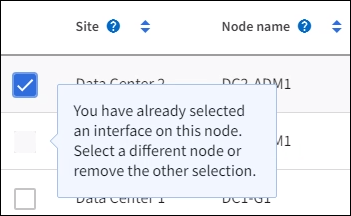
You can select only one interface for a node.
-
If the HA group is for HA protection of Admin Node services, which include the Grid Manager and the Tenant Manager, select interfaces on Admin Nodes only.
-
If the HA group is for HA protection of S3 or Swift client traffic, select interfaces on Admin Nodes, Gateway Nodes, or both.
-
If you select interfaces on different types of nodes, an informational note appears. You are reminded that if a failover occurs, services provided by the previously active node might not be available on the newly active node. For example, a backup Gateway Node can't provide HA protection of Admin Node services. Similarly, a backup Admin Node can't perform all of the maintenance procedures that the primary Admin Node can provide.
-
If you can't select an interface, its checkbox is disabled. The tool tip provides more information.
-
You can't select an interface if its subnet value or gateway conflicts with another selected interface.
-
You can't select a configured interface if it does not have a static IP address.
-
-
Select Continue.
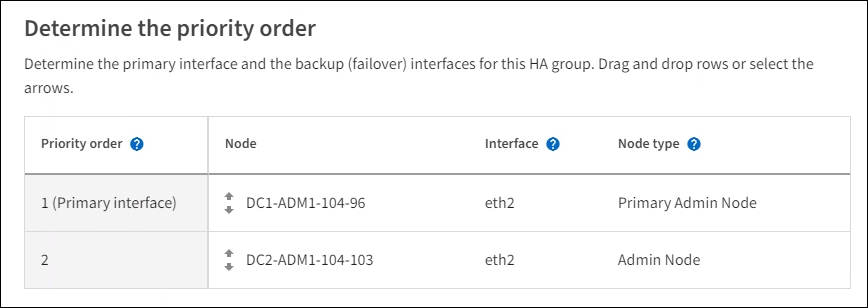
Determine the priority order
If the HA group includes more than one interface, you can determine which is the Primary interface and which are the Backup (failover) interfaces. If the Primary interface fails, the VIP addresses move to the highest priority interface that is available. If that interface fails, the VIP addresses move to the next highest priority interface that is available, and so on.
-
Drag rows in the Priority order column to determine the Primary interface and any Backup interfaces.
The first interface in the list is the Primary interface. The Primary interface is the active interface unless a failure occurs.

If the HA group provides access to the Grid Manager, you must select an interface on the primary Admin Node to be the Primary interface. Some maintenance procedures can only be performed from the primary Admin Node. -
Select Continue.
Enter IP addresses
-
In the Subnet CIDR field, specify the VIP subnet in CIDR notation—an IPv4 address followed by a slash and the subnet length (0-32).
The network address must not have any host bits set. For example,
192.16.0.0/22.
If you use a 32-bit prefix, the VIP network address also serves as the gateway address and the VIP address. 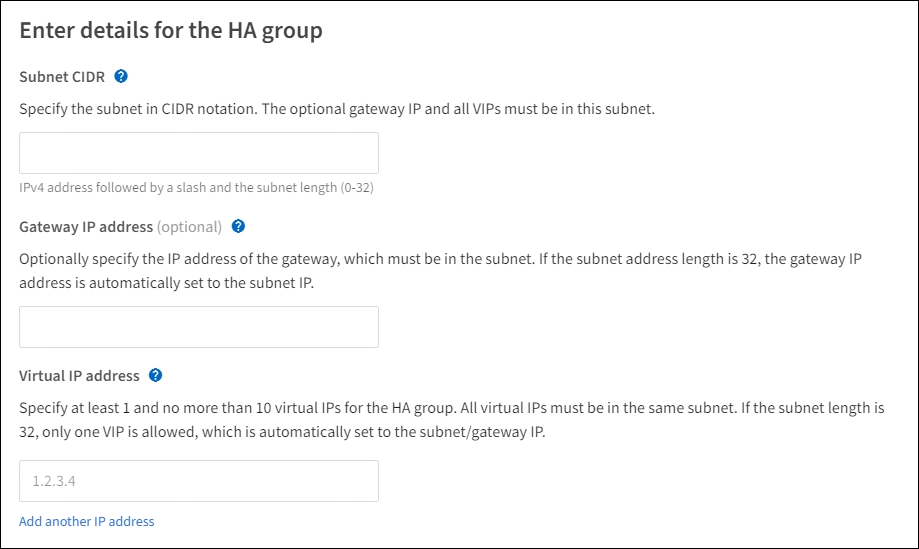
-
Optionally, if any S3, Swift, administrative or tenant clients will access these VIP addresses from a different subnet, enter the Gateway IP address. The gateway address must be within the VIP subnet.
Client and admin users will use this gateway to access the virtual IP addresses.
-
Enter at least one and no more than ten VIP addresses for the active interface in the HA group. All VIP addresses must be within the VIP subnet and all will be active at the same time on the active interface.
You must provide at least one IPv4 address. Optionally, you can specify additional IPv4 and IPv6 addresses.
-
Select Create HA group and select Finish.
The HA Group is created, and you can now use the configured virtual IP addresses.
Next steps
If you will use this HA group for load balancing, create a load balancer endpoint to determine the port and network protocol and to attach any required certificates. See Configure load balancer endpoints.
Edit a high availability group
You can edit a high availability (HA) group to change its name and description, add or remove interfaces, change the priority order, or add or update virtual IP addresses.
For example, you might need to edit an HA group if you want to remove the node associated with a selected interface in a site or node decommission procedure.
-
Select CONFIGURATION > Network > High availability groups.
The High availability groups page shows all existing HA groups.
-
Select the checkbox for the HA group you want to edit.
-
Do one of the following, based on what you want to update:
-
Select Actions > Edit virtual IP address to add or remove VIP addresses.
-
Select Actions > Edit HA group to update the group's name or description, add or remove interfaces, change the priority order, or add or remove VIP addresses.
-
-
If you selected Edit virtual IP address:
-
Update the virtual IP addresses for the HA group.
-
Select Save.
-
Select Finish.
-
-
If you selected Edit HA group:
-
Optionally, update the group's name or description.
-
Optionally, select or clear the checkboxes to add or remove interfaces.
If the HA group provides access to the Grid Manager, you must select an interface on the primary Admin Node to be the Primary interface. Some maintenance procedures can only be performed from the primary Admin Node -
Optionally, drag rows to change the priority order of the Primary interface and any Backup interfaces for this HA group.
-
Optionally, update the virtual IP addresses.
-
Select Save and then select Finish.
-
Remove a high availability group
You can remove one or more high availability (HA) groups at a time.
|
|
You can't remove an HA group if it is bound to a load balancer endpoint. To delete an HA group, you must remove it from any load balancer endpoints that use it. |
To prevent client disruptions, update any affected S3 or Swift client applications before you remove an HA group. Update each client to connect using another IP address, for example, the virtual IP address of a different HA group or the IP address that was configured for an interface during installation.
-
Select CONFIGURATION > Network > High availability groups.
-
Review the Load balancer endpoints column for each HA group you want to remove. If any load balancer endpoints are listed:
-
Go to CONFIGURATION > Network > Load balancer endpoints.
-
Select the checkbox for the endpoint.
-
Select Actions > Edit endpoint binding mode.
-
Update the binding mode to remove the HA group.
-
Select Save changes.
-
-
If no load balancer endpoints are listed, select the checkbox for each HA group you want to remove.
-
Select Actions > Remove HA group.
-
Review the message and select Delete HA group to confirm your selection.
All HA groups you selected are removed. A green success banner appears on the High availability groups page.