

How to use port remap
 Suggest changes
You may have a need to remap an incoming or outbound port for multiple reasons. You may be moving from the legacy CLB load balancer service to the current nginx service load balancer endpoint and maintain the same port to reduce the impact to clients, wish to use port 443 for client S3 on an admin node client network, or for firewall restrictions.
Migrate S3 clients from CLB to NGINX with Port ReMap
In releases earlier than StorageGRID 11.3, the included Load Balancer service on the Gateway Nodes is the Connection Load Balancer (CLB). In StorageGRID 11.3, NetApp introduces the NGINX service as a feature rich integrated solution for load balancing HTTP(s) traffic. Because the CLB service remains available in the current release of StorageGRID, you cannot reuse port 8082 in the new load balancer endpoint configuration. To work around this, the 8082 inbound port is remapped to 10443. This makes all HTTPS requests coming into port 8082 on the gateway redirect to port 10443, bypassing the CLB service and instead connecting to the NGINX service. Although the following instructions are for VMware, the PORT_REMAP functionality exists for all installation methods, and you can use a similar process for bare metal deployments and appliances.
VMware virtual machine Gateway Node deployment
The following steps are for a StorageGRID deployment where the Gateway Node or Nodes are deployed in VMware vSphere 7 as VMs using the StorageGRID Open Virtualization Format (OVF). The process entails destructively removing the VM and redeploying the VM with the same name and configuration. Before you power on the VM, change the vAPP property to remap the port, then power on the VM and follow the node recovery process.
Prerequisites
-
You are running StorageGRID 11.3 or later
-
You have downloaded and have access to the installed StorageGRID version VMware install files.
-
You have a vCenter account with permissions to power on/off VMs, change the settings of the VMs and vApps, remove VMs from vCenter, and deploy VMs by OVF.
-
You have created a load balancer endpoint
-
The port is configured to the desired redirect port
-
The endpoint SSL certificate is the same as installed for the CLB service in the Configuration/Server Certificates/ Object Storage API Service Endpoints Server Certificate or the client is able to accept a change in certificate.
-

|
If your existing certificate is self-signed, you cannot reuse it in the new endpoint. You must generate a new self-signed certificate when creating the endpoint and configure the clients to accept the new certificate. |
Destroy the first Gateway Node
To destroy the first Gateway Node, follow these steps:
-
Choose the Gateway Node to start with if the grid contains more than one.
-
Remove the node IPs from all DNS round-robin entities or load balancer pools, if applicable.
-
Wait for Time-to-Live (TTL) and open sessions to expire.
-
Power off the VM node.
-
Remove the VM node from the disk.
Deploy the replacement Gateway Node
To deploy the replacement Gateway Node, follow these steps:
-
Deploy the new VM from OVF, selecting the .ovf, .mf, and .vmdk files from the install package downloaded from the support site:
-
vsphere-gateway.mf
-
vsphere-gateway.ovf
-
NetApp-SG-11.4.0-20200721.1338.d3969b3.vmdk
-
-
After the VM has been deployed, select it from the list of VMs, select the Configure tab vApp Options.
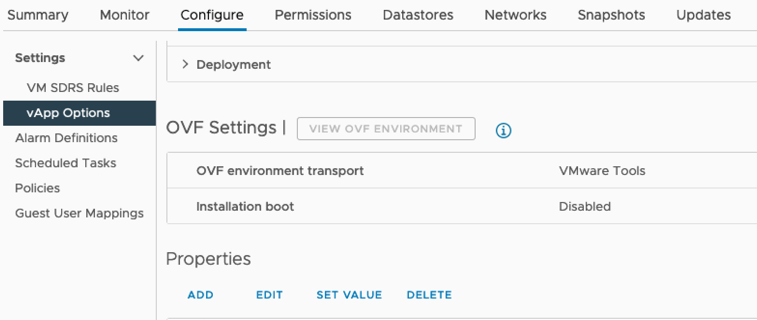
-
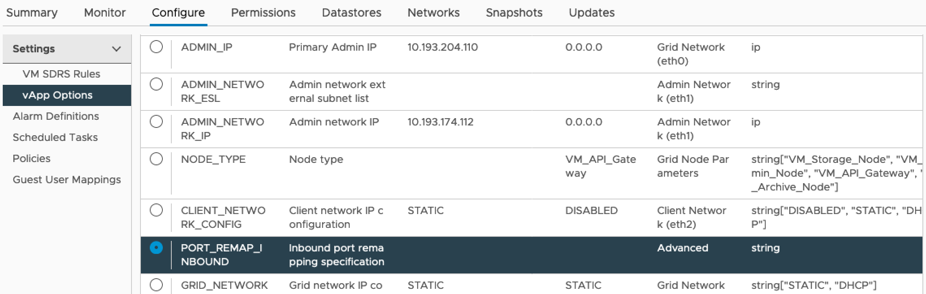
Scroll down to the Properties section and select the PORT_REMAP_INBOUND property
-
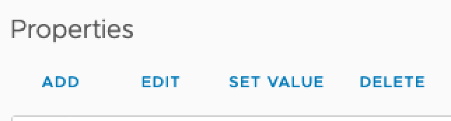
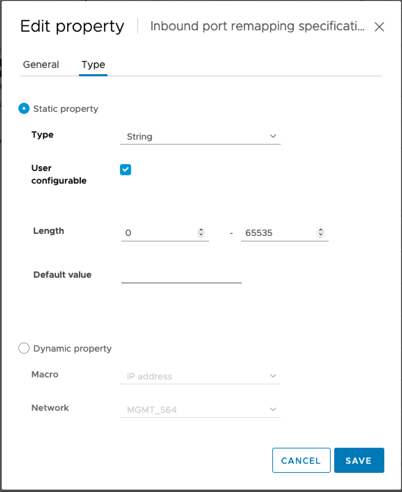
Scroll to the top of the Properties list and click Edit
-
Select the Type tab, confirm that the User Configurable checkbox is selected, and then click Save.
-
At the top of the Properties list, with the “PORT_REMAP_INBOUND” property still selected, click Set Value.
-
In the Property Value field, enter the network (grid, admin, or client), TCP, the original port (8082), and the new port (10443) with “/” in between each value as depicted following.
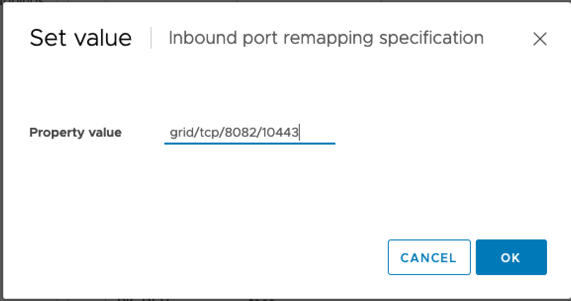
-
If you are using multiple networks, use a comma (,) to separate the network strings, for example, grid/tcp/8082/10443,admin/tcp/8082/10443,client/tcp/8082/10443
Recover the Gateway Node
To recover the Gateway Node, follow these steps:
-
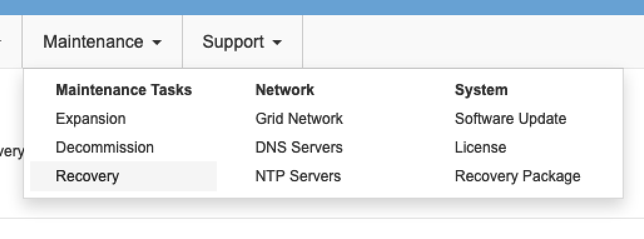
Navigate to the Maintenance/Recovery section of the Grid Management UI.
-
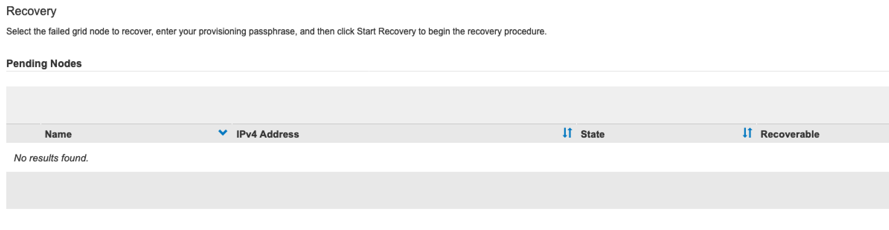
Power on the VM node and wait for the node to appear in the Maintenance/Recovery Pending Nodes section of the Grid Management UI.
For information and directions for node recovery, see the https://docs.netapp.com/sgws-114/topic/com.netapp.doc.sg-maint/GUID-7E22B1B9-4169-4800-8727-75F25FC0FFB1.html[Recovery and Maintenance guide]
-
After the node has been recovered, the IP can be included in all DNS round-robin entities, or load balancer pools, if applicable.
Now, any HTTPS sessions on port 8082 go to port 10443
Remap port 443 for client S3 access on an Admin node
The default configuration in the StorageGRID system for an admin node, or HA group containing an Admin node is for port 443 and 80 to be reserved for the management and tenant manager UI's and cannot be used for load balancer endpoints. The solution to this is to use the port remap feature and redirect inbound port 443 to a new port that will be configured as a load balancer endpoint. Once this completed Client S3 traffic will be able to use port 443, the Grid management UI will only be accessible through port 8443, and the Tenant management UI will only be accessible on port 9443. The remap port feature can only be configured at install time of the node. In order to implement a port remap of an active node in the grid, it must be reset to the pre-installed state. This is a destructive procedure that includes a node recovery once the configuration change has been made.
Backup logs and databases
Admin nodes contain audit logs, prometheus metrics, as well as historical information about attributes, alarms, and alerts. Having multiple admin nodes means you have multiple copies of this data. If you do not have multiple admin nodes in your grid, you should make sure to preserve this data to restore after the node has been recovered in the end of this process. If you have another admin node in your grid, you can copy the data from that node during the recovery process. If you do not have another admin node in the grid you can follow these instructions to copy the data before destroying the node.
Copy audit logs
-
Log in to the Admin Node:
-
Enter the following command:
ssh admin@grid_node_IP -
Enter the password listed in the
Passwords.txtfile. -
Enter the following command to switch to root:
su - -
Enter the password listed in the
Passwords.txtfile. -
Add the SSH private key to the SSH agent. Enter:
ssh-add -
Enter the SSH Access Password listed in the
Passwords.txtfile.When you are logged in as root, the prompt changes from `$` to `#`.
-
-
Create the directory to copy all audit log files to a temporary location on a separate grid node lets use storage_node_01:
-
ssh admin@storage_node_01_IP -
mkdir -p /var/local/tmp/saved-audit-logs
-
-
Back on the admin node, stop the AMS service to prevent it from creating a new log file:
service ams stop -
Rename the audit.log file so that it does not overwrite the existing file when you copy it to the recovered Admin Node.
-
Rename audit.log to a unique numbered file name such as yyyy-mm-dd.txt.1. For example, you can rename the audit log file to 2015-10-25.txt.1
cd /var/local/audit/export
ls -l
mv audit.log 2015-10-25.txt.1
-
-
Restart the AMS service:
service ams start -
Copy all audit log files:
scp * admin@storage_node_01_IP:/var/local/tmp/saved-audit-logs
Copy Prometheus data
|
|
Copying the Prometheus database might take an hour or more. Some Grid Manager features will be unavailable while services are stopped on the Admin Node. |
-
Create the directory to copy the prometheus data to a temporary location on a separate grid node, again we will user storage_node_01:
-
Log in to the storage node:
-
Enter the following command:
ssh admin@storage_node_01_IP -
Enter the password listed in the
Passwords.txtfile. -
mkdir -p /var/local/tmp/prometheus`
-
-
-
Log in to the Admin Node:
-
Enter the following command:
ssh admin@admin_node_IP -
Enter the password listed in the
Passwords.txtfile. -
Enter the following command to switch to root:
su - -
Enter the password listed in the
Passwords.txtfile. -
Add the SSH private key to the SSH agent. Enter:
ssh-add -
Enter the SSH Access Password listed in the
Passwords.txtfile.When you are logged in as root, the prompt changes from `$` to `#`.
-
-
From the Admin Node, stop the Prometheus service:
service prometheus stop-
Copy the Prometheus database from the source Admin Node to the storage node backup location Node:
/rsync -azh --stats "/var/local/mysql_ibdata/prometheus/data" "storage_node_01_IP:/var/local/tmp/prometheus/"
-
-
Restart the Prometheus service on the source Admin Node.
service prometheus start
Backup historical information
The historical information is stored in a mysql database. In order to dump a copy of the database you will need the user and password from NetApp. If you have another admin node in the grid, this step is not necessary and the database can be cloned from a remaining admin node during the recovery process.
-
Log in to the Admin Node:
-
Enter the following command:
ssh admin@admin_node_IP -
Enter the password listed in the
Passwords.txtfile. -
Enter the following command to switch to root:
su - -
Enter the password listed in the
Passwords.txtfile. -
Add the SSH private key to the SSH agent. Enter:
ssh-add -
Enter the SSH Access Password listed in the
Passwords.txtfile.When you are logged in as root, the prompt changes from `$` to `#`.
-
-
Stop StorageGRID services on Admin Node and startup ntp and mysql
-
Stop all services:
service servermanager stop -
restart ntp service:
service ntp start
..restart mysql service:service mysql start
-
-
Dump mi database to /var/local/tmp
-
enter the following command:
mysqldump –u username –p password mi > /var/local/tmp/mysql-mi.sql
-
-
Copy the mysql dump file to an alternate node, we will use storage_node_01:
scp /var/local/tmp/mysql-mi.sql _storage_node_01_IP:/var/local/tmp/mysql-mi.sql-
When you no longer require passwordless access to other servers, remove the private key from the SSH agent. Enter:
ssh-add -D
-
Rebuild the Admin node
Now that you have a backup copy of all desired data and logs either on another admin node in the grid or stored in a temporary location it is time to reset the appliance so the port remap can be configured.
-
Resetting an appliance returns it to the pre-installed state where it only retains the host name, IP's and network configurations. All data will be lost which is why we made sure to have a backup of any important information.
-
enter the following command:
sgareinstallroot@sg100-01:~ # sgareinstall WARNING: All StorageGRID Webscale services on this node will be shut down. WARNING: Data stored on this node may be lost. WARNING: You will have to reinstall StorageGRID Webscale to this node. After running this command and waiting a few minutes for the node to reboot, browse to one of the following URLs to reinstall StorageGRID Webscale on this node: https://10.193.174.192:8443 https://10.193.204.192:8443 https://169.254.0.1:8443 Are you sure you want to continue (y/n)? y Renaming SG installation flag file. Initiating a reboot to trigger the StorageGRID Webscale appliance installation wizard.
-
-
After some time has passed the appliance will reboot and you will be able to access the node PGE UI.
-
Browse to the Configure Networking
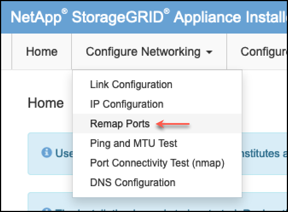
-
Select the desired network, protocol, direction and ports then click the Add Rule button.
Remap of inbound port 443 on on the GRID network will break install, and expansion procedures. It is not recommended to remap port 443 on the GRID network. 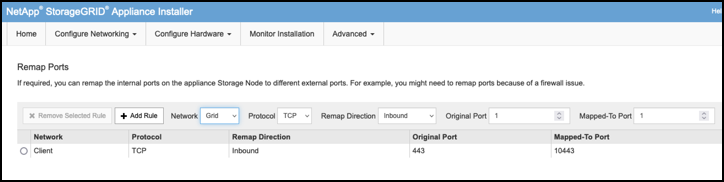
-
One the desired port remaps have been added, you can return to the home tab and click on the Start Installation button.
You can now follow the Admin node recovery procedures in the product documentation
Restore Databases and logs
Now that the admin node has been recovered, you can restore the metrics, logs, and historical information. If you have another admin node in the grid, follow the product documentation utilizing the prometheus-clone-db.sh and mi-clone-db.sh scripts. If this is your only admin node and you chose to backup this data, you can follow the below steps to restore the information.
Copy audit logs back
-
Log in to the Admin Node:
-
Enter the following command:
ssh admin@grid_node_IP -
Enter the password listed in the
Passwords.txtfile. -
Enter the following command to switch to root:
su - -
Enter the password listed in the
Passwords.txtfile. -
Add the SSH private key to the SSH agent. Enter:
ssh-add -
Enter the SSH Access Password listed in the
Passwords.txtfile.When you are logged in as root, the prompt changes from `$` to `#`.
-
-
Copy the preserved audit log files to the recovered Admin Node:
scp admin@grid_node_IP:/var/local/tmp/saved-audit-logs/YYYY* . -
For security, delete the audit logs from the failed grid node after verifying that they have been copied successfully to the recovered Admin Node.
-
Update the user and group settings of the audit log files on the recovered Admin Node:
chown ams-user:bycast *
You must also restore any pre-existing client access to the audit share. For more information, see the instructions for administering StorageGRID.
Restore Prometheus metrics
|
|
Copying the Prometheus database might take an hour or more. Some Grid Manager features will be unavailable while services are stopped on the Admin Node. |
-
Log in to the Admin Node:
-
Enter the following command:
ssh admin@grid_node_IP -
Enter the password listed in the
Passwords.txtfile. -
Enter the following command to switch to root:
su - -
Enter the password listed in the
Passwords.txtfile. -
Add the SSH private key to the SSH agent. Enter:
ssh-add -
Enter the SSH Access Password listed in the
Passwords.txtfile.When you are logged in as root, the prompt changes from `$` to `#`.
-
-
From the Admin Node, stop the Prometheus service:
service prometheus stop-
Copy the Prometheus database from the temporary backup location to the admin node:
/rsync -azh --stats "backup_node:/var/local/tmp/prometheus/" "/var/local/mysql_ibdata/prometheus/" -
verify the data is in the correct path and is complete
ls /var/local/mysql_ibdata/prometheus/data/
-
-
Restart the Prometheus service on the source Admin Node.
service prometheus start
Restore historical information
-
Log in to the Admin Node:
-
Enter the following command:
ssh admin@grid_node_IP -
Enter the password listed in the
Passwords.txtfile. -
Enter the following command to switch to root:
su - -
Enter the password listed in the
Passwords.txtfile. -
Add the SSH private key to the SSH agent. Enter:
ssh-add -
Enter the SSH Access Password listed in the
Passwords.txtfile.When you are logged in as root, the prompt changes from `$` to `#`.
-
-
Copy the mysql dump file from the alternate node:
scp grid_node_IP_:/var/local/tmp/mysql-mi.sql /var/local/tmp/mysql-mi.sql -
Stop StorageGRID services on Admin Node and startup ntp and mysql
-
Stop all services:
service servermanager stop -
restart ntp service:
service ntp start
..restart mysql service:service mysql start
-
-
Drop the mi database and create a new empty database:
mysql -u username -p password -A mi -e "drop database mi; create database mi;" -
restore the mysql database from the database dump:
mysql -u username -p password -A mi < /var/local/tmp/mysql-mi.sql -
Restart all other services
service servermanager start
By Aron Klein