Manage node-based licenses
 Suggest changes


Manage node-based licenses in the BlueXP digital wallet to ensure that each Cloud Volumes ONTAP system has a valid license with the required capacity.
Node-based licenses are the previous generation licensing model (and not available for new customers):
-
BYOL licenses purchased from NetApp
-
Hourly pay-as-you-go (PAYGO) subscriptions from your cloud provider's marketplace
The BlueXP digital wallet enables you to manage licenses for Cloud Volumes ONTAP from a single location. You can add new licenses and update existing licenses.
Manage PAYGO licenses
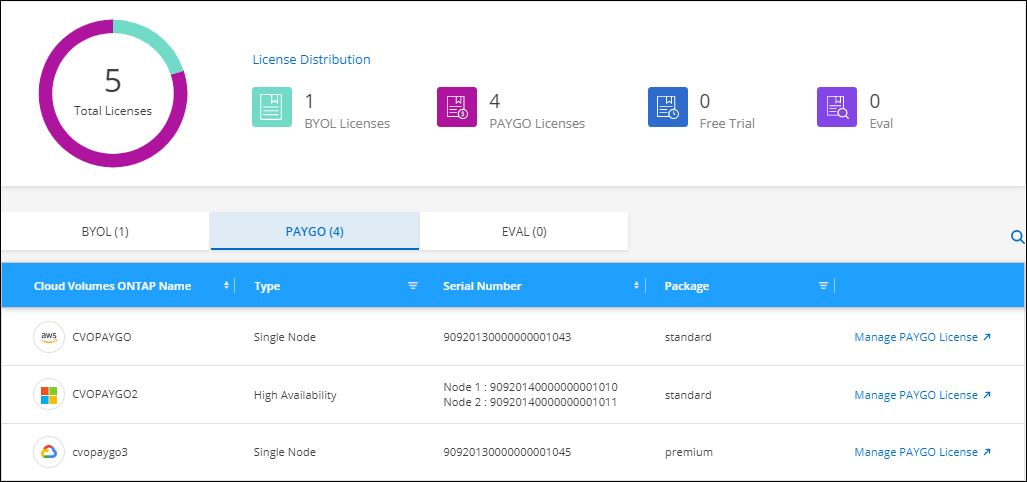
The BlueXP digital wallet page enables you to view details about each of your PAYGO Cloud Volumes ONTAP systems, including the serial number and PAYGO license type.
-
From the BlueXP navigation menu, select Governance > Digital wallet.
-
On the Cloud Volumes ONTAP tab, select Node Based Licenses from the drop-down.
-
Click PAYGO.
-
View details in the table about each of your PAYGO licenses.

-
If needed, click Manage PAYGO License to change the PAYGO license or to change the instance type.
Manage BYOL licenses
Manage licenses that you purchased directly from NetApp by adding and removing system licenses and extra capacity licenses.
Add unassigned licenses
Add a node-based license to the BlueXP digital wallet so that you can select the license when you create a new Cloud Volumes ONTAP system. The digital wallet identifies these licenses as unassigned.
-
From the BlueXP navigation menu, select Governance > Digital wallet.
-
On the Cloud Volumes ONTAP tab, select Node Based Licenses from the drop-down.
-
Click Unassigned.
-
Click Add Unassigned Licenses.
-
Enter the serial number of the license or upload the license file.
If you don't have the license file yet, refer to the section below.
-
Click Add License.
BlueXP adds the license to the digital wallet. The license will be identified as unassigned until you associate it with a new Cloud Volumes ONTAP system. After that happens, the license moves to the BYOL tab in the digital wallet.
Exchange unassigned node-based licenses
If you have an unassigned node-based license for Cloud Volumes ONTAP that you haven't used, you can exchange the license by converting it to a BlueXP backup and recovery license, a BlueXP classification license, or a BlueXP tiering license.
Exchanging the license revokes the Cloud Volumes ONTAP license and creates a dollar-equivalent license for the service:
-
Licensing for a Cloud Volumes ONTAP HA pair is converted to a 51 TiB data service license
-
Licensing for a Cloud Volumes ONTAP single node is converted to a 32 TiB data service license
The converted license has the same expiry date as the Cloud Volumes ONTAP license.
-
From the BlueXP navigation menu, select Governance > Digital wallet.
-
On the Cloud Volumes ONTAP tab, select Node Based Licenses from the drop-down.
-
Click Unassigned.
-
Click Exchange License.

-
Select the service that you'd like to exchange the license with.
-
If you're prompted, select an additional license for the HA pair.
-
Read the legal consent and click Agree.
BlueXP converts the unassigned license to the service that you selected. You can view the new license in the Data Services Licenses tab.
Obtain a system license file
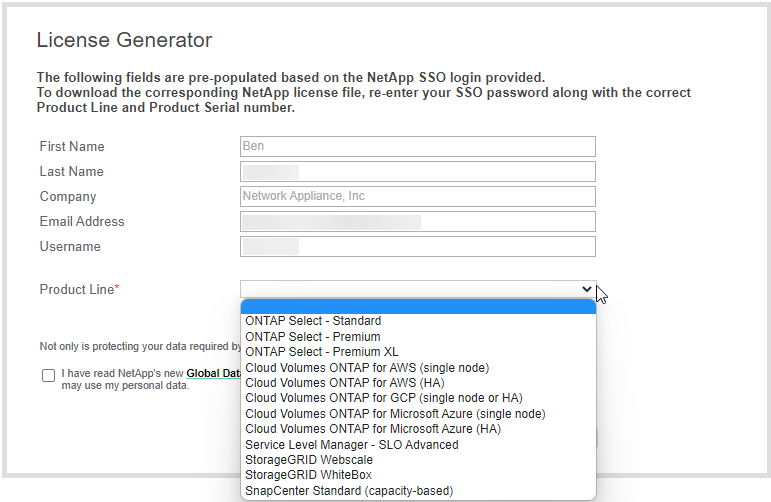
In most cases, BlueXP can automatically obtain your license file using your NetApp Support Site account. But if it can't, then you'll need to manually upload the license file. If you don't have the license file, you can obtain it from netapp.com.
-
Go to the NetApp License File Generator and log in using your NetApp Support Site credentials.
-
Enter your password, choose your product, enter the serial number, confirm that you have read and accepted the privacy policy, and then click Submit.
Example

-
Choose whether you want to receive the serialnumber.NLF JSON file through email or direct download.
Update a system license
When you renew a BYOL subscription by contacting a NetApp representative, BlueXP automatically obtains the new license from NetApp and installs it on the Cloud Volumes ONTAP system.
If BlueXP can't access the license file over the secure internet connection, you can obtain the file yourself and then manually upload the file to BlueXP.
-
From the BlueXP navigation menu, select Governance > Digital wallet.
-
On the Cloud Volumes ONTAP tab, select Node Based Licenses from the drop-down.
-
In the BYOL tab, expand the details for a Cloud Volumes ONTAP system.
-
Click the action menu next to the system license and select Update License.
-
Upload the license file (or files if you have an HA pair).
-
Click Update License.
BlueXP updates the license on the Cloud Volumes ONTAP system.
Manage extra capacity licenses
You can purchase extra capacity licenses for a Cloud Volumes ONTAP BYOL system to allocate more than the 368 TiB of capacity that's provided with a BYOL system license. For example, you might purchase one extra license capacity to allocate up to 736 TiB of capacity to Cloud Volumes ONTAP. Or you could purchase three extra capacity licenses to get up to 1.4 PiB.
The number of licenses that you can purchase for a single node system or HA pair is unlimited.
Add capacity licenses
Purchase an extra capacity license by contacting us through the chat icon in the lower-right of BlueXP. After you purchase the license, you can apply it to a Cloud Volumes ONTAP system.
-
From the BlueXP navigation menu, select Governance > Digital wallet.
-
On the Cloud Volumes ONTAP tab, select Node Based Licenses from the drop-down.
-
In the BYOL tab, expand the details for a Cloud Volumes ONTAP system.
-
Click Add Capacity License.
-
Enter the serial number or upload the license file (or files if you have an HA pair).
-
Click Add Capacity License.
Update capacity licenses
If you extended the term of an extra capacity license, you'll need to update the license in BlueXP.
-
From the BlueXP navigation menu, select Governance > Digital wallet.
-
On the Cloud Volumes ONTAP tab, select Node Based Licenses from the drop-down.
-
In the BYOL tab, expand the details for a Cloud Volumes ONTAP system.
-
Click the action menu next to the capacity license and select Update License.
-
Upload the license file (or files if you have an HA pair).
-
Click Update License.
Remove capacity licenses
If an extra capacity license expired and is no longer in use, then you can remove it at any time.
-
From the BlueXP navigation menu, select Governance > Digital wallet.
-
On the Cloud Volumes ONTAP tab, select Node Based Licenses from the drop-down.
-
In the BYOL tab, expand the details for a Cloud Volumes ONTAP system.
-
Click the action menu next to the capacity license and select Remove License.
-
Click Remove.
Convert an Eval license to a BYOL
An evaluation license is good for 30 days. You can apply a new BYOL license on top of the evaluation license for an in-place upgrade.
When you convert an Eval license to a BYOL, BlueXP restarts the Cloud Volumes ONTAP system.
-
For a single-node system, the restart results in I/O interruption during the reboot process.
-
For an HA pair, the restart initiates takeover and giveback to continue serving I/O to clients.
-
From the BlueXP navigation menu, select Governance > Digital wallet.
-
On the Cloud Volumes ONTAP tab, select Node Based Licenses from the drop-down.
-
Click Eval.
-
In the table, click Convert to BYOL License for a Cloud Volumes ONTAP system.
-
Enter the serial number or upload the license file.
-
Click Convert License.
BlueXP starts the conversion process. Cloud Volumes ONTAP automatically restarts as part of this process. When it's back up, the licensing information will reflect the new license.
Change between PAYGO and BYOL
Converting a system from PAYGO by-node licensing to BYOL by-node licensing (and vice versa) isn't supported. If you want to switch between a pay-as-you-go subscription and a BYOL subscription, then you need to deploy a new system and replicate data from the existing system to the new system.
-
Create a new Cloud Volumes ONTAP working environment.
-
Set up a one-time data replication between the systems for each volume that you need to replicate.
-
Terminate the Cloud Volumes ONTAP system that you no longer need by deleting the original working environment.


