

Set up and manage QoSSIOC for Element volumes and VMware datastores
 Suggest changes
You can set up QoSSIOC automation for individual volumes and datastores controlled by the plug-in. QoSSIOC is automatic quality of service (QoS) based on Storage I/O Control (SIOC) settings of all VMs on a standard datastore.
The QoSSIOC service on the management node communicates with vCenter and monitors VM activity on datastores. QoSSIOC adjusts QoS values on standard Element volumes when virtual machine events occur, such as power on or power off events, guest restarts or shutdown, or reconfiguration activity. QoSSIOC is an optional feature and is not required for the plug-in to manage storage clusters.
QoSSIOC is available only with standard datastores. It does not work with virtual volumes (VVols).

|
You cannot enable virtual volumes (VVols) functionality or make VVols available to vSphere using the QoSSIOC Settings page. See Element Plug-in for vCenter Server documentation about configuring VVols functionality for more information. |
For Linked Mode, the Element vCenter plug-in registers all vCenter Servers using the QoSSIOC settings you provide on a single vCenter Server.
Using the vCenter Plug-in, you can configure and manage QoSSIOC by completing the following tasks:
Management tasks
Enabling QoSSIOC automation on datastores
You can enable QoSSIOC automation and customize virtual machine disk (VMDK) performance levels for datastores after you enable the QoSSIOC service for the plug-in.
You have configured the QoSSIOC service settings on the QoSSIOC Settings page and the QoSSIOC Status field displays UP.
QoSSIOC is available only with standard datastores. It does not work with virtual volumes (VVols). QoSSIOC adjusts QoS values on standard Element volumes when virtual machine events occur, such as power on or power off events, guest restarts or shutdown, or reconfiguration activity.

|
If you are using QoS policies, do not enable QoSSIOC. QoSSIOC will override and adjust QoS values for any volume QoS settings regardless of policy. |
-
In your vSphere Web Client, open the Management tab:
-
Beginning with Element vCenter plug-in 5.0, select NetApp Element Remote Plugin > Management > Management.
-
For Element vCenter plug-in 4.10 and earlier, select NetApp Element Management > Management.
If two or more clusters are added, ensure that the cluster you intend to use for the task is selected in the navigation bar. -
-
Click the status button in the QoSSIOC Automation column for the selected datastore.

Ensure that the datastore does not have QoSSIOC integration enabled on another vCenter to prevent unexpected changes in QoS. -
Select Enable QoS & SIOC.
-
Configure the Burst Factor.
The burst factor is a multiple of the IOPS limit (SIOC) setting for the VMDK. If you change the default, make sure to use a burst factor value that will not exceed the maximum burst limit for a NetApp Element software-based volume when the burst factor value is multiplied by the IOPS limit for any VMDK.
-
(Optional) Select Override Default QoS and configure the settings.
If the Override Default QoS setting is disabled for the datastore, the Shares and Limit IOPS values are automatically set based on the default SIOC settings of each VM.
Do not customize the SIOC share limit without also customizing the SIOC IOPS limit.
By default, the maximum SIOC disk shares are set to Unlimited. In a large VM environment such as VDI, this can lead to overcommitting maximum IOPS on the cluster. When you enable QoSSIOC, always check the Override Default QoS and set the Limit IOPS option to something reasonable. -
Click OK.
When you enable the QoSSIOC Automation for a datastore, the button changes from
DisabledtoEnabled.
Edit QoSSIOC settings
You can change the QoSSIOC and vCenter credentials of an active Element management node.
-
In your vSphere Web Client, open the QoSSIOC Settings tab:
-
Beginning with Element vCenter plug-in 5.0, select NetApp Element Remote Plugin > Configuration > QoSSIOC Settings.
-
For Element vCenter plug-in 4.10 and earlier, select NetApp Element Configuration > QoSSIOC Settings.
-
-
Select Actions.
-
In the resulting menu, select Edit.
-
In the Edit QoSSIOC Settings dialog box, change any of the following:
-
QoSSIOC User ID: The user ID for the QoSSIOC service. The QoSSIOC service default user ID is
admin. For NetApp HCI, the user ID is the same one entered during installation using the NetApp Deployment Engine. -
QoSSIOC Password: The password for the Element QoSSIOC service. The QoSSIOC service default password is
solidfire. If you have not created a custom password, you can create one from the registration utility UI (https://[management node IP]:9443).
For NetApp HCI deployments, the default password is randomly generated during installation. To determine the password, see procedure 4 in this KB article. -
vCenter User ID: The user name for the vCenter admin with full Administrator role privileges.
-
vCenter Password: The password for the vCenter admin with full Administrator role privileges.
-
-
Select OK.
The QoSSIOC Status field displaysUPwhen the plug-in can successfully communicate with the service.
See this KB to troubleshoot if the status is any of the following:
*Down: QoSSIOC is not enabled.
*Not Configured: QoSSIOC settings have not been configured.
*Network Down: vCenter cannot communicate with the QoSSIOC service on the network. The
mNode and SIOC service might still be running.
After you have configured valid QoSSIOC settings for the management node, these settings become the default. The QoSSIOC settings revert to the last known valid QoSSIOC settings until you provide valid QoSSIOC settings for a new management node. You must clear the QoSSIOC settings for the configured management node before setting the QoSSIOC credentials for a new management node.
Change the QoSSIOC service password
You can change the password for the QoSSIOC service on the management node using the registration utility UI.
-
Your management node is powered on.
This process describes how to change the QoSSIOC password only. If you want to change the QoSSIOC user name, you can do so from the QoSSIOC Settings page.
-
In your vSphere Web Client, open the QoSSIOC Settings tab:
-
Beginning with Element vCenter plug-in 5.0, select NetApp Element Remote Plugin > Configuration > QoSSIOC Settings.
-
For Element vCenter plug-in 4.10 and earlier, select NetApp Element Configuration > QoSSIOC Settings.
-
-
Select Actions.
-
In the resulting menu, select Clear.
-
Confirm the action.
The QoSSIOC Status field displays
Not Configuredafter the process is complete. -
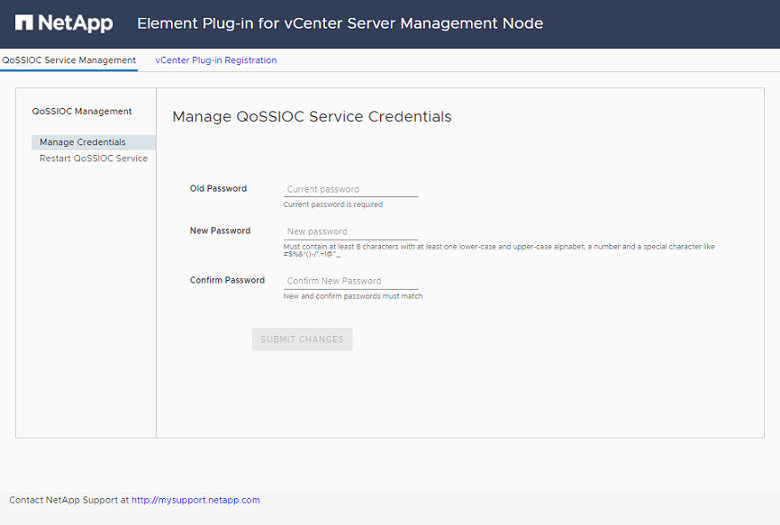
Enter the IP address for your management node in a browser, including the TCP port for registration:
https://[management node IP]:9443.The registration utility UI displays the Manage QoSSIOC Service Credentials page for the plug-in.
-
Enter the following information:
-
Old Password: The current password of the QoSSIOC service. If you have not yet assigned a password, type the default password of
solidfire.
For NetApp HCI deployments, the default password is randomly generated during installation. To determine the password, see procedure 4 in this KB article. -
New Password: The new password for the QoSSIOC service.
-
Confirm Password: Enter the new password again.
-
-
Select Submit Changes.
The QoSSIOC service automatically restarts after you submit changes. -
In your vSphere Web Client, select NetApp Element Configuration > QoSSIOC Settings.
-
Select Actions.
-
In the resulting menu, select Configure.
-
In the Configure QoSSIOC Settings dialog box, enter the new password in the QoSSIOC Password field.
-
Select OK.
The QoSSIOC Status field displays
UPwhen the plug-in can successfully communicate with the service.
Disable QoSSIOC automation for a datastore
You can disable QoSSIOC integration for a datastore.
-
In your vSphere Web Client, open the Management tab:
-
Beginning with Element vCenter plug-in 5.0, select NetApp Element Remote Plugin > Management > Management.
-
For Element vCenter plug-in 4.10 and earlier, select NetApp Element Management > Management.
If two or more clusters are added, ensure that the cluster you intend to use for the task is selected in the navigation bar. -
-
Select the button in the QoSSIOC Automation column for the selected datastore.
-
Clear the Enable QoS & SIOC check box to disable the integration.
Clearing the Enable QoS & SIOC check box automatically disables the Override Default QoS option.
-
Select OK.
Clear QoSSIOC settings
You can clear the QoSSIOC configuration details for the Element storage management node (mNode). You must clear the settings for the configured management node before configuring the credentials for a new management node or changing the QoSSIOC service password. Clearing the QoSSIOC settings removes active QoSSIOC from the vCenter, cluster, and datastores.
-
In your vSphere Web Client, open the QoSSIOC Settings tab:
-
Beginning with Element vCenter plug-in 5.0, select NetApp Element Remote Plugin > Configuration > QoSSIOC Settings.
-
For Element vCenter plug-in 4.10 and earlier, select NetApp Element Configuration > QoSSIOC Settings.
-
-
Select Actions.
-
In the resulting menu, select Clear.
-
Confirm the action.
The QoSSIOC Status field displays
Not Configuredafter the process is complete.