

Create a workflow
 Suggest changes
You can use Workflow Automation (WFA) to create workflows for tasks such as provisioning, migrating, and decommissioning storage for databases or file systems. You should create workflows when the predefined WFA workflows do not match your requirements.
-
You must have understood the concepts for WFA building blocks.
-
You must have understood capabilities such as repeat row, approval points, and resource selection that are required for your workflow.
-
You must have completed the planning required for your workflow, including the workflow requirement checklist.
-
You should have created the help content, which provides information about the workflow to storage operators.
The construction of each workflow might vary based on the goal and requirement of the workflow. This task does not provide instructions for a specific workflow, but provides general instructions for creating a workflow.
-
Click Workflow Design > Workflows.
-
Click
 on the toolbar.
 -
In the Workflow tab, perform the following steps:
-
Expand the required schema, and then double-click the required
 (command) or
  (workflow) from the Available Steps list.
You can repeat this step as required. You can drag-and-drop steps to rearrange the steps in the workflow editor.
-
Optional: Click
 to add the required number of rows, which are used to specify details for execution of steps.
Each step is executed based on the specified step details at the specified row and column. The steps are executed from left to right and in the top to bottom order.
-
Position your cursor below the step you have added and click
 to add step details for the step execution, at the required row.
For this step… Do this… Workflow
Enter the required user inputs in the Workflow tab and the required condition in the Advanced tab.
Command
In the Parameters for <command> tab, click each object tab, select the required option to define the object attributes, and then enter the required details in the Advanced tab and the Other Parameter tab.
Search or define
Select the dictionary entry object that should be searched for or defined.
The following illustration shows the available options for defining the object attributes:
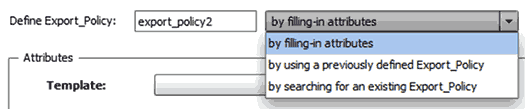
Choose the appropriate action:
For… Do this… by filling-in attributes
Enter the value for attributes using the following options:
-
Expressions
-
Variables
-
User inputs
-
Resource selection
-
Incremental naming
You must position your cursor over the attribute fields and click
 to use the resource selection or incremental naming capabilities.
by using a previously defined
objectSelect the previously defined
objectin the box before the option list.by searching for an existing
object-
Click Enter search criteria to search for the object using the resource selection capability.
-
Select one of the required options for execution if the required object is not found:
-
Abort workflow
This option aborts the workflow execution if the specific object is not found.
-
Disable this command
This option disables only the current step and executes the workflow.
-
Fill-in attributes for
objectand execute the commandThis option enables you to enter the required attributes and execute the workflow.
-
-
-
-
If you want to insert an approval point, click
 and enter the required comment for the approval point.
Approval point comments can include MVEL expressions.
-
Click
 that is next to the row numbers to perform the following:
-
Insert a row.
-
Copy the row.
-
Repeat the row.
You can use one of the following options to specify repetition of the command parameters:
-
Number of times
You can use this option to repeat the command execution for the number of repetitions you specify. For example, you can specify that the “Create qtree” command should be repeated three times to create three qtrees.
You can also use this option for a dynamic number of command executions. For example, you can create a user input variable for the number of LUNs to be created and use the number specified by the storage operator when the workflow is executed or scheduled.
-
For every resource in a group
You can use this option and then specify a search criteria for an object. The command is repeated as many times as the object is returned by the search criteria. For example, you can search for the nodes in a cluster and repeat the “Create iSCSI Logical Interface” command for each node.
-
-
Add a condition for execution of the row.
-
Remove the row.
-
-
In the Details tab, perform the following steps:
-
Specify the required information in the Workflow name and Workflow Description fields.
The workflow name and description must be unique for each workflow.
-
Optional: Specify the entity version.
-
Optional: Clear the Consider Reserved Elements check box if you do not want to use the reservation capability.
-
Optional: Clear the Enable element existence validation check box if you do not want to enable validation for elements that exist with the same name.
-
-
If you want to edit the user inputs, perform the following steps:
-
Click the User Inputs tab.
-
Double-click the user input you want to edit.
-
In the Edit Variable: <user input> dialog box, edit the user input.
-
-
If you want to add constants, perform the following steps
-
Click the Constants tab, and then add the required constants for your workflow by using the Add button.
You can define constants when you are using a common value for defining the parameters for multiple commands. For example, see the AGGREGATE_OVERCOMMITMENT_THRESHOLD constant used in the “Create, map and protect LUNs with SnapVault” workflow.
-
Enter the name, description, and value for each constant.
-
-
Click the Return Parameters tab, and then add the required parameters for your workflow by using the Add button.
You can use return parameters when the workflow planning and execution must return some calculated or selected values during planning. You can view the calculated or selected values in the Return Parameters tab of the monitoring window in the workflow preview or after the workflow execution is complete.
Aggregate: You can specify aggregate as a return parameter to see which aggregate was selected using the resource selection logic.
If you have included a child workflow in your workflow and if the child workflow return parameter names contain a space, dollar sign ($), or a function, you should specify the return parameter name within square brackets in the parent workflow to view the child workflow return parameter value in your parent workflow.
If the parameter name is… Specify as… ChildWorkflow1.abc$valueChildWorkflow1["abc$"+"value"]ChildWorkflow1.$valueChildWorkflow1["$"+"value"]ChildWorkflow1.value$ChildWorkflow1.value$ChildWorkflow1.P NChildWorkflow1["P N"]ChildWorkflow1.return_string("HW")ChildWorkflow1["return_string(\"HW\")"] -
Optional: Click the Help Content tab to add the help content file you have created for the workflow.
-
Click Preview and ensure that the planning of the workflow is completed successfully.
-
Click OK to close the preview window.
-
Click Save.
After you finish
Test the workflow in your test environment, and then mark the workflow as ready for production in WorkflowName > Details.