Deploy the GenAI infrastructure
 Suggest changes


You need to deploy the GenAI infrastructure for RAG framework in your environment before you can build FSx for ONTAP knowledge bases and applications for your organization. The primary infrastructure components are the Amazon Bedrock service, a virtual machine instance for the NetApp GenAI engine, and an FSx for ONTAP file system.
The deployed infrastructure can support multiple knowledge bases and chatbots, so you'll typically only need to perform this task once.
Infrastructure details
Your GenAI deployment must be in an AWS region that has Amazon Bedrock enabled. View the list of supported regions
The deployment consists of the following components.
- Amazon Bedrock service
-
Amazon Bedrock is a fully-managed service that enables you to use foundation models (FMs) from leading AI companies via a single API. It also provides the capabilities you need to build secure generative AI applications.
- Virtual machine for the NetApp GenAI engine
-
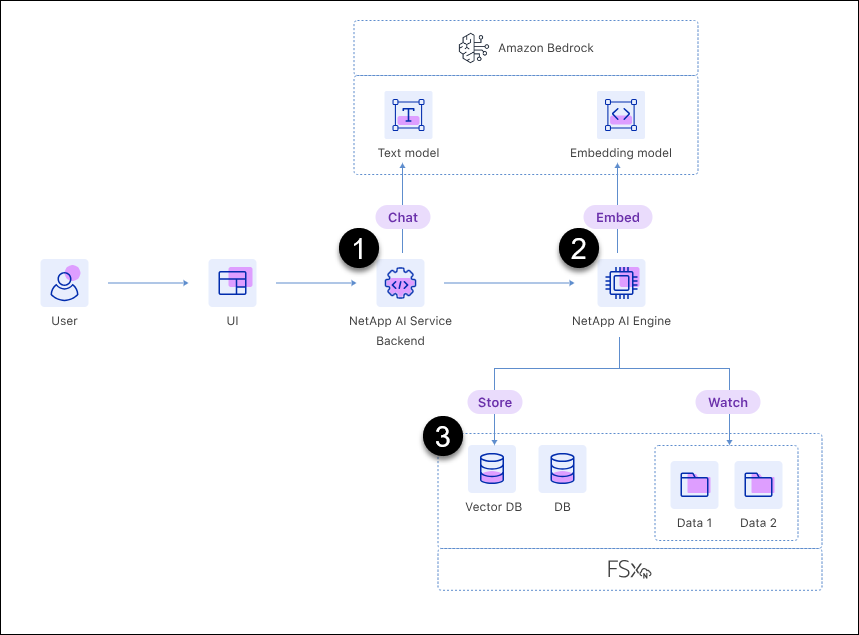
The NetApp GenAI engine gets deployed during this process. It provides the processing power to ingest the data from your data sources and then write that data in the vector database.
- FSx for ONTAP file system
-
The FSx for ONTAP file system provides the storage for your GenAI system.
A single volume is deployed that will contain the vector database that stores the data that has been generated by the foundational model based on your data sources.
The data sources that you'll integrate into your knowledge base can reside on the same FSx for ONTAP file system, or on a different system.
The NetApp GenAI engine monitors and interacts with both of these volumes.
The following image shows the GenAI infrastructure. The components numbered 1, 2, and 3 are deployed during this procedure. The other elements must be in place before starting the deployment.

Deploy the GenAI infrastructure
You'll need to enter your AWS credentials and select the FSx for ONTAP file system to deploy the retrieval-augmented generation (RAG) infrastructure.
Make sure your environment meets the requirements before you start this procedure.
-
Log in to workload factory using one of the console experiences.
-
In the AI workloads tile, select Deploy & manage.
-
Review the infrastructure diagram and select Next.
-
Complete the items in the AWS settings section:
-
AWS credentials: Select or add the AWS credentials that provide permissions to deploy the AWS resources.
-
Location: Select an AWS region, VPC, and subnet.
The GenAI deployment must be in an AWS region that has Amazon Bedrock enabled. View the list of supported regions
-
-
Complete the items in the Infrastructure settings section:
-
Tags: Enter any tag key/value pairs that you want to apply to all the AWS resources that are part of this deployment. These tags are visible in the AWS Management Console and the infrastructure information area within workload factory, and can help you keep track of workload factory resources.
-
-
Complete the Connectivity section:
-
Key pair: Select a key pair that allows you to securely connect to the NetApp GenAI engine instance.
-
-
Complete the AI engine section:
-
Instance name: Optionally, select Define instance name and enter a custom name for the AI engine instance. The instance name appears in the AWS Management Console and the infrastructure information area within workload factory, and can help you keep track of workload factory resources.
-
-
Select Deploy to begin the deployment.
If deployment fails with a credentials error, you can get further error details by selecting the hyperlinks within the error message. You can see a list of permissions that are missing or blocked, as well as a list of permissions that the GenAI workload needs so that it can deploy the GenAI infrastructure.
Workload factory starts deploying the chatbot infrastructure. This process can take up to 10 minutes.
During the deployment process, the following items are set up:
-
The network is set up along with the private endpoints.
-
The IAM role, instance profile, and security group are created.
-
The virtual machine instance for the GenAI engine is deployed.
-
Amazon Bedrock is configured to send logs to Amazon CloudWatch Logs, using a log group with the prefix
/aws/bedrock/. -
The GenAI engine is configured to send logs to Amazon CloudWatch Logs, using a log group with the name
/netapp/wlmai/<tenancyAccountId>/randomId, where<tenancyAccountID>is the BlueXP account ID for the current user.


