

Access File Analytics
 Suggest changes
File Analytics provides a graphical view of scan results.
Log in to the File Analytics GUI
The XCP File Analytics GUI provides a dashboard with graphs for visualizing File Analytics. The XCP File Analytics GUI is enabled when you configure XCP on a Linux machine.

|
To check the supported browsers for accessing File Analytics, see the NetApp IMT. |
-
Use the link
https://<IP address of linux machine>/xcpto access the File Analytics GUI.
When prompted, accept the security certificate:-
Select Advanced below the privacy statement.
-
Select the Proceed to
<IP address of linux machine>link.
-
-
Log in to the File Analytics GUI.
There are two ways to log in to the File Analytics GUI:
Log in using user credentials-
Log in to the GUI using the user credentials obtained when you installed File Analytics.
-
Optionally, change the password to your own password.
If you want to change the password obtained during installation to your own password, select the user icon and select Change password.
Your new password must be at least eight characters in length and contain at least one number, one upper case letter, one lower case letter, and one special character (! @ # $ % ^ & * - _).
After changing the password, you are automatically logged out of the GUI and you must sign in again using the new password that you created. Configure and enable SSO capabilityYou can use this login capability to set up XCP File Analytics on a particular machine and share the web UI URL enterprise-wide, allowing users to log in to the UI using their single sign-on (SSO) credentials.
SSO login is optional and can be configured and enabled permanently.
To set up Security Assertion Markup Language (SAML) based SSO login, see Configure SSO credentials. -
-
After logging in, you can see the NFS agent; a green tick is present showing minimal system configuration of the Linux system and XCP version.
-
If you have configured an SMB agent, you can see the SMB agent added in the same agent card.
Configure SSO credentials
The SSO login functionality is implemented in XCP File Analytics using SAML and is supported with the Active Directory Federation Services (ADFS) identity provider. SAML offloads the authentication task to the third-party identity provider (IdP) for your enterprise which can utilize any number of approaches for MFA (multifactor authentication).
-
Register the XCP File Analytics application with your enterprise identity provider.
File Analytics now runs as a service provider and therefore must be registered with your enterprise identity provider. Generally, there is a team in the enterprise that handles this SSO integration process. The first step is to find and reach out to the relevant team and share the File Analytics application metadata details with them.
The following are the mandatory details that you must share to register with your identity provider:
-
Service provider entity ID:
https://<IP address of linux machine>/xcp -
Service provider Assertion Consumer Service (ACS) URL:
https://<IP address of linux machine>:5030/api/xcp/SAML/spYou can also verify these details by logging in to the File Analytics UI:
-
Log in to the GUI using the steps described in Log in to the File Analytics GUI.
-
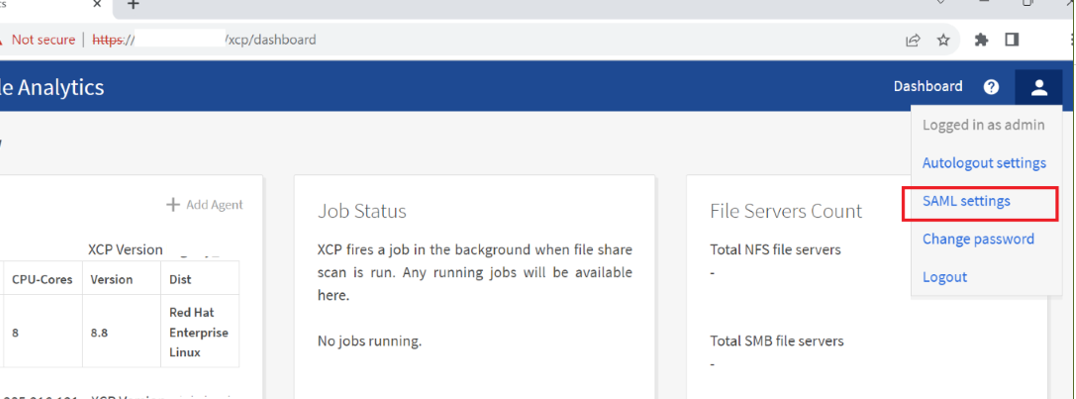
Select the User icon on the top right corner of the page, then select SAML settings.
Check Service provider settings in the drop down menu that appears.
After registration, you receive the IdP endpoint details for your enterprise. You are required to provide this IdP endpoint metadata to the File Analytics UI.
-
-
-
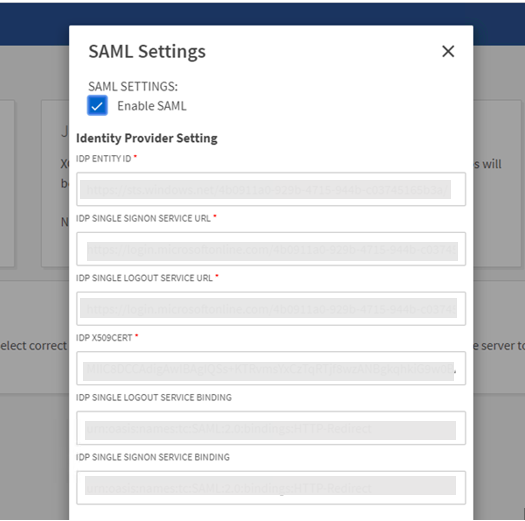
Provide the IdP details:
-
Go to Dashboard. Select the User icon at the top right corner of the page and select SAML settings.
-
Input the IdP details that you obtained after registration.
Example
-
Select the Enable SAML checkbox to permanently enable SAML-based SSO.
-
Select Save.
-
Log out of File Analytics and log back in again.
You are redirected to your enterprise SSO page.
-