更换驱动器- E2800 (60个驱动器的磁盘架)
 建议更改
建议更改


您可以将 E2800 中的驱动器更换为具有 60 个驱动器的磁盘架。
SANtricity System Manager 中的恢复 Guru 可监控存储阵列中的驱动器,并可通知您即将发生的驱动器故障或实际发生的驱动器故障。驱动器发生故障时,其琥珀色警示 LED 亮起。您可以在存储阵列接收 I/O 操作时热插拔故障驱动器。
此过程适用于 DCM、DCM2 和 DCM3 驱动器架。
-
查看中的驱动器处理要求 "更换 E2800 驱动器的要求"。
-
确保您已具备以下条件:
-
NetApp 为您的控制器架或驱动器架支持的替代驱动器。
-
ESD 腕带,或者您已采取其他防静电预防措施。
-
一个管理工作站,其浏览器可访问控制器的 SANtricity 系统管理器。(要打开 System Manager 界面,请将浏览器指向控制器的域名或 IP 地址。)
-
第 1 步:准备更换驱动器
检查 SANtricity System Manager 中的恢复 Guru 并完成所有前提步骤,以便准备更换驱动器。然后,您可以找到故障组件。
-
如果 SANtricity System Manager 中的恢复 Guru 已通知您驱动器出现 _ 即将发生故障 _ ,但驱动器尚未出现故障,请按照恢复 Guru 中的说明对驱动器进行故障转移。
-
如果需要,请使用 SANtricity 系统管理器确认您有合适的替代驱动器。
-
选择 * 硬件 * 。
-
在磁盘架图中选择故障驱动器。
-
单击驱动器以显示其上下文菜单,然后选择 * 查看设置 * 。
-
确认替代驱动器的容量等于或大于要更换的驱动器,并且具有您期望的功能。
例如,不要尝试将硬盘驱动器( HDD )更换为固态磁盘( SSD )。同样,如果要更换支持安全保护的驱动器,请确保更换的驱动器也支持安全保护。
-
-
如果需要,请使用 SANtricity 系统管理器查找存储阵列中的驱动器。
-
如果磁盘架有挡板,请将其卸下,以便您可以看到 LED 。
-
从驱动器的上下文菜单中,选择 * 打开定位灯 * 。
The drive drawer's Attention LED (amber) blinks so you can open the correct drive drawer to identify which drive to replace.
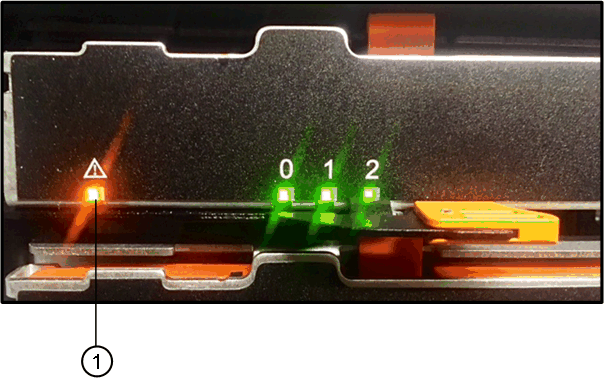
-
( 1 ) * _ 警示 LED_
-
-
Unlatch the drive drawer by pulling on both levers.
-
Using the extended levers, carefully pull the drive drawer out until it stops.
-
查看驱动器抽屉的顶部,找到每个驱动器前面的警示 LED 。
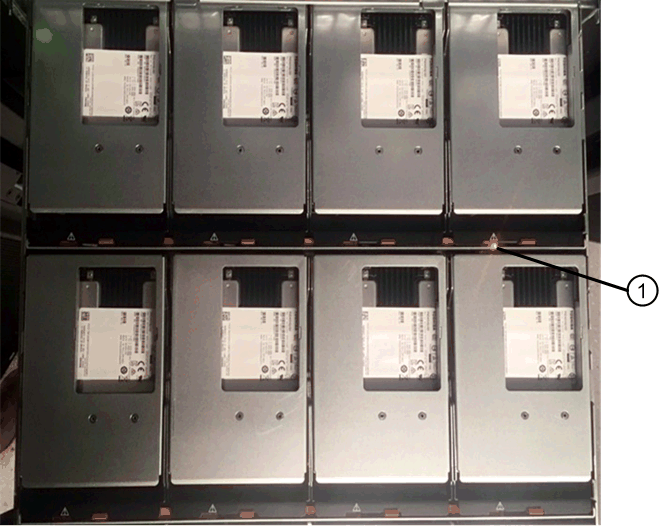
-
驱动器右上角的 * ( 1 ) * 警示 LED 亮起
驱动器抽屉警示 LED 位于每个驱动器前面的左侧,驱动器把手上的警示图标位于 LED 后面。
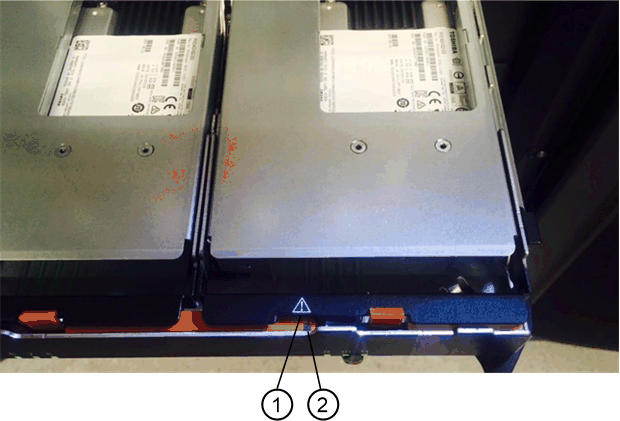
-
( 1 ) * _ 注意图标 _
-
( 2 ) * _ 警示 LED_
第 2 步:删除故障驱动器
删除故障驱动器以更换为新驱动器。
-
拆开备用驱动器的包装,并将其放在磁盘架附近的无静电平面上。
请保存所有包装材料,以便下次需要退回驱动器时使用。
-
将驱动器抽屉拉杆同时拉向相应驱动器抽屉的两侧,以从驱动器抽屉的中央释放驱动器抽屉拉杆。
-
小心地拉动扩展驱动器抽盒拉杆,将驱动器抽盒拉出至其完全扩展,而无需将其从机箱中卸下。
-
Gently pull back the orange release latch that is in front of the drive you want to remove.
驱动器弹簧上的凸轮把手部分打开,驱动器将从抽盒中释放。
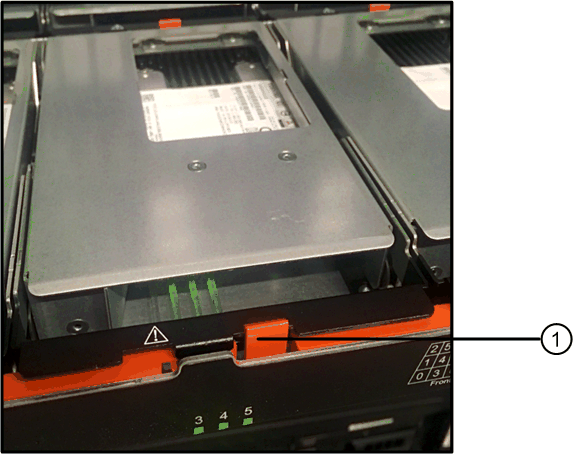
-
( 1 ) * _橙色 释放闩锁 _
-
-
Open the cam handle, and lift out the drive slightly.
-
Wait 60 seconds.
-
Use the cam handle to lift the drive from the shelf.
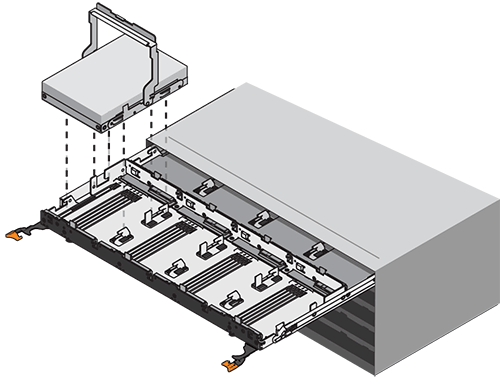
-
Place the drive on an antistatic, cushioned surface away from magnetic fields.
-
等待 60 秒,使软件识别出驱动器已被删除。
如果您意外删除了活动驱动器,请至少等待 60 秒,然后重新安装它。有关恢复操作步骤,请参阅存储管理软件。
第 3 步:安装新驱动器
安装新驱动器以更换故障驱动器。

|
删除故障驱动器后,请尽快安装替代驱动器。否则,设备可能会过热。 |

|
* 可能丢失数据访问 * - 将驱动器抽盒推回机箱时,切勿使抽盒关闭。Push the drawer in slowly to avoid jarring the drawer and causing damage to the storage array. |
-
Raise the cam handle on the new drive to vertical.
-
Align the two raised buttons on each side of the drive carrier with the matching gap in the drive channel on the drive drawer.
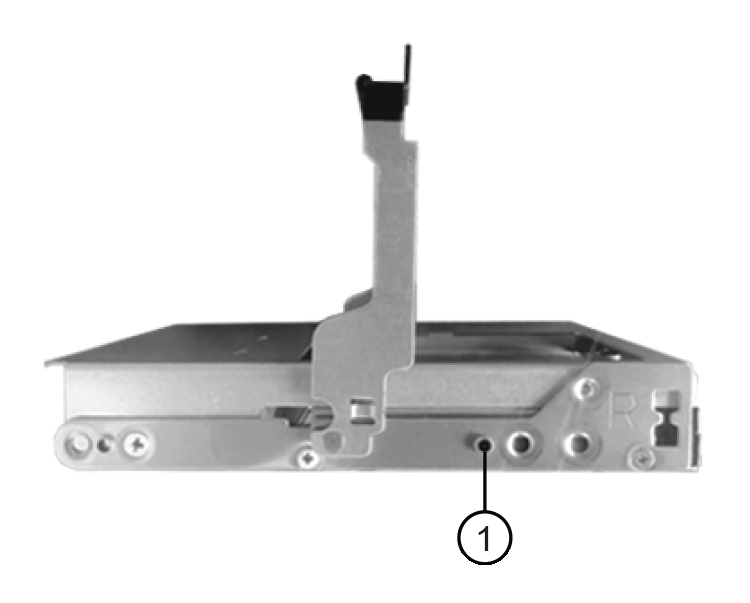
驱动器托架右侧的 * ( 1 ) * _raised 按钮
-
Lower the drive straight down, and then rotate the cam handle down until the drive snaps into place under the orange release latch.
-
Carefully push the drive drawer back into the enclosure.Push the drawer in slowly to avoid jarring the drawer and causing damage to the storage array.
-
Close the drive drawer by pushing both levers towards the center.
The green Activity LED for the replaced drive on the front of the drive drawer comes on when the drive is inserted correctly.
根据您的配置,控制器可能会自动将数据重建到新驱动器。如果磁盘架使用热备用驱动器,则控制器可能需要对热备用磁盘执行完整重建,然后才能将数据复制到更换的驱动器。此重建过程会增加完成此操作步骤所需的时间。
第 4 步:完成驱动器更换
确认新驱动器运行正常。
-
检查您更换的驱动器上的电源 LED 和警示 LED 。(首次插入驱动器时,其警示 LED 可能会亮起。但是, LED 应在一分钟内熄灭。)
-
电源 LED 亮起或闪烁,警示 LED 熄灭:表示新驱动器正常工作。
-
电源 LED 熄灭:表示驱动器可能安装不正确。Remove the drive, wait 60 seconds, and then reinstall it.
-
警示 LED 亮起:表示新驱动器可能出现故障。Replace it with another new drive.
-
-
如果 SANtricity 系统管理器中的恢复 Guru 仍显示问题描述,请选择 * 重新检查 * 以确保问题已解决。
-
如果 Recovery Guru 指示驱动器重建未自动启动,请手动启动重建,如下所示:
只有在技术支持或 Recovery Guru 指示执行此操作时,才能执行此操作。 -
选择 * 硬件 * 。
-
单击已更换的驱动器。
-
从驱动器的上下文菜单中,选择 * 重建 * 。
-
确认要执行此操作。
驱动器重建完成后,卷组将处于最佳状态。
-
-
根据需要重新安装挡板。
-
按照套件随附的 RMA 说明将故障部件退回 NetApp 。
驱动器更换已完成。您可以恢复正常操作。


