

TR-4998:使用 Pacemaker Clustering 和 FSx ONTAP在 AWS EC2 中实现 Oracle HA
 建议更改
建议更改
Allen Cao、Niyaz Mohamed, NetApp
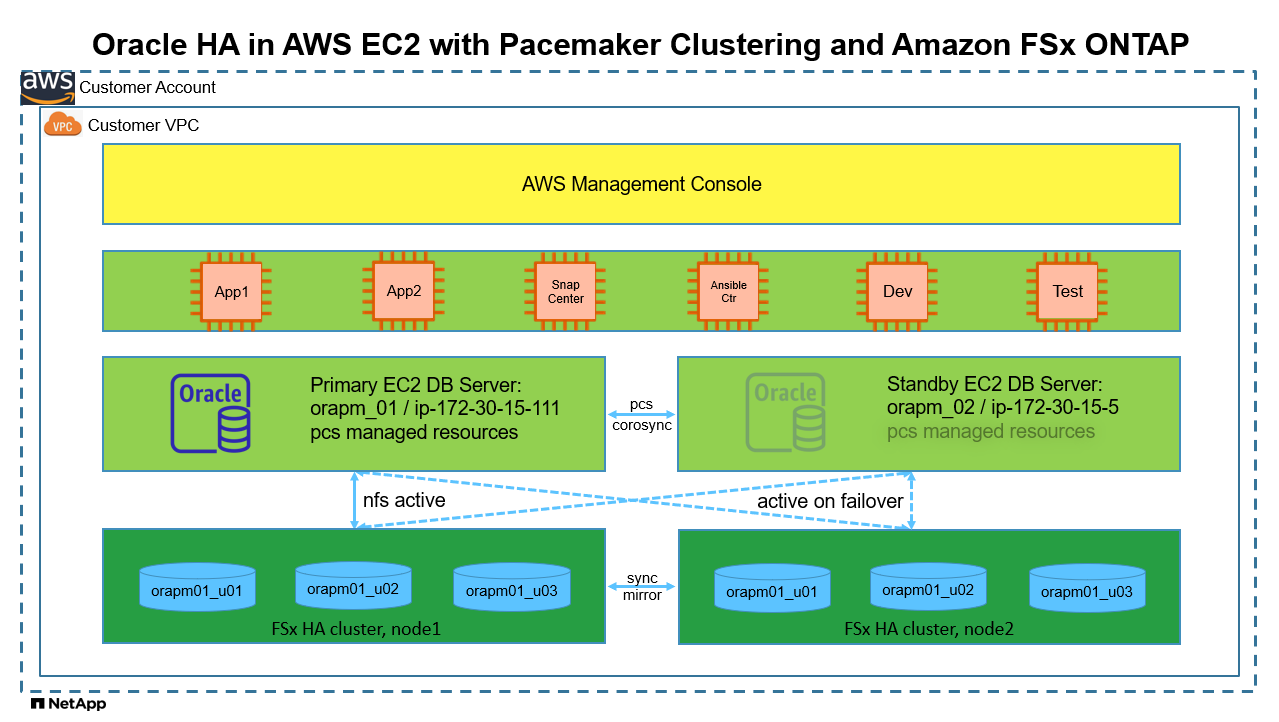
该解决方案概述并详细介绍了如何在 AWS EC2 中使用 Redhat Enterprise Linux (RHEL) 上的 Pacemaker 集群以及通过 NFS 协议使用Amazon FSx ONTAP实现数据库存储 HA 的 Oracle 高可用性 (HA)。
目的
许多努力在公共云中自行管理和运行 Oracle 的客户需要克服一些挑战。其中一个挑战是实现 Oracle 数据库的高可用性。传统上,Oracle 客户依靠称为“真正应用集群”或 RAC 的 Oracle 数据库功能在多个集群节点上实现主动-主动事务支持。一个节点发生故障不会阻碍应用程序的处理。不幸的是,Oracle RAC 实现在许多流行的公共云(如 AWS EC2)中并不容易获得或支持。通过利用 RHEL 和Amazon FSx ONTAP中内置的 Pacemaker 集群 (PCS),客户可以在无需 Oracle RAC 许可证成本的情况下实现可行的替代方案,以便在计算和存储上实现主动-被动集群,从而支持 AWS 云中的关键任务 Oracle 数据库工作负载。
本文档演示了在 RHEL 上设置 Pacemaker 集群、在 EC2 和使用 NFS 协议的Amazon FSx ONTAP上部署 Oracle 数据库、在 Pacemaker 中配置 Oracle 资源以实现 HA 以及在最常遇到的 HA 场景下通过验证完成演示的详细信息。该解决方案还提供有关使用NetApp SnapCenter UI 工具快速备份、恢复和克隆 Oracle 数据库的信息。
此解决方案适用于以下用例:
-
RHEL 中的 Pacemaker HA 集群设置和配置。
-
AWS EC2 和Amazon FSx ONTAP中的 Oracle 数据库 HA 部署。
受众
此解决方案适用于以下人群:
-
想要在 AWS EC2 和Amazon FSx ONTAP中部署 Oracle 的 DBA。
-
一位数据库解决方案架构师,想要在 AWS EC2 和Amazon FSx ONTAP中测试 Oracle 工作负载。
-
想要在 AWS EC2 和Amazon FSx ONTAP中部署和管理 Oracle 数据库的存储管理员。
-
希望在 AWS EC2 和Amazon FSx ONTAP中建立 Oracle 数据库的应用程序所有者。
解决方案测试和验证环境
该解决方案的测试和验证是在实验室环境中进行的,可能与最终部署环境不匹配。请参阅部署考虑的关键因素了解更多信息。
架构
硬件和软件组件
硬件 |
||
Amazon FSx ONTAP存储 |
AWS 提供的当前版本 |
us-east-1 中的单可用区,容量 1024 GiB,吞吐量 128 MB/s |
数据库服务器的 EC2 实例 |
t2.xlarge/4vCPU/16G |
两个 EC2 T2 xlarge EC2 实例,一个作为主数据库服务器,另一个作为备用数据库服务器 |
Ansible 控制器的虚拟机 |
4 个 vCPU,16GiB RAM |
一个 Linux VM,用于在 NFS 上运行自动化 AWS EC2/FSx 配置和 Oracle 部署 |
软件 |
||
红帽Linux |
RHEL Linux 8.6(LVM)-x64 Gen2 |
部署 RedHat 订阅进行测试 |
Oracle 数据库 |
19.18 版 |
已应用RU补丁p34765931_190000_Linux-x86-64.zip |
Oracle OPatch |
版本 12.2.0.1.36 |
最新补丁 p6880880_190000_Linux-x86-64.zip |
起搏器 |
版本 0.10.18 |
RedHat RHEL 8.0 高可用性附加组件 |
NFS |
3.0 版 |
已启用 Oracle dNFS |
Ansible |
核心 2.16.2 |
Python 3.6.8 |
AWS EC2/FSx 实验室环境中的 Oracle 数据库主动/被动配置
服务器 |
数据库 |
数据库存储 |
主节点:orapm01/ip-172.30.15.111 |
NTAP(NTAP_PDB1,NTAP_PDB2,NTAP_PDB3) |
/u01、/u02、/u03 在Amazon FSx ONTAP卷上挂载 NFS |
备用节点:orapm02/ip-172.30.15.5 |
故障转移时 NTAP(NTAP_PDB1、NTAP_PDB2、NTAP_PDB3) |
/u01、/u02、/u03 故障转移时 NFS 挂载 |
部署考虑的关键因素
-
* Amazon FSx ONTAP HA。*默认情况下, Amazon FSx ONTAP在单个或多个可用区域的 HA 存储控制器对中配置。它以主动/被动方式为关键任务数据库工作负载提供存储冗余。存储故障转移对于最终用户来说是透明的。发生存储故障转移时无需用户干预。
-
*PCS 资源组和资源排序。*资源组允许多个具有依赖关系的资源在同一个集群节点上运行。资源顺序强制执行资源启动顺序和关闭顺序的相反顺序。
-
首选节点。 Pacemaker 集群特意部署在主动/被动集群中(不是 Pacemaker 的要求),并与 FSx ONTAP集群同步。当具有位置约束时,活动的 EC2 实例将配置为 Oracle 资源的首选节点。
-
*备用节点的隔离延迟。*在双节点 PCS 集群中,仲裁数被人为设置为 1。如果集群节点之间出现通信问题,则任一节点都可能尝试隔离另一个节点,这可能会导致数据损坏。在备用节点上设置延迟可以缓解该问题,并允许主节点在备用节点被隔离时继续提供服务。
-
*多可用区部署考虑。*该解决方案在单个可用区域内部署并验证。对于多可用区部署,需要额外的 AWS 网络资源在可用区之间移动 PCS 浮动 IP。
-
Oracle 数据库存储布局。在此解决方案演示中,我们为测试数据库 NTAP 配置三个数据库卷来托管 Oracle 二进制文件、数据和日志。这些卷通过 NFS 安装在 Oracle DB 服务器上,形式为 /u01 - 二进制、/u02 - 数据和 /u03 - 日志。在 /u02 和 /u03 挂载点上配置双控制文件以实现冗余。
-
*dNFS 配置。*通过使用 dNFS(自 Oracle 11g 起可用),在 DB VM 上运行的 Oracle 数据库可以比本机 NFS 客户端驱动更多的 I/O。自动化 Oracle 部署默认在 NFSv3 上配置 dNFS。
-
数据库备份。 NetApp提供了SnapCenter software套件,用于数据库备份、恢复和克隆,并具有用户友好的 UI 界面。 NetApp建议实施这样的管理工具,以实现快速(一分钟内)快照备份、快速(几分钟内)数据库恢复和数据库克隆。
解决方案部署
以下部分提供了在 AWS EC2 中使用 Pacemaker 集群和Amazon FSx ONTAP部署和配置 Oracle 数据库 HA 以进行数据库存储保护的分步过程。
部署先决条件
Details
部署需要以下先决条件。
-
已设置 AWS 账户,并在您的 AWS 账户内创建了必要的 VPC 和网络段。
-
将 Linux VM 配置为 Ansible 控制器节点,并安装最新版本的 Ansible 和 Git。详细信息请参考以下链接:"NetApp解决方案自动化入门"在第 -
Setup the Ansible Control Node for CLI deployments on RHEL / CentOS`或者。
`Setup the Ansible Control Node for CLI deployments on Ubuntu / Debian在 Ansible 控制器和 EC2 实例数据库虚拟机之间启用 ssh 公钥/私钥认证。
配置 EC2 实例和Amazon FSx ONTAP存储集群
Details
虽然可以从 AWS 控制台手动配置 EC2 实例和Amazon FSx ONTAP ,但建议使用基于NetApp Terraform 的自动化工具包来自动配置 EC2 实例和 FSx ONTAP存储集群。以下是详细步骤。
-
从 AWS CloudShell 或 Ansible 控制器 VM 克隆 EC2 和 FSx ONTAP的自动化工具包副本。
git clone https://bitbucket.ngage.netapp.com/scm/ns-bb/na_aws_fsx_ec2_deploy.git
如果工具包不是从 AWS CloudShell 执行的,则需要使用 AWS 用户帐户访问/密钥对对您的 AWS 帐户进行 AWS CLI 身份验证。 -
查看工具包中包含的 READme.md 文件。根据所需的 AWS 资源修改 main.tf 和相关参数文件。
An example of main.tf: resource "aws_instance" "orapm01" { ami = var.ami instance_type = var.instance_type subnet_id = var.subnet_id key_name = var.ssh_key_name root_block_device { volume_type = "gp3" volume_size = var.root_volume_size } tags = { Name = var.ec2_tag1 } } resource "aws_instance" "orapm02" { ami = var.ami instance_type = var.instance_type subnet_id = var.subnet_id key_name = var.ssh_key_name root_block_device { volume_type = "gp3" volume_size = var.root_volume_size } tags = { Name = var.ec2_tag2 } } resource "aws_fsx_ontap_file_system" "fsx_01" { storage_capacity = var.fs_capacity subnet_ids = var.subnet_ids preferred_subnet_id = var.preferred_subnet_id throughput_capacity = var.fs_throughput fsx_admin_password = var.fsxadmin_password deployment_type = var.deployment_type disk_iops_configuration { iops = var.iops mode = var.iops_mode } tags = { Name = var.fsx_tag } } resource "aws_fsx_ontap_storage_virtual_machine" "svm_01" { file_system_id = aws_fsx_ontap_file_system.fsx_01.id name = var.svm_name svm_admin_password = var.vsadmin_password } -
验证并执行 Terraform 计划。成功执行将在目标 AWS 账户中创建两个 EC2 实例和一个 FSx ONTAP存储集群。自动化输出显示 EC2 实例 IP 地址和 FSx ONTAP集群端点。
terraform plan -out=main.planterraform apply main.plan
这完成了 Oracle 的 EC2 实例和 FSx ONTAP配置。
Pacemaker 集群设置
Details
RHEL 的高可用性附加组件是一个集群系统,可为关键生产服务(如 Oracle 数据库服务)提供可靠性、可扩展性和可用性。在此用例演示中,设置并配置了一个双节点 Pacemaker 集群,以支持主动/被动集群场景中 Oracle 数据库的高可用性。
以 ec2-user 身份登录 EC2 实例,完成以下任务 `both`EC2 实例:
-
删除 AWS Red Hat 更新基础设施 (RHUI) 客户端。
sudo -i yum -y remove rh-amazon-rhui-client* -
向 Red Hat 注册 EC2 实例虚拟机。
sudo subscription-manager register --username xxxxxxxx --password 'xxxxxxxx' --auto-attach -
启用 RHEL 高可用性 rpm。
sudo subscription-manager config --rhsm.manage_repos=1sudo subscription-manager repos --enable=rhel-8-for-x86_64-highavailability-rpms -
安装起搏器和围栏代理。
sudo yum update -ysudo yum install pcs pacemaker fence-agents-aws -
在所有集群节点上为 hacluster 用户创建密码。对所有节点使用相同的密码。
sudo passwd hacluster -
启动 pcs 服务并使其在启动时启动。
sudo systemctl start pcsd.servicesudo systemctl enable pcsd.service -
验证 pcsd 服务。
sudo systemctl status pcsd[ec2-user@ip-172-30-15-5 ~]$ sudo systemctl status pcsd ● pcsd.service - PCS GUI and remote configuration interface Loaded: loaded (/usr/lib/systemd/system/pcsd.service; enabled; vendor preset: disabled) Active: active (running) since Tue 2024-09-10 18:50:22 UTC; 33s ago Docs: man:pcsd(8) man:pcs(8) Main PID: 65302 (pcsd) Tasks: 1 (limit: 100849) Memory: 24.0M CGroup: /system.slice/pcsd.service └─65302 /usr/libexec/platform-python -Es /usr/sbin/pcsd Sep 10 18:50:21 ip-172-30-15-5.ec2.internal systemd[1]: Starting PCS GUI and remote configuration interface... Sep 10 18:50:22 ip-172-30-15-5.ec2.internal systemd[1]: Started PCS GUI and remote configuration interface. -
将集群节点添加到主机文件。
sudo vi /etc/hosts[ec2-user@ip-172-30-15-5 ~]$ cat /etc/hosts 127.0.0.1 localhost localhost.localdomain localhost4 localhost4.localdomain4 ::1 localhost localhost.localdomain localhost6 localhost6.localdomain6 # cluster nodes 172.30.15.111 ip-172-30-15-111.ec2.internal 172.30.15.5 ip-172-30-15-5.ec2.internal
-
安装并配置 awscli 以连接到 AWS 账户。
sudo yum install awsclisudo aws configure[ec2-user@ip-172-30-15-111 ]# sudo aws configure AWS Access Key ID [None]: XXXXXXXXXXXXXXXXX AWS Secret Access Key [None]: XXXXXXXXXXXXXXXX Default region name [None]: us-east-1 Default output format [None]: json
-
如果尚未安装,请安装资源代理包。
sudo yum install resource-agents
在 `only one`集群节点,完成以下任务来创建pcs集群。
-
对pcs用户hacluster进行身份验证。
sudo pcs host auth ip-172-30-15-5.ec2.internal ip-172-30-15-111.ec2.internal[ec2-user@ip-172-30-15-111 ~]$ sudo pcs host auth ip-172-30-15-5.ec2.internal ip-172-30-15-111.ec2.internal Username: hacluster Password: ip-172-30-15-111.ec2.internal: Authorized ip-172-30-15-5.ec2.internal: Authorized
-
创建 pcs 集群。
sudo pcs cluster setup ora_ec2nfsx ip-172-30-15-5.ec2.internal ip-172-30-15-111.ec2.internal[ec2-user@ip-172-30-15-111 ~]$ sudo pcs cluster setup ora_ec2nfsx ip-172-30-15-5.ec2.internal ip-172-30-15-111.ec2.internal No addresses specified for host 'ip-172-30-15-5.ec2.internal', using 'ip-172-30-15-5.ec2.internal' No addresses specified for host 'ip-172-30-15-111.ec2.internal', using 'ip-172-30-15-111.ec2.internal' Destroying cluster on hosts: 'ip-172-30-15-111.ec2.internal', 'ip-172-30-15-5.ec2.internal'... ip-172-30-15-5.ec2.internal: Successfully destroyed cluster ip-172-30-15-111.ec2.internal: Successfully destroyed cluster Requesting remove 'pcsd settings' from 'ip-172-30-15-111.ec2.internal', 'ip-172-30-15-5.ec2.internal' ip-172-30-15-111.ec2.internal: successful removal of the file 'pcsd settings' ip-172-30-15-5.ec2.internal: successful removal of the file 'pcsd settings' Sending 'corosync authkey', 'pacemaker authkey' to 'ip-172-30-15-111.ec2.internal', 'ip-172-30-15-5.ec2.internal' ip-172-30-15-111.ec2.internal: successful distribution of the file 'corosync authkey' ip-172-30-15-111.ec2.internal: successful distribution of the file 'pacemaker authkey' ip-172-30-15-5.ec2.internal: successful distribution of the file 'corosync authkey' ip-172-30-15-5.ec2.internal: successful distribution of the file 'pacemaker authkey' Sending 'corosync.conf' to 'ip-172-30-15-111.ec2.internal', 'ip-172-30-15-5.ec2.internal' ip-172-30-15-111.ec2.internal: successful distribution of the file 'corosync.conf' ip-172-30-15-5.ec2.internal: successful distribution of the file 'corosync.conf' Cluster has been successfully set up.
-
启用集群。
sudo pcs cluster enable --all[ec2-user@ip-172-30-15-111 ~]$ sudo pcs cluster enable --all ip-172-30-15-5.ec2.internal: Cluster Enabled ip-172-30-15-111.ec2.internal: Cluster Enabled
-
启动并验证集群。
sudo pcs cluster start --allsudo pcs status[ec2-user@ip-172-30-15-111 ~]$ sudo pcs status Cluster name: ora_ec2nfsx WARNINGS: No stonith devices and stonith-enabled is not false Cluster Summary: * Stack: corosync (Pacemaker is running) * Current DC: ip-172-30-15-111.ec2.internal (version 2.1.7-5.1.el8_10-0f7f88312) - partition with quorum * Last updated: Wed Sep 11 15:43:23 2024 on ip-172-30-15-111.ec2.internal * Last change: Wed Sep 11 15:43:06 2024 by hacluster via hacluster on ip-172-30-15-111.ec2.internal * 2 nodes configured * 0 resource instances configured Node List: * Online: [ ip-172-30-15-5.ec2.internal ip-172-30-15-111.ec2.internal ] Full List of Resources: * No resources Daemon Status: corosync: active/enabled pacemaker: active/enabled pcsd: active/enabled
这完成了 Pacemaker 集群设置和初始配置。
Pacemaker 集群防护配置
Details
对于生产集群来说,Pacemaker 防护配置是必需的。它可确保 AWS EC2 集群上的故障节点被自动隔离,从而防止该节点消耗集群的资源、损害集群的功能或破坏共享数据。本节演示了使用 fence_aws 隔离代理配置集群隔离。
-
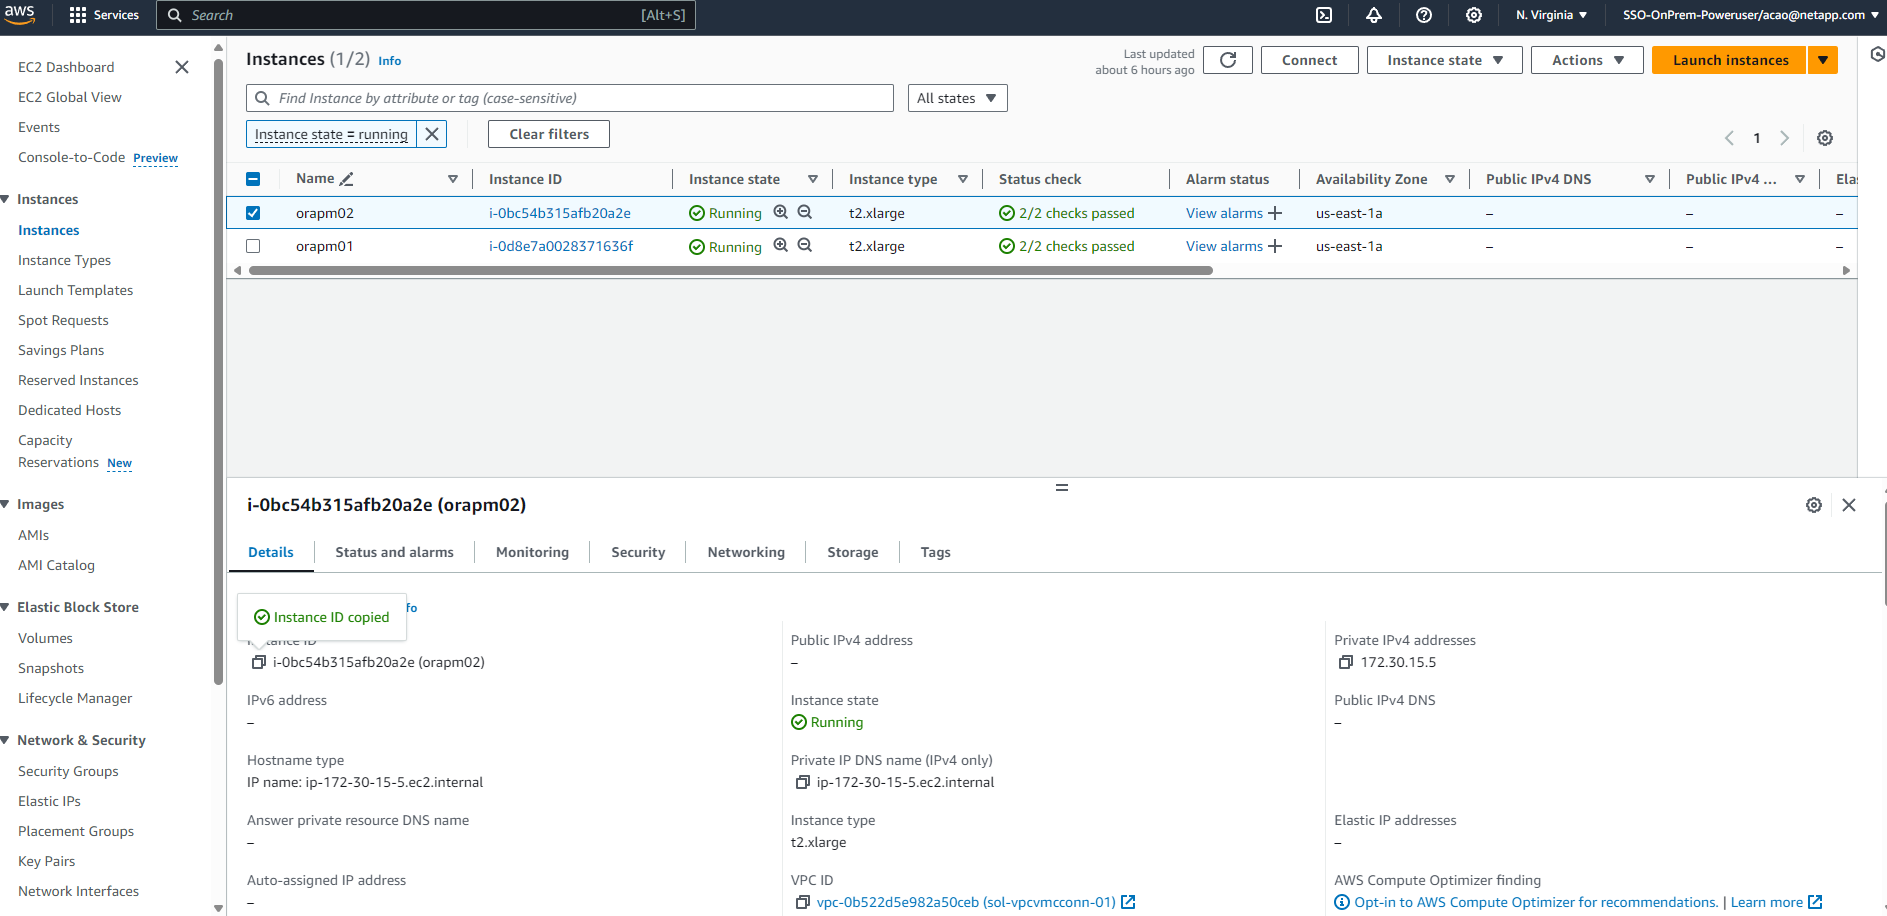
以 root 用户身份输入以下 AWS 元数据查询以获取每个 EC2 实例节点的实例 ID。
echo $(curl -s http://169.254.169.254/latest/meta-data/instance-id)[root@ip-172-30-15-111 ec2-user]# echo $(curl -s http://169.254.169.254/latest/meta-data/instance-id) i-0d8e7a0028371636f or just get instance-id from AWS EC2 console
-
输入以下命令配置隔离设备。使用 pcmk_host_map 命令将 RHEL 主机名映射到实例 ID。使用您之前用于 AWS 身份验证的 AWS 用户账户的 AWS 访问密钥和 AWS 秘密访问密钥。
sudo pcs stonith \ create clusterfence fence_aws access_key=XXXXXXXXXXXXXXXXX secret_key=XXXXXXXXXXXXXXXXXX \ region=us-east-1 pcmk_host_map="ip-172-30-15-111.ec2.internal:i-0d8e7a0028371636f;ip-172-30-15-5.ec2.internal:i-0bc54b315afb20a2e" \ power_timeout=240 pcmk_reboot_timeout=480 pcmk_reboot_retries=4 -
验证防护配置。
pcs status[root@ip-172-30-15-111 ec2-user]# pcs status Cluster name: ora_ec2nfsx Cluster Summary: * Stack: corosync (Pacemaker is running) * Current DC: ip-172-30-15-111.ec2.internal (version 2.1.7-5.1.el8_10-0f7f88312) - partition with quorum * Last updated: Wed Sep 11 21:17:18 2024 on ip-172-30-15-111.ec2.internal * Last change: Wed Sep 11 21:16:40 2024 by root via root on ip-172-30-15-111.ec2.internal * 2 nodes configured * 1 resource instance configured Node List: * Online: [ ip-172-30-15-5.ec2.internal ip-172-30-15-111.ec2.internal ] Full List of Resources: * clusterfence (stonith:fence_aws): Started ip-172-30-15-111.ec2.internal Daemon Status: corosync: active/enabled pacemaker: active/enabled pcsd: active/enabled
-
将 stonith-action 设置为关闭,而不是在集群级别重新启动。
pcs property set stonith-action=off[root@ip-172-30-15-111 ec2-user]# pcs property config Cluster Properties: cluster-infrastructure: corosync cluster-name: ora_ec2nfsx dc-version: 2.1.7-5.1.el8_10-0f7f88312 have-watchdog: false last-lrm-refresh: 1726257586 stonith-action: off
当 stonith-action 设置为 off 时,隔离集群节点将首先关闭。在 stonith power_timeout 定义的时间(240 秒)之后,隔离节点将重新启动并重新加入集群。 -
将备用节点的隔离延迟设置为 10 秒。
pcs stonith update clusterfence pcmk_delay_base="ip-172-30-15-111.ec2.internal:0;ip-172-30-15-5.ec2.internal:10s"[root@ip-172-30-15-111 ec2-user]# pcs stonith config Resource: clusterfence (class=stonith type=fence_aws) Attributes: clusterfence-instance_attributes access_key=XXXXXXXXXXXXXXXX pcmk_delay_base=ip-172-30-15-111.ec2.internal:0;ip-172-30-15-5.ec2.internal:10s pcmk_host_map=ip-172-30-15-111.ec2.internal:i-0d8e7a0028371636f;ip-172-30-15-5.ec2.internal:i-0bc54b315afb20a2e pcmk_reboot_retries=4 pcmk_reboot_timeout=480 power_timeout=240 region=us-east-1 secret_key=XXXXXXXXXXXXXXXX Operations: monitor: clusterfence-monitor-interval-60s interval=60s
|
|
执行 `pcs stonith refresh`命令刷新已停止的 stonith 防护代理或清除失败的 stonith 资源操作。 |
在 PCS 集群中部署 Oracle 数据库
Details
我们建议利用NetApp提供的 Ansible 剧本在 PCS 集群上使用预定义参数执行数据库安装和配置任务。对于此自动化 Oracle 部署,在剧本执行之前需要用户输入三个用户定义的参数文件。
-
主机 - 定义自动化剧本运行的目标。
-
vars/vars.yml - 定义适用于所有目标的变量的全局变量文件。
-
host_vars/host_name.yml - 定义仅适用于命名目标的变量的本地变量文件。在我们的用例中,这些是 Oracle DB 服务器。
除了这些用户定义的变量文件之外,还有几个默认变量文件,其中包含默认参数,除非必要,否则不需要更改。以下显示了在 PCS 集群配置中 AWS EC2 和 FSx ONTAP中自动 Oracle 部署的详细信息。
-
从 Ansible 控制器管理员用户主目录,克隆一份用于 NFS 的NetApp Oracle 部署自动化工具包的副本。
git clone https://bitbucket.ngage.netapp.com/scm/ns-bb/na_oracle_deploy_nfs.git
Ansible 控制器可以位于与数据库 EC2 实例相同的 VPC 中,也可以位于本地,只要它们之间有网络连接即可。 -
在hosts参数文件中填写用户定义的参数。以下是典型主机文件配置的示例。
[admin@ansiblectl na_oracle_deploy_nfs]$ cat hosts
#Oracle hosts
[oracle]
orapm01 ansible_host=172.30.15.111 ansible_ssh_private_key_file=ec2-user.pem
orapm02 ansible_host=172.30.15.5 ansible_ssh_private_key_file=ec2-user.pem
-
在vars/vars.yml参数文件中填写用户定义的参数。以下是典型的 vars.yml 文件配置的示例。
[admin@ansiblectl na_oracle_deploy_nfs]$ cat vars/vars.yml
######################################################################
###### Oracle 19c deployment user configuration variables       ######
###### Consolidate all variables from ONTAP, linux and oracle   ######
######################################################################

###########################################
### ONTAP env specific config variables ###
###########################################

# Prerequisite to create three volumes in NetApp ONTAP storage from System Manager or cloud dashboard with following naming convention:
# db_hostname_u01 - Oracle binary
# db_hostname_u02 - Oracle data
# db_hostname_u03 - Oracle redo
# It is important to strictly follow the name convention or the automation will fail.


###########################################
### Linux env specific config variables ###
###########################################

redhat_sub_username: xxxxxxxx
redhat_sub_password: "xxxxxxxx"


####################################################
### DB env specific install and config variables ###
####################################################

# Database domain name
db_domain: ec2.internal

# Set initial password for all required Oracle passwords. Change them after installation.
initial_pwd_all: "xxxxxxxx"
-
在host_vars/host_name.yml参数文件中填写用户定义的参数。以下是典型的 host_vars/host_name.yml 文件配置的示例。
[admin@ansiblectl na_oracle_deploy_nfs]$ cat host_vars/orapm01.yml
# User configurable Oracle host specific parameters

# Database SID. By default, a container DB is created with 3 PDBs within the CDB
oracle_sid: NTAP

# CDB is created with SGA at 75% of memory_limit, MB. Consider how many databases to be hosted on the node and
# how much ram to be allocated to each DB. The grand total of SGA should not exceed 75% available RAM on node.
memory_limit: 8192

# Local NFS lif ip address to access database volumes
nfs_lif: 172.30.15.95
可以从上一节中自动 EC2 和 FSx ONTAP部署的 FSx ONTAP集群端点输出中检索 nfs_lif 地址。 -
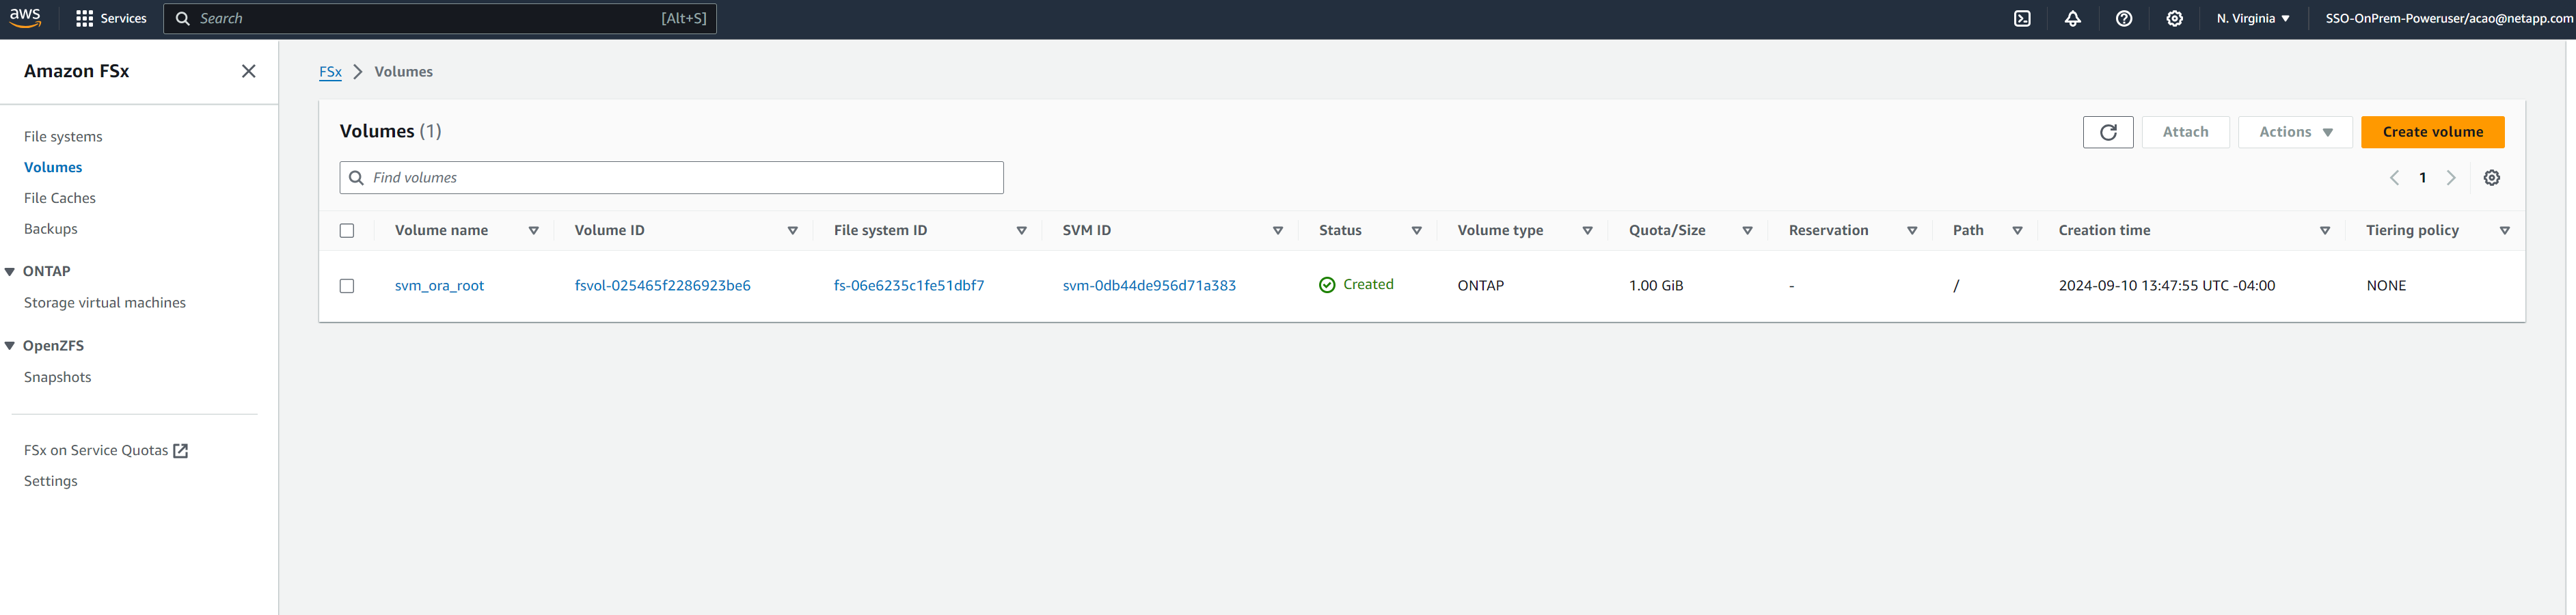
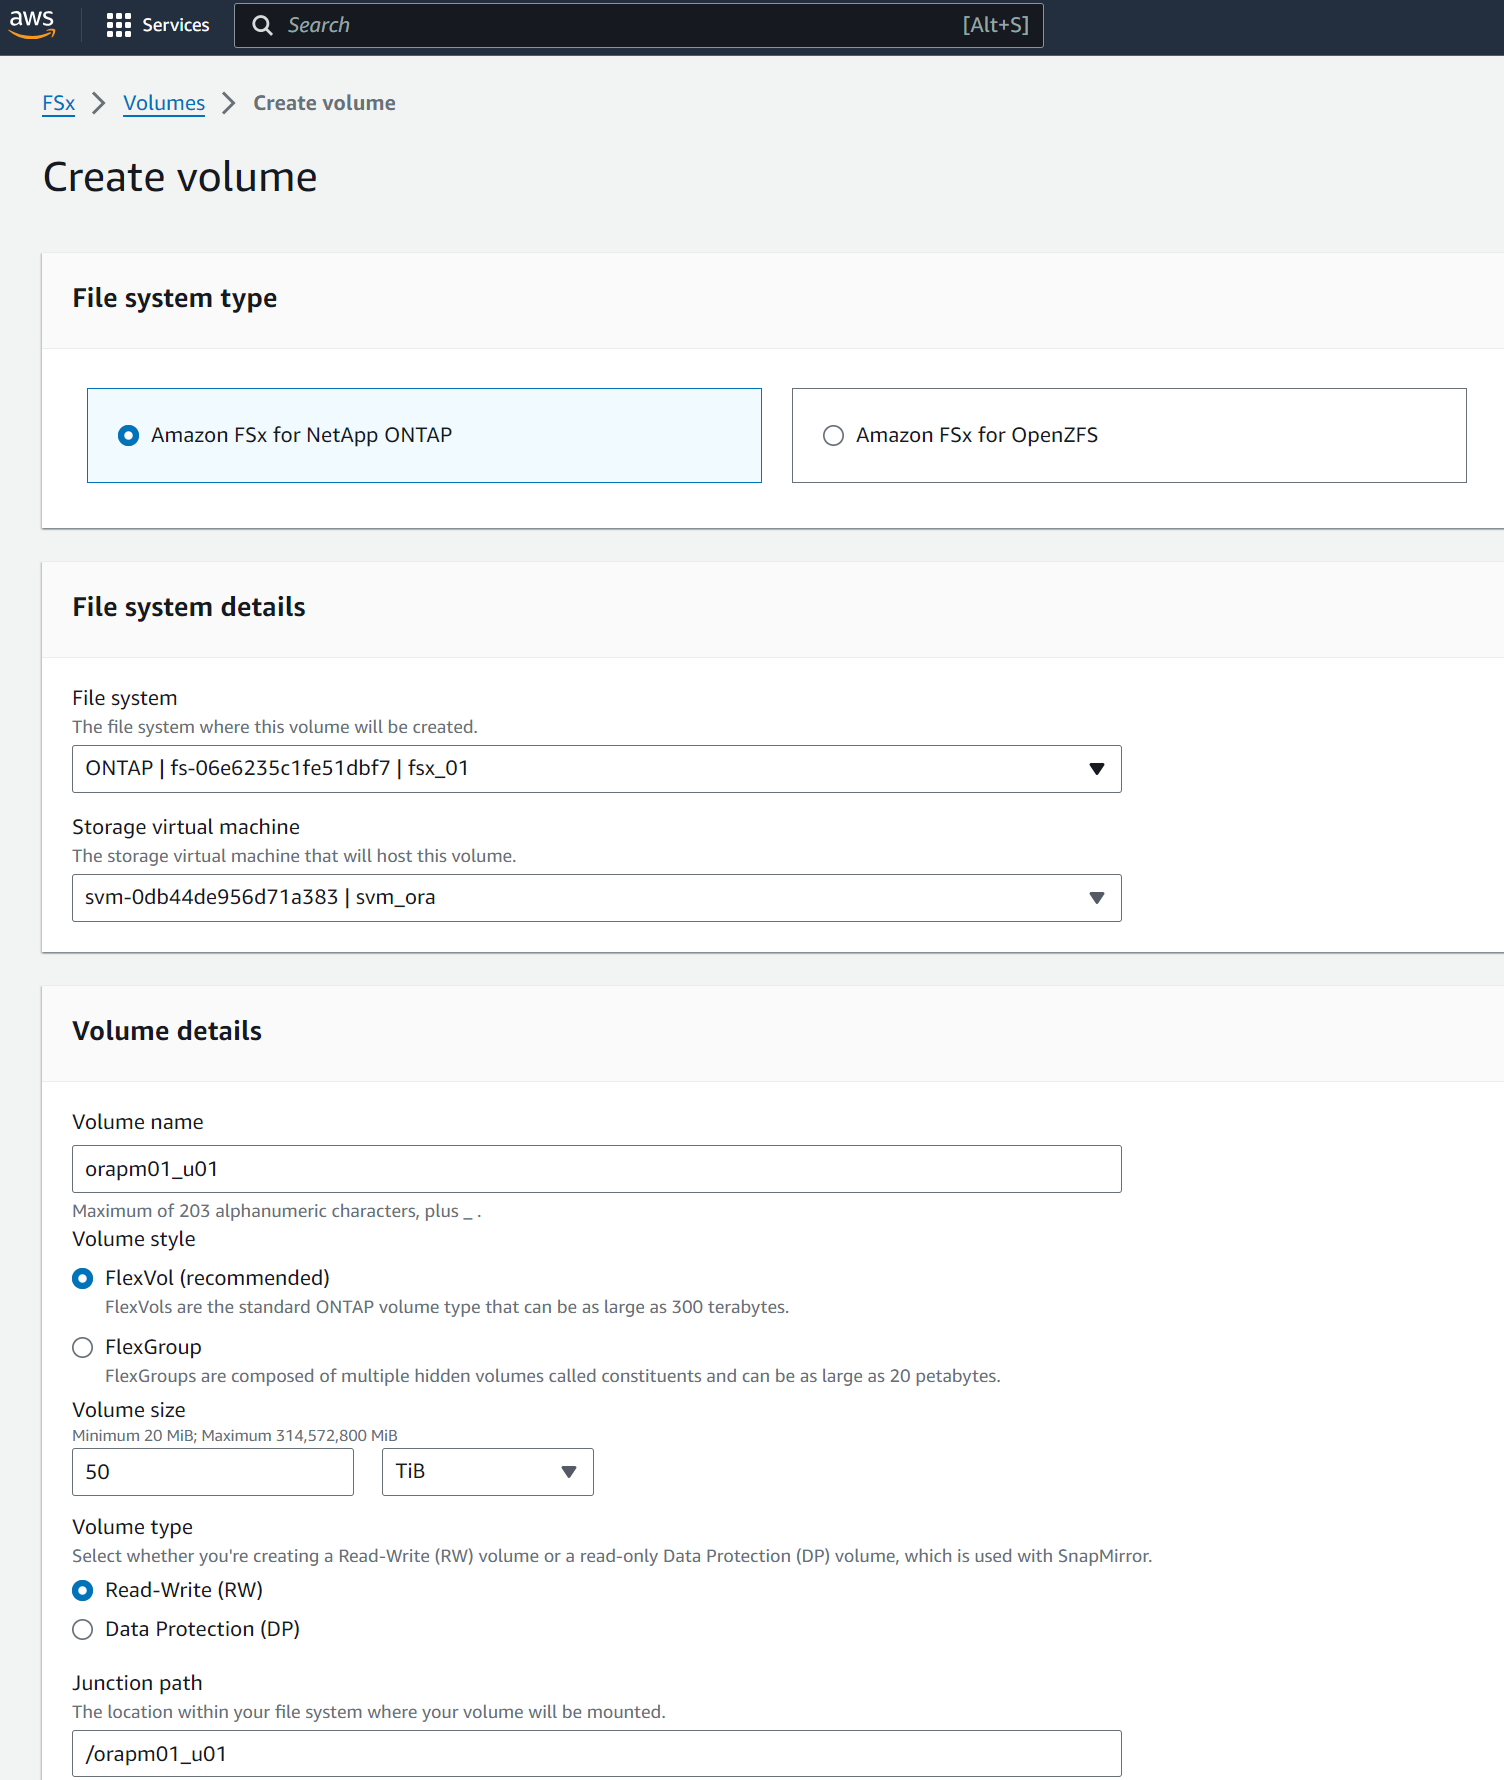
从 AWS FSx 控制台创建数据库卷。确保使用 PCS 主节点主机名(orapm01)作为卷的前缀,如下所示。
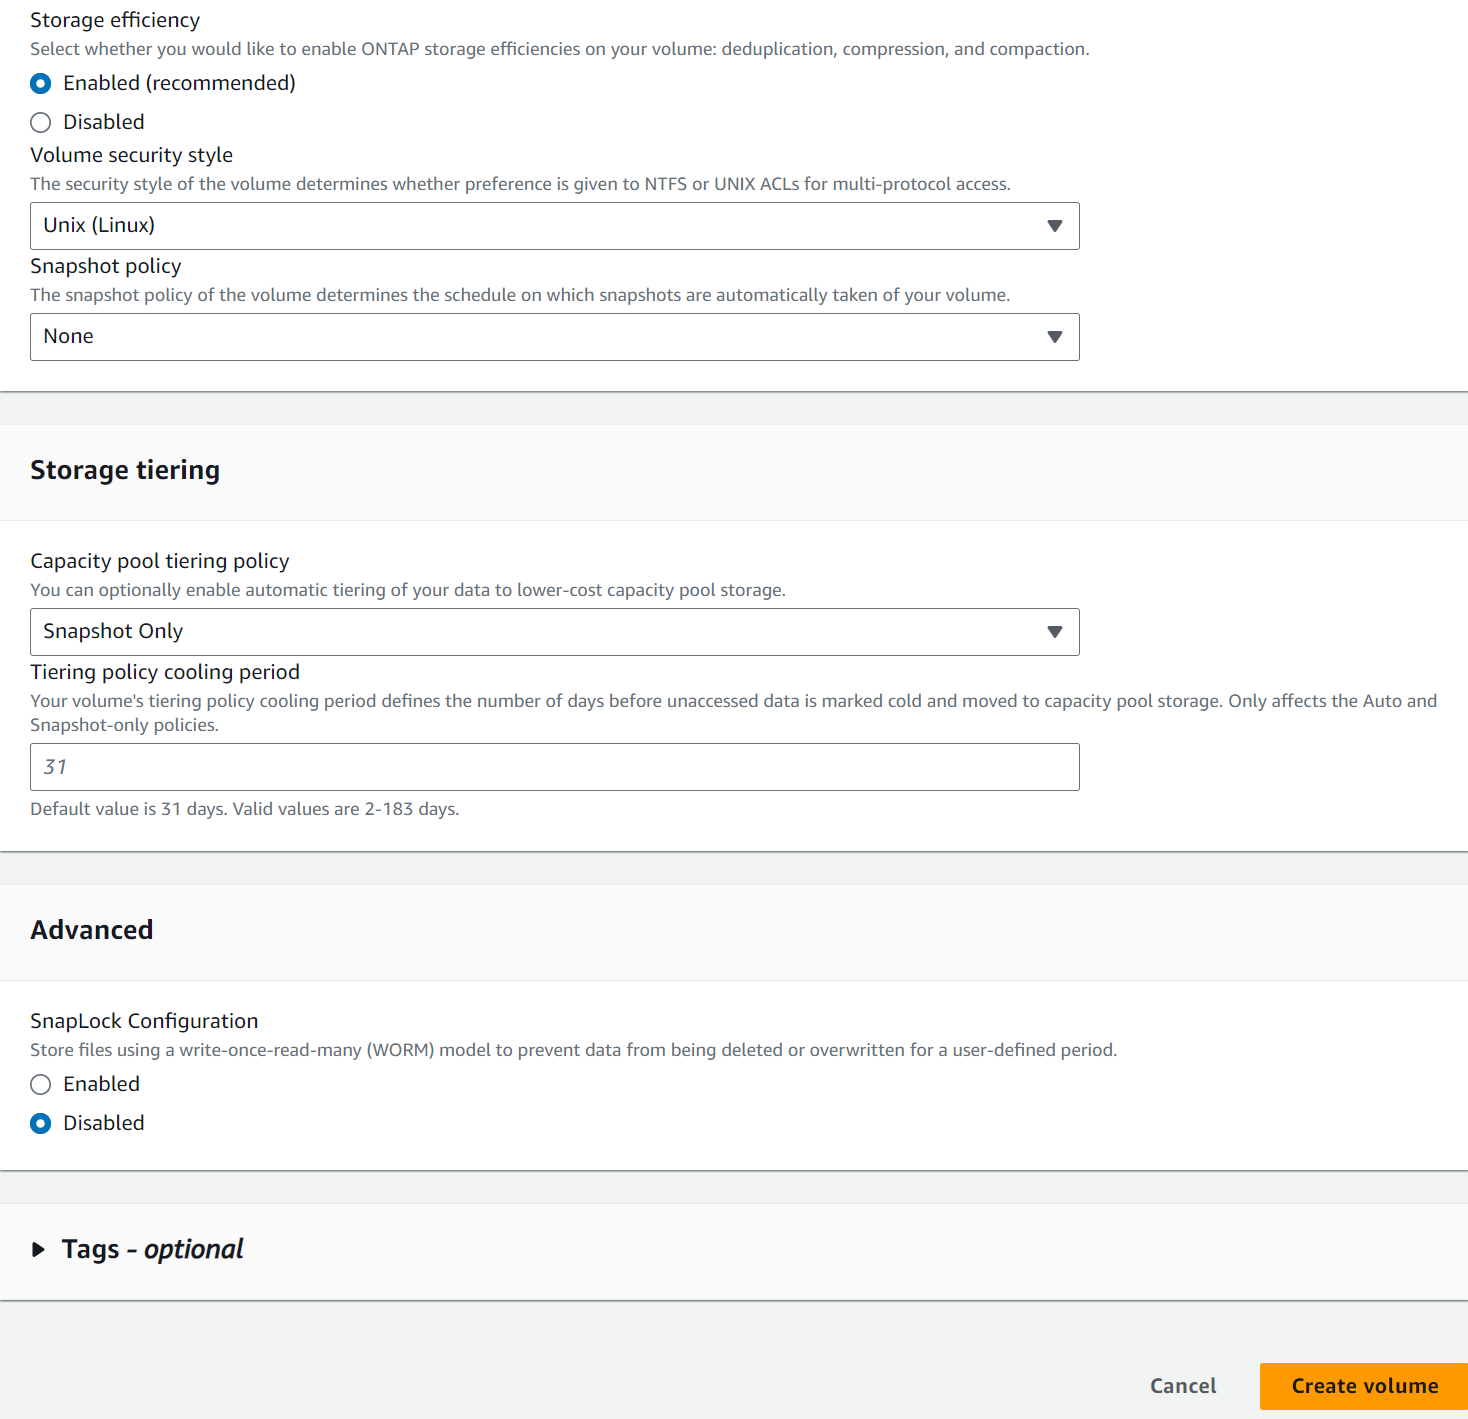
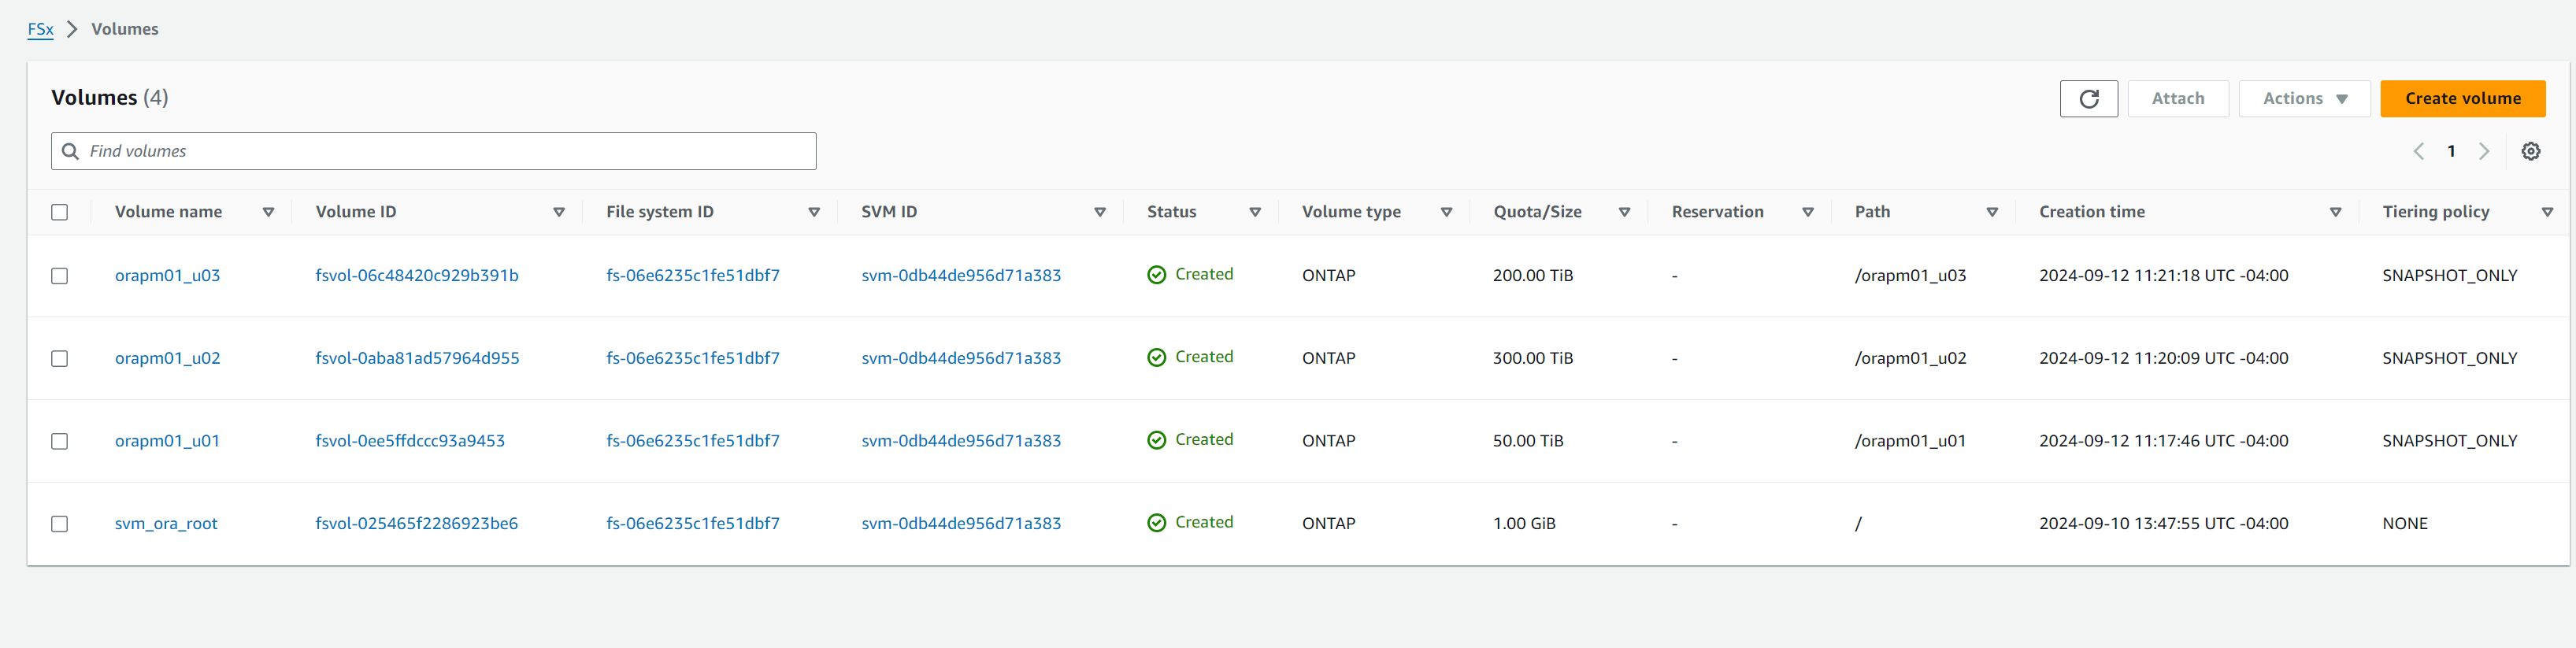
-
阶段以下 Oracle 19c 安装文件在 PCS 主节点 EC2 实例的 ip-172-30-15-111.ec2.internal /tmp/archive 目录中,权限为 777。
installer_archives:
  - "LINUX.X64_193000_db_home.zip"
  - "p34765931_190000_Linux-x86-64.zip"
  - "p6880880_190000_Linux-x86-64.zip"
-
执行 Linux 配置的剧本
all nodes。ansible-playbook -i hosts 2-linux_config.yml -u ec2-user -e @vars/vars.yml[admin@ansiblectl na_oracle_deploy_nfs]$ ansible-playbook -i hosts 2-linux_config.yml -u ec2-user -e @vars/vars.yml PLAY [Linux Setup and Storage Config for Oracle] **************************************************************************************************************************************************************************************************************************************************************************** TASK [Gathering Facts] ****************************************************************************************************************************************************************************************************************************************************************************************************** ok: [orapm01] ok: [orapm02] TASK [linux : Configure RedHat 7 for Oracle DB installation] **************************************************************************************************************************************************************************************************************************************************************** skipping: [orapm01] skipping: [orapm02] TASK [linux : Configure RedHat 8 for Oracle DB installation] **************************************************************************************************************************************************************************************************************************************************************** included: /home/admin/na_oracle_deploy_nfs/roles/linux/tasks/rhel8_config.yml for orapm01, orapm02 TASK [linux : Register subscriptions for RedHat Server] ********************************************************************************************************************************************************************************************************************************************************************* ok: [orapm01] ok: [orapm02] . . .
-
执行 Oracle 配置的剧本
only on primary node(注释掉 hosts 文件中的备用节点)。ansible-playbook -i hosts 4-oracle_config.yml -u ec2-user -e @vars/vars.yml --skip-tags "enable_db_start_shut"[admin@ansiblectl na_oracle_deploy_nfs]$ ansible-playbook -i hosts 4-oracle_config.yml -u ec2-user -e @vars/vars.yml --skip-tags "enable_db_start_shut" PLAY [Oracle installation and configuration] ******************************************************************************************************************************************************************************************************************************************************************************** TASK [Gathering Facts] ****************************************************************************************************************************************************************************************************************************************************************************************************** ok: [orapm01] TASK [oracle : Oracle software only install] ******************************************************************************************************************************************************************************************************************************************************************************** included: /home/admin/na_oracle_deploy_nfs/roles/oracle/tasks/oracle_install.yml for orapm01 TASK [oracle : Create mount points for NFS file systems / Mount NFS file systems on Oracle hosts] *************************************************************************************************************************************************************************************************************************** included: /home/admin/na_oracle_deploy_nfs/roles/oracle/tasks/oracle_mount_points.yml for orapm01 TASK [oracle : Create mount points for NFS file systems] ******************************************************************************************************************************************************************************************************************************************************************** changed: [orapm01] => (item=/u01) changed: [orapm01] => (item=/u02) changed: [orapm01] => (item=/u03) . . .
-
部署数据库后,注释掉主节点上 /etc/fstab 中的 /u01、/u02、/u03 挂载,因为挂载点仅由 PCS 管理。
sudo vi /etc/fstab[root@ip-172-30-15-111 ec2-user]# cat /etc/fstab UUID=eaa1f38e-de0f-4ed5-a5b5-2fa9db43bb38 / xfs defaults 0 0 /mnt/swapfile swap swap defaults 0 0 #172.30.15.95:/orapm01_u01 /u01 nfs rw,bg,hard,vers=3,proto=tcp,timeo=600,rsize=65536,wsize=65536 0 0 #172.30.15.95:/orapm01_u02 /u02 nfs rw,bg,hard,vers=3,proto=tcp,timeo=600,rsize=65536,wsize=65536 0 0 #172.30.15.95:/orapm01_u03 /u03 nfs rw,bg,hard,vers=3,proto=tcp,timeo=600,rsize=65536,wsize=65536 0 0
-
将 /etc/oratab /etc/oraInst.loc、/home/oracle/.bash_profile 复制到备用节点。确保维护适当的文件所有权和权限。
-
关闭数据库、监听器,并在主节点上卸载 /u01、/u02、/u03。
[root@ip-172-30-15-111 ec2-user]# su - oracle
Last login: Wed Sep 18 16:51:02 UTC 2024
[oracle@ip-172-30-15-111 ~]$ sqlplus / as sysdba

SQL*Plus: Release 19.0.0.0.0 - Production on Wed Sep 18 16:51:16 2024
Version 19.18.0.0.0

Copyright (c) 1982, 2022, Oracle.  All rights reserved.


Connected to:
Oracle Database 19c Enterprise Edition Release 19.0.0.0.0 - Production
Version 19.18.0.0.0

SQL> shutdown immediate;

SQL> exit
Disconnected from Oracle Database 19c Enterprise Edition Release 19.0.0.0.0 - Production
Version 19.18.0.0.0
[oracle@ip-172-30-15-111 ~]$ lsnrctl stop listener.ntap

[oracle@ip-172-30-15-111 ~]$ exit
logout
[root@ip-172-30-15-111 ec2-user]# umount /u01
[root@ip-172-30-15-111 ec2-user]# umount /u02
[root@ip-172-30-15-111 ec2-user]# umount /u03
-
在备用节点ip-172-30-15-5上创建挂载点。
mkdir /u01 mkdir /u02 mkdir /u03 -
在备用节点 ip-172-30-15-5 上挂载 FSx ONTAP数据库卷。
mount -t nfs 172.30.15.95:/orapm01_u01 /u01 -o rw,bg,hard,vers=3,proto=tcp,timeo=600,rsize=65536,wsize=65536mount -t nfs 172.30.15.95:/orapm01_u02 /u02 -o rw,bg,hard,vers=3,proto=tcp,timeo=600,rsize=65536,wsize=65536mount -t nfs 172.30.15.95:/orapm01_u03 /u03 -o rw,bg,hard,vers=3,proto=tcp,timeo=600,rsize=65536,wsize=65536[root@ip-172-30-15-5 ec2-user]# df -h Filesystem Size Used Avail Use% Mounted on devtmpfs 7.7G 0 7.7G 0% /dev tmpfs 7.7G 33M 7.7G 1% /dev/shm tmpfs 7.7G 17M 7.7G 1% /run tmpfs 7.7G 0 7.7G 0% /sys/fs/cgroup /dev/xvda2 50G 21G 30G 41% / tmpfs 1.6G 0 1.6G 0% /run/user/1000 172.30.15.95:/orapm01_u01 48T 47T 844G 99% /u01 172.30.15.95:/orapm01_u02 285T 285T 844G 100% /u02 172.30.15.95:/orapm01_u03 190T 190T 844G 100% /u03
-
更改为 oracle 用户,重新链接二进制文件。
[root@ip-172-30-15-5 ec2-user]# su - oracle
Last login: Thu Sep 12 18:09:03 UTC 2024 on pts/0
[oracle@ip-172-30-15-5 ~]$ env | grep ORA
ORACLE_SID=NTAP
ORACLE_HOME=/u01/app/oracle/product/19.0.0/NTAP
[oracle@ip-172-30-15-5 ~]$ cd $ORACLE_HOME/bin
[oracle@ip-172-30-15-5 bin]$ ./relink
writing relink log to: /u01/app/oracle/product/19.0.0/NTAP/install/relinkActions2024-09-12_06-21-40PM.log
-
将 dnfs lib 复制回 odm 文件夹。重新链接可能会丢失 dfns 库文件。
[oracle@ip-172-30-15-5 odm]$ cd /u01/app/oracle/product/19.0.0/NTAP/rdbms/lib/odm
[oracle@ip-172-30-15-5 odm]$ cp ../../../lib/libnfsodm19.so .
-
在备用节点 ip-172-30-15-5 上启动数据库进行验证。
[oracle@ip-172-30-15-5 odm]$ sqlplus / as sysdba SQL*Plus: Release 19.0.0.0.0 - Production on Thu Sep 12 18:30:04 2024 Version 19.18.0.0.0 Copyright (c) 1982, 2022, Oracle. All rights reserved. Connected to an idle instance. SQL> startup; ORACLE instance started. Total System Global Area 6442449688 bytes Fixed Size 9177880 bytes Variable Size 1090519040 bytes Database Buffers 5335154688 bytes Redo Buffers 7598080 bytes Database mounted. Database opened. SQL> select name, open_mode from v$database; NAME OPEN_MODE --------- -------------------- NTAP READ WRITE SQL> show pdbs CON_ID CON_NAME OPEN MODE RESTRICTED ---------- ------------------------------ ---------- ---------- 2 PDB$SEED READ ONLY NO 3 NTAP_PDB1 READ WRITE NO 4 NTAP_PDB2 READ WRITE NO 5 NTAP_PDB3 READ WRITE NO -
关闭数据库并将数据库故障恢复至主节点 ip-172-30-15-111。
SQL> shutdown immediate;
Database closed.
Database dismounted.
ORACLE instance shut down.
SQL> exit

[root@ip-172-30-15-5 ec2-user]# df -h
Filesystem                 Size  Used Avail Use% Mounted on
devtmpfs                   7.7G     0  7.7G   0% /dev
tmpfs                      7.7G   33M  7.7G   1% /dev/shm
tmpfs                      7.7G   17M  7.7G   1% /run
tmpfs                      7.7G     0  7.7G   0% /sys/fs/cgroup
/dev/xvda2                  50G   21G   30G  41% /
tmpfs                      1.6G     0  1.6G   0% /run/user/1000
172.30.15.95:/orapm01_u01   48T   47T  844G  99% /u01
172.30.15.95:/orapm01_u02  285T  285T  844G 100% /u02
172.30.15.95:/orapm01_u03  190T  190T  844G 100% /u03

[root@ip-172-30-15-5 ec2-user]# umount /u01
[root@ip-172-30-15-5 ec2-user]# umount /u02
[root@ip-172-30-15-5 ec2-user]# umount /u03

[root@ip-172-30-15-111 ec2-user]# mount -t nfs 172.30.15.95:/orapm01_u01 /u01 -o rw,bg,hard,vers=3,proto=tcp,timeo=600,rsize=65536,wsize=65536
mount: (hint) your fstab has been modified, but systemd still uses
       the old version; use 'systemctl daemon-reload' to reload.
[root@ip-172-30-15-111 ec2-user]# mount -t nfs 172.30.15.95:/orapm01_u02 /u02 -o rw,bg,hard,vers=3,proto=tcp,timeo=600,rsize=65536,wsize=65536
mount: (hint) your fstab has been modified, but systemd still uses
       the old version; use 'systemctl daemon-reload' to reload.
[root@ip-172-30-15-111 ec2-user]# mount -t nfs 172.30.15.95:/orapm01_u03 /u03 -o rw,bg,hard,vers=3,proto=tcp,timeo=600,rsize=65536,wsize=65536
mount: (hint) your fstab has been modified, but systemd still uses
       the old version; use 'systemctl daemon-reload' to reload.
[root@ip-172-30-15-111 ec2-user]# df -h
Filesystem                 Size  Used Avail Use% Mounted on
devtmpfs                   7.7G     0  7.7G   0% /dev
tmpfs                      7.8G   48M  7.7G   1% /dev/shm
tmpfs                      7.8G   33M  7.7G   1% /run
tmpfs                      7.8G     0  7.8G   0% /sys/fs/cgroup
/dev/xvda2                  50G   29G   22G  58% /
tmpfs                      1.6G     0  1.6G   0% /run/user/1000
172.30.15.95:/orapm01_u01   48T   47T  844G  99% /u01
172.30.15.95:/orapm01_u02  285T  285T  844G 100% /u02
172.30.15.95:/orapm01_u03  190T  190T  844G 100% /u03
[root@ip-172-30-15-111 ec2-user]# su - oracle
Last login: Thu Sep 12 18:13:34 UTC 2024 on pts/1
[oracle@ip-172-30-15-111 ~]$ sqlplus / as sysdba

SQL*Plus: Release 19.0.0.0.0 - Production on Thu Sep 12 18:38:46 2024
Version 19.18.0.0.0

Copyright (c) 1982, 2022, Oracle.  All rights reserved.

Connected to an idle instance.

SQL> startup;
ORACLE instance started.

Total System Global Area 6442449688 bytes
Fixed Size                  9177880 bytes
Variable Size            1090519040 bytes
Database Buffers         5335154688 bytes
Redo Buffers                7598080 bytes
Database mounted.
Database opened.
SQL> exit
Disconnected from Oracle Database 19c Enterprise Edition Release 19.0.0.0.0 - Production
Version 19.18.0.0.0
[oracle@ip-172-30-15-111 ~]$ lsnrctl start listener.ntap

LSNRCTL for Linux: Version 19.0.0.0.0 - Production on 12-SEP-2024 18:39:17

Copyright (c) 1991, 2022, Oracle.  All rights reserved.

Starting /u01/app/oracle/product/19.0.0/NTAP/bin/tnslsnr: please wait...

TNSLSNR for Linux: Version 19.0.0.0.0 - Production
System parameter file is /u01/app/oracle/product/19.0.0/NTAP/network/admin/listener.ora
Log messages written to /u01/app/oracle/diag/tnslsnr/ip-172-30-15-111/listener.ntap/alert/log.xml
Listening on: (DESCRIPTION=(ADDRESS=(PROTOCOL=tcp)(HOST=ip-172-30-15-111.ec2.internal)(PORT=1521)))
Listening on: (DESCRIPTION=(ADDRESS=(PROTOCOL=ipc)(KEY=EXTPROC1521)))

Connecting to (DESCRIPTION=(ADDRESS=(PROTOCOL=TCP)(HOST=ip-172-30-15-111.ec2.internal)(PORT=1521)))
STATUS of the LISTENER
------------------------
Alias                     listener.ntap
Version                   TNSLSNR for Linux: Version 19.0.0.0.0 - Production
Start Date                12-SEP-2024 18:39:17
Uptime                    0 days 0 hr. 0 min. 0 sec
Trace Level               off
Security                  ON: Local OS Authentication
SNMP                      OFF
Listener Parameter File   /u01/app/oracle/product/19.0.0/NTAP/network/admin/listener.ora
Listener Log File         /u01/app/oracle/diag/tnslsnr/ip-172-30-15-111/listener.ntap/alert/log.xml
Listening Endpoints Summary...
  (DESCRIPTION=(ADDRESS=(PROTOCOL=tcp)(HOST=ip-172-30-15-111.ec2.internal)(PORT=1521)))
  (DESCRIPTION=(ADDRESS=(PROTOCOL=ipc)(KEY=EXTPROC1521)))
The listener supports no services
The command completed successfully
配置 Oracle 资源以进行 PCS 管理
Details
配置 Pacemaker 集群的目标是建立一个主动/被动高可用性解决方案,用于在 AWS EC2 和 FSx ONTAP环境中运行 Oracle,并在发生故障时尽量减少用户干预。下面演示了 PCS 管理的 Oracle 资源配置。
-
以主 EC2 实例 ip-172-30-15-111 上的 root 用户身份,使用 VPC CIDR 块中未使用的私有 IP 地址作为浮动 IP 创建辅助私有 IP 地址。在此过程中,创建辅助私有 IP 地址所属的 oracle 资源组。
pcs resource create privip ocf:heartbeat:awsvip secondary_private_ip=172.30.15.33 --group oracle[root@ip-172-30-15-111 ec2-user]# pcs status Cluster name: ora_ec2nfsx Cluster Summary: * Stack: corosync (Pacemaker is running) * Current DC: ip-172-30-15-111.ec2.internal (version 2.1.7-5.1.el8_10-0f7f88312) - partition with quorum * Last updated: Fri Sep 13 16:25:35 2024 on ip-172-30-15-111.ec2.internal * Last change: Fri Sep 13 16:25:23 2024 by root via root on ip-172-30-15-111.ec2.internal * 2 nodes configured * 2 resource instances configured Node List: * Online: [ ip-172-30-15-5.ec2.internal ip-172-30-15-111.ec2.internal ] Full List of Resources: * clusterfence (stonith:fence_aws): Started ip-172-30-15-111.ec2.internal * Resource Group: oracle: * privip (ocf::heartbeat:awsvip): Started ip-172-30-15-5.ec2.internal Daemon Status: corosync: active/enabled pacemaker: active/enabled pcsd: active/enabled
如果 privip 恰好是在备用集群节点上创建的,请将其移动到主节点,如下所示。 -
在集群节点之间移动资源。
pcs resource move privip ip-172-30-15-111.ec2.internal[root@ip-172-30-15-111 ec2-user]# pcs resource move privip ip-172-30-15-111.ec2.internal Warning: A move constraint has been created and the resource 'privip' may or may not move depending on other configuration [root@ip-172-30-15-111 ec2-user]# pcs status Cluster name: ora_ec2nfsx WARNINGS: Following resources have been moved and their move constraints are still in place: 'privip' Run 'pcs constraint location' or 'pcs resource clear <resource id>' to view or remove the constraints, respectively Cluster Summary: * Stack: corosync (Pacemaker is running) * Current DC: ip-172-30-15-111.ec2.internal (version 2.1.7-5.1.el8_10-0f7f88312) - partition with quorum * Last updated: Fri Sep 13 16:26:38 2024 on ip-172-30-15-111.ec2.internal * Last change: Fri Sep 13 16:26:27 2024 by root via root on ip-172-30-15-111.ec2.internal * 2 nodes configured * 2 resource instances configured Node List: * Online: [ ip-172-30-15-5.ec2.internal ip-172-30-15-111.ec2.internal ] Full List of Resources: * clusterfence (stonith:fence_aws): Started ip-172-30-15-111.ec2.internal * Resource Group: oracle: * privip (ocf::heartbeat:awsvip): Started ip-172-30-15-111.ec2.internal (Monitoring) Daemon Status: corosync: active/enabled pacemaker: active/enabled pcsd: active/enabled -
为 Oracle 创建虚拟 IP(vip)。虚拟 IP 将根据需要在主节点和备用节点之间浮动。
pcs resource create vip ocf:heartbeat:IPaddr2 ip=172.30.15.33 cidr_netmask=25 nic=eth0 op monitor interval=10s --group oracle[root@ip-172-30-15-111 ec2-user]# pcs resource create vip ocf:heartbeat:IPaddr2 ip=172.30.15.33 cidr_netmask=25 nic=eth0 op monitor interval=10s --group oracle [root@ip-172-30-15-111 ec2-user]# pcs status Cluster name: ora_ec2nfsx WARNINGS: Following resources have been moved and their move constraints are still in place: 'privip' Run 'pcs constraint location' or 'pcs resource clear <resource id>' to view or remove the constraints, respectively Cluster Summary: * Stack: corosync (Pacemaker is running) * Current DC: ip-172-30-15-111.ec2.internal (version 2.1.7-5.1.el8_10-0f7f88312) - partition with quorum * Last updated: Fri Sep 13 16:27:34 2024 on ip-172-30-15-111.ec2.internal * Last change: Fri Sep 13 16:27:24 2024 by root via root on ip-172-30-15-111.ec2.internal * 2 nodes configured * 3 resource instances configured Node List: * Online: [ ip-172-30-15-5.ec2.internal ip-172-30-15-111.ec2.internal ] Full List of Resources: * clusterfence (stonith:fence_aws): Started ip-172-30-15-111.ec2.internal * Resource Group: oracle: * privip (ocf::heartbeat:awsvip): Started ip-172-30-15-111.ec2.internal * vip (ocf::heartbeat:IPaddr2): Started ip-172-30-15-111.ec2.internal Daemon Status: corosync: active/enabled pacemaker: active/enabled pcsd: active/enabled -
以 oracle 用户身份,更新 listener.ora 和 tnsnames.ora 文件以指向 vip 地址。重新启动监听器。如果需要,则反弹数据库以便 DB 向侦听器注册。
vi $ORACLE_HOME/network/admin/listener.oravi $ORACLE_HOME/network/admin/tnsnames.ora[oracle@ip-172-30-15-111 admin]$ cat listener.ora # listener.ora Network Configuration File: /u01/app/oracle/product/19.0.0/NTAP/network/admin/listener.ora # Generated by Oracle configuration tools. LISTENER.NTAP = (DESCRIPTION_LIST = (DESCRIPTION = (ADDRESS = (PROTOCOL = TCP)(HOST = 172.30.15.33)(PORT = 1521)) (ADDRESS = (PROTOCOL = IPC)(KEY = EXTPROC1521)) ) ) [oracle@ip-172-30-15-111 admin]$ cat tnsnames.ora # tnsnames.ora Network Configuration File: /u01/app/oracle/product/19.0.0/NTAP/network/admin/tnsnames.ora # Generated by Oracle configuration tools. NTAP = (DESCRIPTION = (ADDRESS = (PROTOCOL = TCP)(HOST = 172.30.15.33)(PORT = 1521)) (CONNECT_DATA = (SERVER = DEDICATED) (SERVICE_NAME = NTAP.ec2.internal) ) ) LISTENER_NTAP = (ADDRESS = (PROTOCOL = TCP)(HOST = 172.30.15.33)(PORT = 1521)) [oracle@ip-172-30-15-111 admin]$ lsnrctl status listener.ntap LSNRCTL for Linux: Version 19.0.0.0.0 - Production on 13-SEP-2024 18:28:17 Copyright (c) 1991, 2022, Oracle. All rights reserved. Connecting to (DESCRIPTION=(ADDRESS=(PROTOCOL=TCP)(HOST=172.30.15.33)(PORT=1521))) STATUS of the LISTENER ------------------------ Alias listener.ntap Version TNSLSNR for Linux: Version 19.0.0.0.0 - Production Start Date 13-SEP-2024 18:15:51 Uptime 0 days 0 hr. 12 min. 25 sec Trace Level off Security ON: Local OS Authentication SNMP OFF Listener Parameter File /u01/app/oracle/product/19.0.0/NTAP/network/admin/listener.ora Listener Log File /u01/app/oracle/diag/tnslsnr/ip-172-30-15-111/listener.ntap/alert/log.xml Listening Endpoints Summary... (DESCRIPTION=(ADDRESS=(PROTOCOL=tcp)(HOST=172.30.15.33)(PORT=1521))) (DESCRIPTION=(ADDRESS=(PROTOCOL=ipc)(KEY=EXTPROC1521))) (DESCRIPTION=(ADDRESS=(PROTOCOL=tcps)(HOST=ip-172-30-15-111.ec2.internal)(PORT=5500))(Security=(my_wallet_directory=/u01/app/oracle/product/19.0.0/NTAP/admin/NTAP/xdb_wallet))(Presentation=HTTP)(Session=RAW)) Services Summary... Service "21f0b5cc1fa290e2e0636f0f1eacfd43.ec2.internal" has 1 instance(s). Instance "NTAP", status READY, has 1 handler(s) for this service... Service "21f0b74445329119e0636f0f1eacec03.ec2.internal" has 1 instance(s). Instance "NTAP", status READY, has 1 handler(s) for this service... Service "21f0b83929709164e0636f0f1eacacc3.ec2.internal" has 1 instance(s). Instance "NTAP", status READY, has 1 handler(s) for this service... Service "NTAP.ec2.internal" has 1 instance(s). Instance "NTAP", status READY, has 1 handler(s) for this service... Service "NTAPXDB.ec2.internal" has 1 instance(s). Instance "NTAP", status READY, has 1 handler(s) for this service... Service "ntap_pdb1.ec2.internal" has 1 instance(s). Instance "NTAP", status READY, has 1 handler(s) for this service... Service "ntap_pdb2.ec2.internal" has 1 instance(s). Instance "NTAP", status READY, has 1 handler(s) for this service... Service "ntap_pdb3.ec2.internal" has 1 instance(s). Instance "NTAP", status READY, has 1 handler(s) for this service... The command completed successfully **Oracle listener now listens on vip for database connection** -
将 /u01、/u02、/u03 挂载点添加到 oracle 资源组。
pcs resource create u01 ocf:heartbeat:Filesystem device='172.30.15.95:/orapm01_u01' directory='/u01' fstype='nfs' options='rw,bg,hard,vers=3,proto=tcp,timeo=600,rsize=65536,wsize=65536' --group oraclepcs resource create u02 ocf:heartbeat:Filesystem device='172.30.15.95:/orapm01_u02' directory='/u02' fstype='nfs' options='rw,bg,hard,vers=3,proto=tcp,timeo=600,rsize=65536,wsize=65536' --group oraclepcs resource create u03 ocf:heartbeat:Filesystem device='172.30.15.95:/orapm01_u03' directory='/u03' fstype='nfs' options='rw,bg,hard,vers=3,proto=tcp,timeo=600,rsize=65536,wsize=65536' --group oracle -
在 oracle DB 中创建 PCS 监控用户 ID。
[root@ip-172-30-15-111 ec2-user]# su - oracle
Last login: Fri Sep 13 18:12:24 UTC 2024 on pts/0
[oracle@ip-172-30-15-111 ~]$ sqlplus / as sysdba

SQL*Plus: Release 19.0.0.0.0 - Production on Fri Sep 13 19:08:41 2024
Version 19.18.0.0.0

Copyright (c) 1982, 2022, Oracle.  All rights reserved.


Connected to:
Oracle Database 19c Enterprise Edition Release 19.0.0.0.0 - Production
Version 19.18.0.0.0

SQL> CREATE USER c##ocfmon IDENTIFIED BY "XXXXXXXX";

User created.

SQL> grant connect to c##ocfmon;

Grant succeeded.

SQL> exit
Disconnected from Oracle Database 19c Enterprise Edition Release 19.0.0.0.0 - Production
Version 19.18.0.0.0
-
将数据库添加到 oracle 资源组。
pcs resource create ntap ocf:heartbeat:oracle sid='NTAP' home='/u01/app/oracle/product/19.0.0/NTAP' user='oracle' monuser='C##OCFMON' monpassword='XXXXXXXX' monprofile='DEFAULT' --group oracle -
将数据库监听器添加到oracle资源组。
pcs resource create listener ocf:heartbeat:oralsnr sid='NTAP' listener='listener.ntap' --group=oracle -
将 oracle 资源组中的所有资源位置约束更新为主节点作为首选节点。
pcs constraint location privip prefers ip-172-30-15-111.ec2.internal
pcs constraint location vip prefers ip-172-30-15-111.ec2.internal
pcs constraint location u01 prefers ip-172-30-15-111.ec2.internal
pcs constraint location u02 prefers ip-172-30-15-111.ec2.internal
pcs constraint location u03 prefers ip-172-30-15-111.ec2.internal
pcs constraint location ntap prefers ip-172-30-15-111.ec2.internal
pcs constraint location listener prefers ip-172-30-15-111.ec2.internal
[root@ip-172-30-15-111 ec2-user]# pcs constraint config Location Constraints: Resource: listener Enabled on: Node: ip-172-30-15-111.ec2.internal (score:INFINITY) Resource: ntap Enabled on: Node: ip-172-30-15-111.ec2.internal (score:INFINITY) Resource: privip Enabled on: Node: ip-172-30-15-111.ec2.internal (score:INFINITY) Resource: u01 Enabled on: Node: ip-172-30-15-111.ec2.internal (score:INFINITY) Resource: u02 Enabled on: Node: ip-172-30-15-111.ec2.internal (score:INFINITY) Resource: u03 Enabled on: Node: ip-172-30-15-111.ec2.internal (score:INFINITY) Resource: vip Enabled on: Node: ip-172-30-15-111.ec2.internal (score:INFINITY) Ordering Constraints: Colocation Constraints: Ticket Constraints: -
验证 Oracle 资源配置。
pcs status[root@ip-172-30-15-111 ec2-user]# pcs status Cluster name: ora_ec2nfsx Cluster Summary: * Stack: corosync (Pacemaker is running) * Current DC: ip-172-30-15-111.ec2.internal (version 2.1.7-5.1.el8_10-0f7f88312) - partition with quorum * Last updated: Fri Sep 13 19:25:32 2024 on ip-172-30-15-111.ec2.internal * Last change: Fri Sep 13 19:23:40 2024 by root via root on ip-172-30-15-111.ec2.internal * 2 nodes configured * 8 resource instances configured Node List: * Online: [ ip-172-30-15-5.ec2.internal ip-172-30-15-111.ec2.internal ] Full List of Resources: * clusterfence (stonith:fence_aws): Started ip-172-30-15-111.ec2.internal * Resource Group: oracle: * privip (ocf::heartbeat:awsvip): Started ip-172-30-15-111.ec2.internal * vip (ocf::heartbeat:IPaddr2): Started ip-172-30-15-111.ec2.internal * u01 (ocf::heartbeat:Filesystem): Started ip-172-30-15-111.ec2.internal * u02 (ocf::heartbeat:Filesystem): Started ip-172-30-15-111.ec2.internal * u03 (ocf::heartbeat:Filesystem): Started ip-172-30-15-111.ec2.internal * ntap (ocf::heartbeat:oracle): Started ip-172-30-15-111.ec2.internal * listener (ocf::heartbeat:oralsnr): Started ip-172-30-15-111.ec2.internal Daemon Status: corosync: active/enabled pacemaker: active/enabled pcsd: active/enabled
部署后 HA 验证
Details
部署后,必须运行一些测试和验证以确保 PCS Oracle 数据库故障转移群集配置正确并按预期运行。测试验证包括管理故障转移和模拟意外资源故障以及通过集群保护机制进行恢复。
-
通过手动触发备用节点的防护来验证节点防护,并观察备用节点是否在超时后脱机并重新启动。
pcs stonith fence <standbynodename>[root@ip-172-30-15-111 ec2-user]# pcs stonith fence ip-172-30-15-5.ec2.internal Node: ip-172-30-15-5.ec2.internal fenced [root@ip-172-30-15-111 ec2-user]# pcs status Cluster name: ora_ec2nfsx Cluster Summary: * Stack: corosync (Pacemaker is running) * Current DC: ip-172-30-15-111.ec2.internal (version 2.1.7-5.1.el8_10-0f7f88312) - partition with quorum * Last updated: Fri Sep 13 21:58:45 2024 on ip-172-30-15-111.ec2.internal * Last change: Fri Sep 13 21:55:12 2024 by root via root on ip-172-30-15-111.ec2.internal * 2 nodes configured * 8 resource instances configured Node List: * Online: [ ip-172-30-15-111.ec2.internal ] * OFFLINE: [ ip-172-30-15-5.ec2.internal ] Full List of Resources: * clusterfence (stonith:fence_aws): Started ip-172-30-15-111.ec2.internal * Resource Group: oracle: * privip (ocf::heartbeat:awsvip): Started ip-172-30-15-111.ec2.internal * vip (ocf::heartbeat:IPaddr2): Started ip-172-30-15-111.ec2.internal * u01 (ocf::heartbeat:Filesystem): Started ip-172-30-15-111.ec2.internal * u02 (ocf::heartbeat:Filesystem): Started ip-172-30-15-111.ec2.internal * u03 (ocf::heartbeat:Filesystem): Started ip-172-30-15-111.ec2.internal * ntap (ocf::heartbeat:oracle): Started ip-172-30-15-111.ec2.internal * listener (ocf::heartbeat:oralsnr): Started ip-172-30-15-111.ec2.internal Daemon Status: corosync: active/enabled pacemaker: active/enabled pcsd: active/enabled -
通过终止监听器进程来模拟数据库监听器故障,并观察 PCS 监视监听器故障并在几秒钟内重新启动它。
[root@ip-172-30-15-111 ec2-user]# ps -ef | grep lsnr
oracle    154895       1  0 18:15 ?        00:00:00 /u01/app/oracle/product/19.0.0/NTAP/bin/tnslsnr listener.ntap -inherit
root      217779  120186  0 19:36 pts/0    00:00:00 grep --color=auto lsnr
[root@ip-172-30-15-111 ec2-user]# kill -9 154895

[root@ip-172-30-15-111 ec2-user]# su - oracle
Last login: Thu Sep 19 14:58:54 UTC 2024
[oracle@ip-172-30-15-111 ~]$ lsnrctl status listener.ntap

LSNRCTL for Linux: Version 19.0.0.0.0 - Production on 13-SEP-2024 19:36:51

Copyright (c) 1991, 2022, Oracle.  All rights reserved.

Connecting to (DESCRIPTION=(ADDRESS=(PROTOCOL=TCP)(HOST=172.30.15.33)(PORT=1521)))
TNS-12541: TNS:no listener
 TNS-12560: TNS:protocol adapter error
  TNS-00511: No listener
   Linux Error: 111: Connection refused
Connecting to (DESCRIPTION=(ADDRESS=(PROTOCOL=IPC)(KEY=EXTPROC1521)))
TNS-12541: TNS:no listener
 TNS-12560: TNS:protocol adapter error
  TNS-00511: No listener
   Linux Error: 111: Connection refused

[oracle@ip-172-30-15-111 ~]$ lsnrctl status listener.ntap

LSNRCTL for Linux: Version 19.0.0.0.0 - Production on 19-SEP-2024 15:00:10

Copyright (c) 1991, 2022, Oracle.  All rights reserved.

Connecting to (DESCRIPTION=(ADDRESS=(PROTOCOL=TCP)(HOST=172.30.15.33)(PORT=1521)))
STATUS of the LISTENER
------------------------
Alias                     listener.ntap
Version                   TNSLSNR for Linux: Version 19.0.0.0.0 - Production
Start Date                16-SEP-2024 14:00:14
Uptime                    3 days 0 hr. 59 min. 56 sec
Trace Level               off
Security                  ON: Local OS Authentication
SNMP                      OFF
Listener Parameter File   /u01/app/oracle/product/19.0.0/NTAP/network/admin/listener.ora
Listener Log File         /u01/app/oracle/diag/tnslsnr/ip-172-30-15-111/listener.ntap/alert/log.xml
Listening Endpoints Summary...
  (DESCRIPTION=(ADDRESS=(PROTOCOL=tcp)(HOST=172.30.15.33)(PORT=1521)))
  (DESCRIPTION=(ADDRESS=(PROTOCOL=ipc)(KEY=EXTPROC1521)))
  (DESCRIPTION=(ADDRESS=(PROTOCOL=tcps)(HOST=ip-172-30-15-111.ec2.internal)(PORT=5500))(Security=(my_wallet_directory=/u01/app/oracle/product/19.0.0/NTAP/admin/NTAP/xdb_wallet))(Presentation=HTTP)(Session=RAW))
Services Summary...
Service "21f0b5cc1fa290e2e0636f0f1eacfd43.ec2.internal" has 1 instance(s).
  Instance "NTAP", status READY, has 1 handler(s) for this service...
Service "21f0b74445329119e0636f0f1eacec03.ec2.internal" has 1 instance(s).
  Instance "NTAP", status READY, has 1 handler(s) for this service...
Service "21f0b83929709164e0636f0f1eacacc3.ec2.internal" has 1 instance(s).
  Instance "NTAP", status READY, has 1 handler(s) for this service...
Service "NTAP.ec2.internal" has 1 instance(s).
  Instance "NTAP", status READY, has 1 handler(s) for this service...
Service "NTAPXDB.ec2.internal" has 1 instance(s).
  Instance "NTAP", status READY, has 1 handler(s) for this service...
Service "ntap_pdb1.ec2.internal" has 1 instance(s).
  Instance "NTAP", status READY, has 1 handler(s) for this service...
Service "ntap_pdb2.ec2.internal" has 1 instance(s).
  Instance "NTAP", status READY, has 1 handler(s) for this service...
Service "ntap_pdb3.ec2.internal" has 1 instance(s).
  Instance "NTAP", status READY, has 1 handler(s) for this service...
The command completed successfully
-
通过终止 pmon 进程来模拟数据库故障,并观察 PCS 监视数据库故障并在几秒钟内重新启动它。
**Make a remote connection to ntap database**

[oracle@ora_01 ~]$ sqlplus system@//172.30.15.33:1521/NTAP.ec2.internal

SQL*Plus: Release 19.0.0.0.0 - Production on Fri Sep 13 15:42:42 2024
Version 19.18.0.0.0

Copyright (c) 1982, 2022, Oracle.  All rights reserved.

Enter password:
Last Successful login time: Thu Sep 12 2024 13:37:28 -04:00

Connected to:
Oracle Database 19c Enterprise Edition Release 19.0.0.0.0 - Production
Version 19.18.0.0.0

SQL> select instance_name, host_name from v$instance;

INSTANCE_NAME
----------------
HOST_NAME
----------------------------------------------------------------
NTAP
ip-172-30-15-111.ec2.internal


SQL>

**Kill ntap pmon process to simulate a failure**

[root@ip-172-30-15-111 ec2-user]# ps -ef | grep pmon
oracle    159247       1  0 18:27 ?        00:00:00 ora_pmon_NTAP
root      230595  120186  0 19:44 pts/0    00:00:00 grep --color=auto pmon
[root@ip-172-30-15-111 ec2-user]# kill -9 159247

**Observe the DB failure**

SQL> /
select instance_name, host_name from v$instance
*
ERROR at line 1:
ORA-03113: end-of-file on communication channel
Process ID: 227424
Session ID: 396 Serial number: 4913


SQL> exit
Disconnected from Oracle Database 19c Enterprise Edition Release 19.0.0.0.0 - Production
Version 19.18.0.0.0

**Reconnect to DB after reboot**

[oracle@ora_01 ~]$ sqlplus system@//172.30.15.33:1521/NTAP.ec2.internal

SQL*Plus: Release 19.0.0.0.0 - Production on Fri Sep 13 15:47:24 2024
Version 19.18.0.0.0

Copyright (c) 1982, 2022, Oracle.  All rights reserved.

Enter password:
Last Successful login time: Fri Sep 13 2024 15:42:47 -04:00

Connected to:
Oracle Database 19c Enterprise Edition Release 19.0.0.0.0 - Production
Version 19.18.0.0.0

SQL> select instance_name, host_name from v$instance;

INSTANCE_NAME
----------------
HOST_NAME
----------------------------------------------------------------
NTAP
ip-172-30-15-111.ec2.internal


SQL>
-
通过将主节点置于待机模式以将 Oracle 资源故障转移到备用节点,验证从主节点到备用节点的托管数据库故障转移。
pcs node standby <nodename>**Stopping Oracle resources on primary node in reverse order** [root@ip-172-30-15-111 ec2-user]# pcs node standby ip-172-30-15-111.ec2.internal [root@ip-172-30-15-111 ec2-user]# pcs status Cluster name: ora_ec2nfsx Cluster Summary: * Stack: corosync (Pacemaker is running) * Current DC: ip-172-30-15-111.ec2.internal (version 2.1.7-5.1.el8_10-0f7f88312) - partition with quorum * Last updated: Fri Sep 13 20:01:16 2024 on ip-172-30-15-111.ec2.internal * Last change: Fri Sep 13 20:01:08 2024 by root via root on ip-172-30-15-111.ec2.internal * 2 nodes configured * 8 resource instances configured Node List: * Node ip-172-30-15-111.ec2.internal: standby (with active resources) * Online: [ ip-172-30-15-5.ec2.internal ] Full List of Resources: * clusterfence (stonith:fence_aws): Started ip-172-30-15-5.ec2.internal * Resource Group: oracle: * privip (ocf::heartbeat:awsvip): Started ip-172-30-15-111.ec2.internal * vip (ocf::heartbeat:IPaddr2): Started ip-172-30-15-111.ec2.internal * u01 (ocf::heartbeat:Filesystem): Stopping ip-172-30-15-111.ec2.internal * u02 (ocf::heartbeat:Filesystem): Stopped * u03 (ocf::heartbeat:Filesystem): Stopped * ntap (ocf::heartbeat:oracle): Stopped * listener (ocf::heartbeat:oralsnr): Stopped Daemon Status: corosync: active/enabled pacemaker: active/enabled pcsd: active/enabled **Starting Oracle resources on standby node in sequencial order** [root@ip-172-30-15-111 ec2-user]# pcs status Cluster name: ora_ec2nfsx Cluster Summary: * Stack: corosync (Pacemaker is running) * Current DC: ip-172-30-15-111.ec2.internal (version 2.1.7-5.1.el8_10-0f7f88312) - partition with quorum * Last updated: Fri Sep 13 20:01:34 2024 on ip-172-30-15-111.ec2.internal * Last change: Fri Sep 13 20:01:08 2024 by root via root on ip-172-30-15-111.ec2.internal * 2 nodes configured * 8 resource instances configured Node List: * Node ip-172-30-15-111.ec2.internal: standby * Online: [ ip-172-30-15-5.ec2.internal ] Full List of Resources: * clusterfence (stonith:fence_aws): Started ip-172-30-15-5.ec2.internal * Resource Group: oracle: * privip (ocf::heartbeat:awsvip): Started ip-172-30-15-5.ec2.internal * vip (ocf::heartbeat:IPaddr2): Started ip-172-30-15-5.ec2.internal * u01 (ocf::heartbeat:Filesystem): Started ip-172-30-15-5.ec2.internal * u02 (ocf::heartbeat:Filesystem): Started ip-172-30-15-5.ec2.internal * u03 (ocf::heartbeat:Filesystem): Started ip-172-30-15-5.ec2.internal * ntap (ocf::heartbeat:oracle): Starting ip-172-30-15-5.ec2.internal * listener (ocf::heartbeat:oralsnr): Stopped Daemon Status: corosync: active/enabled pacemaker: active/enabled pcsd: active/enabled **NFS mount points mounted on standby node** [root@ip-172-30-15-5 ec2-user]# df -h Filesystem Size Used Avail Use% Mounted on devtmpfs 7.7G 0 7.7G 0% /dev tmpfs 7.7G 33M 7.7G 1% /dev/shm tmpfs 7.7G 17M 7.7G 1% /run tmpfs 7.7G 0 7.7G 0% /sys/fs/cgroup /dev/xvda2 50G 21G 30G 41% / tmpfs 1.6G 0 1.6G 0% /run/user/1000 172.30.15.95:/orapm01_u01 48T 47T 840G 99% /u01 172.30.15.95:/orapm01_u02 285T 285T 840G 100% /u02 172.30.15.95:/orapm01_u03 190T 190T 840G 100% /u03 tmpfs 1.6G 0 1.6G 0% /run/user/54321 **Database opened on standby node** [oracle@ora_01 ~]$ sqlplus system@//172.30.15.33:1521/NTAP.ec2.internal SQL*Plus: Release 19.0.0.0.0 - Production on Fri Sep 13 16:34:08 2024 Version 19.18.0.0.0 Copyright (c) 1982, 2022, Oracle. All rights reserved. Enter password: Last Successful login time: Fri Sep 13 2024 15:47:28 -04:00 Connected to: Oracle Database 19c Enterprise Edition Release 19.0.0.0.0 - Production Version 19.18.0.0.0 SQL> select name, open_mode from v$database; NAME OPEN_MODE --------- -------------------- NTAP READ WRITE SQL> select instance_name, host_name from v$instance; INSTANCE_NAME ---------------- HOST_NAME ---------------------------------------------------------------- NTAP ip-172-30-15-5.ec2.internal SQL> -
通过非备用主节点验证托管数据库从备用故障恢复到主节点,并观察 Oracle 资源是否由于首选节点设置而自动故障恢复。
pcs node unstandby <nodename>**Stopping Oracle resources on standby node for failback to primary** [root@ip-172-30-15-111 ec2-user]# pcs node unstandby ip-172-30-15-111.ec2.internal [root@ip-172-30-15-111 ec2-user]# pcs status Cluster name: ora_ec2nfsx Cluster Summary: * Stack: corosync (Pacemaker is running) * Current DC: ip-172-30-15-111.ec2.internal (version 2.1.7-5.1.el8_10-0f7f88312) - partition with quorum * Last updated: Fri Sep 13 20:41:30 2024 on ip-172-30-15-111.ec2.internal * Last change: Fri Sep 13 20:41:18 2024 by root via root on ip-172-30-15-111.ec2.internal * 2 nodes configured * 8 resource instances configured Node List: * Online: [ ip-172-30-15-5.ec2.internal ip-172-30-15-111.ec2.internal ] Full List of Resources: * clusterfence (stonith:fence_aws): Started ip-172-30-15-5.ec2.internal * Resource Group: oracle: * privip (ocf::heartbeat:awsvip): Stopping ip-172-30-15-5.ec2.internal * vip (ocf::heartbeat:IPaddr2): Stopped * u01 (ocf::heartbeat:Filesystem): Stopped * u02 (ocf::heartbeat:Filesystem): Stopped * u03 (ocf::heartbeat:Filesystem): Stopped * ntap (ocf::heartbeat:oracle): Stopped * listener (ocf::heartbeat:oralsnr): Stopped Daemon Status: corosync: active/enabled pacemaker: active/enabled pcsd: active/enabled **Starting Oracle resources on primary node for failback** [root@ip-172-30-15-111 ec2-user]# pcs status Cluster name: ora_ec2nfsx Cluster Summary: * Stack: corosync (Pacemaker is running) * Current DC: ip-172-30-15-111.ec2.internal (version 2.1.7-5.1.el8_10-0f7f88312) - partition with quorum * Last updated: Fri Sep 13 20:41:45 2024 on ip-172-30-15-111.ec2.internal * Last change: Fri Sep 13 20:41:18 2024 by root via root on ip-172-30-15-111.ec2.internal * 2 nodes configured * 8 resource instances configured Node List: * Online: [ ip-172-30-15-5.ec2.internal ip-172-30-15-111.ec2.internal ] Full List of Resources: * clusterfence (stonith:fence_aws): Started ip-172-30-15-5.ec2.internal * Resource Group: oracle: * privip (ocf::heartbeat:awsvip): Started ip-172-30-15-111.ec2.internal * vip (ocf::heartbeat:IPaddr2): Started ip-172-30-15-111.ec2.internal * u01 (ocf::heartbeat:Filesystem): Started ip-172-30-15-111.ec2.internal * u02 (ocf::heartbeat:Filesystem): Started ip-172-30-15-111.ec2.internal * u03 (ocf::heartbeat:Filesystem): Started ip-172-30-15-111.ec2.internal * ntap (ocf::heartbeat:oracle): Starting ip-172-30-15-111.ec2.internal * listener (ocf::heartbeat:oralsnr): Stopped Daemon Status: corosync: active/enabled pacemaker: active/enabled pcsd: active/enabled **Database now accepts connection on primary node** [oracle@ora_01 ~]$ sqlplus system@//172.30.15.33:1521/NTAP.ec2.internal SQL*Plus: Release 19.0.0.0.0 - Production on Fri Sep 13 16:46:07 2024 Version 19.18.0.0.0 Copyright (c) 1982, 2022, Oracle. All rights reserved. Enter password: Last Successful login time: Fri Sep 13 2024 16:34:12 -04:00 Connected to: Oracle Database 19c Enterprise Edition Release 19.0.0.0.0 - Production Version 19.18.0.0.0 SQL> select instance_name, host_name from v$instance; INSTANCE_NAME ---------------- HOST_NAME ---------------------------------------------------------------- NTAP ip-172-30-15-111.ec2.internal SQL>
这完成了在 AWS EC2 中使用 Pacemaker 集群和Amazon FSx ONTAP作为数据库存储后端的 Oracle HA 验证和解决方案演示。
使用SnapCenter进行 Oracle 备份、恢复和克隆
Details
NetApp建议使用SnapCenter UI 工具来管理部署在 AWS EC2 和Amazon FSx ONTAP中的 Oracle 数据库。参考 TR-4979"VMware Cloud on AWS 中简化的自主管理 Oracle,带有客户机安装的 FSx ONTAP"部分 `Oracle backup, restore, and clone with SnapCenter`有关设置SnapCenter和执行数据库备份、恢复和克隆工作流的详细信息。
在哪里可以找到更多信息
要了解有关本文档中描述的信息的更多信息,请查看以下文档和/或网站: