

在 SUSE KVM 上为 SAP HANA 配置 SR-IOV 网络接口
 建议更改
建议更改
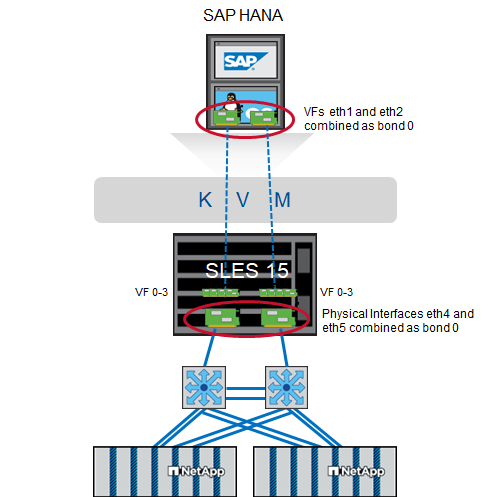
在 SAP HANA 的 SUSE KVM 上配置 SR-IOV 网络接口。设置虚拟功能 (VF),将其分配给虚拟机,并配置冗余网络连接,以实现最佳性能和存储访问。此外,也支持桥接网络。
步骤 1:设置 SR-IOV
在适配器固件中启用和配置 SR-IOV 功能,以允许创建虚拟功能。
该程序基于 "NVIDIA企业支持门户 | 如何为 ConnectX-4/ConnectX-5/ConnectX-6 配置 SR-IOV(以太网)"。SUSE SAP HANA KVM 指南以英特尔网卡为例对此进行了描述。
建议使用冗余以太网连接,将两个物理端口组合成 trunk/bond。分配给虚拟机的虚拟端口(VF)也需要在虚拟机内部进行中继配置。
请确保满足以下先决条件:
-
KVM 已安装
-
服务器BIOS中已启用SR-IOV。
-
通过在引导加载程序中添加“intel_iommu=on”和“iommu=pt”选项来启用PCI直通。
-
KVM 主机和虚拟机上均已安装最新的 MLNX_OFED 驱动程序。

|
分配给虚拟机的每个虚拟功能至少需要 10 Gbit/s 带宽。对于 25GbE 物理端口,不要创建和分配超过两个 VF。 |
-
运行 MFT(Mellanox 固件工具):
# mst start
Starting MST (Mellanox Software Tools) driver set
Loading MST PCI module – Success
Loading MST PCI configuration module – Success
Create devices
Unloading MST PCI module (unused) – Success
-
找到设备:
# mst status
MST modules:
------------
MST PCI module is not loaded
MST PCI configuration module loaded

MST devices:

------------

/dev/mst/mt4125_pciconf0 - PCI configuration cycles access.
domain:bus:dev.fn=0000:ab:00.0 addr.reg=88 data.reg=92 cr_bar.gw_offset=-1

Chip revision is: 00
-
检查设备状态:
mlxconfig -d /dev/mst/mt4125_pciconf0 q |grep -e SRIOV_EN -e NUM_OF_VFS
NUM_OF_VFS 8
SRIOV_EN True(1)_
-
如有必要,启用 SR-IOV:
mlxconfig -d /dev/mst/mt4125_pciconf0 set SRIOV_EN=1
-
设置 VF 的最大数量:
mlxconfig -d /dev/mst/mt4125_pciconf0 set NUM_OF_VFS=4
-
如果需要启用该功能或更改最大 VF 数量,请重启服务器。
步骤 2:创建虚拟接口
在物理网络端口上创建虚拟功能(VF),以启用 SR-IOV 功能。在此步骤中,每个物理端口创建四个虚拟功能 (VF)。
-
找到设备:
# ibstat

CA 'mlx5_0'
CA type: MT4125
Number of ports: 1
Firmware version: 22.36.1010
Hardware version: 0
Node GUID: 0xa088c20300a6f6fc
System image GUID: 0xa088c20300a6f6fc
Port 1:
State: Active
Physical state: LinkUp
Rate: 100
Base lid: 0
LMC: 0
SM lid: 0
Capability mask: 0x00010000
Port GUID: 0xa288c2fffea6f6fd
Link layer: Ethernet
CA 'mlx5_1'
CA type: MT4125
Number of ports: 1
Firmware version: 22.36.1010
Hardware version: 0
Node GUID: 0xa088c20300a6f6fd
System image GUID: 0xa088c20300a6f6fc
Port 1:
State: Active
Physical state: LinkUp
Rate: 100
Base lid: 0
LMC: 0
SM lid: 0
Capability mask: 0x00010000
Port GUID: 0xa288c2fffea6f6fd
Link layer: Ethernet
如果债券已创建,则输出结果如下所示:
# ibstat
CA 'mlx5_bond_0'
CA type: MT4125
Number of ports: 1
Firmware version: 22.36.1010
Hardware version: 0
Node GUID: 0xa088c20300a6f6fc
System image GUID: 0xa088c20300a6f6fc
Port 1:
State: Active
Physical state: LinkUp
Rate: 100
Base lid: 0
LMC: 0
SM lid: 0
Capability mask: 0x00010000
Port GUID: 0xa288c2fffea6f6fc
Link layer: Ethernet
#:/etc/sysconfig/network # cat /sys/class/infiniband/mlx5_bond_0/device/
aerdevcorrectable iommugroup/ resetmethod
aerdevfatal irq resource
aerdevnonfatal link/ resource0
arienabled localcpulist resource0wc
brokenparitystatus localcpus revision
class maxlinkspeed rom
config maxlinkwidth sriovdriversautoprobe
consistentdmamaskbits mlx5_core.eth.0/ sriovnumvfs
urrentlinkspeed mlx5_core.rdma.0/ sriovoffset
currentlinkwidth modalias sriovstride
d3coldallowed msibus sriovtotalvfs
device msiirqs/ sriovvfdevice
dmamaskbits net/ sriovvftotalmsix
driver/ numanode subsystem/
driveroverride pools subsystemdevice
enable power/ subsystemvendor
firmwarenode/ powerstate uevent
infiniband/ ptp/ vendor
infinibandmad/ remove vpd
infinibandverbs/ rescan
iommu/ reset
# ibdev2netdev
mlx5_0 port 1 ==> eth4 (Up)
mlx5_1 port 1 ==> eth5 (Up)
-
获取固件中允许和配置的 VF 总数:
# cat /sys/class/net/eth4/device/sriov_totalvfs
4
# cat /sys/class/net/eth5/device/sriov_totalvfs
4
-
获取此设备上当前的 VF 数量:
# cat /sys/class/infiniband/mlx5_0/device/sriov_numvfs
0
# cat /sys/class/infiniband/mlx5_1/device/sriov_numvfs
0
-
设置所需的 VF 数量:
# echo 4 > /sys/class/infiniband/mlx5_0/device/sriov_numvfs
# echo 4 > /sys/class/infiniband/mlx5_1/device/sriov_numvfs
如果您已经使用这两个端口配置了绑定,则需要针对该绑定执行第一条命令:
# echo 4 > /sys/class/infiniband/mlx5_bond_0/device/sriov_numvfs
-
检查PCI总线:
# lspci -D | grep Mellanox

0000:ab:00.0 Ethernet controller: Mellanox Technologies MT2892 Family [ConnectX-6 Dx]
0000:ab:00.1 Ethernet controller: Mellanox Technologies MT2892 Family [ConnectX-6 Dx]
0000:ab:00.2 Ethernet controller: Mellanox Technologies ConnectX Family mlx5Gen Virtual Function
0000:ab:00.3 Ethernet controller: Mellanox Technologies ConnectX Family mlx5Gen Virtual Function
0000:ab:00.4 Ethernet controller: Mellanox Technologies ConnectX Family mlx5Gen Virtual Function
0000:ab:00.5 Ethernet controller: Mellanox Technologies ConnectX Family mlx5Gen Virtual Function
0000:ab:01.2 Ethernet controller: Mellanox Technologies ConnectX Family mlx5Gen Virtual Function
0000:ab:01.3 Ethernet controller: Mellanox Technologies ConnectX Family mlx5Gen Virtual Function
0000:ab:01.4 Ethernet controller: Mellanox Technologies ConnectX Family mlx5Gen Virtual Function
0000:ab:01.5 Ethernet controller: Mellanox Technologies ConnectX Family mlx5Gen Virtual Function
# ibdev2netdev -v

0000:ab:00.0 mlx5_0 (MT4125 - 51TF3A5000XV3) Mellanox ConnectX-6 Dx 100GbE QSFP56 2-port PCIe 4 Ethernet Adapter fw 22.36.1010 port 1 (ACTIVE) ==> eth4 (Up)
0000:ab:00.1 mlx5_1 (MT4125 - 51TF3A5000XV3) Mellanox ConnectX-6 Dx 100GbE QSFP56 2-port PCIe 4 Ethernet Adapter fw 22.36.1010 port 1 (ACTIVE) ==> eth6 (Up)
0000:ab:00.2 mlx523 (MT4126 - NA) fw 22.36.1010 port 1 (DOWN ) ==> eth6 (Down)
0000:ab:00.3 mlx5_3 (MT4126 - NA) fw 22.36.1010 port 1 (DOWN ) ==> eth7 (Down)
0000:ab:00.4 mlx5_4 (MT4126 - NA) fw 22.36.1010 port 1 (DOWN ) ==> eth8 (Down)
0000:ab:00.5 mlx5_5 (MT4126 - NA) fw 22.36.1010 port 1 (DOWN ) ==> eth9 (Down)
0000:ab:01.2 mlx5_6 (MT4126 - NA) fw 22.36.1010 port 1 (DOWN ) ==> eth10 (Down)
0000:ab:01.3 mlx5_7 (MT4126 - NA) fw 22.36.1010 port 1 (DOWN ) ==> eth11 (Down)
0000:ab:01.4 mlx5_8 (MT4126 - NA) fw 22.36.1010 port 1 (DOWN ) ==> eth12 (Down)
0000:ab:01.5 mlx5_9 (MT4126 - NA) fw 22.36.1010 port 1 (DOWN ) ==> eth13 (Down)
-
通过 IP 工具检查 VF 配置:
# ip link show
…
6: eth4: <BROADCAST,MULTICAST,SLAVE,UP,LOWER_UP> mtu 9000 qdisc mq master bond0 state UP mode DEFAULT group default qlen 1000

link/ether a0:88:c2:a6:f6:fd brd ff:ff:ff:ff:ff:ff permaddr a0:88:c2:a6:f6:fc
vf 0 link/ether 00:00:00:00:00:00 brd ff:ff:ff:ff:ff:ff, spoof checking off, link-state auto, trust off, query_rss off
vf 1 link/ether 00:00:00:00:00:00 brd ff:ff:ff:ff:ff:ff, spoof checking off, link-state auto, trust off, query_rss off
vf 2 link/ether 00:00:00:00:00:00 brd ff:ff:ff:ff:ff:ff, spoof checking off, link-state auto, trust off, query_rss off
vf 3 link/ether 00:00:00:00:00:00 brd ff:ff:ff:ff:ff:ff, spoof checking off, link-state auto, trust off, query_rss off

altname enp171s0f0np0
altname ens3f0np0

7: eth5: <BROADCAST,MULTICAST,SLAVE,UP,LOWER_UP> mtu 9000 qdisc mq master bond0 state UP mode DEFAULT group default qlen 1000

link/ether a0:88:c2:a6:f6:fd brd ff:ff:ff:ff:ff:ff
vf 0 link/ether 00:00:00:00:00:00 brd ff:ff:ff:ff:ff:ff, spoof checking off, link-state auto, trust off, query_rss off
vf 1 link/ether 00:00:00:00:00:00 brd ff:ff:ff:ff:ff:ff, spoof checking off, link-state auto, trust off, query_rss off
vf 2 link/ether 00:00:00:00:00:00 brd ff:ff:ff:ff:ff:ff, spoof checking off, link-state auto, trust off, query_rss off
vf 3 link/ether 00:00:00:00:00:00 brd ff:ff:ff:ff:ff:ff, spoof checking off, link-state auto, trust off, query_rss off

altname enp171s0f1np1
altname ens3f1np1
…
步骤 3:启动时启用虚拟功能
通过创建 systemd 服务和启动脚本,配置 VF 设置以使其在系统重启后仍然有效。
-
创建一个 systemd 单元文件 `/etc/systemd/system/after.local`内容如下:
[Unit]
Description=/etc/init.d/after.local Compatibility
After=libvirtd.service Requires=libvirtd.service

[Service]
Type=oneshot
ExecStart=/etc/init.d/after.local
RemainAfterExit=true

[Install]
WantedBy=multi-user.target
-
创建脚本 /etc/init.d/after.local:
#! /bin/sh
#
#
# ...
echo 4 > /sys/class/infiniband/mlx5_bond_0/device/sriov_numvfs
echo 4 > /sys/class/infiniband/mlx5_1/device/sriov_numvfs
-
确保文件可以执行:
# cd /etc/init.d/
# chmod 750 after.local
步骤 4:将虚拟接口分配给虚拟机
使用 virt-manager 将创建的虚拟功能作为 PCI 主机设备分配给 SAP HANA VM。
-
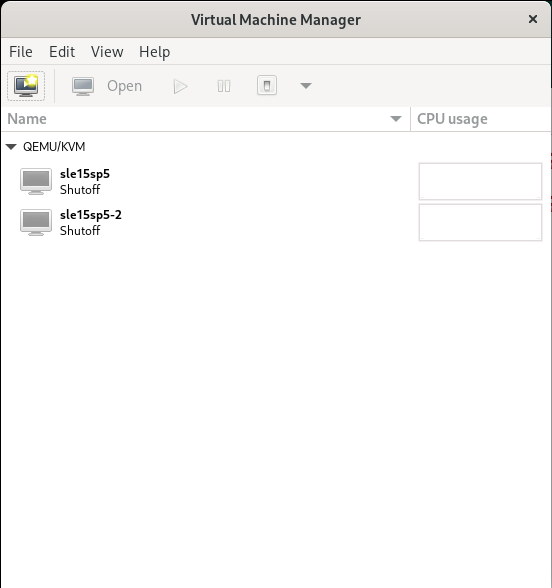
启动 virt-manager。
-
打开所需的虚拟机。
-
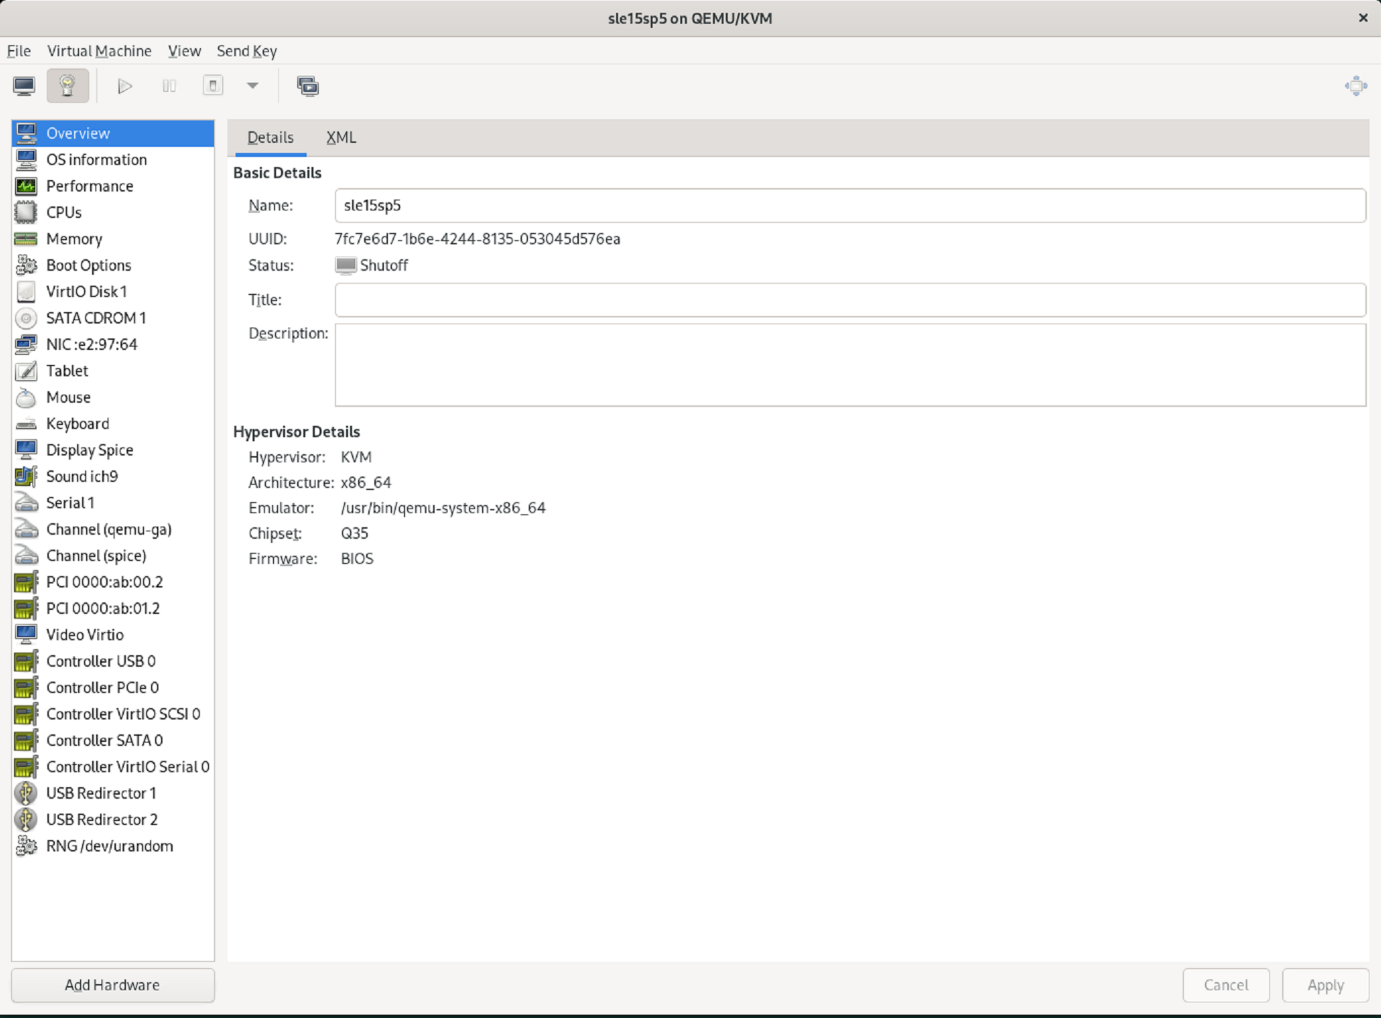
选择“添加硬件”。+
-
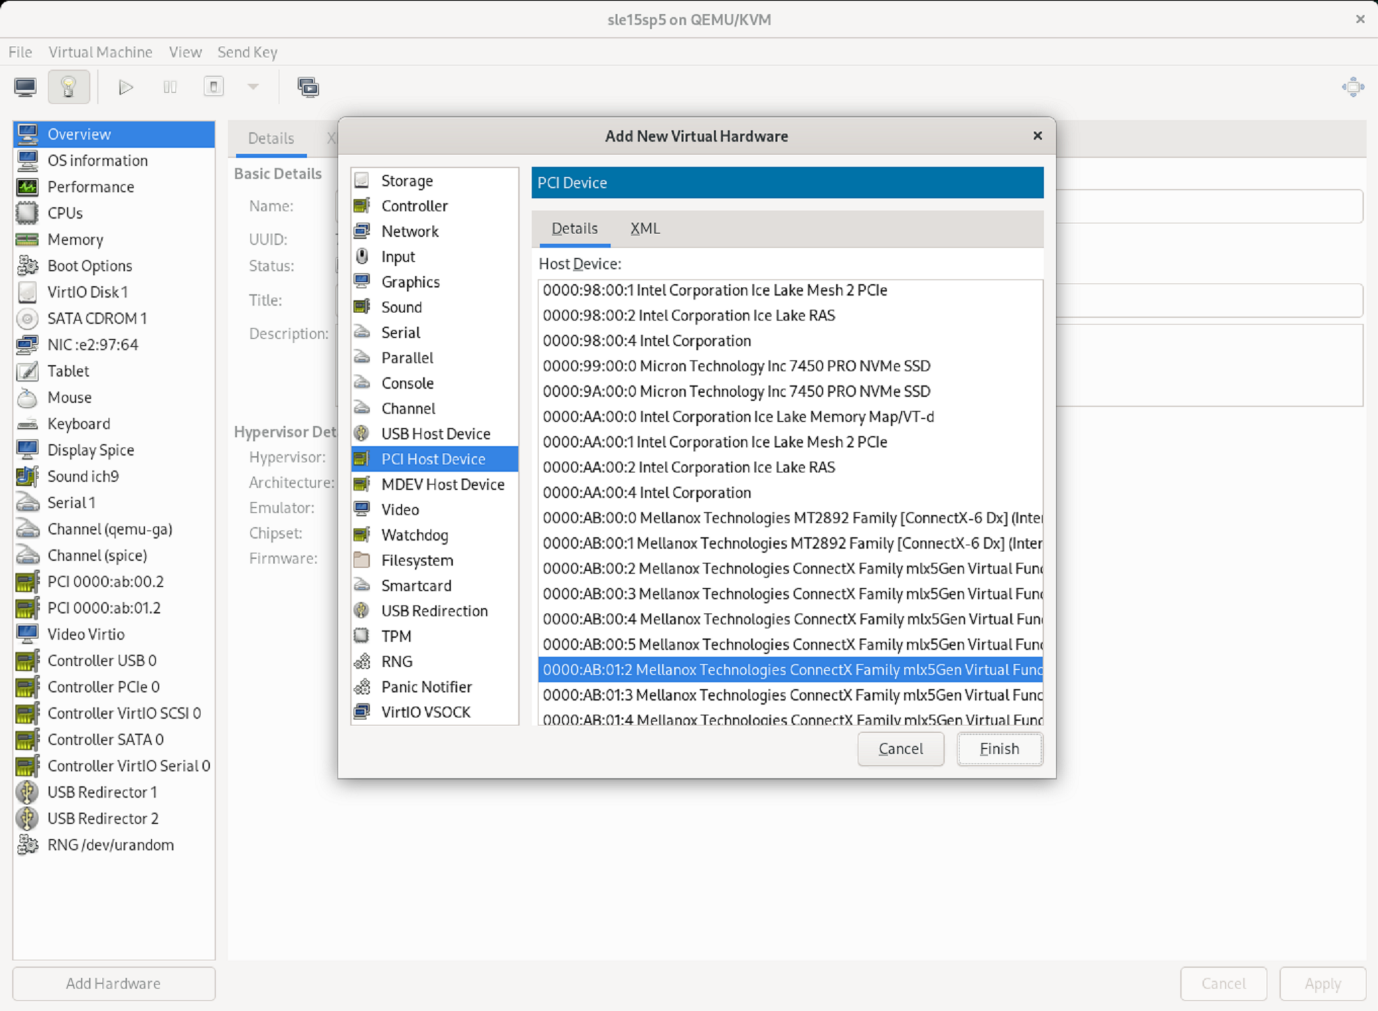
从 PCI 主机设备列表中选择第一个物理端口对应的虚拟网卡,然后按完成键。
在这个例子中,0000.AB:00:2 - 0000.AB:00:4 属于第一个物理端口,而 0000.AB:01:2 - 0000.AB:01:4 属于第二个物理端口。

-
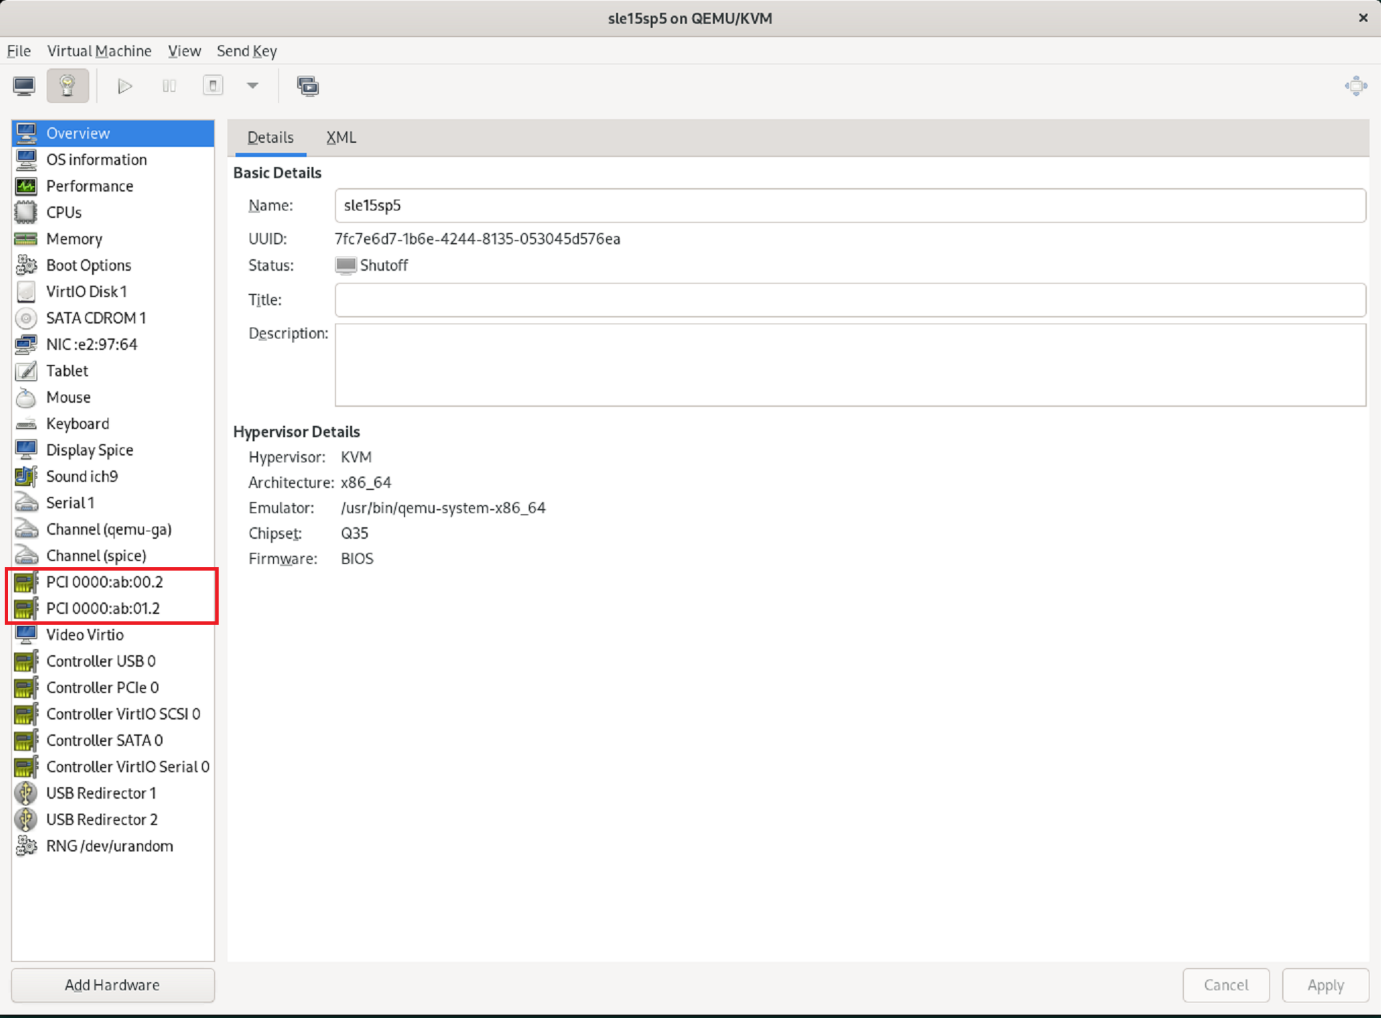
从 PCI 主机设备列表中选择下一个虚拟网卡端口,使用第二个物理端口的虚拟端口,然后选择“完成”。
-
之后,将虚拟接口分配给虚拟机,即可启动虚拟机。+
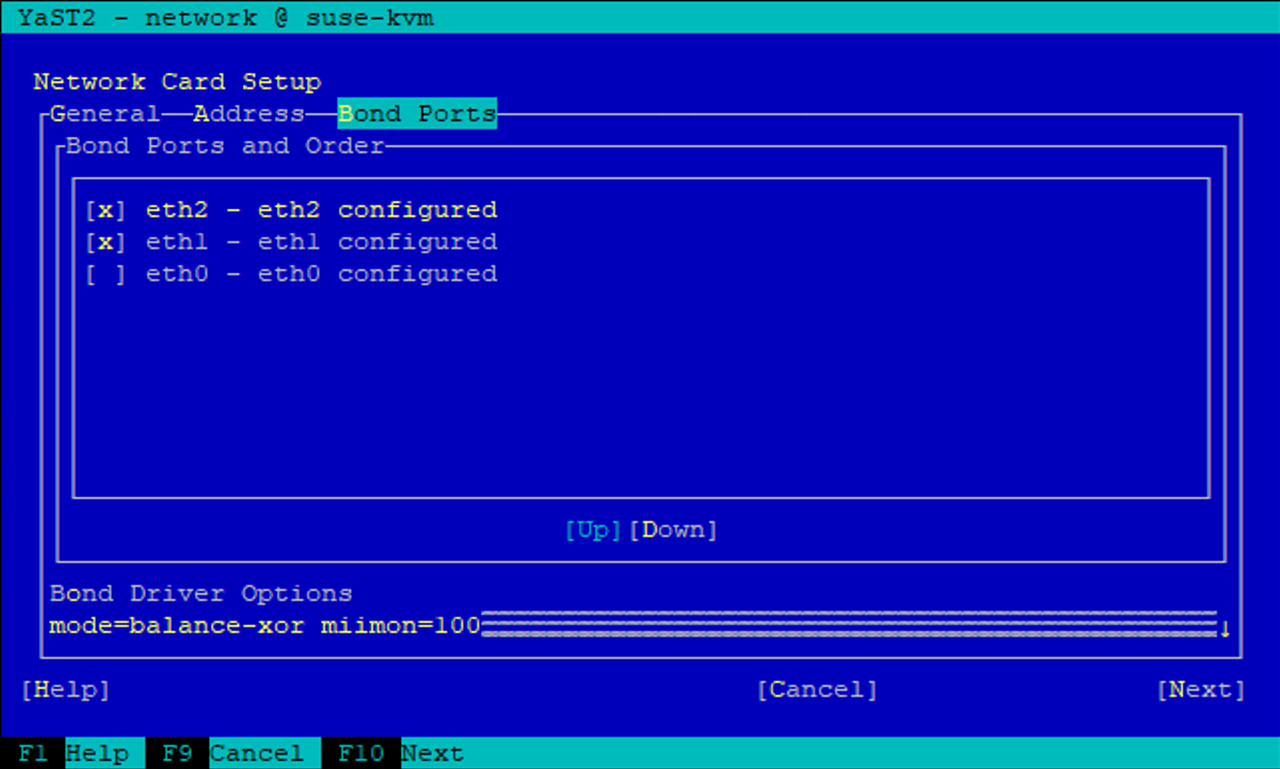
步骤 5:配置虚拟机内的网络接口
登录到虚拟机并将两个虚拟功能配置为绑定。选择模式 0 或模式 2。请勿使用 LACP,因为 LACP 只能用于物理端口。下图显示了使用 YAST 的模式 2 配置。
下一步是什么?
配置完SR-IOV网络接口后,"配置光纤通道网络"如果使用FCP作为存储协议。