使用NetApp和MLflow实现数据集到模型的可跟踪性
 建议更改
建议更改


https://github.com/NetApp/netapp-dataops-toolkit/tree/main/netapp_dataops_k8s["适用于Kubernetes的NetApp DataOps工具包"^]可与MLflow的实验跟踪功能结合使用、以实现代码到数据集、数据集到模型或工作空间到模型的可追溯性。
示例笔记本中使用了以下库:
前提条件
要实现代码数据集模型或工作空间到模型的可追溯性、只需在训练过程中使用DataOps工具包创建数据集或工作空间卷的快照、如以下示例代码片段所示。此代码会将数据卷名称和快照名称保存为与您要记录到MLflow实验跟踪服务器的特定训练运行关联的标记。
...
from netapp_dataops.k8s import cloneJupyterLab, createJupyterLab, deleteJupyterLab, \
listJupyterLabs, createJupyterLabSnapshot, listJupyterLabSnapshots, restoreJupyterLabSnapshot, \
cloneVolume, createVolume, deleteVolume, listVolumes, createVolumeSnapshot, \
deleteVolumeSnapshot, listVolumeSnapshots, restoreVolumeSnapshot


mlflow.set_tracking_uri("<your_tracking_server_uri>>:<port>>")
    os.environ['MLFLOW_HTTP_REQUEST_TIMEOUT'] = '500'  # Increase to 500 seconds
    mlflow.set_experiment(experiment_id)
    with mlflow.start_run() as run:
        latest_run_id = run.info.run_id
        start_time = datetime.now()

        # Preprocess the data
        preprocess(input_pdf_file_path, to_be_cleaned_input_file_path)

        # Print out sensitive data (passwords, SECRET_TOKEN, API_KEY found)
        check_pretrain(to_be_cleaned_input_file_path)

        # Tokenize the input file
        pretrain_tokenization(to_be_cleaned_input_file_path, model_name, tokenized_output_file_path)

        # Load the tokenizer and model
        tokenizer = GPT2Tokenizer.from_pretrained(model_name)
        model = GPT2LMHeadModel.from_pretrained(model_name)

        # Set the pad token
        tokenizer.pad_token = tokenizer.eos_token
        tokenizer.add_special_tokens({'pad_token': '[PAD]'})

        # Encode, generate, and decode the text
        with open(tokenized_output_file_path, 'r', encoding='utf-8') as file:
            content = file.read()
        encode_generate_decode(content, decoded_output_file_path, tokenizer=tokenizer, model=model)

        # Save the model
        model.save_pretrained(model_save_path)
        tokenizer.save_pretrained(model_save_path)

        # Finetuning here
        with open(decoded_output_file_path, 'r', encoding='utf-8') as file:
            content = file.read()
        model.finetune(content, tokenizer=tokenizer, model=model)

        # Evaluate the model using NLTK
        output_set = Dataset.from_dict({"text": [content]})
        test_set = Dataset.from_dict({"text": [content]})
        scores = nltk_evaluation_gpt(output_set, test_set, model=model, tokenizer=tokenizer)
        print(f"Scores: {scores}")

        # End time and elapsed time
        end_time = datetime.now()
        elapsed_time = end_time - start_time
        elapsed_minutes = elapsed_time.total_seconds() // 60
        elapsed_seconds = elapsed_time.total_seconds() % 60

        # Create DOTK snapshots for code, dataset, and model
        snapshot = createVolumeSnapshot(pvcName="model-pvc", namespace="default", printOutput=True)

        #Log snapshot IDs to MLflow
        mlflow.log_param("code_snapshot_id", snapshot)
        mlflow.log_param("dataset_snapshot_id", snapshot)
        mlflow.log_param("model_snapshot_id", snapshot)

        # Log parameters and metrics to MLflow
        mlflow.log_param("wf_start_time", start_time)
        mlflow.log_param("wf_end_time", end_time)
        mlflow.log_param("wf_elapsed_time_minutes", elapsed_minutes)
        mlflow.log_param("wf_elapsed_time_seconds", elapsed_seconds)

        mlflow.log_artifact(decoded_output_file_path.rsplit('/', 1)[0])  # Remove the filename to log the directory
        mlflow.log_artifact(model_save_path) # log the model save path

        print(f"Experiment ID: {experiment_id}")
        print(f"Run ID: {latest_run_id}")
print(f"Elapsed time: {elapsed_minutes} minutes and {elapsed_seconds} seconds")上述代码片段将快照ID记录到MLflow实验跟踪服务器、该服务器可用于追溯到训练模型所使用的特定数据集和模型。这样、您就可以追溯到训练模型所使用的特定数据集和模型、以及用于预处理数据、标记输入文件、加载标记器和模型、编码、生成和解码文本、保存模型、微调模型、使用"NWTK"Perplexity分数评估模型以及将超参数和指标记录到MLflow中的特定代码。例如、下图显示了不同实验运行的一个seckit学习模型的平均平方误差(MSE):

数据分析、业务部门负责人和高管可以直接了解和推定哪个模型在您的特定限制、设置、时间段和其他情况下表现最佳。有关如何预处理、标记、加载、编码、生成、解码、保存、微调和评估模型的更多详细信息、请参见 dotk-mlflow `netapp_dataops.k8s`存储库中打包的Python示例。
有关如何为数据集或JupyterLab工作空间创建快照的详细信息,请参阅"NetApp数据操作工具包页面"。
对于经过训练的模型、在DOK-超 流笔记本中使用了以下模型:
型号
-
"GPT2LMHeadModel":GPT2模型转换器,顶部有一个语言建模头(线性层,权重与输入内插线相连)。它是一个转换器模型、已针对大量文本数据进行了预先训练、并针对特定数据集进行了微调。我们使用默认的GPT2模型"注意掩码"为您选择的型号批处理输入序列以及相应的标记器。
-
"PHI-2":PHI-2是一个具有27亿个参数的"一个"的"一个"。它使用与PHI-1.5相同的数据源进行了培训、并增加了一个新的数据源、该数据源包含各种NPP合成文本和经过筛选的网站(出于安全和教育价值考虑)。
-
"XLNet (基于规模的模型)":XLNet模型经过英语预培训。它是"XLNet:用于语言理解的广义自动注册预培训"杨等人在论文中介绍的,并在本文中首次发布"存储库"。
生成的结果"MLflow中的模型注册表"将包含以下随机林模型、版本和标记:
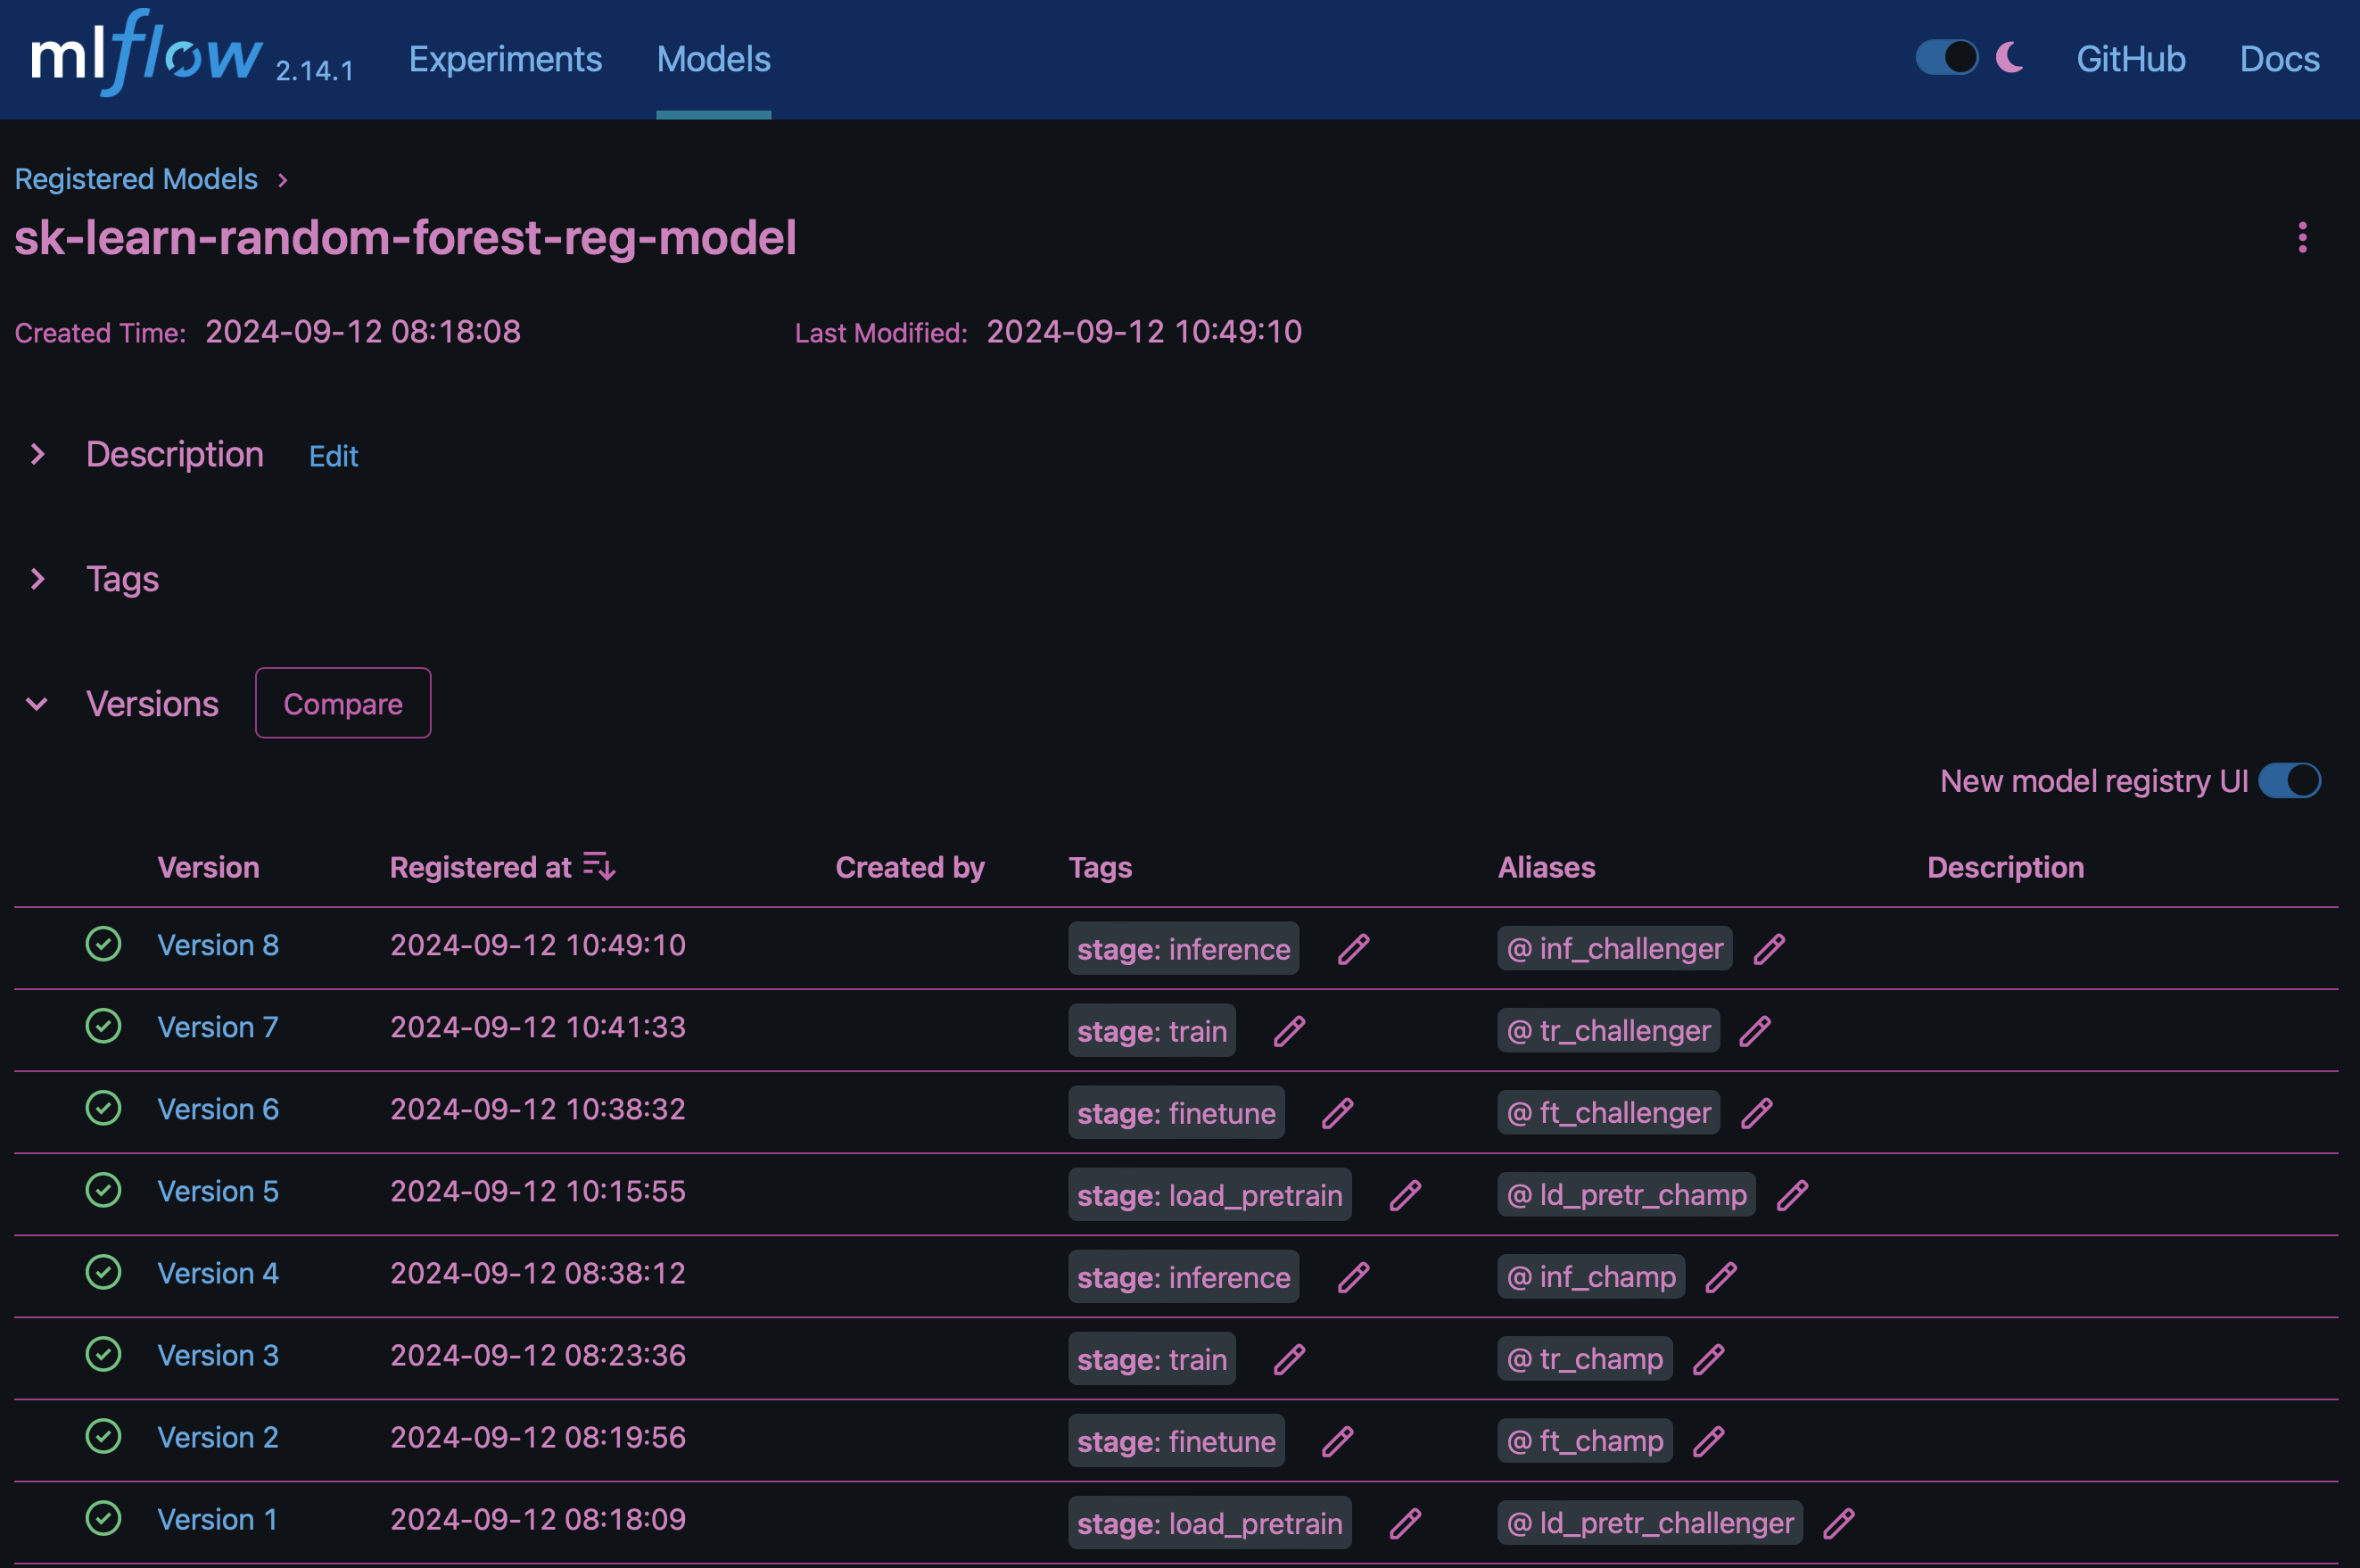
要通过Kubelnetes将模型部署到参考服务器、只需运行以下Jupyter笔记本即可。请注意、在本示例中 dotk-mlflow、我们不使用软件包、而是修改随机林回归模型架构、以最大限度地减少初始模型中的平均平方错误(MSE)、从而在模型注册表中创建此类模型的多个版本。
from mlflow.models import Model
mlflow.set_tracking_uri("http://<tracking_server_URI_with_port>")
experiment_id='<your_specified_exp_id>'

# Alternatively, you can load the Model object from a local MLmodel file
# model1 = Model.load("~/path/to/my/MLmodel")

from sklearn.datasets import make_regression
from sklearn.ensemble import RandomForestRegressor
from sklearn.metrics import mean_squared_error
from sklearn.model_selection import train_test_split

import mlflow
import mlflow.sklearn
from mlflow.models import infer_signature

# Create a new experiment and get its ID
experiment_id = mlflow.create_experiment(experiment_id)

# Or fetch the ID of the existing experiment
# experiment_id = mlflow.get_experiment_by_name("<your_specified_exp_id>").experiment_id

with mlflow.start_run(experiment_id=experiment_id) as run:
    X, y = make_regression(n_features=4, n_informative=2, random_state=0, shuffle=False)
    X_train, X_test, y_train, y_test = train_test_split(
        X, y, test_size=0.2, random_state=42
    )
    params = {"max_depth": 2, "random_state": 42}
    model = RandomForestRegressor(**params)
    model.fit(X_train, y_train)

    # Infer the model signature
    y_pred = model.predict(X_test)
    signature = infer_signature(X_test, y_pred)

    # Log parameters and metrics using the MLflow APIs
    mlflow.log_params(params)
    mlflow.log_metrics({"mse": mean_squared_error(y_test, y_pred)})

    # Log the sklearn model and register as version 1
    mlflow.sklearn.log_model(
        sk_model=model,
        artifact_path="sklearn-model",
        signature=signature,
        registered_model_name="sk-learn-random-forest-reg-model",
    )
Jupyter笔记本单元格的执行结果应类似于以下内容、模型 `3`在模型注册表中注册为版本:
Registered model 'sk-learn-random-forest-reg-model' already exists. Creating a new version of this model...
2024/09/12 15:23:36 INFO mlflow.store.model_registry.abstract_store: Waiting up to 300 seconds for model version to finish creation. Model name: sk-learn-random-forest-reg-model, version 3
Created version '3' of model 'sk-learn-random-forest-reg-model'.
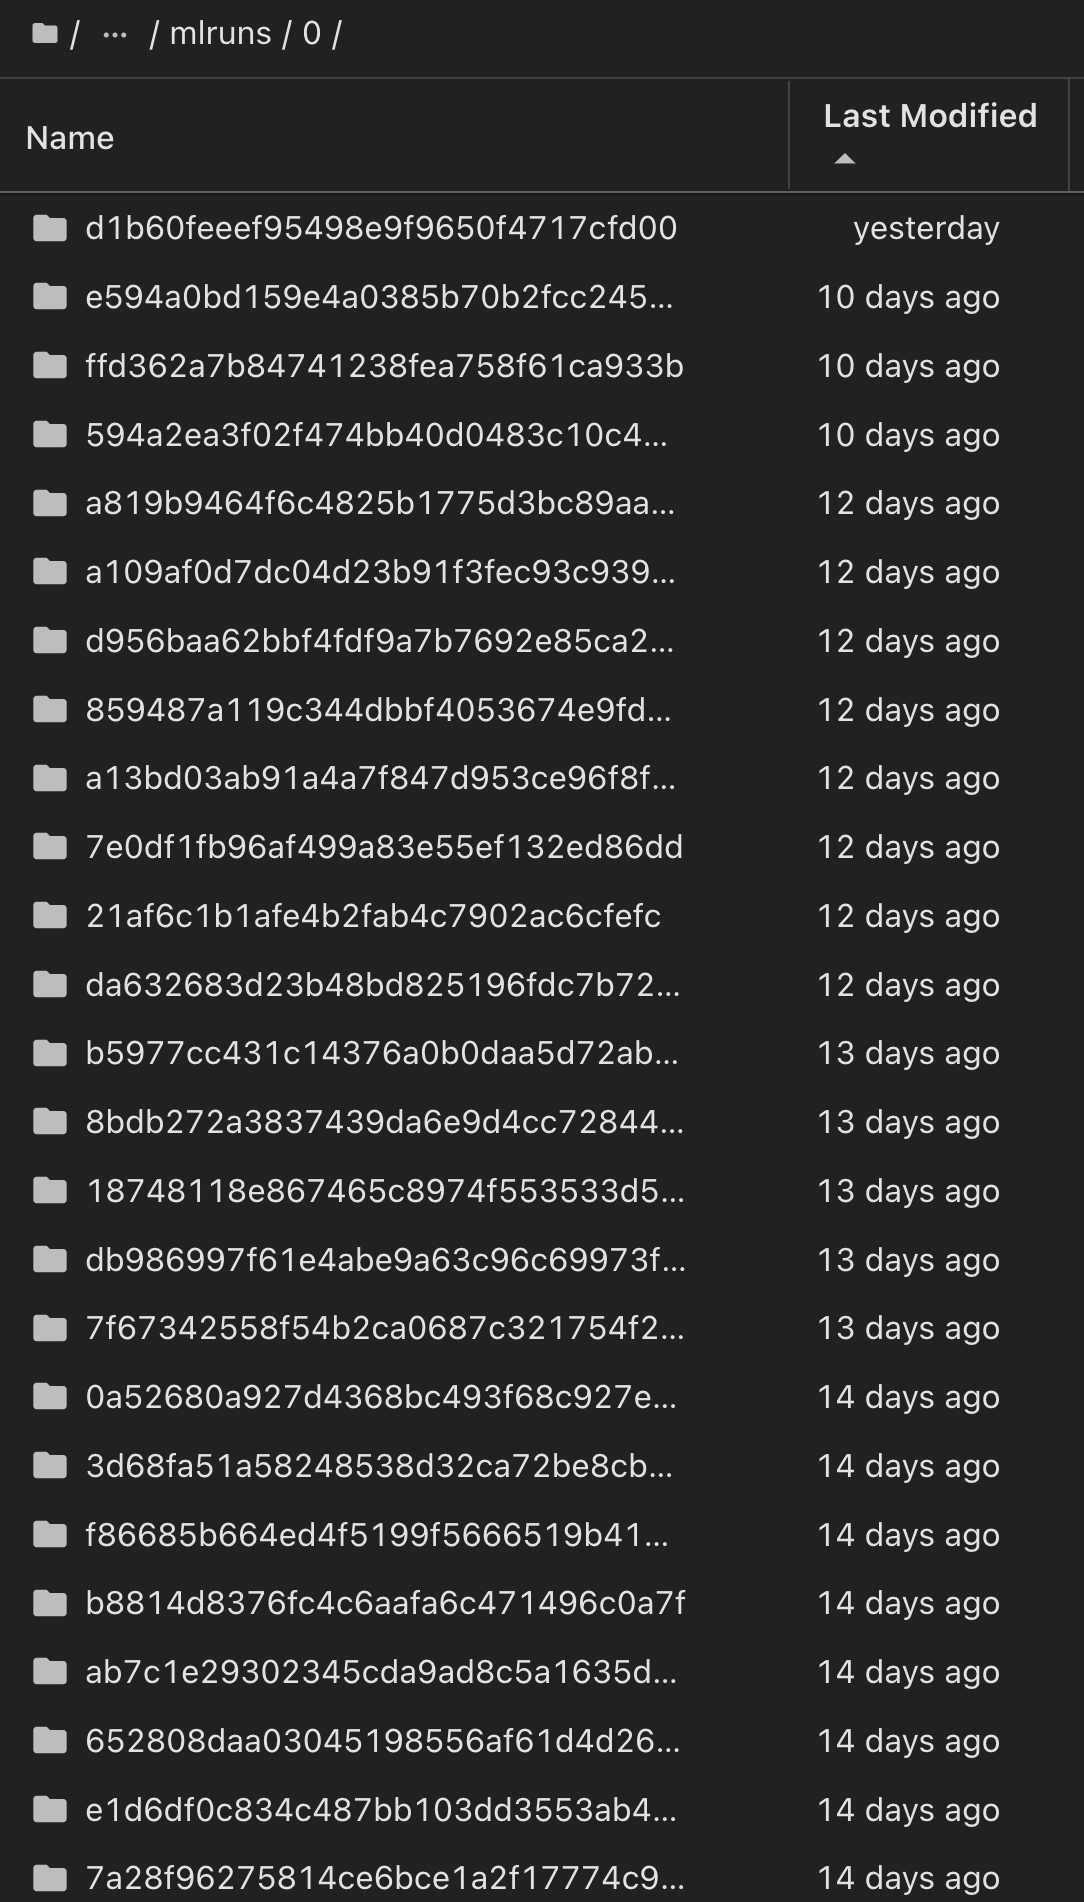
在模型注册表中、保存所需的模型、版本和标记后、可以追溯到训练模型所使用的特定数据集、模型和代码、以及用于处理数据的特定代码、加载 `snapshot_id's and your chosen metrics to MLflow by choosing the corerct experiment under `mlrun`JupterHub和模型、编码、生成和解码文本、保存模型、微调模型、使用NLDK persperity评分或当前文件夹下拉菜单中的其他超标记评估模型:
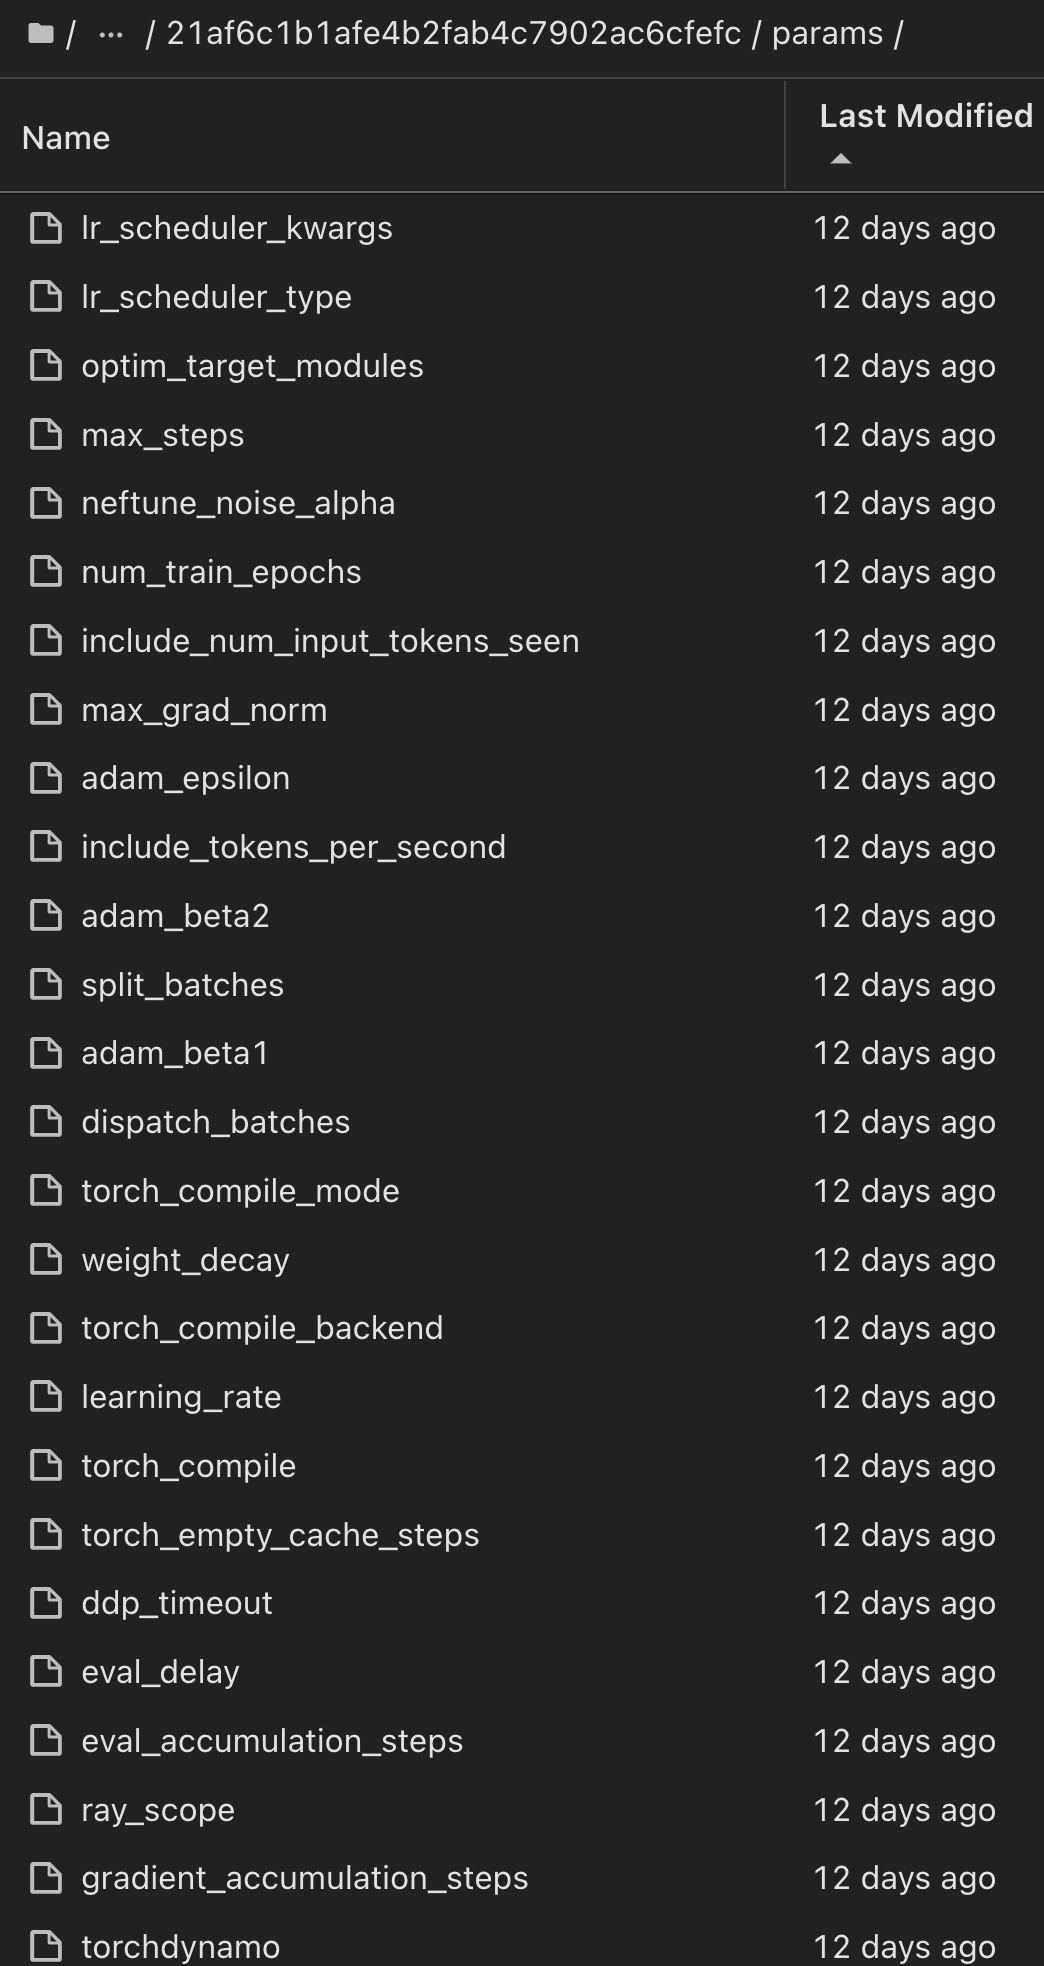
同样、对于 `phi-2_finetuned_model`使用 `torch`库通过GPU或vGPU计算其量化权重的、我们可以检查以下中间项目、这些项目可以优化整个工作流的性能、提高可扩展性(吞吐量/SLA优势)并降低成本:
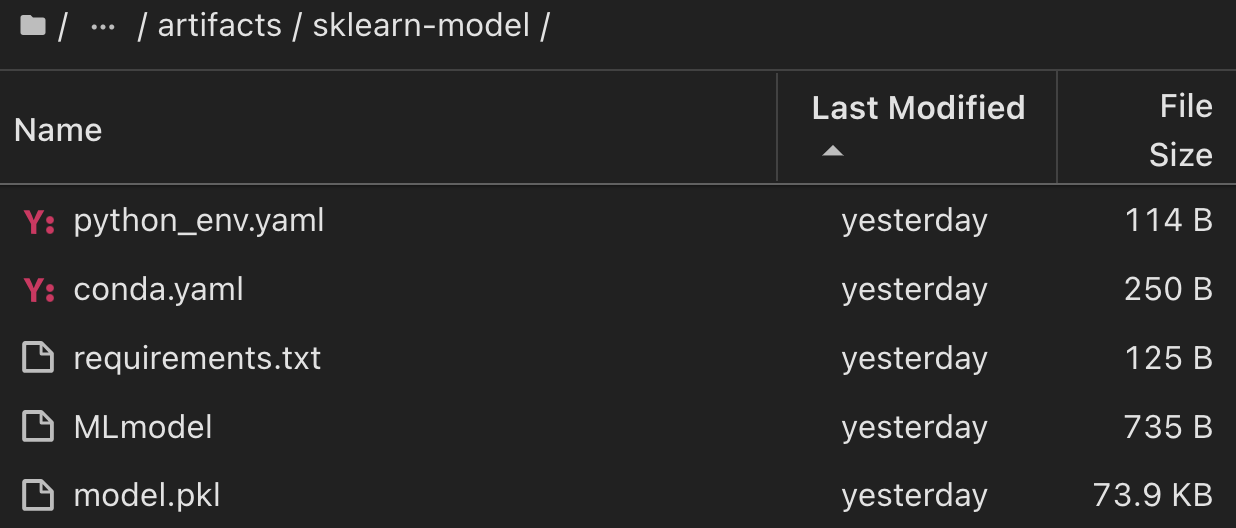
对于使用ShiKIT学习和MLflow运行的单个实验、下图显示了生成的项目、 `conda`环境、 `MLmodel`文件和 `MLmodel`目录:
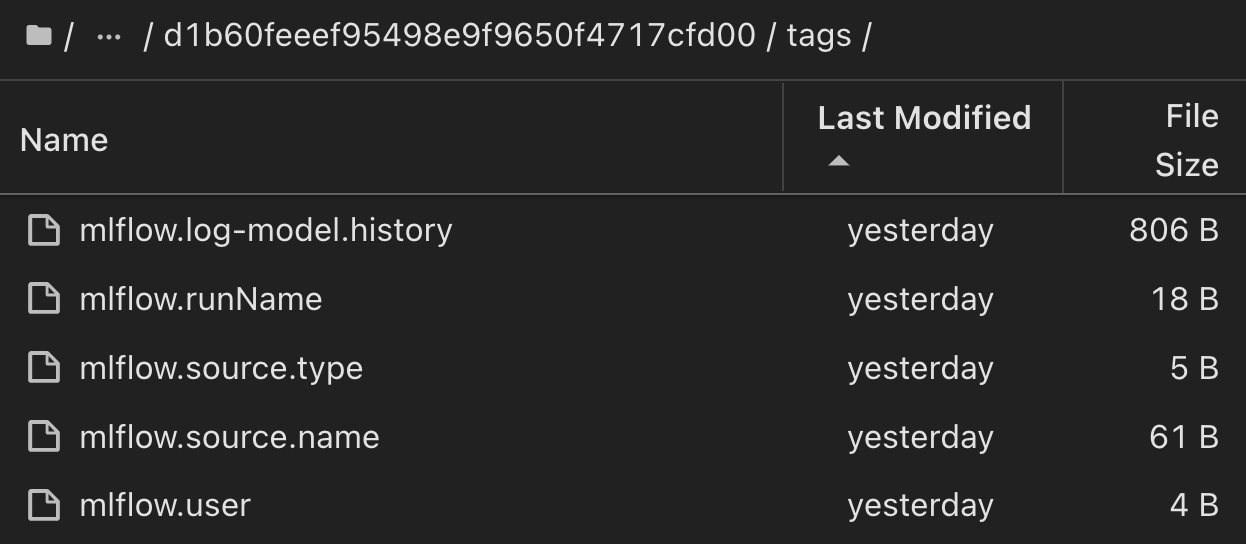
客户可以指定"默认"、"阶段"、"流程"、"瓶颈"等标记来组织其AI工作流运行的不同特征、记录其最新结果或设置 contributors`为跟踪数据科学团队开发人员进度。如果对于默认标记“”,则在 `mlflow.log-model.history mlflow.runName mlflow.source.type mlflow.source.name `mlflow.user`JupyterHub下保存的、、、和当前活动的文件导航器选项卡:
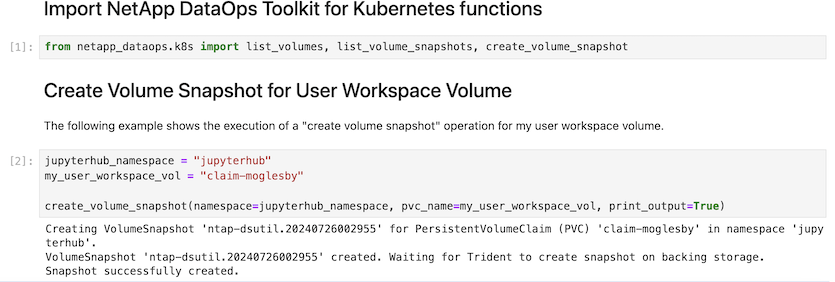
最后、用户拥有自己指定的Jupyter工作空间、该工作空间会进行版本管理并存储在Kubbernetes集群的永久性卷请求(PVC)中。下图显示了包含 netapp_dataops.k8s`Python软件包的Jupyter工作空间以及成功创建的结果 `VolumeSnapshot:
我们采用了经业内验证的Snapshot®和其他技术来确保企业级数据保护、移动和高效压缩。有关其他AI用例、请参见"NetApp AIPod"文档。

