Apache Airflow 部署
 建議變更
建議變更
本節介紹在 Kubernetes 叢集中部署 Airflow 必須完成的任務。

|
可以在 Kubernetes 以外的平台上部署 Airflow。在 Kubernetes 以外的平台上部署 Airflow 超出了本解決方案的範圍。 |
先決條件
在執行本節概述的部署練習之前,我們假設您已經執行了以下任務:
-
您已經有一個可以運行的 Kubernetes 叢集。
-
您已經在 Kubernetes 叢集中安裝並設定了NetApp Trident 。有關Trident的更多詳細信息,請參閱"Trident文檔"。
安裝 Helm
Airflow 使用 Helm(Kubernetes 的流行套件管理器)進行部署。在部署 Airflow 之前,必須在部署跳轉主機上安裝 Helm。若要在部署跳轉主機上安裝 Helm,請依照 "安裝說明"在 Helm 官方文件中。
設定預設 Kubernetes StorageClass
在部署 Airflow 之前,您必須在 Kubernetes 叢集中指定一個預設 StorageClass。 Airflow 部署程序嘗試使用預設 StorageClass 來設定新的持久性磁碟區。如果沒有指定 StorageClass 作為預設 StorageClass,則部署失敗。若要在叢集中指定預設 StorageClass,請依照"Kubeflow部署"部分。如果您已經在叢集中指定了預設 StorageClass,則可以跳過此步驟。
使用 Helm 部署 Airflow
若要使用 Helm 在 Kubernetes 叢集中部署 Airflow,請從部署跳轉主機執行下列任務:
-
按照以下說明使用 Helm 部署 Airflow "部署說明"查看 Artifact Hub 上的官方 Airflow 圖表。下面的範例指令展示了使用 Helm 部署 Airflow。修改、新增和/或刪除 `custom- values.yaml`根據您的環境和所需配置,根據需要建立文件。
$ cat << EOF > custom-values.yaml ################################### # Airflow - Common Configs ################################### airflow: ## the airflow executor type to use ## executor: "CeleryExecutor" ## environment variables for the web/scheduler/worker Pods (for airflow configs) ## # ################################### # Airflow - WebUI Configs ################################### web: ## configs for the Service of the web Pods ## service: type: NodePort ################################### # Airflow - Logs Configs ################################### logs: persistence: enabled: true ################################### # Airflow - DAGs Configs ################################### dags: ## configs for the DAG git repository & sync container ## gitSync: enabled: true ## url of the git repository ## repo: "git@github.com:mboglesby/airflow-dev.git" ## the branch/tag/sha1 which we clone ## branch: master revision: HEAD ## the name of a pre-created secret containing files for ~/.ssh/ ## ## NOTE: ## - this is ONLY RELEVANT for SSH git repos ## - the secret commonly includes files: id_rsa, id_rsa.pub, known_hosts ## - known_hosts is NOT NEEDED if `git.sshKeyscan` is true ## sshSecret: "airflow-ssh-git-secret" ## the name of the private key file in your `git.secret` ## ## NOTE: ## - this is ONLY RELEVANT for PRIVATE SSH git repos ## sshSecretKey: id_rsa ## the git sync interval in seconds ## syncWait: 60 EOF $ helm install airflow airflow-stable/airflow -n airflow --version 8.0.8 --values ./custom-values.yaml ... Congratulations. You have just deployed Apache Airflow! 1. Get the Airflow Service URL by running these commands: export NODE_PORT=$(kubectl get --namespace airflow -o jsonpath="{.spec.ports[0].nodePort}" services airflow-web) export NODE_IP=$(kubectl get nodes --namespace airflow -o jsonpath="{.items[0].status.addresses[0].address}") echo http://$NODE_IP:$NODE_PORT/ 2. Open Airflow in your web browser -
確認所有 Airflow pod 均已啟動並正在運作。所有 pod 啟動可能需要幾分鐘。
$ kubectl -n airflow get pod
NAME                                READY   STATUS    RESTARTS   AGE
airflow-flower-b5656d44f-h8qjk      1/1     Running   0          2h
airflow-postgresql-0                1/1     Running   0          2h
airflow-redis-master-0              1/1     Running   0          2h
airflow-scheduler-9d95fcdf9-clf4b   2/2     Running   2          2h
airflow-web-59c94db9c5-z7rg4        1/1     Running   0          2h
airflow-worker-0                    2/2     Running   2          2h
-
請依照步驟 1 中使用 Helm 部署 Airflow 時列印到控制台的說明取得 Airflow Web 服務 URL。
$ export NODE_PORT=$(kubectl get --namespace airflow -o jsonpath="{.spec.ports[0].nodePort}" services airflow-web) $ export NODE_IP=$(kubectl get nodes --namespace airflow -o jsonpath="{.items[0].status.addresses[0].address}") $ echo http://$NODE_IP:$NODE_PORT/ -
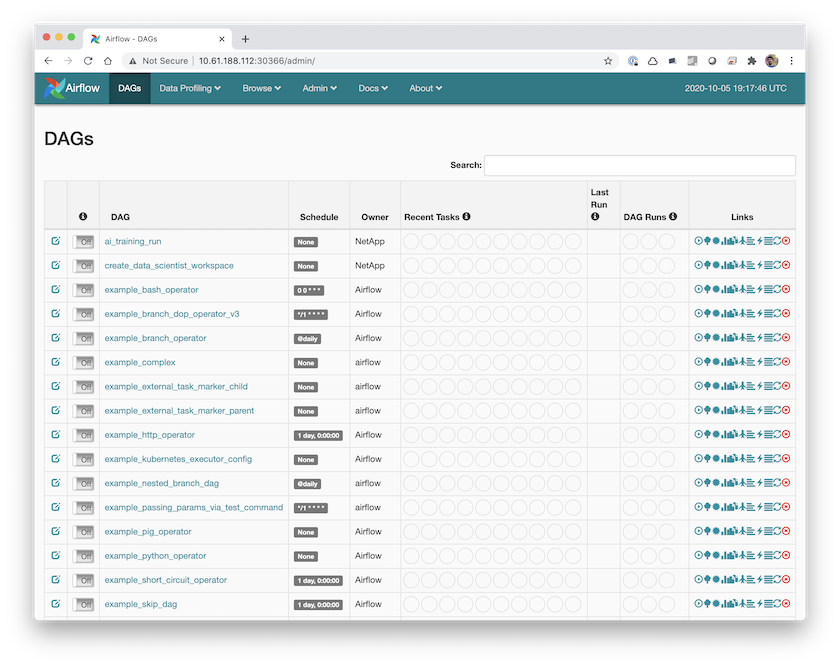
確認您可以存取 Airflow Web 服務。