使用 Trident Protect 為 OpenShift Container Platform 中的 Container Apps 提供資料保護
 建議變更
建議變更
本參考文件的這一部分詳細介紹如何使用 Trident Protect 建立 Container Apps 的快照和備份。NetApp Trident Protect 提供進階應用程式資料管理功能,可增強由 NetApp ONTAP 儲存系統和 NetApp Trident CSI 儲存設定器支援的有狀態 Kubernetes 應用程式的功能和可用性。Trident Protect 會建立應用程式快照和備份。這意味著,它不僅會為持久性磁碟區中的應用程式資料建立快照和備份,還會為應用程式元資料建立快照和備份。Trident Protect 建立的快照和備份可以儲存在以下任何物件儲存中,並可在以後從中還原。
-
AWS S3
-
Azure Blob 儲存
-
Google 雲端儲存
-
ONTAP S3
-
儲存網格
-
任何其他與 S3 相容的儲存設備
Trident Protect 使用 Kubernetes 的角色型存取控制(RBAC)模型。預設情況下,Trident Protect 提供一個名為 trident-protect 的系統命名空間及其關聯的預設服務帳戶。如果您的組織擁有眾多使用者或有特定的安全需求,則可以使用 Trident Protect 的 RBAC 功能來更精細地控制對資源和命名空間的存取。
有關 Trident Protect 中 RBAC 的其他資訊、請參閱"Trident Protect 說明文件"

|
叢集管理員可以存取預設的 trident-protect 命名空間中的資源,也可以存取所有其他命名空間中的資源。使用者無法在 trident-protect 命名空間中建立應用程式資料管理自訂資源 (CR),如快照和備份 CR。作為最佳實踐,使用者需要在應用程式命名空間中建立這些 CR。 |
Trident Protect 可使用文件中提供的說明安裝"這裡"。本節將介紹使用 Trident Protect 對容器應用程式進行資料保護和復原的工作流程。1.建立快照(按需或排程)2.從快照還原(還原到相同或不同的命名空間)3.建立備份 4.從備份還原
先決條件
在為應用程式建立快照和備份之前,必須在 Trident Protect 中配置物件儲存以儲存快照和備份。此配置透過儲存桶 CR 完成。只有管理員才能建立和配置儲存桶 CR。在 Trident Protect 中,儲存桶 CR 稱為 AppVault。AppVault 物件是儲存桶的聲明式 Kubernetes 工作流程表示。AppVault CR 包含儲存桶在保護作業(例如備份、快照、復原作業和 SnapMirror 複製)中所需的設定。
在本範例中,我們將展示如何使用 ONTAP S3 作為物件儲存。以下是為 ONTAP S3 建立 AppVault CR 的工作流程:1.在 ONTAP 叢集的 SVM 中建立 S3 物件儲存伺服器。2.在物件儲存伺服器中建立儲存桶。3.在 SVM 中建立 S3 使用者。將存取金鑰和私密金鑰保存在安全的位置。4.在 OpenShift 中,建立密鑰來儲存 ONTAP S3 憑證。5.為 ONTAP S3 建立 AppVault 物件
為 ONTAP S3 設定 Trident Protect AppVault
用於設定 Trident Protect 與 ONTAP S3 作為 AppVault 的範例 YAML 檔案
# alias tp='tridentctl-protect'

appvault-secret.yaml

apiVersion: v1
stringData:
  accessKeyID: "<access key id created for a user to access ONTAP S3 bucket>"
  secretAccessKey: "corresponding Secret Access Key"
#data:
# base 64 encoded values
#  accessKeyID: <base64 access key id created for a user to access ONTAP S3 bucket>
#  secretAccessKey: <base 64  Secret Access Key>
kind: Secret
metadata:
  name: appvault-secret
  namespace: trident-protect
type: Opaque

appvault.yaml

apiVersion: protect.trident.netapp.io/v1
kind: AppVault
metadata:
  name: ontap-s3-appvault
  namespace: trident-protect
spec:
  providerConfig:
    azure:
      accountName: ""
      bucketName: ""
      endpoint: ""
    gcp:
      bucketName: ""
      projectID: ""
    s3:
      bucketName: <bucket-name for storing the snapshots and backups>
      endpoint: <endpoint IP for S3>
      secure: "false"
      skipCertValidation: "true"
  providerCredentials:
    accessKeyID:
      valueFromSecret:
        key: accessKeyID
        name: appvault-secret
    secretAccessKey:
      valueFromSecret:
        key: secretAccessKey
        name: appvault-secret
  providerType: OntapS3

# oc create -f appvault-secret.yaml -n trident-protect
# oc create -f appvault.yaml -n trident-protect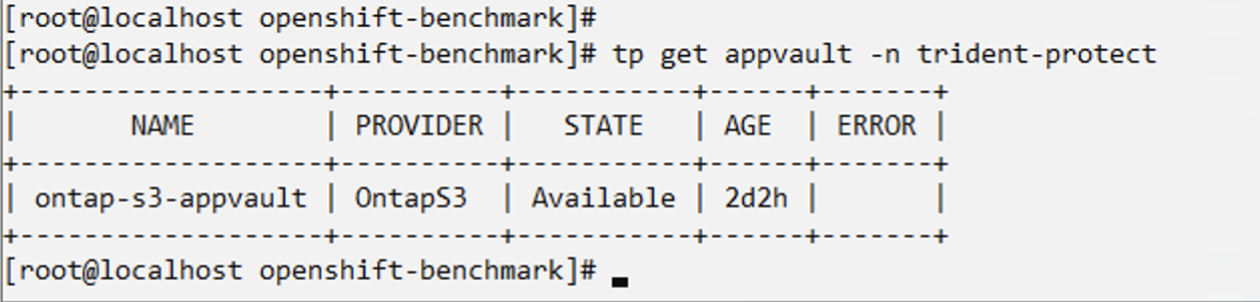
用於安裝 postgresql 應用程式的範例 yaml 檔案
postgres.yaml
apiVersion: apps/v1
kind: Deployment
metadata:
  name: postgres
spec:
  replicas: 1
  selector:
    matchLabels:
      app: postgres
  template:
    metadata:
      labels:
        app: postgres
    spec:
      containers:
      - name: postgres
        image: postgres:14
        env:
        - name: POSTGRES_USER
          #value: "myuser"
          value: "admin"
        - name: POSTGRES_PASSWORD
          #value: "mypassword"
          value: "adminpass"
        - name: POSTGRES_DB
          value: "mydb"
        - name: PGDATA
          value: "/var/lib/postgresql/data/pgdata"
        ports:
        - containerPort: 5432
        volumeMounts:
        - name: postgres-storage
          mountPath: /var/lib/postgresql/data
      volumes:
      - name: postgres-storage
        persistentVolumeClaim:
          claimName: postgres-pvc
---
apiVersion: v1
kind: PersistentVolumeClaim
metadata:
  name: postgres-pvc
spec:
  accessModes:
    - ReadWriteOnce
  resources:
    requests:
      storage: 5Gi
---
apiVersion: v1
kind: Service
metadata:
  name: postgres
spec:
  selector:
    app: postgres
  ports:
  - protocol: TCP
    port: 5432
    targetPort: 5432
  type: ClusterIP

Now create the Trident Protect application CR for the postgres app. Include the objects in the namespace postgres and create it in the postgres namespace.
# tp create app postgres-app --namespaces postgres -n postgres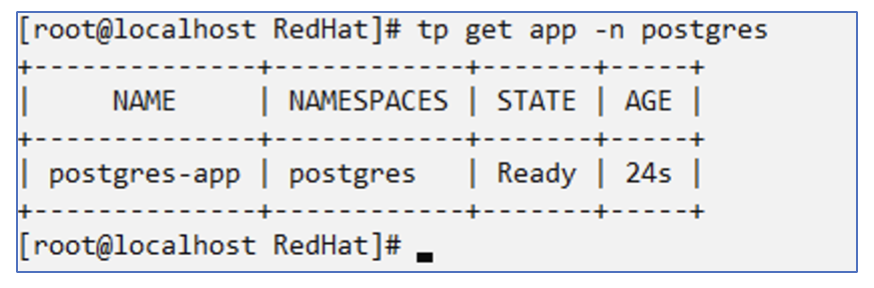
建立快照
建立按需快照
# tp create snapshot postgres-snap1 --app postgres-app --appvault ontap-s3-appvault -n postgres
Snapshot "postgres-snap1" created.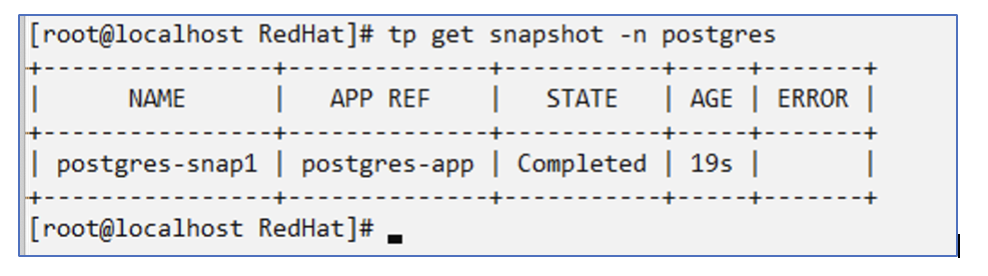
建立計畫 使用以下命令,將每天 15:33 建立快照,並保留兩個快照和備份。
# tp create schedule schedule1 --app postgres-app --appvault ontap-s3-appvault --backup-retention 2 --snapshot-retention 2 --granularity Daily --hour 15 --minute 33 --data-mover Restic -n postgres
Schedule "schedule1" created.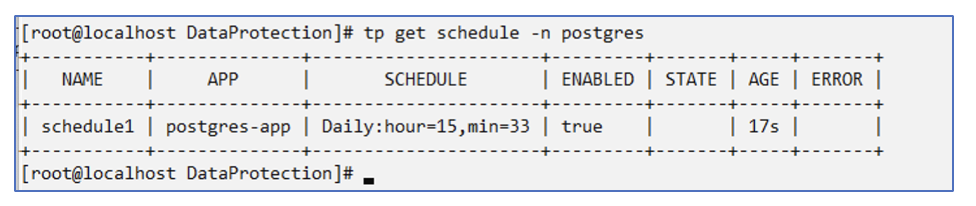
使用 yaml 建立計劃
# tp create schedule schedule2 --app postgres-app --appvault ontap-s3-appvault --backup-retention 2 --snapshot-retention 2 --granularity Daily --hour 15 --minute 33 --data-mover Restic -n postgres --dry-run > hourly-snapshotschedule.yaml

cat hourly-snapshotschedule.yaml

apiVersion: protect.trident.netapp.io/v1
kind: Schedule
metadata:
  creationTimestamp: null
  name: schedule2
  namespace: postgres
spec:
  appVaultRef: ontap-s3-appvault
  applicationRef: postgres-app
  backupRetention: "2"
  dataMover: Restic
  dayOfMonth: ""
  dayOfWeek: ""
  enabled: true
  granularity: Hourly
  #hour: "15"
  minute: "33"
  recurrenceRule: ""
  snapshotRetention: "2"
status: {}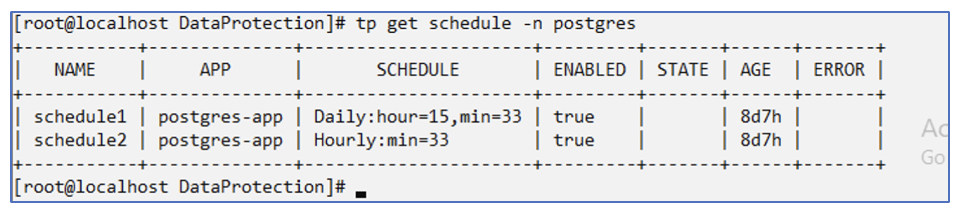
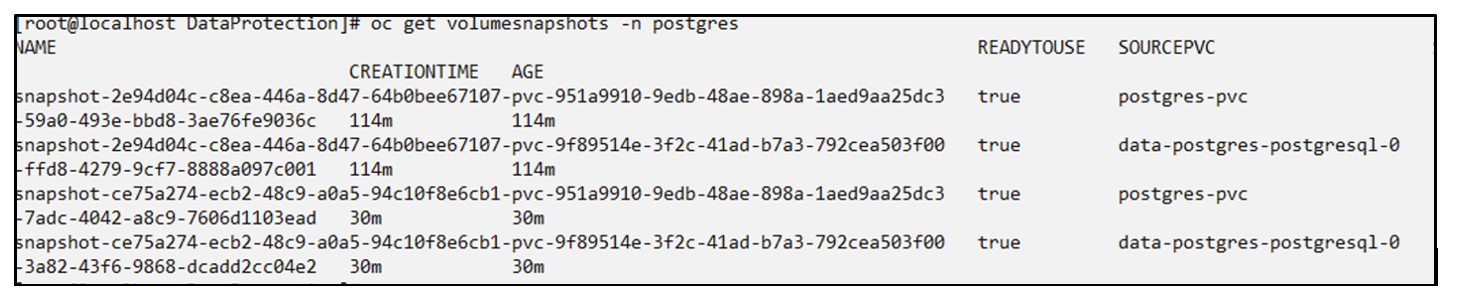
您可以看到按照此計劃建立的快照。
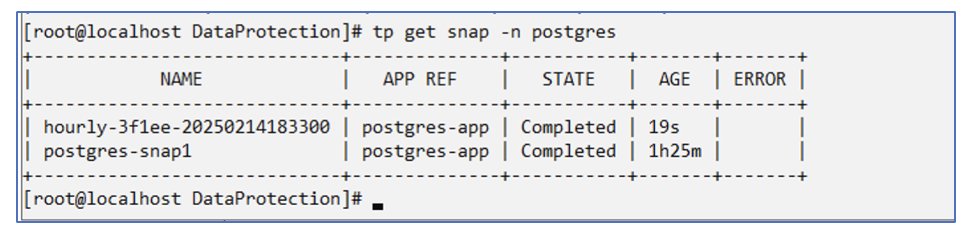
也創建了磁碟區快照。
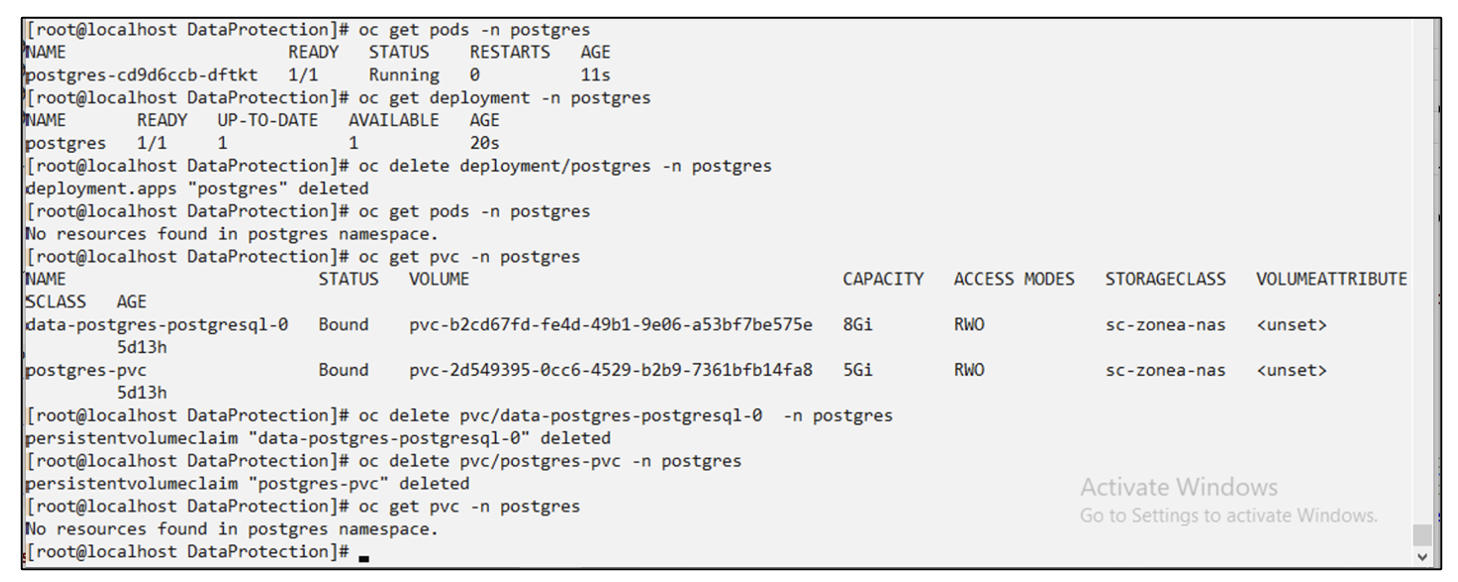
刪除應用程式以模擬應用程式遺失
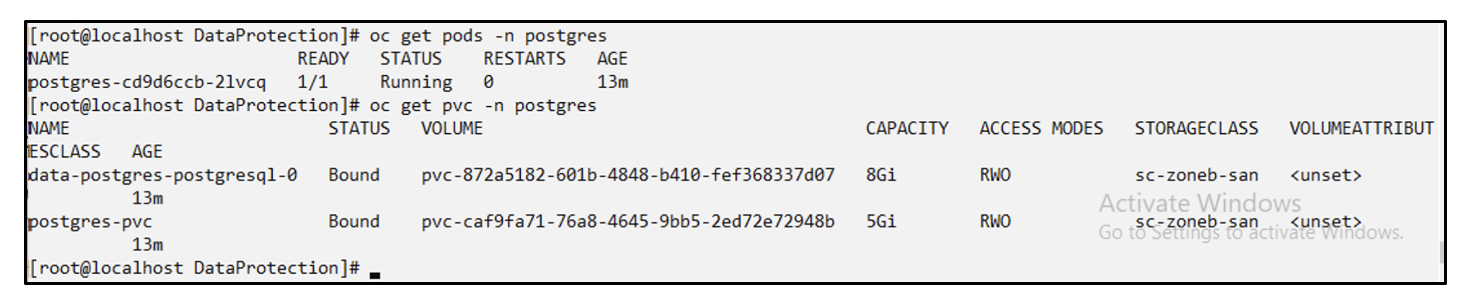
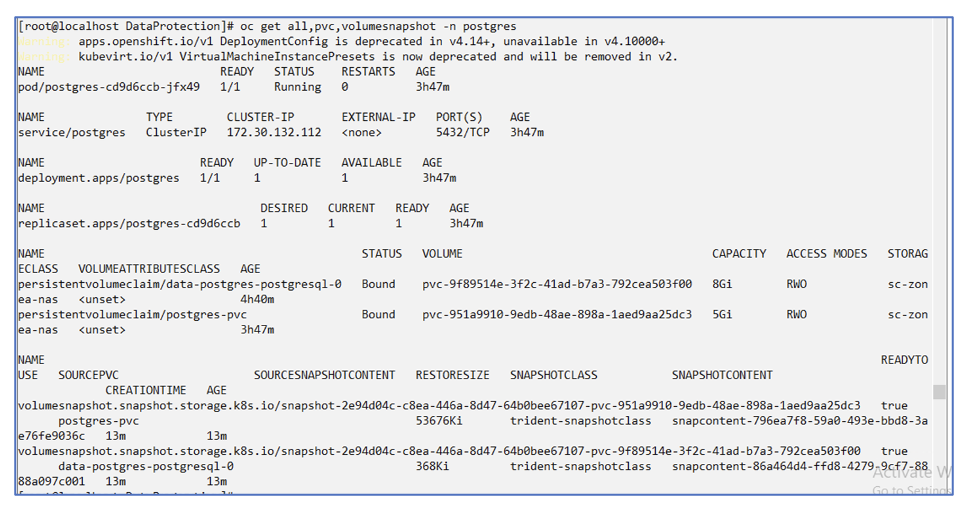
# oc delete deployment/postgres -n postgres
# oc get pod,pvc -n postgres
No resources found in postgres namespace.
從快照還原到相同命名空間
# tp create sir postgres-sir --snapshot postgres/hourly-3f1ee-20250214183300 -n postgres
SnapshotInplaceRestore "postgres-sir" created.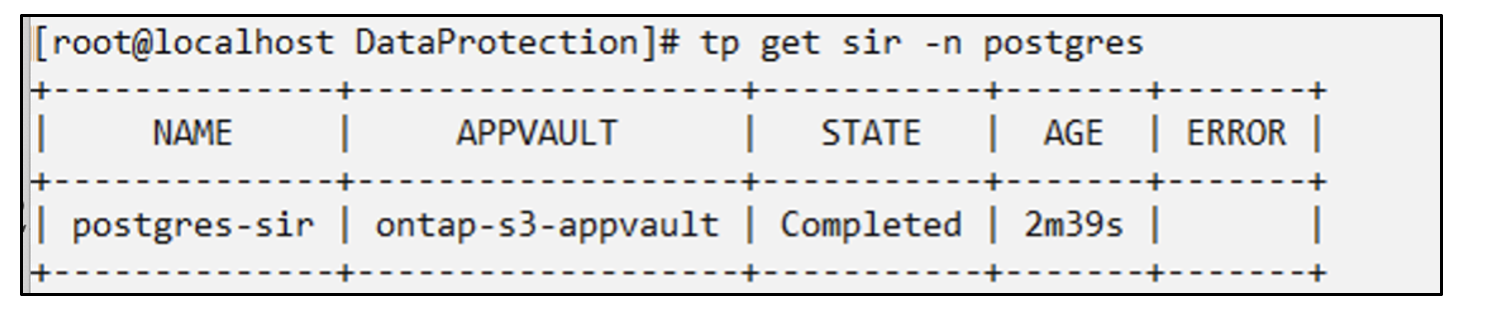
應用程式及其 PVC 恢復到同一個命名空間。

從快照還原到不同的命名空間
# tp create snapshotrestore postgres-restore --snapshot postgres/hourly-3f1ee-20250214183300 --namespace-mapping postgres:postgres-restore -n postgres-restore
SnapshotRestore "postgres-restore" created.
您可以看到應用程式已還原到新的命名空間。

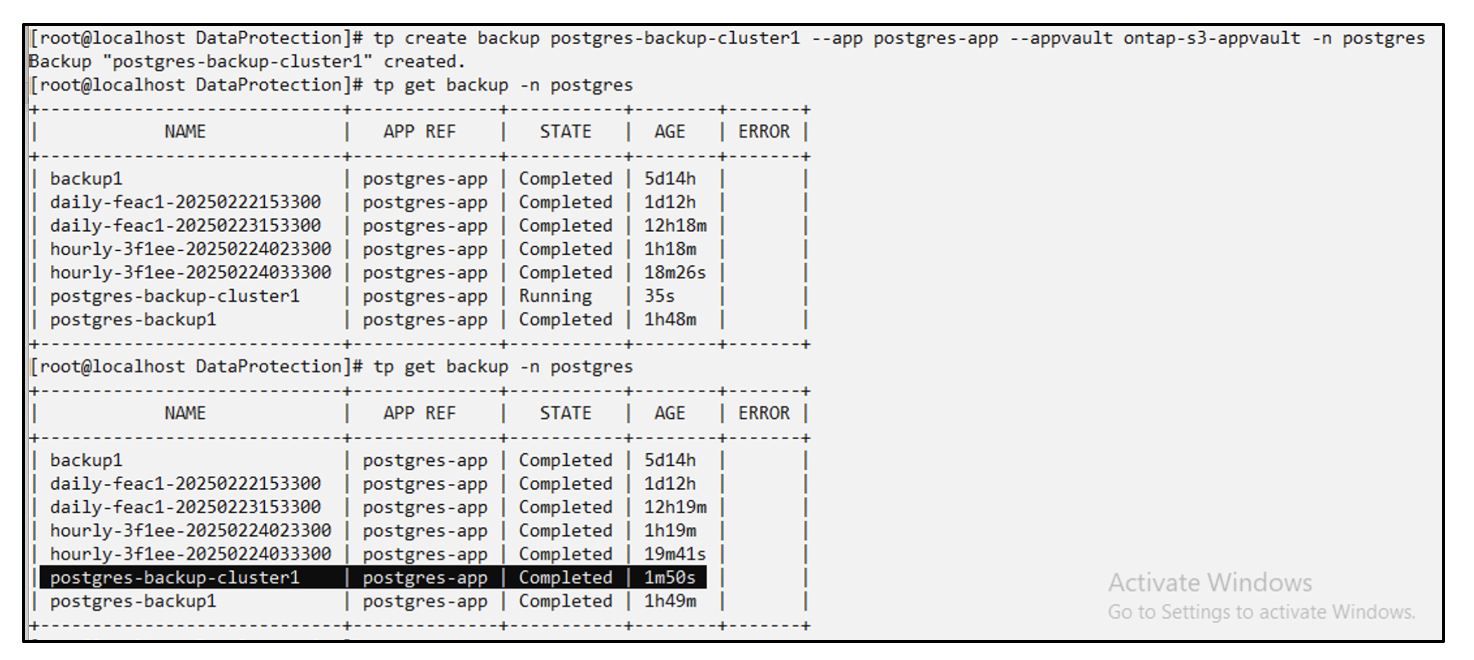
建立備份
建立按需備份
# tp create backup postgres-backup1 --app postgres-app --appvault ontap-s3-appvault -n postgres
Backup "postgres-backup1" created.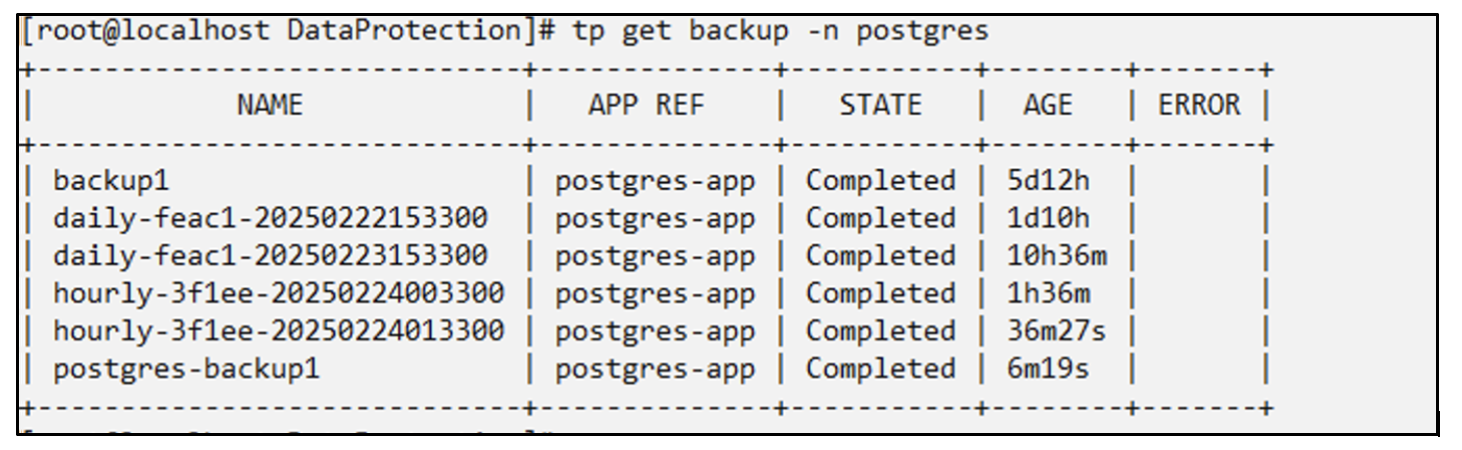
建立備份計畫
上面列表中的每日和每小時備份是根據先前設定的計劃建立的。
# tp create schedule schedule1 --app postgres-app --appvault ontap-s3-appvault --backup-retention 2 --snapshot-retention 2 --granularity Daily --hour 15 --minute 33 --data-mover Restic -n postgres
Schedule "schedule1" created.
從備份中恢復
刪除應用程式和 PVC 以模擬資料遺失。
恢復到相同的命名空間 #tp create bir postgres-bir --backup postgres/hourly-3f1ee-20250224023300 -n postgres BackupInplaceRestore "postgres-bir" created。
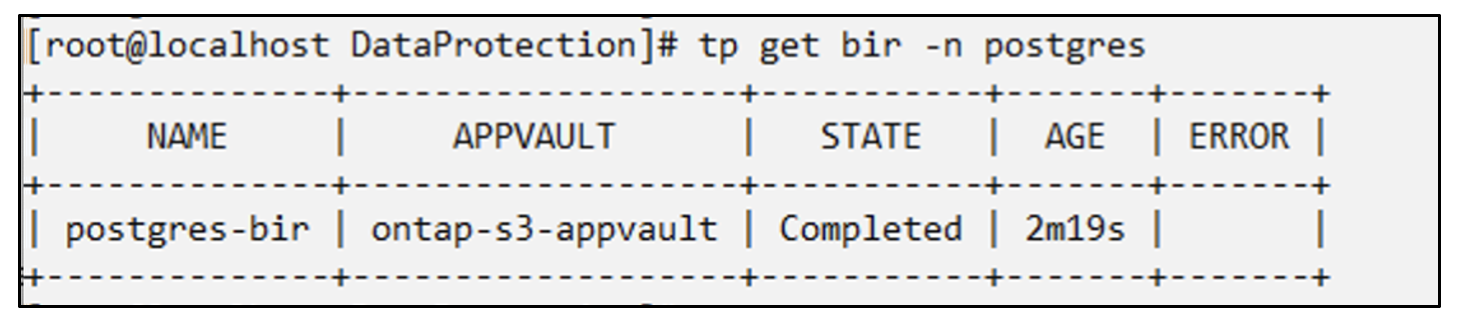
應用程式和 PVC 在同一個命名空間中恢復。

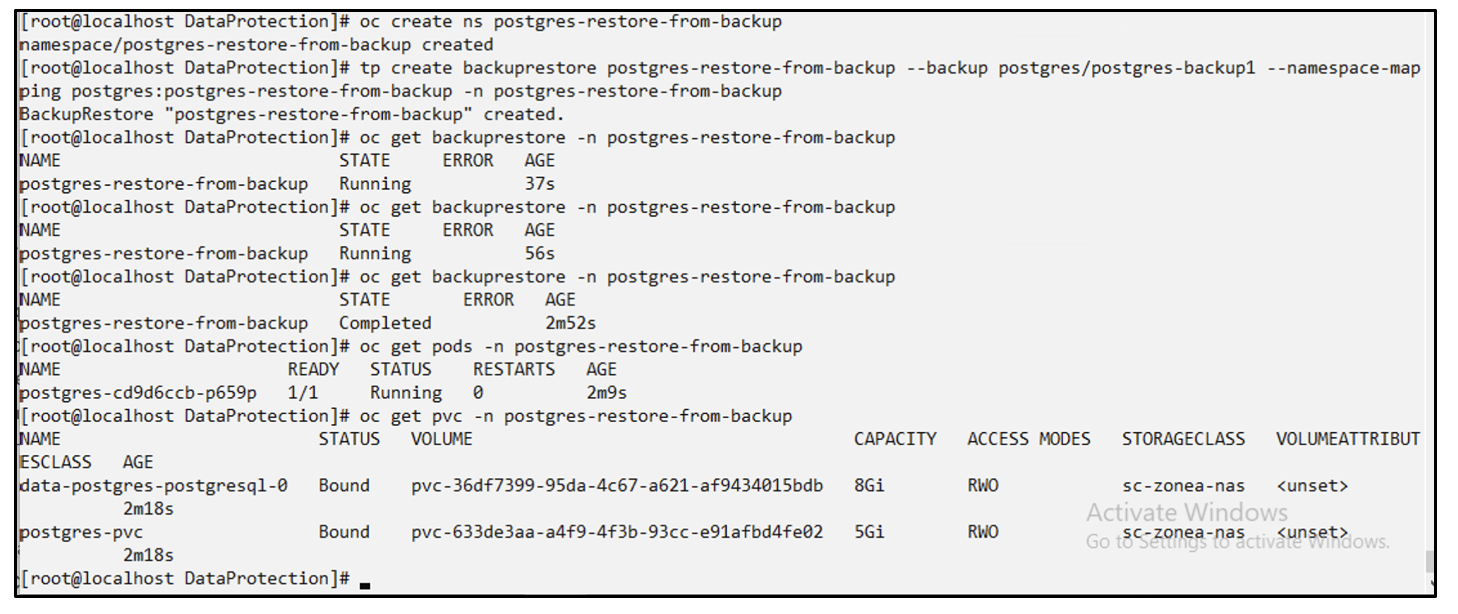
恢復到不同的命名空間 建立一個新的命名空間。從備份還原到新的命名空間。
遷移應用程式
若要將應用程式複製或遷移到不同的叢集(執行跨叢集克隆),請在來源叢集上建立備份,然後將備份還原到不同的叢集。請確保目標叢集上已安裝 Trident Protect。
在來源叢集上,執行下圖所示的步驟:
從來源集群,將上下文切換到目標集群。然後,確保可以從目標群集上下文存取 AppVault,並從目標群集取得 AppVault 內容。
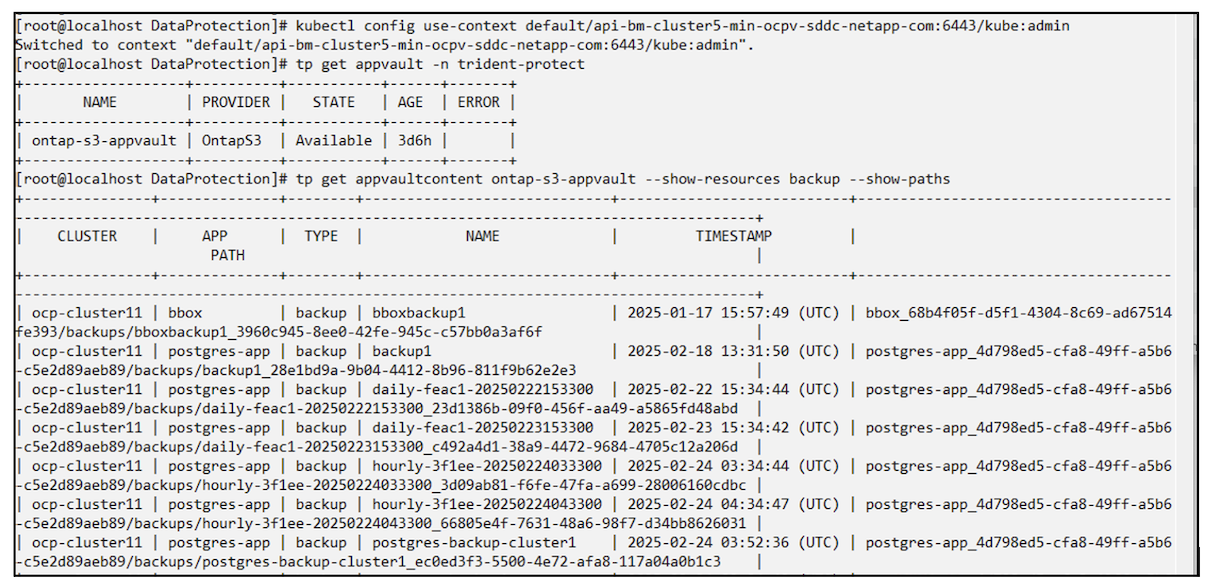
使用清單中的備份路徑並建立備份還原 CR 對象,如下面的命令所示。
# tp create backuprestore backup-restore-cluster2 --namespace-mapping postgres:postgres --appvault ontap-s3-appvault --path postgres-app_4d798ed5-cfa8-49ff-a5b6-c5e2d89aeb89/backups/postgres-backup-cluster1_ec0ed3f3-5500-4e72-afa8-117a04a0b1c3 -n postgres
BackupRestore "backup-restore-cluster2" created.
現在您可以看到應用程式 pod 和 PVC 已在目標叢集中建立。