資料集對模型的追蹤性、可透過 NetApp 和 MLflow 進行
 建議變更
建議變更


https://github.com/NetApp/netapp-dataops-toolkit/tree/main/netapp_dataops_k8s["適用於Kubernetes的NetApp DataOps工具套件"^]可搭配 MLflow 的實驗追蹤功能使用、以實作程式碼對資料集、資料集對模型或工作區對模型的追蹤。
範例筆記本中使用下列程式庫:
先決條件
若要實作程式碼資料集模型或工作區對模型的可追蹤性、只需在訓練過程中使用 DataOps Toolkit 建立資料集或工作區 Volume 的快照、如下所示的程式碼片段範例所示。此程式碼會將資料磁碟區名稱和快照名稱儲存為與您登入 MLflow 實驗追蹤伺服器的特定訓練路跑相關的標籤。
...
from netapp_dataops.k8s import cloneJupyterLab, createJupyterLab, deleteJupyterLab, \
listJupyterLabs, createJupyterLabSnapshot, listJupyterLabSnapshots, restoreJupyterLabSnapshot, \
cloneVolume, createVolume, deleteVolume, listVolumes, createVolumeSnapshot, \
deleteVolumeSnapshot, listVolumeSnapshots, restoreVolumeSnapshot


mlflow.set_tracking_uri("<your_tracking_server_uri>>:<port>>")
    os.environ['MLFLOW_HTTP_REQUEST_TIMEOUT'] = '500'  # Increase to 500 seconds
    mlflow.set_experiment(experiment_id)
    with mlflow.start_run() as run:
        latest_run_id = run.info.run_id
        start_time = datetime.now()

        # Preprocess the data
        preprocess(input_pdf_file_path, to_be_cleaned_input_file_path)

        # Print out sensitive data (passwords, SECRET_TOKEN, API_KEY found)
        check_pretrain(to_be_cleaned_input_file_path)

        # Tokenize the input file
        pretrain_tokenization(to_be_cleaned_input_file_path, model_name, tokenized_output_file_path)

        # Load the tokenizer and model
        tokenizer = GPT2Tokenizer.from_pretrained(model_name)
        model = GPT2LMHeadModel.from_pretrained(model_name)

        # Set the pad token
        tokenizer.pad_token = tokenizer.eos_token
        tokenizer.add_special_tokens({'pad_token': '[PAD]'})

        # Encode, generate, and decode the text
        with open(tokenized_output_file_path, 'r', encoding='utf-8') as file:
            content = file.read()
        encode_generate_decode(content, decoded_output_file_path, tokenizer=tokenizer, model=model)

        # Save the model
        model.save_pretrained(model_save_path)
        tokenizer.save_pretrained(model_save_path)

        # Finetuning here
        with open(decoded_output_file_path, 'r', encoding='utf-8') as file:
            content = file.read()
        model.finetune(content, tokenizer=tokenizer, model=model)

        # Evaluate the model using NLTK
        output_set = Dataset.from_dict({"text": [content]})
        test_set = Dataset.from_dict({"text": [content]})
        scores = nltk_evaluation_gpt(output_set, test_set, model=model, tokenizer=tokenizer)
        print(f"Scores: {scores}")

        # End time and elapsed time
        end_time = datetime.now()
        elapsed_time = end_time - start_time
        elapsed_minutes = elapsed_time.total_seconds() // 60
        elapsed_seconds = elapsed_time.total_seconds() % 60

        # Create DOTK snapshots for code, dataset, and model
        snapshot = createVolumeSnapshot(pvcName="model-pvc", namespace="default", printOutput=True)

        #Log snapshot IDs to MLflow
        mlflow.log_param("code_snapshot_id", snapshot)
        mlflow.log_param("dataset_snapshot_id", snapshot)
        mlflow.log_param("model_snapshot_id", snapshot)

        # Log parameters and metrics to MLflow
        mlflow.log_param("wf_start_time", start_time)
        mlflow.log_param("wf_end_time", end_time)
        mlflow.log_param("wf_elapsed_time_minutes", elapsed_minutes)
        mlflow.log_param("wf_elapsed_time_seconds", elapsed_seconds)

        mlflow.log_artifact(decoded_output_file_path.rsplit('/', 1)[0])  # Remove the filename to log the directory
        mlflow.log_artifact(model_save_path) # log the model save path

        print(f"Experiment ID: {experiment_id}")
        print(f"Run ID: {latest_run_id}")
        print(f"Elapsed time: {elapsed_minutes} minutes and {elapsed_seconds} seconds")
上述程式碼片段會將快照 ID 記錄到 MLflow 實驗追蹤伺服器、可用來追蹤回溯到用於訓練模型的特定資料集和模型。這可讓您追蹤回溯至用於訓練模型的特定資料集和模型、以及用於預先處理資料的特定程式碼、標記輸入檔案、載入 tokenizer 和模型、編碼、產生和解碼文字、儲存模型、微調模型、使用 "NLTK" Perplexity 分數評估模型、以及記錄超流程和 MLflow 參數。例如、下圖顯示不同實驗執行的 sci 套件學習模型平均平方誤差( MSE ):

資料分析、業務單位擁有者和高階主管都能直接瞭解並推斷在您的特定限制、設定、期間和其他情況下、哪種模式的效能最佳。如需更多有關如何預先處理、標記化、載入、編碼、產生、解碼、儲存、微調及評估模型的詳細資訊、請參閱 dotk-mlflow `netapp_dataops.k8s`儲存庫中的套裝 Python 範例。
如需如何建立資料集或 JupyterLab 工作區快照的詳細資訊、請參閱"NetApp DataOps Toolkit 頁面"。
關於受過訓練的機型、在 dotk-mlflow 筆記型電腦中使用下列機型:
模型
-
"GPT2LMHeadModel": GPT2 模型變壓器、頂端有語言模型頭(線性層、權重與輸入嵌入資料相關)。這是一種變壓器模型、已預先訓練過大量的文字資料、並已在特定資料集上完成。我們使用預設的 GPT2 模型"注意遮罩"、針對您選擇的機型、使用對應的 tokenizer 來批次輸入序列。
-
"PHI 2": PH1-2 是一款具有 27 億個參數的變壓器。訓練課程使用與 PHA-1.5 相同的資料來源、並以新的資料來源進行補充、其中包含各種 NLP 合成文字和篩選網站(安全性與教育價值)。
-
"XLNet (基礎型機型)": XLNet 模式已接受過英文訓練。這是"XLNet :針對語言瞭解進行「一般化自動預先訓練」"楊等人在文件中介紹的、並於本文件中首次發表"儲存庫"。
結果"MLflow 中的模型登錄"將包含下列隨機樹系模型、版本和標記:
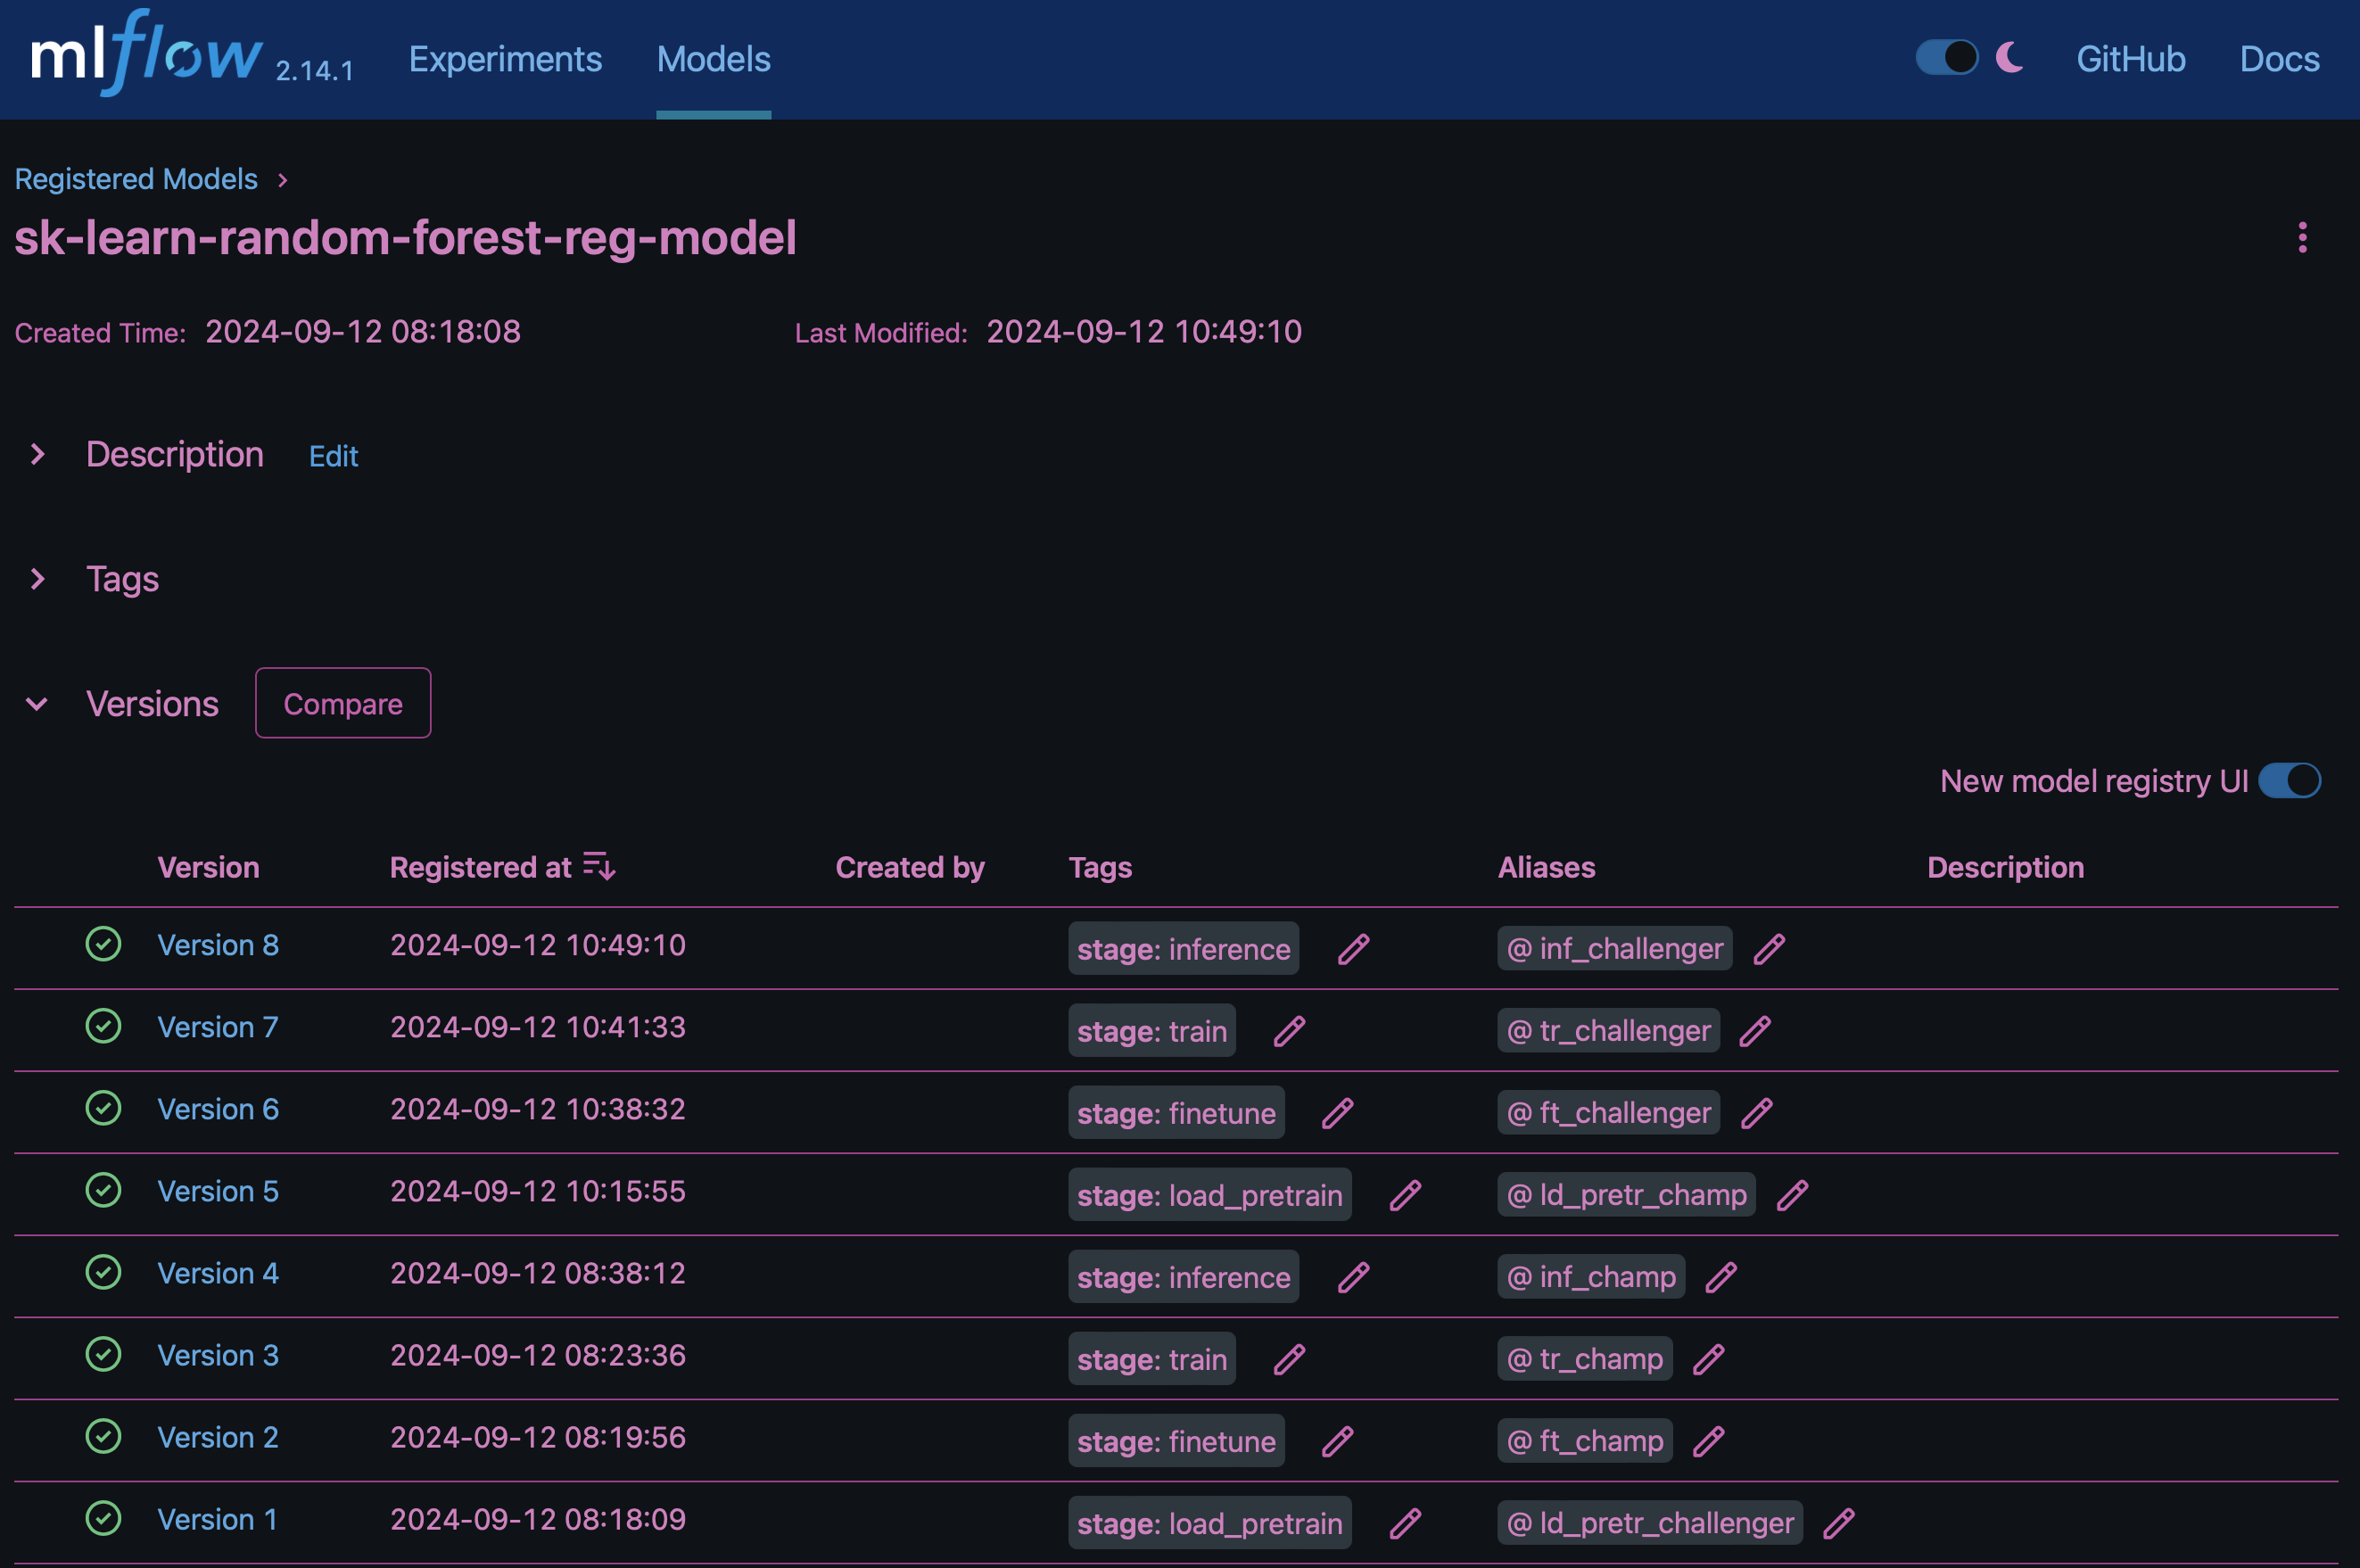
若要透過 Kubernetes 將模型部署至推斷伺服器、只需執行下列 Jupyter Notebook 即可。請注意、在此範例中 dotk-mlflow、我們不使用套件、而是修改隨機樹系回歸模型架構、以將初始模型中的平均平方錯誤( MSE )降至最低、因此在我們的模型登錄中建立此類模型的多個版本。
from mlflow.models import Model
mlflow.set_tracking_uri("http://<tracking_server_URI_with_port>")
experiment_id='<your_specified_exp_id>'

# Alternatively, you can load the Model object from a local MLmodel file
# model1 = Model.load("~/path/to/my/MLmodel")

from sklearn.datasets import make_regression
from sklearn.ensemble import RandomForestRegressor
from sklearn.metrics import mean_squared_error
from sklearn.model_selection import train_test_split

import mlflow
import mlflow.sklearn
from mlflow.models import infer_signature

# Create a new experiment and get its ID
experiment_id = mlflow.create_experiment(experiment_id)

# Or fetch the ID of the existing experiment
# experiment_id = mlflow.get_experiment_by_name("<your_specified_exp_id>").experiment_id

with mlflow.start_run(experiment_id=experiment_id) as run:
    X, y = make_regression(n_features=4, n_informative=2, random_state=0, shuffle=False)
    X_train, X_test, y_train, y_test = train_test_split(
        X, y, test_size=0.2, random_state=42
    )
    params = {"max_depth": 2, "random_state": 42}
    model = RandomForestRegressor(**params)
    model.fit(X_train, y_train)

    # Infer the model signature
    y_pred = model.predict(X_test)
    signature = infer_signature(X_test, y_pred)

    # Log parameters and metrics using the MLflow APIs
    mlflow.log_params(params)
    mlflow.log_metrics({"mse": mean_squared_error(y_test, y_pred)})

    # Log the sklearn model and register as version 1
    mlflow.sklearn.log_model(
        sk_model=model,
        artifact_path="sklearn-model",
        signature=signature,
        registered_model_name="sk-learn-random-forest-reg-model",
    )
Jupyter Notebook 儲存格的執行結果應類似下列項目、且模型已 `3`在 Model Registry 中登錄為版本:
Registered model 'sk-learn-random-forest-reg-model' already exists. Creating a new version of this model...
2024/09/12 15:23:36 INFO mlflow.store.model_registry.abstract_store: Waiting up to 300 seconds for model version to finish creation. Model name: sk-learn-random-forest-reg-model, version 3
Created version '3' of model 'sk-learn-random-forest-reg-model'.
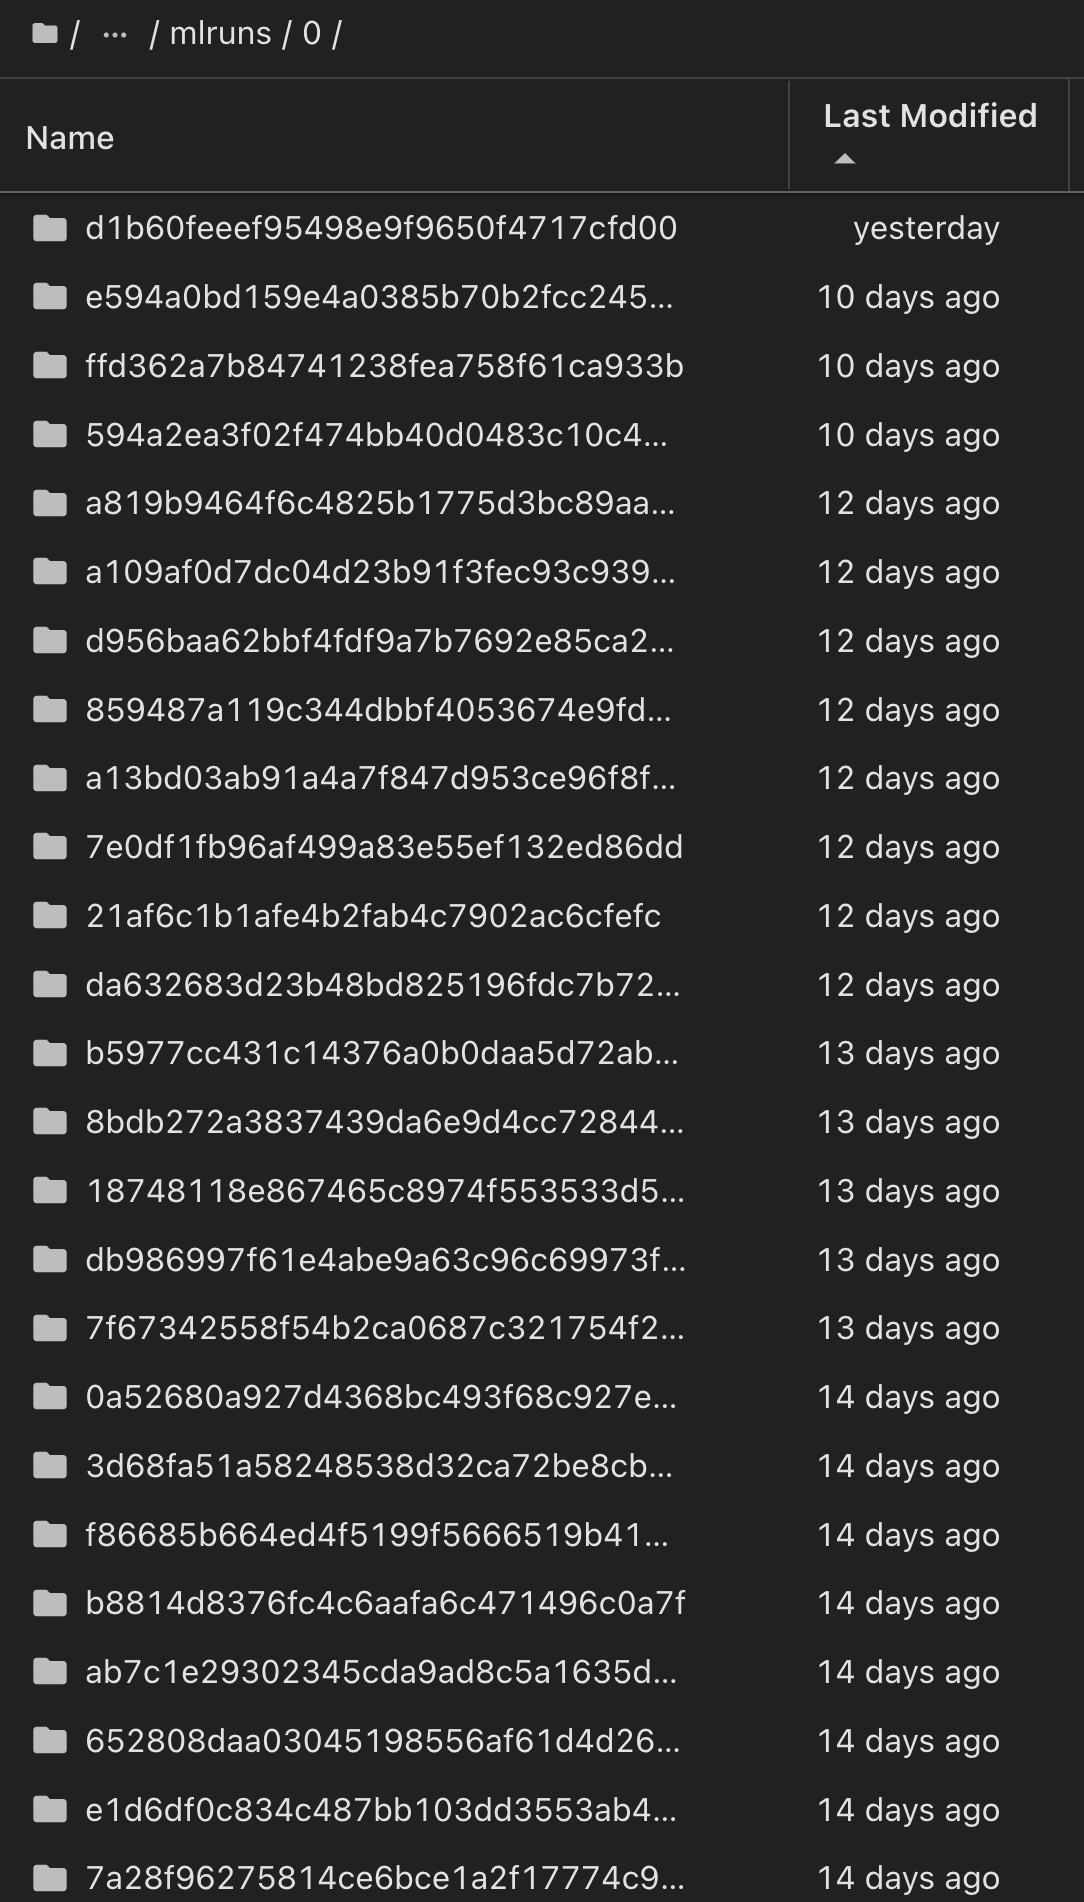
在模型登錄中、儲存所需的模型、版本和標記之後、您可以追蹤回溯至用於訓練模型的特定資料集、模型和程式碼、以及用於處理資料的特定程式碼、載入 tokenizer 和模型、編碼、產生和解碼文字、儲存模型、微調模型、使用 Jupterlog snapshot_id's and your chosen metrics to MLflow by choosing the corerct experiment under `mlrun 目前使用中的資料夾、 Jupteryk 資料夾和 hupterylog 資料夾等資料夾中的超快取資料夾、資料夾中的超快取參數評估模型。
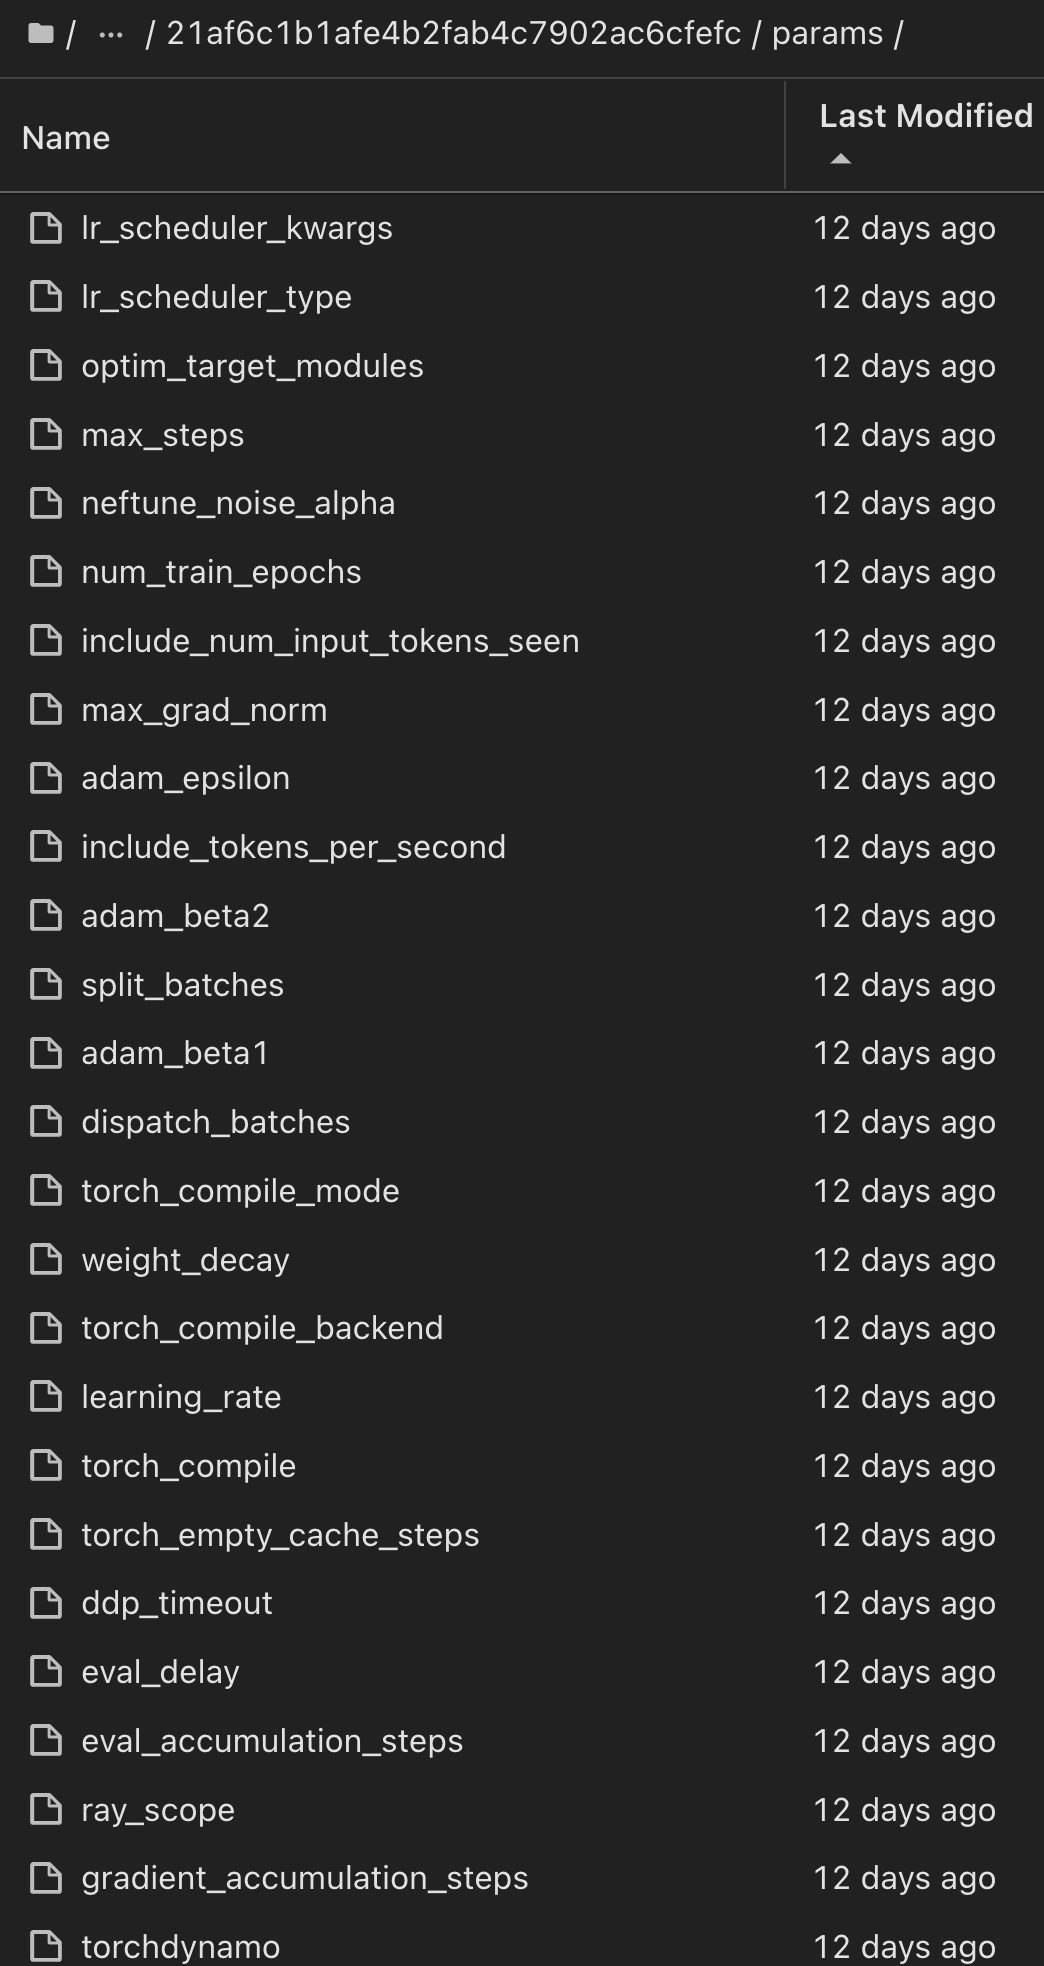
同樣地、對於我們 `phi-2_finetuned_model`透過 GPU 或 vGPU 使用 `torch`程式庫計算量化權重的產品、我們可以檢查下列中間成品、以實現整個工作流程的效能最佳化、擴充性(處理量 /SLA 保有權)和成本降低:
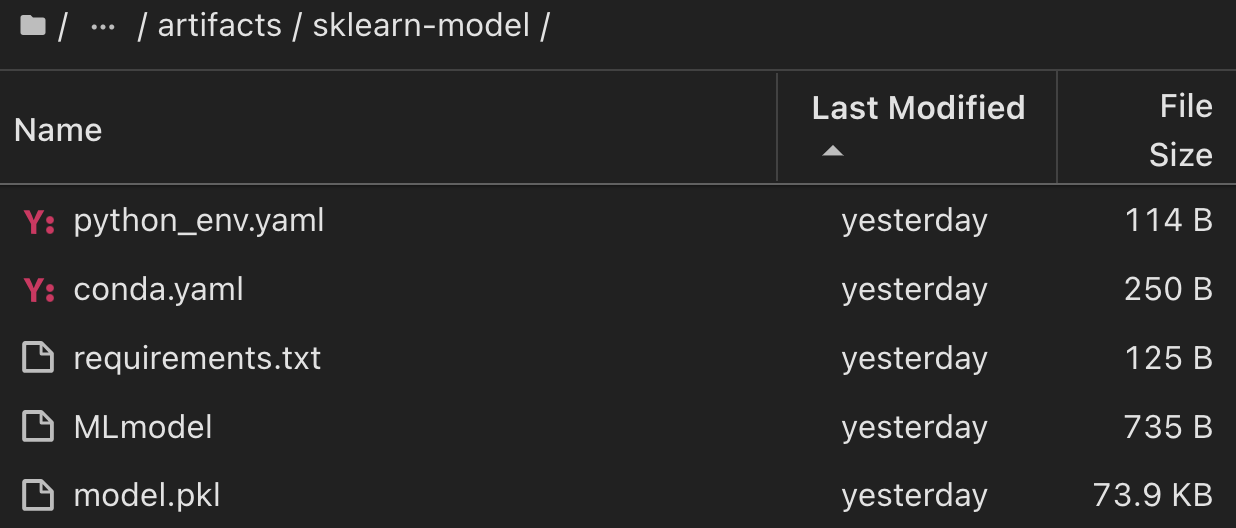
對於使用 Scikit 學習和 MLflow 執行的單一實驗、下圖顯示產生的成品、 `conda`環境、 `MLmodel`檔案和 `MLmodel`目錄:
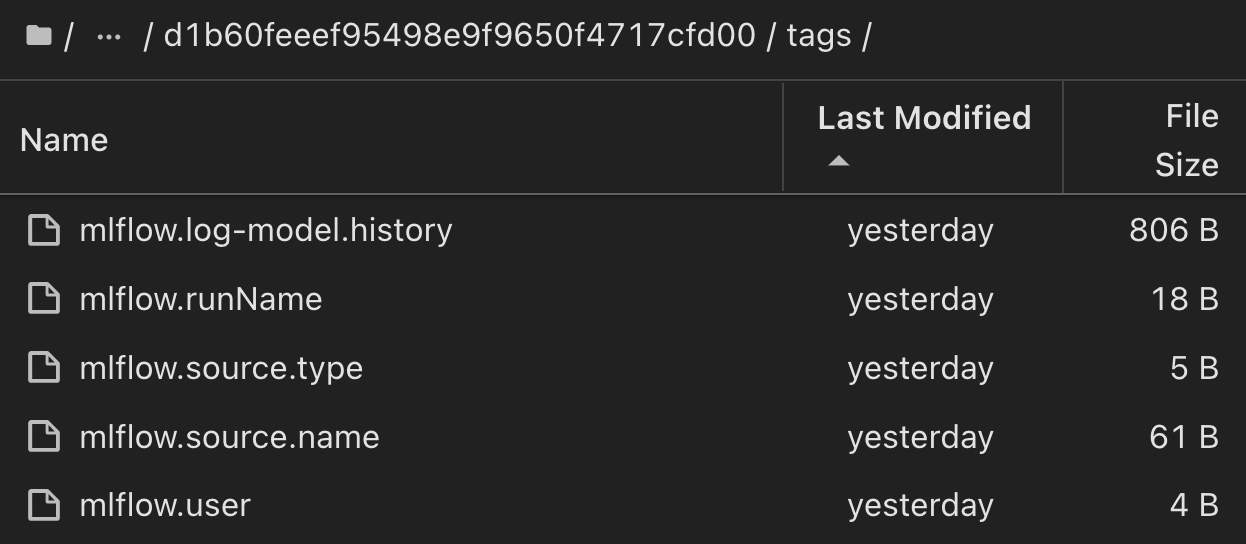
客戶可以指定標籤、例如「預設」、「階段」、「程序」、「瓶頸」、以組織不同的 AI 工作流程執行功能、記錄其最新結果、或設定 contributors`以追蹤資料科學團隊開發人員的進度。如果是預設標籤「」、則表示您已儲存的 `mlflow.log-model.history、、 mlflow.runName、 mlflow.source.type`和 `mlflow.source.name mlflow.user JupyterHub 目前使用中的檔案導覽標籤:
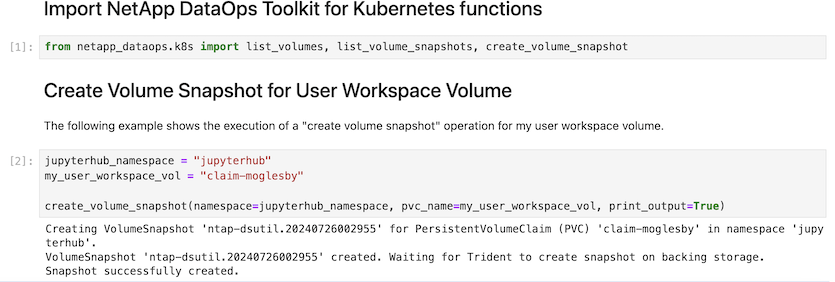
最後、使用者擁有自己指定的 Jupyter Workspace 、該工作區已經過版本管理、並儲存在 Kubernetes 叢集中的持續磁碟區宣告( PVC )中。下圖顯示 Jupyter Workspace (包含 netapp_dataops.k8s Python 套件)及成功建立的結果 VolumeSnapshot:
我們採用業界公認的 Snapshot ® 和其他技術來確保企業級的資料保護、移動和高效壓縮。如需其他 AI 使用案例、請參閱"NetApp AIPod"文件。

