

管理 ONTAP Mediator
 建議變更
建議變更
管理 ONTAP Mediator,包括變更使用者憑證、停止和重新啟用服務、驗證其運作狀況以及安裝或解除安裝 SCST 以進行主機維護。您也可以管理憑證、例如重新產生自我簽署的憑證、以信任的協力廠商憑證取代它們、以及疑難排解憑證相關問題。
變更使用者名稱
您可以使用下列程序變更使用者名稱。
在安裝了 ONTAP Mediator 的 Linux 主機上執行此任務。
如果無法連線至此命令、您可能需要使用完整路徑來執行命令、如下列範例所示:
/usr/local/bin/mediator_username
選擇下列其中一個選項來變更使用者名稱:
-
* 選項( a ) * :執行命令
mediator_change_user並回應下列範例所示的提示:[root@mediator-host ~]# mediator_change_user Modify the Mediator API username by entering the following values: Mediator API User Name: mediatoradmin Password: New Mediator API User Name: mediator The account username has been modified successfully. [root@mediator-host ~]# -
* 選項( b ) * :執行下列命令:
MEDIATOR_USERNAME=mediator MEDIATOR_PASSWORD=mediator2 MEDIATOR_NEW_USERNAME=mediatoradmin mediator_change_user[root@mediator-host ~]# MEDIATOR_USERNAME=mediator MEDIATOR_PASSWORD='mediator2' MEDIATOR_NEW_USERNAME=mediatoradmin mediator_change_user The account username has been modified successfully. [root@mediator-host ~]#
變更密碼
您可以使用下列程序變更密碼。
在安裝了 ONTAP Mediator 的 Linux 主機上執行此任務。
如果無法連線至此命令、您可能需要使用完整路徑來執行命令、如下列範例所示:
/usr/local/bin/mediator_change_password
選擇下列其中一個選項來變更密碼:
-
* 選項( a ) * :執行
mediator_change_password命令並回應提示、如下列範例所示:[root@mediator-host ~]# mediator_change_password Change the Mediator API password by entering the following values: Mediator API User Name: mediatoradmin Old Password: New Password: Confirm Password: The password has been updated successfully. [root@mediator-host ~]# -
* 選項( b ) * :執行下列命令:
MEDIATOR_USERNAME=mediatoradmin MEDIATOR_PASSWORD=mediator1 MEDIATOR_NEW_PASSWORD=mediator2 mediator_change_password範例顯示密碼已從「 media1 」變更為「 media2 」。
 [root@mediator-host ~]# MEDIATOR_USERNAME=mediatoradmin MEDIATOR_PASSWORD=mediator1 MEDIATOR_NEW_PASSWORD=mediator2 mediator_change_password
 The password has been updated successfully.
 [root@mediator-host ~]#
停止 ONTAP 調解器
若要停止 ONTAP 調解器,請執行下列步驟:
-
停止 ONTAP 調解器:
systemctl stop ontap_mediator -
停止 SCST :
systemctl stop mediator-scst -
停用 ONTAP 調解器和 SCST:
systemctl disable ontap_mediator mediator-scst
重新啟用 ONTAP 調解器
若要重新啟用 ONTAP 調解器,請執行下列步驟:
-
啟用 ONTAP 調解器和 SCST:
systemctl enable ontap_mediator mediator-scst -
啟動 SCST :
systemctl start mediator-scst -
啟動 ONTAP Mediator :
systemctl start ontap_mediator
驗證 ONTAP 調解器是否正常運作
安裝 ONTAP Mediator 後,請驗證它是否成功運作。
-
查看 ONTAP 調解器的狀態:
-
systemctl status ontap_mediator[root@mediator_host ~]# systemctl status ontap_mediator ontap_mediator.service - ONTAP Mediator Loaded: loaded (/etc/systemd/system/ontap_mediator.service; enabled; vendor preset: disabled) Active: active (running) since Mon 2022-04-18 10:41:49 EDT; 1 weeks 0 days ago Process: 286710 ExecStop=/bin/kill -s INT $MAINPID (code=exited, status=0/SUCCESS) Main PID: 286712 (uwsgi) Status: "uWSGI is ready" Tasks: 3 (limit: 49473) Memory: 139.2M CGroup: /system.slice/ontap_mediator.service ├─286712 /opt/netapp/lib/ontap_mediator/pyenv/bin/uwsgi --ini /opt/netapp/lib/ontap_mediator/uwsgi/ontap_mediator.ini ├─286716 /opt/netapp/lib/ontap_mediator/pyenv/bin/uwsgi --ini /opt/netapp/lib/ontap_mediator/uwsgi/ontap_mediator.ini └─286717 /opt/netapp/lib/ontap_mediator/pyenv/bin/uwsgi --ini /opt/netapp/lib/ontap_mediator/uwsgi/ontap_mediator.ini [root@mediator_host ~]# -
systemctl status mediator-scst[root@mediator_host ~]# systemctl status mediator-scst Loaded: loaded (/etc/systemd/system/mediator-scst.service; enabled; vendor preset: disabled) Active: active (running) since Mon 2022-04-18 10:41:47 EDT; 1 weeks 0 days ago Process: 286595 ExecStart=/etc/init.d/scst start (code=exited, status=0/SUCCESS) Main PID: 286662 (iscsi-scstd) Tasks: 1 (limit: 49473) Memory: 1.2M CGroup: /system.slice/mediator-scst.service └─286662 /usr/local/sbin/iscsi-scstd [root@mediator_host ~]#
-
-
確認 ONTAP 調解器所使用的連接埠:
netstat[root@scspr1905507001 ~]# netstat -anlt | grep -E '3260|31784' tcp 0 0 0.0.0.0:31784 0.0.0.0:* LISTEN tcp 0 0 0.0.0.0:3260 0.0.0.0:* LISTEN tcp6 0 0 :::3260 :::* LISTEN
卸載 ONTAP 調解器
如有必要,您可以刪除 ONTAP Mediator。
您必須先斷開 ONTAP 調解器與 ONTAP 之間的連接,然後才能將其移除。
在安裝了 ONTAP Mediator 的 Linux 主機上執行此任務。
如果無法連線至此命令、您可能需要使用完整路徑來執行命令、如下列範例所示:
/usr/local/bin/uninstall_ontap_mediator
-
卸載 ONTAP 調解器:
uninstall_ontap_mediator[root@mediator-host ~]# uninstall_ontap_mediator ONTAP Mediator: Self Extracting Uninstaller + Removing ONTAP Mediator. (Log: /tmp/ontap_mediator.GmRGdA/uninstall_ontap_mediator/remove.log) + Remove successful. [root@mediator-host ~]#
重新產生暫時自我簽署的憑證
從 ONTAP Mediator 1.7 開始、您可以使用下列程序重新產生暫時自我簽署的憑證。

|
此程序僅支援執行 ONTAP Mediator 1.7 或更新版本的系統。 |
-
在安裝了 ONTAP Mediator 的 Linux 主機上執行此任務。
-
只有安裝 ONTAP 調解器後,由於主機的主機名稱或 IP 位址發生變更而導致產生的自簽章憑證已過時時,您才可以執行此任務。
-
當暫時自我簽署的憑證已由信任的協力廠商憑證取代之後、您不會使用此工作來重新產生憑證。如果沒有自我簽署的憑證、將導致此程序失敗。
若要為目前主機重新產生新的暫時自我簽署憑證、請執行下列步驟:
-
重新啟動 ONTAP 調解器:
./make_self_signed_certs.sh overwrite[root@xyz000123456 ~]# cd /opt/netapp/lib/ontap_mediator/ontap_mediator/server_config [root@xyz000123456 server_config]# ./make_self_signed_certs.sh overwrite Adding Subject Alternative Names to the self-signed server certificate # # OpenSSL example configuration file. Generating self-signed certificates Generating RSA private key, 4096 bit long modulus (2 primes) ..................................................................................................................................................................++++ ........................................................++++ e is 65537 (0x010001) Generating a RSA private key ................................................++++ .............................................................................................................................................++++ writing new private key to 'ontap_mediator_server.key' ----- Signature ok subject=C = US, ST = California, L = San Jose, O = "NetApp, Inc.", OU = ONTAP Core Software, CN = ONTAP Mediator, emailAddress = support@netapp.com Getting CA Private Key
以信任的協力廠商憑證取代自我簽署的憑證
如果支援、您可以使用信任的第三方憑證來取代自我簽署的憑證。

|
|
-
在安裝了 ONTAP Mediator 的 Linux 主機上執行此任務。
-
如果產生的自我簽署憑證需要由從信任的次級憑證授權單位( CA )取得的憑證所取代、您可以執行此工作。若要達成此目標、您應該可以存取信任的公開金鑰基礎架構( PKI )授權。
-
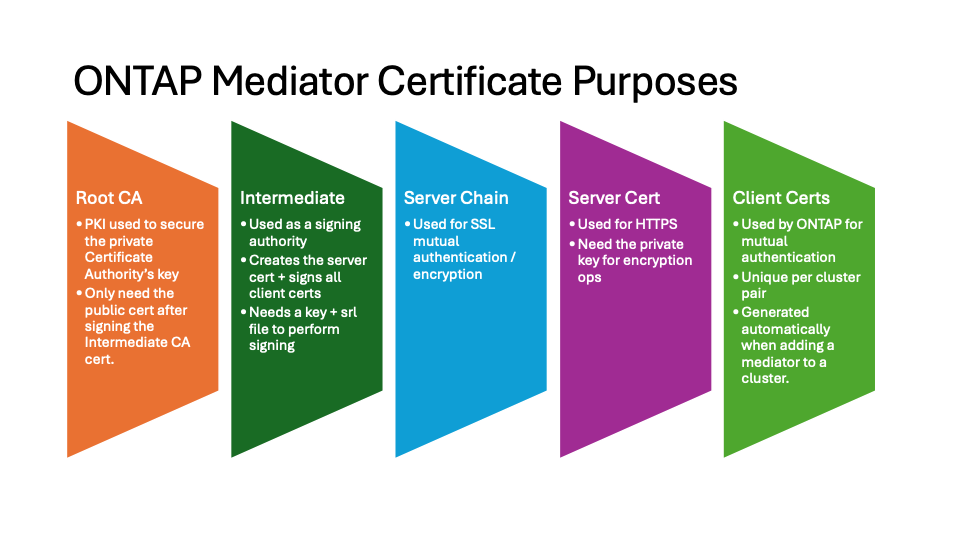
下圖顯示每個 ONTAP Mediator 憑證的用途。
-
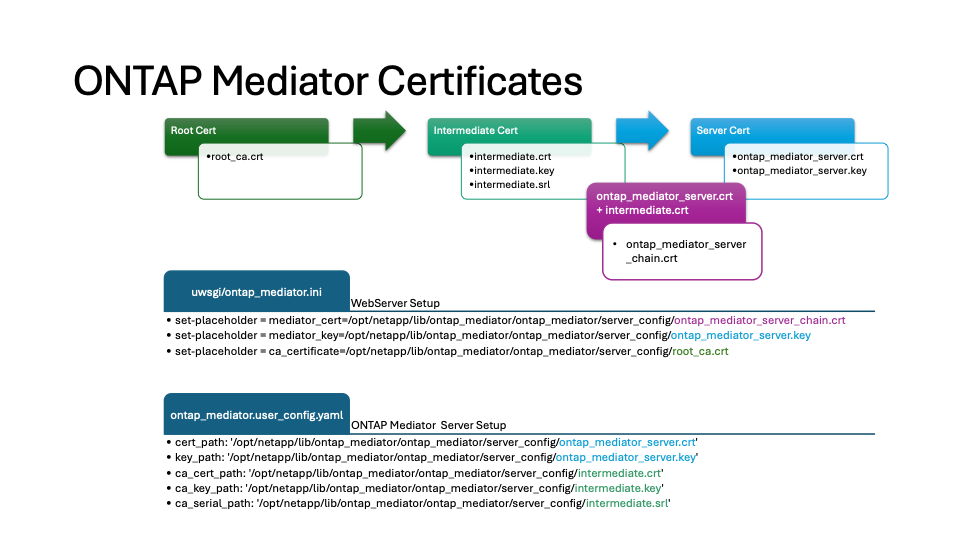
下圖顯示了 Web 伺服器設定和 ONTAP Mediator 設定的配置。
步驟 1 :從發行 CA 憑證的協力廠商取得憑證
您可以使用下列程序從 PKI 授權單位取得憑證。
以下範例示範如何以位於的協力廠商憑證參與者取代自我簽署的憑證參與者 /opt/netapp/lib/ontap_mediator/ontap_mediator/server_config/。
|
|
此範例說明了 ONTAP 調解器所需憑證的必要標準。您可以使用與此程序不同的方式、從 PKI 授權單位取得憑證。根據您的業務需求調整程序。 |
-
建立私密金鑰
intermediate.key`和組態檔 `openssl_ca.cnf,供 PKI 授權單位用來產生憑證。-
產生私密金鑰
intermediate.key:-
範例 *
-
openssl genrsa -aes256 -out intermediate.key 4096-
組態檔案
openssl_ca.cnf(位於/opt/netapp/lib/ontap_mediator/ontap_mediator/server_config/openssl_ca.cnf)定義產生的憑證必須具有的內容。
-
-
使用私密金鑰和組態檔案來建立憑證簽署要求
intermediate.csr:範例:
openssl req -key <private_key_name>.key -new -out <certificate_csr_name>.csr -config <config_file_name>.cnf[root@mediator_host server_config]# openssl req -key intermediate.key -new -config openssl_ca.cnf -out intermediate.csr Enter pass phrase for intermediate.key: [root@mediator_host server_config]# cat intermediate.csr -----BEGIN CERTIFICATE REQUEST----- <certificate_value> -----END CERTIFICATE REQUEST-----
-
將憑證簽署要求傳送 `intermediate.csr`至 PKI 授權單位以供其簽署。
PKI 機構驗證請求並簽署
.csr,生成證書intermediate.crt。此外,您還需要獲得 `root_ca.crt`簽署的證書 `intermediate.crt`來自 PKI 機構的憑證。
對於SnapMirror業務連續性 (SM-BC) 集群,您必須新增 `intermediate.crt`和 `root_ca.crt`證書到ONTAP集群。看"為 SnapMirror 主動同步配置 ONTAP 調解器和集群"。
-
建立私密金鑰
ca.key`和組態檔 `openssl_ca.cnf,供 PKI 授權單位用來產生憑證。-
產生私密金鑰
ca.key:-
範例 *
-
openssl genrsa -aes256 -out ca.key 4096-
組態檔案
openssl_ca.cnf(位於/opt/netapp/lib/ontap_mediator/ontap_mediator/server_config/openssl_ca.cnf)定義產生的憑證必須具有的內容。
-
-
使用私密金鑰和組態檔案來建立憑證簽署要求
ca.csr:範例:
openssl req -key <private_key_name>.key -new -out <certificate_csr_name>.csr -config <config_file_name>.cnf[root@mediator_host server_config]# openssl req -key ca.key -new -config openssl_ca.cnf -out ca.csr Enter pass phrase for ca.key: [root@mediator_host server_config]# cat ca.csr -----BEGIN CERTIFICATE REQUEST----- <certificate_value> -----END CERTIFICATE REQUEST-----
-
將憑證簽署要求傳送 `ca.csr`至 PKI 授權單位以供其簽署。
PKI 授權單位會驗證要求並簽署
.csr、產生憑證ca.crt。此外,您需要從 PKI 授權單位取得 `root_ca.crt that signed the `ca.crt`憑證。
對於 SnapMirror Business Continuity ( SM-BC )叢集、您必須將和憑證新增 ca.crtroot_ca.crt至 ONTAP 叢集。請參閱。 "為 SnapMirror 主動同步配置 ONTAP 調解器和集群"
步驟 2 :使用協力廠商 CA 認證簽署以產生伺服器憑證
伺服器憑證必須由私密金鑰和協力廠商憑證 intermediate.crt`簽署 `intermediate.key。此外,組態檔案還 `/opt/netapp/lib/ontap_mediator/ontap_mediator/server_config/openssl_server.cnf`包含特定屬性,可指定由 OpenSSL 發行的伺服器憑證所需的內容。
下列命令可產生伺服器憑證。
-
若要產生伺服器憑證簽署要求( CSR )、請從資料夾執行下列命令
/opt/netapp/lib/ontap_mediator/ontap_mediator/server_config:openssl req -config openssl_server.cnf -extensions v3_req -nodes -newkey rsa:4096 -sha512 -keyout ontap_mediator_server.key -out ontap_mediator_server.csr -
要從 CSR 產生伺服器證書,請從 `/opt/netapp/lib/ontap_mediator/ontap_mediator/server_config`資料夾:
這些檔案是從 PKI 授權單位取得的。如果您使用的是不同的憑證名稱,請以相關的檔案名稱取代 intermediate.crt`和 `intermediate.key。openssl x509 -extfile openssl_server.cnf -extensions v3_req -CA intermediate.crt -CAkey intermediate.key -CAcreateserial -sha512 -days 1095 -req -in ontap_mediator_server.csr -out ontap_mediator_server.crt-
此 `-CAcreateserial`選項用於產生 `intermediate.srl`檔案。
-
伺服器憑證必須由私密金鑰和協力廠商憑證 ca.crt`簽署 `ca.key。此外,組態檔案還 `/opt/netapp/lib/ontap_mediator/ontap_mediator/server_config/openssl_server.cnf`包含特定屬性,可指定由 OpenSSL 發行的伺服器憑證所需的內容。
下列命令可產生伺服器憑證。
-
若要產生伺服器憑證簽署要求( CSR )、請從資料夾執行下列命令
/opt/netapp/lib/ontap_mediator/ontap_mediator/server_config:openssl req -config openssl_server.cnf -extensions v3_req -nodes -newkey rsa:4096 -sha512 -keyout ontap_mediator_server.key -out ontap_mediator_server.csr -
要從 CSR 產生伺服器證書,請從 `/opt/netapp/lib/ontap_mediator/ontap_mediator/server_config`資料夾:
這些檔案是從 PKI 授權單位取得的。如果您使用的是不同的憑證名稱,請以相關的檔案名稱取代 ca.crt`和 `ca.key。openssl x509 -extfile openssl_server.cnf -extensions v3_req -CA ca.crt -CAkey ca.key -CAcreateserial -sha512 -days 1095 -req -in ontap_mediator_server.csr -out ontap_mediator_server.crt-
此 `-CAcreateserial`選項用於產生 `ca.srl`檔案。
-
步驟 3 :在 ONTAP Mediator 組態中取代新的協力廠商 CA 憑證和伺服器憑證
憑證設定透過位於下列位置的設定檔提供給 ONTAP 調解器 /opt/netapp/lib/ontap_mediator/ontap_mediator/server_config/ontap_mediator.config.yaml 。檔案包含下列屬性:
cert_path: '/opt/netapp/lib/ontap_mediator/ontap_mediator/server_config/ontap_mediator_server.crt'
key_path: '/opt/netapp/lib/ontap_mediator/ontap_mediator/server_config/ontap_mediator_server.key'
ca_cert_path: '/opt/netapp/lib/ontap_mediator/ontap_mediator/server_config/intermediate.crt'
ca_key_path: '/opt/netapp/lib/ontap_mediator/ontap_mediator/server_config/intermediate.key'
ca_serial_path: '/opt/netapp/lib/ontap_mediator/ontap_mediator/server_config/intermediate.srl'
-
cert_path和key_path為伺服器憑證變數。 -
ca_cert_path、ca_key_path`和 `ca_serial_path為 CA 憑證變數。
-
以協力廠商憑證取代所有
intermediate.*檔案。 -
從和憑證建立憑證鏈結
intermediate.crtontap_mediator_server.crt:cat ontap_mediator_server.crt intermediate.crt > ontap_mediator_server_chain.crt -
更新 `/opt/netapp/lib/ontap_mediator/uvicorn/config.json`文件。
更新
ssl_keyfile,ssl_certfile, 和ssl_ca_certs:ssl_keyfile:/opt/netapp/lib/ontap_mediator/ontap_mediator/server_config/ontap_mediator_server.keyssl_certfile:/opt/netapp/lib/ontap_mediator/ontap_mediator/server_config/ontap_mediator_server_chain.crtssl_ca_certs:/opt/netapp/lib/ontap_mediator/ontap_mediator/server_config/root_ca.crt-
這
ssl_keyfile`值是關鍵路徑 `ontap_mediator_server.crt`文件,即 `ontap_mediator_server.key。 -
這 `ssl_certfile`值是 `ontap_mediator_server_chain.crt`文件。
-
這 `ssl_ca_certs`值是 `root_ca.crt`文件。
-
-
確認新產生憑證的下列屬性已正確設定:
-
Linux 群組擁有者:
netapp:netapp -
Linux 權限:
600
-
-
重新啟動 ONTAP 調解器:
systemctl restart ontap_mediator
憑證設定透過位於下列位置的設定檔提供給 ONTAP 調解器 /opt/netapp/lib/ontap_mediator/ontap_mediator/server_config/ontap_mediator.config.yaml 。檔案包含下列屬性:
cert_path: '/opt/netapp/lib/ontap_mediator/ontap_mediator/server_config/ontap_mediator_server.crt'
key_path: '/opt/netapp/lib/ontap_mediator/ontap_mediator/server_config/ontap_mediator_server.key'
ca_cert_path: '/opt/netapp/lib/ontap_mediator/ontap_mediator/server_config/intermediate.crt'
ca_key_path: '/opt/netapp/lib/ontap_mediator/ontap_mediator/server_config/intermediate.key'
ca_serial_path: '/opt/netapp/lib/ontap_mediator/ontap_mediator/server_config/intermediate.srl'
-
cert_path和key_path為伺服器憑證變數。 -
ca_cert_path、ca_key_path`和 `ca_serial_path為 CA 憑證變數。
-
以協力廠商憑證取代所有
intermediate.*檔案。 -
從和憑證建立憑證鏈結
intermediate.crtontap_mediator_server.crt:cat ontap_mediator_server.crt intermediate.crt > ontap_mediator_server_chain.crt -
更新
/opt/netapp/lib/ontap_mediator/uwsgi/ontap_mediator.ini檔案。更新、和的值
mediator_certmediator_keyca_certificate:set-placeholder = mediator_cert = /opt/netapp/lib/ontap_mediator/ontap_mediator/server_config/ontap_mediator_server_chain.crtset-placeholder = mediator_key = /opt/netapp/lib/ontap_mediator/ontap_mediator/server_config/ontap_mediator_server.keyset-placeholder = ca_certificate = /opt/netapp/lib/ontap_mediator/ontap_mediator/server_config/root_ca.crt-
mediator_cert`值是檔案的路徑 `ontap_mediator_server_chain.crt。 -
mediator_key value`是檔案中的金鑰路徑 `ontap_mediator_server.crt,即ontap_mediator_server.key。 -
ca_certificate`值是檔案的路徑 `root_ca.crt。
-
-
確認新產生憑證的下列屬性已正確設定:
-
Linux 群組擁有者:
netapp:netapp -
Linux 權限:
600
-
-
重新啟動 ONTAP 調解器:
systemctl restart ontap_mediator
憑證設定透過位於下列位置的設定檔提供給 ONTAP 調解器 /opt/netapp/lib/ontap_mediator/ontap_mediator/server_config/ontap_mediator.config.yaml 。檔案包含下列屬性:
cert_path: '/opt/netapp/lib/ontap_mediator/ontap_mediator/server_config/ontap_mediator_server.crt'
key_path: '/opt/netapp/lib/ontap_mediator/ontap_mediator/server_config/ontap_mediator_server.key'
ca_cert_path: '/opt/netapp/lib/ontap_mediator/ontap_mediator/server_config/ca.crt'
ca_key_path: '/opt/netapp/lib/ontap_mediator/ontap_mediator/server_config/ca.key'
ca_serial_path: '/opt/netapp/lib/ontap_mediator/ontap_mediator/server_config/ca.srl'
-
cert_path和key_path為伺服器憑證變數。 -
ca_cert_path、ca_key_path`和 `ca_serial_path為 CA 憑證變數。
-
以協力廠商憑證取代所有
ca.*檔案。 -
從和憑證建立憑證鏈結
ca.crtontap_mediator_server.crt:cat ontap_mediator_server.crt ca.crt > ontap_mediator_server_chain.crt -
更新
/opt/netapp/lib/ontap_mediator/uwsgi/ontap_mediator.ini檔案。更新、和的值
mediator_certmediator_keyca_certificate:set-placeholder = mediator_cert = /opt/netapp/lib/ontap_mediator/ontap_mediator/server_config/ontap_mediator_server_chain.crtset-placeholder = mediator_key = /opt/netapp/lib/ontap_mediator/ontap_mediator/server_config/ontap_mediator_server.keyset-placeholder = ca_certificate = /opt/netapp/lib/ontap_mediator/ontap_mediator/server_config/root_ca.crt-
mediator_cert`值是檔案的路徑 `ontap_mediator_server_chain.crt。 -
mediator_key value`是檔案中的金鑰路徑 `ontap_mediator_server.crt,即ontap_mediator_server.key。 -
ca_certificate`值是檔案的路徑 `root_ca.crt。
-
-
確認新產生憑證的下列屬性已正確設定:
-
Linux 群組擁有者:
netapp:netapp -
Linux 權限:
600
-
-
重新啟動 ONTAP 調解器:
systemctl restart ontap_mediator
步驟 4 :選擇性地為協力廠商憑證使用不同的路徑或名稱
您可以使用名稱不同於其他名稱的協力廠商憑證 intermediate.*,或是將協力廠商憑證儲存在不同的位置。
-
設定
/opt/netapp/lib/ontap_mediator/ontap_mediator/server_config/ontap_mediator.user_config.yaml檔案以覆寫檔案中的預設變數值ontap_mediator.config.yaml。如果您是從 PKI 授權單位取得,並將其私密金鑰儲存在該位置,則
intermediate.crtintermediate.key/opt/netapp/lib/ontap_mediator/ontap_mediator/server_configontap_mediator.user_config.yaml檔案應如下例所示:
如果您使用 intermediate.crt來簽署ontap_mediator_server.crt憑證、intermediate.srl則會產生檔案。如需詳細資訊、請參閱 步驟 2 :使用協力廠商 CA 認證簽署以產生伺服器憑證 。[root@mediator_host server_config]# cat ontap_mediator.user_config.yaml # This config file can be used to override the default settings in ontap_mediator.config.yaml # To override a setting, copy the property key from ontap_mediator.config.yaml to this file and # set the property to the desired value. e.g., # # The default value for 'default_mailboxes_per_target' is 4 in ontap_mediator.config.yaml # # To override this value with 6 mailboxes per target, add the following key/value pair # below this comment: # # 'default_mailboxes_per_target': 6 # cert_path: '/opt/netapp/lib/ontap_mediator/ontap_mediator/server_config/ontap_mediator_server.crt' key_path: '/opt/netapp/lib/ontap_mediator/ontap_mediator/server_config/ontap_mediator_server.key' ca_cert_path: '/opt/netapp/lib/ontap_mediator/ontap_mediator/server_config/intermediate.crt' ca_key_path: '/opt/netapp/lib/ontap_mediator/ontap_mediator/server_config/intermediate.key' ca_serial_path: '/opt/netapp/lib/ontap_mediator/ontap_mediator/server_config/intermediate.srl'
-
如果您使用的憑證結構 `root_ca.crt`證書提供了 `intermediate.crt`簽署證書 `ontap_mediator_server.crt`證書,從建立證書鏈 `intermediate.crt`和 `ontap_mediator_server.crt`證書:
您應該已經從程序稍早的 PKI 授權單位取得 intermediate.crt和ontap_mediator_server.crt憑證。cat ontap_mediator_server.crt intermediate.crt > ontap_mediator_server_chain.crt -
更新 `/opt/netapp/lib/ontap_mediator/uvicorn/config.json`文件。
更新
ssl_keyfile,ssl_certfile, 和ssl_ca_certs:ssl_keyfile:/opt/netapp/lib/ontap_mediator/ontap_mediator/server_config/ontap_mediator_server.keyssl_certfile:/opt/netapp/lib/ontap_mediator/ontap_mediator/server_config/ontap_mediator_server_chain.crtssl_ca_certs:/opt/netapp/lib/ontap_mediator/ontap_mediator/server_config/root_ca.crt-
這
ssl_keyfile`值是關鍵路徑 `ontap_mediator_server.crt`文件,即 `ontap_mediator_server.key。 -
這 `ssl_certfile`值是 `ontap_mediator_server_chain.crt`文件。
-
這 `ssl_ca_certs`值是 `root_ca.crt`文件。
對於SnapMirror業務連續性 (SM-BC) 集群,您必須新增 `intermediate.crt`和 `root_ca.crt`證書到ONTAP集群。看"為 SnapMirror 主動同步配置 ONTAP 調解器和集群"。
-
-
確認新產生憑證的下列屬性已正確設定:
-
Linux 群組擁有者:
netapp:netapp -
Linux 權限:
600
-
-
-
當設定檔中的憑證更新後,重新啟動 ONTAP 調解器:
systemctl restart ontap_mediator
您可以使用名稱不同於其他名稱的協力廠商憑證 intermediate.*,或是將協力廠商憑證儲存在不同的位置。
-
設定
/opt/netapp/lib/ontap_mediator/ontap_mediator/server_config/ontap_mediator.user_config.yaml檔案以覆寫檔案中的預設變數值ontap_mediator.config.yaml。如果您是從 PKI 授權單位取得,並將其私密金鑰儲存在該位置,則
intermediate.crtintermediate.key/opt/netapp/lib/ontap_mediator/ontap_mediator/server_configontap_mediator.user_config.yaml檔案應如下例所示:
如果您使用 intermediate.crt來簽署ontap_mediator_server.crt憑證、intermediate.srl則會產生檔案。如需詳細資訊、請參閱 步驟 2 :使用協力廠商 CA 認證簽署以產生伺服器憑證 。[root@mediator_host server_config]# cat ontap_mediator.user_config.yaml # This config file can be used to override the default settings in ontap_mediator.config.yaml # To override a setting, copy the property key from ontap_mediator.config.yaml to this file and # set the property to the desired value. e.g., # # The default value for 'default_mailboxes_per_target' is 4 in ontap_mediator.config.yaml # # To override this value with 6 mailboxes per target, add the following key/value pair # below this comment: # # 'default_mailboxes_per_target': 6 # cert_path: '/opt/netapp/lib/ontap_mediator/ontap_mediator/server_config/ontap_mediator_server.crt' key_path: '/opt/netapp/lib/ontap_mediator/ontap_mediator/server_config/ontap_mediator_server.key' ca_cert_path: '/opt/netapp/lib/ontap_mediator/ontap_mediator/server_config/intermediate.crt' ca_key_path: '/opt/netapp/lib/ontap_mediator/ontap_mediator/server_config/intermediate.key' ca_serial_path: '/opt/netapp/lib/ontap_mediator/ontap_mediator/server_config/intermediate.srl'
-
如果您使用的憑證結構 `root_ca.crt`證書提供了 `intermediate.crt`簽署證書 `ontap_mediator_server.crt`證書,從建立證書鏈 `intermediate.crt`和 `ontap_mediator_server.crt`證書:
您應該已經從程序稍早的 PKI 授權單位取得 intermediate.crt和ontap_mediator_server.crt憑證。cat ontap_mediator_server.crt intermediate.crt > ontap_mediator_server_chain.crt -
更新
/opt/netapp/lib/ontap_mediator/uwsgi/ontap_mediator.ini檔案。更新、和的值
mediator_certmediator_keyca_certificate:set-placeholder = mediator_cert = /opt/netapp/lib/ontap_mediator/ontap_mediator/server_config/ontap_mediator_server_chain.crtset-placeholder = mediator_key = /opt/netapp/lib/ontap_mediator/ontap_mediator/server_config/ontap_mediator_server.keyset-placeholder = ca_certificate = /opt/netapp/lib/ontap_mediator/ontap_mediator/server_config/root_ca.crt-
mediator_cert`值是檔案的路徑 `ontap_mediator_server_chain.crt。 -
該
mediator_key值是檔案中的金鑰路徑ontap_mediator_server.crt,即ontap_mediator_server.key。 -
ca_certificate`值是檔案的路徑 `root_ca.crt。
對於SnapMirror業務連續性 (SM-BC) 集群,您必須新增 `intermediate.crt`和 `root_ca.crt`證書到ONTAP集群。看"為 SnapMirror 主動同步配置 ONTAP 調解器和集群"。
-
-
確認新產生憑證的下列屬性已正確設定:
-
Linux 群組擁有者:
netapp:netapp -
Linux 權限:
600
-
-
-
當設定檔中的憑證更新後,重新啟動 ONTAP 調解器:
systemctl restart ontap_mediator
您可以使用名稱不同於其他名稱的協力廠商憑證 ca.*,或是將協力廠商憑證儲存在不同的位置。
-
設定
/opt/netapp/lib/ontap_mediator/ontap_mediator/server_config/ontap_mediator.user_config.yaml檔案以覆寫檔案中的預設變數值ontap_mediator.config.yaml。如果您是從 PKI 授權單位取得,並將其私密金鑰儲存在該位置,則
ca.crtca.key/opt/netapp/lib/ontap_mediator/ontap_mediator/server_configontap_mediator.user_config.yaml檔案應如下例所示:
如果您使用 ca.crt來簽署ontap_mediator_server.crt憑證、ca.srl則會產生檔案。如需詳細資訊、請參閱 步驟 2 :使用協力廠商 CA 認證簽署以產生伺服器憑證 。[root@mediator_host server_config]# cat ontap_mediator.user_config.yaml # This config file can be used to override the default settings in ontap_mediator.config.yaml # To override a setting, copy the property key from ontap_mediator.config.yaml to this file and # set the property to the desired value. e.g., # # The default value for 'default_mailboxes_per_target' is 4 in ontap_mediator.config.yaml # # To override this value with 6 mailboxes per target, add the following key/value pair # below this comment: # # 'default_mailboxes_per_target': 6 # cert_path: '/opt/netapp/lib/ontap_mediator/ontap_mediator/server_config/ontap_mediator_server.crt' key_path: '/opt/netapp/lib/ontap_mediator/ontap_mediator/server_config/ontap_mediator_server.key' ca_cert_path: '/opt/netapp/lib/ontap_mediator/ontap_mediator/server_config/ca.crt' ca_key_path: '/opt/netapp/lib/ontap_mediator/ontap_mediator/server_config/ca.key' ca_serial_path: '/opt/netapp/lib/ontap_mediator/ontap_mediator/server_config/ca.srl'
-
如果您使用的是憑證結構、其中
root_ca.crt的憑證提供ca.crt簽署憑證的憑證ontap_mediator_server.crt、請從和憑證建立憑證鏈結ca.crtontap_mediator_server.crt:
您應該已經從程序稍早的 PKI 授權單位取得 ca.crt和ontap_mediator_server.crt憑證。cat ontap_mediator_server.crt ca.crt > ontap_mediator_server_chain.crt -
更新
/opt/netapp/lib/ontap_mediator/uwsgi/ontap_mediator.ini檔案。更新、和的值
mediator_certmediator_keyca_certificate:set-placeholder = mediator_cert = /opt/netapp/lib/ontap_mediator/ontap_mediator/server_config/ontap_mediator_server_chain.crtset-placeholder = mediator_key = /opt/netapp/lib/ontap_mediator/ontap_mediator/server_config/ontap_mediator_server.keyset-placeholder = ca_certificate = /opt/netapp/lib/ontap_mediator/ontap_mediator/server_config/root_ca.crt-
mediator_cert`值是檔案的路徑 `ontap_mediator_server_chain.crt。 -
該
mediator_key值是檔案中的金鑰路徑ontap_mediator_server.crt,即ontap_mediator_server.key。 -
ca_certificate`值是檔案的路徑 `root_ca.crt。
對於 SnapMirror Business Continuity ( SM-BC )叢集、您必須將和憑證新增 ca.crtroot_ca.crt至 ONTAP 叢集。請參閱。 "為 SnapMirror 主動同步配置 ONTAP 調解器和集群"
-
-
確認新產生憑證的下列屬性已正確設定:
-
Linux 群組擁有者:
netapp:netapp -
Linux 權限:
600
-
-
-
當設定檔中的憑證更新後,重新啟動 ONTAP 調解器:
systemctl restart ontap_mediator
疑難排解憑證相關問題
您可以檢查憑證的某些內容。
驗證憑證過期
使用下列命令識別憑證有效範圍。
[root@mediator_host server_config]# openssl x509 -in intermediate.crt -text -noout
Certificate:
    Data:
...
        Validity
            Not Before: Feb 22 19:57:25 2024 GMT
            Not After : Feb 15 19:57:25 2029 GMT
[root@mediator_host server_config]# openssl x509 -in ca.crt -text -noout
Certificate:
    Data:
...
        Validity
            Not Before: Feb 22 19:57:25 2024 GMT
            Not After : Feb 15 19:57:25 2029 GMT
驗證 CA 認證中的 X509v3 延伸
使用下列命令來驗證 CA 認證中的 X509v3 延伸。
中 openssl_ca.cnf`定義的內容 `v3_ca`會顯示為 `X509v3 extensions intermediate.crt。
[root@mediator_host server_config]# pwd
/opt/netapp/lib/ontap_mediator/ontap_mediator/server_config

[root@mediator_host server_config]# cat openssl_ca.cnf
...
[ v3_ca ]
subjectKeyIdentifier = hash
authorityKeyIdentifier = keyid:always,issuer
basicConstraints = critical, CA:true
keyUsage = critical, cRLSign, digitalSignature, keyCertSign

[root@mediator_host server_config]# openssl x509 -in intermediate.crt -text -noout
Certificate:
    Data:
...
        X509v3 extensions:
            X509v3 Subject Key Identifier:
                9F:06:FA:47:00:67:BA:B2:D4:82:70:38:B8:48:55:B5:24:DB:FC:27
            X509v3 Authority Key Identifier:
                keyid:9F:06:FA:47:00:67:BA:B2:D4:82:70:38:B8:48:55:B5:24:DB:FC:27

            X509v3 Basic Constraints: critical
                CA:TRUE
            X509v3 Key Usage: critical
                Digital Signature, Certificate Sign, CRL Sign
中 openssl_ca.cnf`定義的內容 `v3_ca`會顯示為 `X509v3 extensions ca.crt。
[root@mediator_host server_config]# pwd
/opt/netapp/lib/ontap_mediator/ontap_mediator/server_config

[root@mediator_host server_config]# cat openssl_ca.cnf
...
[ v3_ca ]
subjectKeyIdentifier = hash
authorityKeyIdentifier = keyid:always,issuer
basicConstraints = critical, CA:true
keyUsage = critical, cRLSign, digitalSignature, keyCertSign

[root@mediator_host server_config]# openssl x509 -in ca.crt -text -noout
Certificate:
    Data:
...
        X509v3 extensions:
            X509v3 Subject Key Identifier:
                9F:06:FA:47:00:67:BA:B2:D4:82:70:38:B8:48:55:B5:24:DB:FC:27
            X509v3 Authority Key Identifier:
                keyid:9F:06:FA:47:00:67:BA:B2:D4:82:70:38:B8:48:55:B5:24:DB:FC:27

            X509v3 Basic Constraints: critical
                CA:TRUE
            X509v3 Key Usage: critical
                Digital Signature, Certificate Sign, CRL Sign
驗證伺服器憑證和主體替代名稱中的 X509v3 副檔名
。 v3_req 中定義的內容 openssl_server.cnf 組態檔案會顯示為 X509v3 extensions 在憑證中。
在下面的例子中,你可以獲取 `alt_names`透過運行命令 `hostname -A`和 `hostname -I`在安裝了 ONTAP Mediator 的 Linux VM 上。
請洽詢您的網路管理員、以取得正確的變數值。
[root@mediator_host server_config]# pwd
/opt/netapp/lib/ontap_mediator/ontap_mediator/server_config

[root@mediator_host server_config]# cat openssl_server.cnf
...
[ v3_req ]
basicConstraints       = CA:false
extendedKeyUsage       = serverAuth
keyUsage               = keyEncipherment, dataEncipherment
subjectAltName         = @alt_names

[ alt_names ]
DNS.1 = abc.company.com
DNS.2 = abc-v6.company.com
IP.1 = 1.2.3.4
IP.2 = abcd:abcd:abcd:abcd:abcd:abcd

[root@mediator_host server_config]# openssl x509 -in intermediate.crt -text -noout
Certificate:
    Data:
...

        X509v3 extensions:
            X509v3 Basic Constraints:
                CA:FALSE
            X509v3 Extended Key Usage:
                TLS Web Server Authentication
            X509v3 Key Usage:
                Key Encipherment, Data Encipherment
            X509v3 Subject Alternative Name:
                DNS:abc.company.com, DNS:abc-v6.company.com, IP Address:1.2.3.4, IP Address:abcd:abcd:abcd:abcd:abcd:abcd
[root@mediator_host server_config]# pwd
/opt/netapp/lib/ontap_mediator/ontap_mediator/server_config

[root@mediator_host server_config]# cat openssl_server.cnf
...
[ v3_req ]
basicConstraints       = CA:false
extendedKeyUsage       = serverAuth
keyUsage               = keyEncipherment, dataEncipherment
subjectAltName         = @alt_names

[ alt_names ]
DNS.1 = abc.company.com
DNS.2 = abc-v6.company.com
IP.1 = 1.2.3.4
IP.2 = abcd:abcd:abcd:abcd:abcd:abcd

[root@mediator_host server_config]# openssl x509 -in ca.crt -text -noout
Certificate:
    Data:
...

        X509v3 extensions:
            X509v3 Basic Constraints:
                CA:FALSE
            X509v3 Extended Key Usage:
                TLS Web Server Authentication
            X509v3 Key Usage:
                Key Encipherment, Data Encipherment
            X509v3 Subject Alternative Name:
                DNS:abc.company.com, DNS:abc-v6.company.com, IP Address:1.2.3.4, IP Address:abcd:abcd:abcd:abcd:abcd:abcd
確認私密金鑰與憑證相符
您可以驗證特定私密金鑰是否與憑證相符。
請分別在金鑰和憑證上使用下列 OpenSSL 命令。
[root@mediator_host server_config]# openssl rsa -noout -modulus -in intermediate.key | openssl md5
Enter pass phrase for intermediate.key:
(stdin)= 14c6b98b0c7c59012b1de89eee4a9dbc
[root@mediator_host server_config]# openssl x509 -noout -modulus -in intermediate.crt | openssl md5
(stdin)= 14c6b98b0c7c59012b1de89eee4a9dbc
[root@mediator_host server_config]# openssl rsa -noout -modulus -in ca.key | openssl md5
Enter pass phrase for ca.key:
(stdin)= 14c6b98b0c7c59012b1de89eee4a9dbc
[root@mediator_host server_config]# openssl x509 -noout -modulus -in ca.crt | openssl md5
(stdin)= 14c6b98b0c7c59012b1de89eee4a9dbc
如果是 -modulus 這兩種配對的屬性都表示私密金鑰與憑證配對是相容的、可以彼此搭配使用。
確認伺服器憑證是從特定 CA 憑證建立
您可以使用下列命令來驗證伺服器憑證是從特定 CA 憑證建立的。
[root@mediator_host server_config]# openssl verify -CAfile root_ca.crt --untrusted intermediate.crt ontap_mediator_server.crt
ontap_mediator_server.crt: OK
[root@mediator_host server_config]#
[root@mediator_host server_config]# openssl verify -CAfile ca.crt ontap_mediator_server.crt
ontap_mediator_server.crt: OK
如果正在使用線上憑證狀態通訊協定 (OCSP) 驗證,請使用命令 "openssl 驗證"。