

TR-4998: Oracle HA in AWS EC2 con Pacemaker Clustering e FSx ONTAP
 Suggerisci modifiche
Allen Cao, Niyaz Mohamed, NetApp
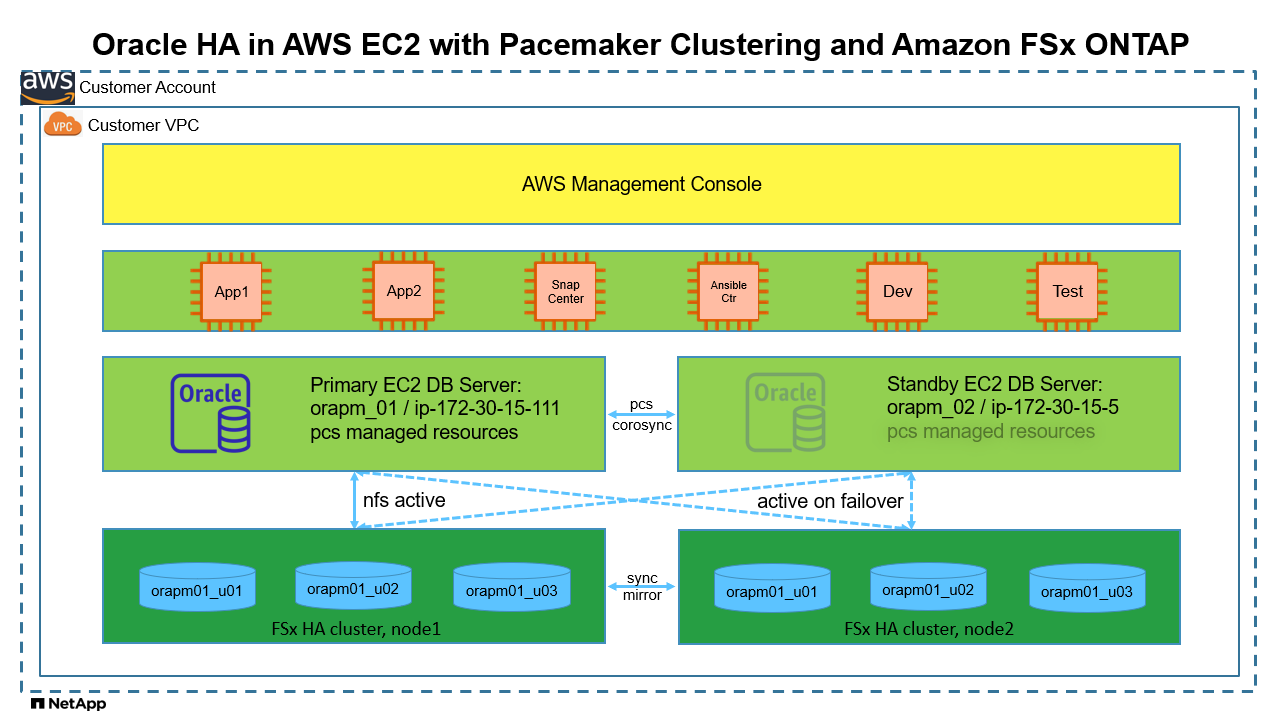
Questa soluzione fornisce una panoramica e dettagli per abilitare l'alta disponibilità (HA) di Oracle in AWS EC2 con clustering Pacemaker su Redhat Enterprise Linux (RHEL) e Amazon FSx ONTAP per l'archiviazione HA del database tramite protocollo NFS.
Scopo
Molti clienti che desiderano autogestire e gestire Oracle nel cloud pubblico devono superare alcune sfide. Una di queste sfide è garantire un'elevata disponibilità per il database Oracle. Tradizionalmente, i clienti Oracle si affidano a una funzionalità del database Oracle denominata "Real Application Cluster" o RAC per il supporto delle transazioni attive-attive su più nodi del cluster. Un nodo guasto non bloccherebbe l'elaborazione dell'applicazione. Sfortunatamente, l'implementazione di Oracle RAC non è prontamente disponibile o supportata in molti cloud pubblici diffusi, come AWS EC2. Sfruttando il clustering Pacemaker (PCS) integrato in RHEL e Amazon FSx ONTAP, i clienti possono ottenere un'alternativa valida senza i costi di licenza Oracle RAC per il clustering attivo-passivo sia su elaborazione che su storage per supportare carichi di lavoro di database Oracle mission-critical nel cloud AWS.
Questa documentazione illustra i dettagli della configurazione del clustering Pacemaker su RHEL, della distribuzione del database Oracle su EC2 e Amazon FSx ONTAP con protocollo NFS, della configurazione delle risorse Oracle in Pacemaker per HA e del completamento della demo con la convalida negli scenari HA più comuni. La soluzione fornisce inoltre informazioni sul backup, il ripristino e la clonazione rapidi del database Oracle con lo strumento NetApp SnapCenter UI.
Questa soluzione affronta i seguenti casi d'uso:
-
Impostazione e configurazione del clustering HA di Pacemaker in RHEL.
-
Distribuzione HA del database Oracle in AWS EC2 e Amazon FSx ONTAP.
Pubblico
Questa soluzione è destinata alle seguenti persone:
-
Un DBA che desidera distribuire Oracle in AWS EC2 e Amazon FSx ONTAP.
-
Un architetto di soluzioni di database che desidera testare i carichi di lavoro Oracle in AWS EC2 e Amazon FSx ONTAP.
-
Un amministratore di storage che desidera distribuire e gestire un database Oracle in AWS EC2 e Amazon FSx ONTAP.
-
Un proprietario di un'applicazione che vorrebbe installare un database Oracle in AWS EC2 e Amazon FSx ONTAP.
Ambiente di test e convalida della soluzione
I test e la convalida di questa soluzione sono stati eseguiti in un ambiente di laboratorio che potrebbe non corrispondere all'ambiente di distribuzione finale. Vedi la sezioneFattori chiave per la considerazione dell'implementazione per maggiori informazioni.
Architettura
Componenti hardware e software
Hardware |
||
Archiviazione Amazon FSx ONTAP |
Versione attuale offerta da AWS |
Single-AZ in us-east-1, capacità 1024 GiB, throughput 128 MB/s |
Istanze EC2 per server DB |
t2.xlarge/4vCPU/16G |
Due istanze EC2 T2 xlarge EC2, una come server DB primario e l'altra come server DB di standby |
VM per il controller Ansible |
4 vCPU, 16 GiB di RAM |
Una VM Linux per eseguire il provisioning automatizzato di AWS EC2/FSx e la distribuzione Oracle su NFS |
Software |
||
RedHat Linux |
RHEL Linux 8.6 (LVM) - x64 Gen2 |
Abbonamento RedHat distribuito per i test |
Database Oracle |
Versione 19.18 |
Patch RU applicata p34765931_190000_Linux-x86-64.zip |
Oracle OPatch |
Versione 12.2.0.1.36 |
Ultima patch p6880880_190000_Linux-x86-64.zip |
Pacemaker |
Versione 0.10.18 |
Componente aggiuntivo ad alta disponibilità per RHEL 8.0 di RedHat |
NFS |
Versione 3.0 |
Oracle dNFS abilitato |
Ansible |
nucleo 2.16.2 |
Python 3.6.8 |
Configurazione attiva/passiva del database Oracle nell'ambiente di laboratorio AWS EC2/FSx
Server |
Banca dati |
Archiviazione DB |
nodo primario: orapm01/ip-172.30.15.111 |
NTAP(NTAP_PDB1,NTAP_PDB2,NTAP_PDB3) |
/u01, /u02, /u03 Montaggi NFS su volumi Amazon FSx ONTAP |
nodo di standby: orapm02/ip-172.30.15.5 |
NTAP(NTAP_PDB1,NTAP_PDB2,NTAP_PDB3) in caso di failover |
/u01, /u02, /u03 NFS montati durante il failover |
Fattori chiave per la considerazione dell'implementazione
-
* Amazon FSx ONTAP HA.* Per impostazione predefinita, Amazon FSx ONTAP viene fornito in una coppia HA di controller di storage in una o più zone di disponibilità. Fornisce ridondanza di archiviazione in modalità attiva/passiva per carichi di lavoro di database critici. Il failover dell'archiviazione è trasparente per l'utente finale. In caso di failover dell'archiviazione non è richiesto l'intervento dell'utente.
-
Gruppo di risorse PCS e ordinamento delle risorse. Un gruppo di risorse consente l'esecuzione di più risorse con dipendenza sullo stesso nodo del cluster. L'ordine delle risorse applica l'ordine di avvio delle risorse e l'ordine di arresto in senso inverso.
-
Nodo preferito. Il cluster Pacemaker è volutamente distribuito in clustering attivo/passivo (non un requisito di Pacemaker) ed è sincronizzato con il clustering FSx ONTAP . L'istanza EC2 attiva è configurata come nodo preferito per le risorse Oracle quando disponibile con un vincolo di posizione.
-
Ritardo di recinzione sul nodo di standby. In un cluster PCS a due nodi, il quorum viene impostato artificialmente su 1. In caso di problemi di comunicazione tra i nodi del cluster, uno dei due nodi potrebbe tentare di isolare l'altro, il che potrebbe potenzialmente causare il danneggiamento dei dati. L'impostazione di un ritardo sul nodo di standby attenua il problema e consente al nodo primario di continuare a fornire servizi mentre il nodo di standby è isolato.
-
Considerazioni sulla distribuzione multi-az. La soluzione viene distribuita e convalidata in un'unica zona di disponibilità. Per la distribuzione multi-az, sono necessarie risorse di rete AWS aggiuntive per spostare l'IP flottante PCS tra le zone di disponibilità.
-
Layout di archiviazione del database Oracle. In questa dimostrazione della soluzione, forniamo tre volumi di database per il database di prova NTAP per ospitare i dati binari, i dati e il registro di Oracle. I volumi vengono montati sul server Oracle DB come /u01 - binario, /u02 - dati e /u03 - registro tramite NFS. Per ridondanza, i file di controllo doppi sono configurati sui punti di montaggio /u02 e /u03.
-
configurazione dNFS. Utilizzando dNFS (disponibile a partire da Oracle 11g), un database Oracle in esecuzione su una DB VM può gestire un I/O significativamente maggiore rispetto al client NFS nativo. Per impostazione predefinita, la distribuzione automatizzata di Oracle configura dNFS su NFSv3.
-
Backup del database. NetApp fornisce una suite SnapCenter software per il backup, il ripristino e la clonazione del database con un'interfaccia utente intuitiva. NetApp consiglia di implementare tale strumento di gestione per ottenere un backup snapshot rapido (in meno di un minuto), un ripristino rapido del database (in pochi minuti) e una clonazione del database.
Distribuzione della soluzione
Le sezioni seguenti forniscono procedure dettagliate per la distribuzione e la configurazione dell'HA del database Oracle in AWS EC2 con clustering Pacemaker e Amazon FSx ONTAP per la protezione dell'archiviazione del database.
Prerequisiti per la distribuzione
Details
Per la distribuzione sono richiesti i seguenti prerequisiti.
-
È stato configurato un account AWS e sono stati creati i segmenti di rete e VPC necessari all'interno del tuo account AWS.
-
Fornire una VM Linux come nodo controller Ansible con installata l'ultima versione di Ansible e Git. Per maggiori dettagli fare riferimento al seguente link:"Introduzione all'automazione delle soluzioni NetApp " nella sezione -
Setup the Ansible Control Node for CLI deployments on RHEL / CentOSO
Setup the Ansible Control Node for CLI deployments on Ubuntu / Debian.Abilita l'autenticazione tramite chiave pubblica/privata SSH tra il controller Ansible e le VM del database dell'istanza EC2.
Fornire istanze EC2 e cluster di storage Amazon FSx ONTAP
Details
Sebbene sia possibile effettuare il provisioning manuale delle istanze EC2 e Amazon FSx ONTAP dalla console AWS, si consiglia di utilizzare il toolkit di automazione basato su NetApp Terraform per automatizzare il provisioning delle istanze EC2 e del cluster di storage FSx ONTAP . Di seguito sono riportate le procedure dettagliate.
-
Da AWS CloudShell o dalla VM del controller Ansible, clonare una copia del toolkit di automazione per EC2 e FSx ONTAP.
git clone https://bitbucket.ngage.netapp.com/scm/ns-bb/na_aws_fsx_ec2_deploy.git
Se il toolkit non viene eseguito da AWS CloudShell, è richiesta l'autenticazione AWS CLI con il tuo account AWS utilizzando la coppia di chiavi segrete/accesso all'account utente AWS. -
Esaminare il file READme.md incluso nel toolkit. Rivedere main.tf e i file dei parametri associati secondo necessità per le risorse AWS richieste.
An example of main.tf: resource "aws_instance" "orapm01" { ami = var.ami instance_type = var.instance_type subnet_id = var.subnet_id key_name = var.ssh_key_name root_block_device { volume_type = "gp3" volume_size = var.root_volume_size } tags = { Name = var.ec2_tag1 } } resource "aws_instance" "orapm02" { ami = var.ami instance_type = var.instance_type subnet_id = var.subnet_id key_name = var.ssh_key_name root_block_device { volume_type = "gp3" volume_size = var.root_volume_size } tags = { Name = var.ec2_tag2 } } resource "aws_fsx_ontap_file_system" "fsx_01" { storage_capacity = var.fs_capacity subnet_ids = var.subnet_ids preferred_subnet_id = var.preferred_subnet_id throughput_capacity = var.fs_throughput fsx_admin_password = var.fsxadmin_password deployment_type = var.deployment_type disk_iops_configuration { iops = var.iops mode = var.iops_mode } tags = { Name = var.fsx_tag } } resource "aws_fsx_ontap_storage_virtual_machine" "svm_01" { file_system_id = aws_fsx_ontap_file_system.fsx_01.id name = var.svm_name svm_admin_password = var.vsadmin_password } -
Convalidare ed eseguire il piano Terraform. Un'esecuzione corretta creerebbe due istanze EC2 e un cluster di storage FSx ONTAP nell'account AWS di destinazione. L'output di automazione visualizza l'indirizzo IP dell'istanza EC2 e gli endpoint del cluster FSx ONTAP .
terraform plan -out=main.planterraform apply main.plan
Questo completa il provisioning delle istanze EC2 e di FSx ONTAP per Oracle.
Configurazione del cluster pacemaker
Details
L'High Availability Add-On per RHEL è un sistema clusterizzato che fornisce affidabilità, scalabilità e disponibilità ai servizi di produzione critici, come i servizi di database Oracle. In questa dimostrazione di caso d'uso, un cluster Pacemaker a due nodi viene impostato e configurato per supportare l'elevata disponibilità di un database Oracle in uno scenario di clustering attivo/passivo.
Accedi alle istanze EC2, come ec2-user, completa le seguenti attività su both Istanze EC2:
-
Rimuovere il client AWS Red Hat Update Infrastructure (RHUI).
sudo -i yum -y remove rh-amazon-rhui-client* -
Registrare le VM dell'istanza EC2 con Red Hat.
sudo subscription-manager register --username xxxxxxxx --password 'xxxxxxxx' --auto-attach -
Abilita gli RPM ad alta disponibilità RHEL.
sudo subscription-manager config --rhsm.manage_repos=1sudo subscription-manager repos --enable=rhel-8-for-x86_64-highavailability-rpms -
Installare un pacemaker e recintare di fronte.
sudo yum update -ysudo yum install pcs pacemaker fence-agents-aws -
Creare una password per l'utente hacluster su tutti i nodi del cluster. Utilizzare la stessa password per tutti i nodi.
sudo passwd hacluster -
Avviare il servizio pcs e abilitarne l'avvio all'avvio.
sudo systemctl start pcsd.servicesudo systemctl enable pcsd.service -
Convalida il servizio pcsd.
sudo systemctl status pcsd[ec2-user@ip-172-30-15-5 ~]$ sudo systemctl status pcsd ● pcsd.service - PCS GUI and remote configuration interface Loaded: loaded (/usr/lib/systemd/system/pcsd.service; enabled; vendor preset: disabled) Active: active (running) since Tue 2024-09-10 18:50:22 UTC; 33s ago Docs: man:pcsd(8) man:pcs(8) Main PID: 65302 (pcsd) Tasks: 1 (limit: 100849) Memory: 24.0M CGroup: /system.slice/pcsd.service └─65302 /usr/libexec/platform-python -Es /usr/sbin/pcsd Sep 10 18:50:21 ip-172-30-15-5.ec2.internal systemd[1]: Starting PCS GUI and remote configuration interface... Sep 10 18:50:22 ip-172-30-15-5.ec2.internal systemd[1]: Started PCS GUI and remote configuration interface. -
Aggiungere nodi del cluster ai file host.
sudo vi /etc/hosts[ec2-user@ip-172-30-15-5 ~]$ cat /etc/hosts 127.0.0.1 localhost localhost.localdomain localhost4 localhost4.localdomain4 ::1 localhost localhost.localdomain localhost6 localhost6.localdomain6 # cluster nodes 172.30.15.111 ip-172-30-15-111.ec2.internal 172.30.15.5 ip-172-30-15-5.ec2.internal
-
Installa e configura awscli per la connettività all'account AWS.
sudo yum install awsclisudo aws configure[ec2-user@ip-172-30-15-111 ]# sudo aws configure AWS Access Key ID [None]: XXXXXXXXXXXXXXXXX AWS Secret Access Key [None]: XXXXXXXXXXXXXXXX Default region name [None]: us-east-1 Default output format [None]: json
-
Installare il pacchetto resource-agents se non è già installato.
sudo yum install resource-agents
SU only one del nodo del cluster, completare le seguenti attività per creare il cluster pcs.
-
Autenticare l'utente pcs hacluster.
sudo pcs host auth ip-172-30-15-5.ec2.internal ip-172-30-15-111.ec2.internal[ec2-user@ip-172-30-15-111 ~]$ sudo pcs host auth ip-172-30-15-5.ec2.internal ip-172-30-15-111.ec2.internal Username: hacluster Password: ip-172-30-15-111.ec2.internal: Authorized ip-172-30-15-5.ec2.internal: Authorized
-
Creare il cluster pcs.
sudo pcs cluster setup ora_ec2nfsx ip-172-30-15-5.ec2.internal ip-172-30-15-111.ec2.internal[ec2-user@ip-172-30-15-111 ~]$ sudo pcs cluster setup ora_ec2nfsx ip-172-30-15-5.ec2.internal ip-172-30-15-111.ec2.internal No addresses specified for host 'ip-172-30-15-5.ec2.internal', using 'ip-172-30-15-5.ec2.internal' No addresses specified for host 'ip-172-30-15-111.ec2.internal', using 'ip-172-30-15-111.ec2.internal' Destroying cluster on hosts: 'ip-172-30-15-111.ec2.internal', 'ip-172-30-15-5.ec2.internal'... ip-172-30-15-5.ec2.internal: Successfully destroyed cluster ip-172-30-15-111.ec2.internal: Successfully destroyed cluster Requesting remove 'pcsd settings' from 'ip-172-30-15-111.ec2.internal', 'ip-172-30-15-5.ec2.internal' ip-172-30-15-111.ec2.internal: successful removal of the file 'pcsd settings' ip-172-30-15-5.ec2.internal: successful removal of the file 'pcsd settings' Sending 'corosync authkey', 'pacemaker authkey' to 'ip-172-30-15-111.ec2.internal', 'ip-172-30-15-5.ec2.internal' ip-172-30-15-111.ec2.internal: successful distribution of the file 'corosync authkey' ip-172-30-15-111.ec2.internal: successful distribution of the file 'pacemaker authkey' ip-172-30-15-5.ec2.internal: successful distribution of the file 'corosync authkey' ip-172-30-15-5.ec2.internal: successful distribution of the file 'pacemaker authkey' Sending 'corosync.conf' to 'ip-172-30-15-111.ec2.internal', 'ip-172-30-15-5.ec2.internal' ip-172-30-15-111.ec2.internal: successful distribution of the file 'corosync.conf' ip-172-30-15-5.ec2.internal: successful distribution of the file 'corosync.conf' Cluster has been successfully set up.
-
Abilitare il cluster.
sudo pcs cluster enable --all[ec2-user@ip-172-30-15-111 ~]$ sudo pcs cluster enable --all ip-172-30-15-5.ec2.internal: Cluster Enabled ip-172-30-15-111.ec2.internal: Cluster Enabled
-
Avviare e convalidare il cluster.
sudo pcs cluster start --allsudo pcs status[ec2-user@ip-172-30-15-111 ~]$ sudo pcs status Cluster name: ora_ec2nfsx WARNINGS: No stonith devices and stonith-enabled is not false Cluster Summary: * Stack: corosync (Pacemaker is running) * Current DC: ip-172-30-15-111.ec2.internal (version 2.1.7-5.1.el8_10-0f7f88312) - partition with quorum * Last updated: Wed Sep 11 15:43:23 2024 on ip-172-30-15-111.ec2.internal * Last change: Wed Sep 11 15:43:06 2024 by hacluster via hacluster on ip-172-30-15-111.ec2.internal * 2 nodes configured * 0 resource instances configured Node List: * Online: [ ip-172-30-15-5.ec2.internal ip-172-30-15-111.ec2.internal ] Full List of Resources: * No resources Daemon Status: corosync: active/enabled pacemaker: active/enabled pcsd: active/enabled
Questo completa l'installazione del cluster Pacemaker e la configurazione iniziale.
Configurazione della recinzione del cluster di pacemaker
Details
La configurazione del pacemaker è obbligatoria per un cluster di produzione. Garantisce che un nodo malfunzionante sul cluster AWS EC2 venga automaticamente isolato, impedendo così al nodo di consumare le risorse del cluster, compromettendone la funzionalità o danneggiando i dati condivisi. Questa sezione illustra la configurazione del cluster fencing utilizzando l'agente di fencing fence_aws.
-
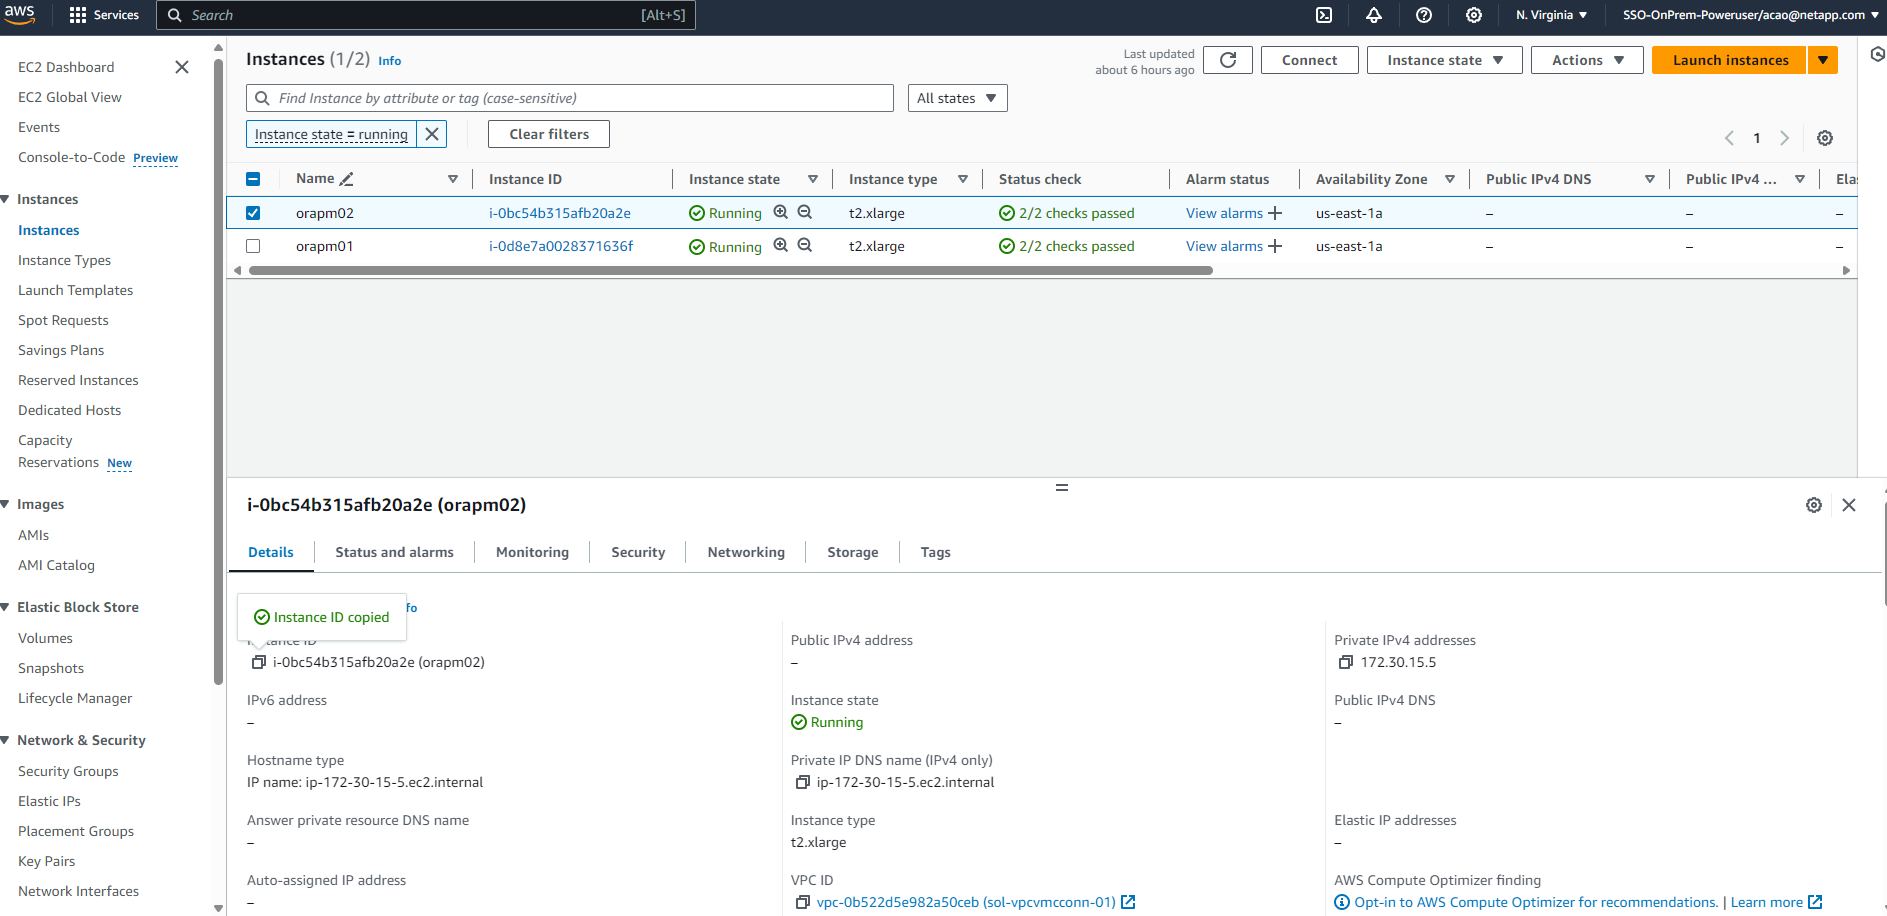
Come utente root, immetti la seguente query di metadati AWS per ottenere l'ID istanza per ciascun nodo di istanza EC2.
echo $(curl -s http://169.254.169.254/latest/meta-data/instance-id)[root@ip-172-30-15-111 ec2-user]# echo $(curl -s http://169.254.169.254/latest/meta-data/instance-id) i-0d8e7a0028371636f or just get instance-id from AWS EC2 console
-
Immettere il seguente comando per configurare il dispositivo di recinzione. Utilizzare il comando pcmk_host_map per mappare il nome host RHEL all'ID istanza. Utilizza la chiave di accesso AWS e la chiave di accesso segreta AWS dell'account utente AWS utilizzato in precedenza per l'autenticazione AWS.
sudo pcs stonith \ create clusterfence fence_aws access_key=XXXXXXXXXXXXXXXXX secret_key=XXXXXXXXXXXXXXXXXX \ region=us-east-1 pcmk_host_map="ip-172-30-15-111.ec2.internal:i-0d8e7a0028371636f;ip-172-30-15-5.ec2.internal:i-0bc54b315afb20a2e" \ power_timeout=240 pcmk_reboot_timeout=480 pcmk_reboot_retries=4 -
Convalidare la configurazione della recinzione.
pcs status[root@ip-172-30-15-111 ec2-user]# pcs status Cluster name: ora_ec2nfsx Cluster Summary: * Stack: corosync (Pacemaker is running) * Current DC: ip-172-30-15-111.ec2.internal (version 2.1.7-5.1.el8_10-0f7f88312) - partition with quorum * Last updated: Wed Sep 11 21:17:18 2024 on ip-172-30-15-111.ec2.internal * Last change: Wed Sep 11 21:16:40 2024 by root via root on ip-172-30-15-111.ec2.internal * 2 nodes configured * 1 resource instance configured Node List: * Online: [ ip-172-30-15-5.ec2.internal ip-172-30-15-111.ec2.internal ] Full List of Resources: * clusterfence (stonith:fence_aws): Started ip-172-30-15-111.ec2.internal Daemon Status: corosync: active/enabled pacemaker: active/enabled pcsd: active/enabled
-
Impostare stonith-action su off anziché riavviare a livello di cluster.
pcs property set stonith-action=off[root@ip-172-30-15-111 ec2-user]# pcs property config Cluster Properties: cluster-infrastructure: corosync cluster-name: ora_ec2nfsx dc-version: 2.1.7-5.1.el8_10-0f7f88312 have-watchdog: false last-lrm-refresh: 1726257586 stonith-action: off
Se stonith-action è impostato su off, il nodo del cluster recintato verrà inizialmente arrestato. Dopo il periodo definito in stonith power_timeout (240 secondi), il nodo recintato verrà riavviato e si ricongiungerà al cluster. -
Imposta il ritardo di recinzione a 10 secondi per il nodo di standby.
pcs stonith update clusterfence pcmk_delay_base="ip-172-30-15-111.ec2.internal:0;ip-172-30-15-5.ec2.internal:10s"[root@ip-172-30-15-111 ec2-user]# pcs stonith config Resource: clusterfence (class=stonith type=fence_aws) Attributes: clusterfence-instance_attributes access_key=XXXXXXXXXXXXXXXX pcmk_delay_base=ip-172-30-15-111.ec2.internal:0;ip-172-30-15-5.ec2.internal:10s pcmk_host_map=ip-172-30-15-111.ec2.internal:i-0d8e7a0028371636f;ip-172-30-15-5.ec2.internal:i-0bc54b315afb20a2e pcmk_reboot_retries=4 pcmk_reboot_timeout=480 power_timeout=240 region=us-east-1 secret_key=XXXXXXXXXXXXXXXX Operations: monitor: clusterfence-monitor-interval-60s interval=60s
|
|
Eseguire pcs stonith refresh comando per aggiornare l'agente di recinzione Stonith arrestato o cancellare le azioni di risorsa Stonith non riuscite.
|
Distribuisci il database Oracle nel cluster PCS
Details
Si consiglia di sfruttare il playbook Ansible fornito da NetApp per eseguire attività di installazione e configurazione del database con parametri predefiniti sul cluster PCS. Per questa distribuzione Oracle automatizzata, tre file di parametri definiti dall'utente necessitano dell'input dell'utente prima dell'esecuzione del playbook.
-
host: definiscono i target su cui viene eseguito il playbook di automazione.
-
vars/vars.yml: il file delle variabili globali che definisce le variabili che si applicano a tutti i target.
-
host_vars/host_name.yml: il file delle variabili locali che definisce le variabili che si applicano solo a una destinazione denominata. Nel nostro caso d'uso, si tratta dei server Oracle DB.
Oltre a questi file di variabili definiti dall'utente, esistono diversi file di variabili predefiniti che contengono parametri predefiniti che non richiedono modifiche, a meno che non siano strettamente necessari. Di seguito sono riportati i dettagli della distribuzione automatizzata di Oracle in AWS EC2 e FSx ONTAP in una configurazione di clustering PCS.
-
Dalla directory home dell'utente amministratore del controller Ansible, clonare una copia del toolkit di automazione della distribuzione NetApp Oracle per NFS.
git clone https://bitbucket.ngage.netapp.com/scm/ns-bb/na_oracle_deploy_nfs.git
Il controller Ansible può essere posizionato nella stessa VPC dell'istanza EC2 del database oppure in locale, a condizione che vi sia connettività di rete tra di essi. -
Inserire i parametri definiti dall'utente nei file dei parametri degli host. Di seguito sono riportati esempi di configurazione tipica del file host.
[admin@ansiblectl na_oracle_deploy_nfs]$ cat hosts
#Oracle hosts
[oracle]
orapm01 ansible_host=172.30.15.111 ansible_ssh_private_key_file=ec2-user.pem
orapm02 ansible_host=172.30.15.5 ansible_ssh_private_key_file=ec2-user.pem
-
Inserire i parametri definiti dall'utente nei file dei parametri vars/vars.yml. Di seguito sono riportati alcuni esempi di configurazione tipica del file vars.yml.
[admin@ansiblectl na_oracle_deploy_nfs]$ cat vars/vars.yml
######################################################################
###### Oracle 19c deployment user configuration variables       ######
###### Consolidate all variables from ONTAP, linux and oracle   ######
######################################################################

###########################################
### ONTAP env specific config variables ###
###########################################

# Prerequisite to create three volumes in NetApp ONTAP storage from System Manager or cloud dashboard with following naming convention:
# db_hostname_u01 - Oracle binary
# db_hostname_u02 - Oracle data
# db_hostname_u03 - Oracle redo
# It is important to strictly follow the name convention or the automation will fail.


###########################################
### Linux env specific config variables ###
###########################################

redhat_sub_username: xxxxxxxx
redhat_sub_password: "xxxxxxxx"


####################################################
### DB env specific install and config variables ###
####################################################

# Database domain name
db_domain: ec2.internal

# Set initial password for all required Oracle passwords. Change them after installation.
initial_pwd_all: "xxxxxxxx"
-
Inserire i parametri definiti dall'utente nei file dei parametri host_vars/host_name.yml. Di seguito sono riportati alcuni esempi di configurazione tipica del file host_vars/host_name.yml.
[admin@ansiblectl na_oracle_deploy_nfs]$ cat host_vars/orapm01.yml
# User configurable Oracle host specific parameters

# Database SID. By default, a container DB is created with 3 PDBs within the CDB
oracle_sid: NTAP

# CDB is created with SGA at 75% of memory_limit, MB. Consider how many databases to be hosted on the node and
# how much ram to be allocated to each DB. The grand total of SGA should not exceed 75% available RAM on node.
memory_limit: 8192

# Local NFS lif ip address to access database volumes
nfs_lif: 172.30.15.95
L'indirizzo nfs_lif può essere recuperato dagli endpoint del cluster FSx ONTAP in uscita dalla distribuzione automatizzata di EC2 e FSx ONTAP nella sezione precedente. -
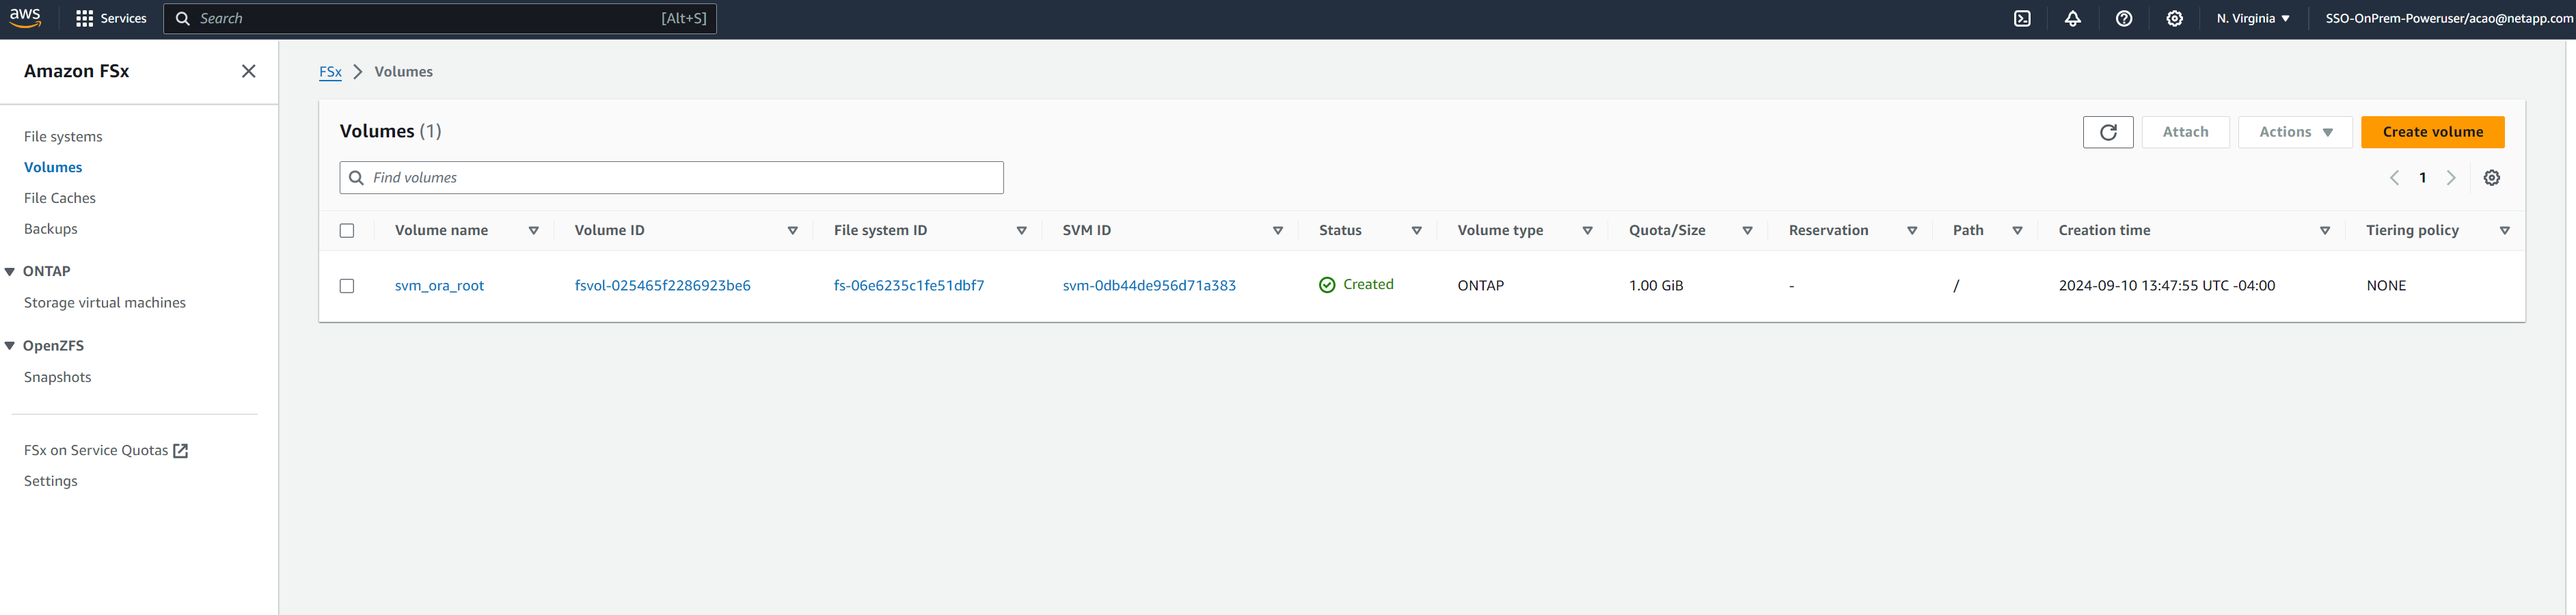
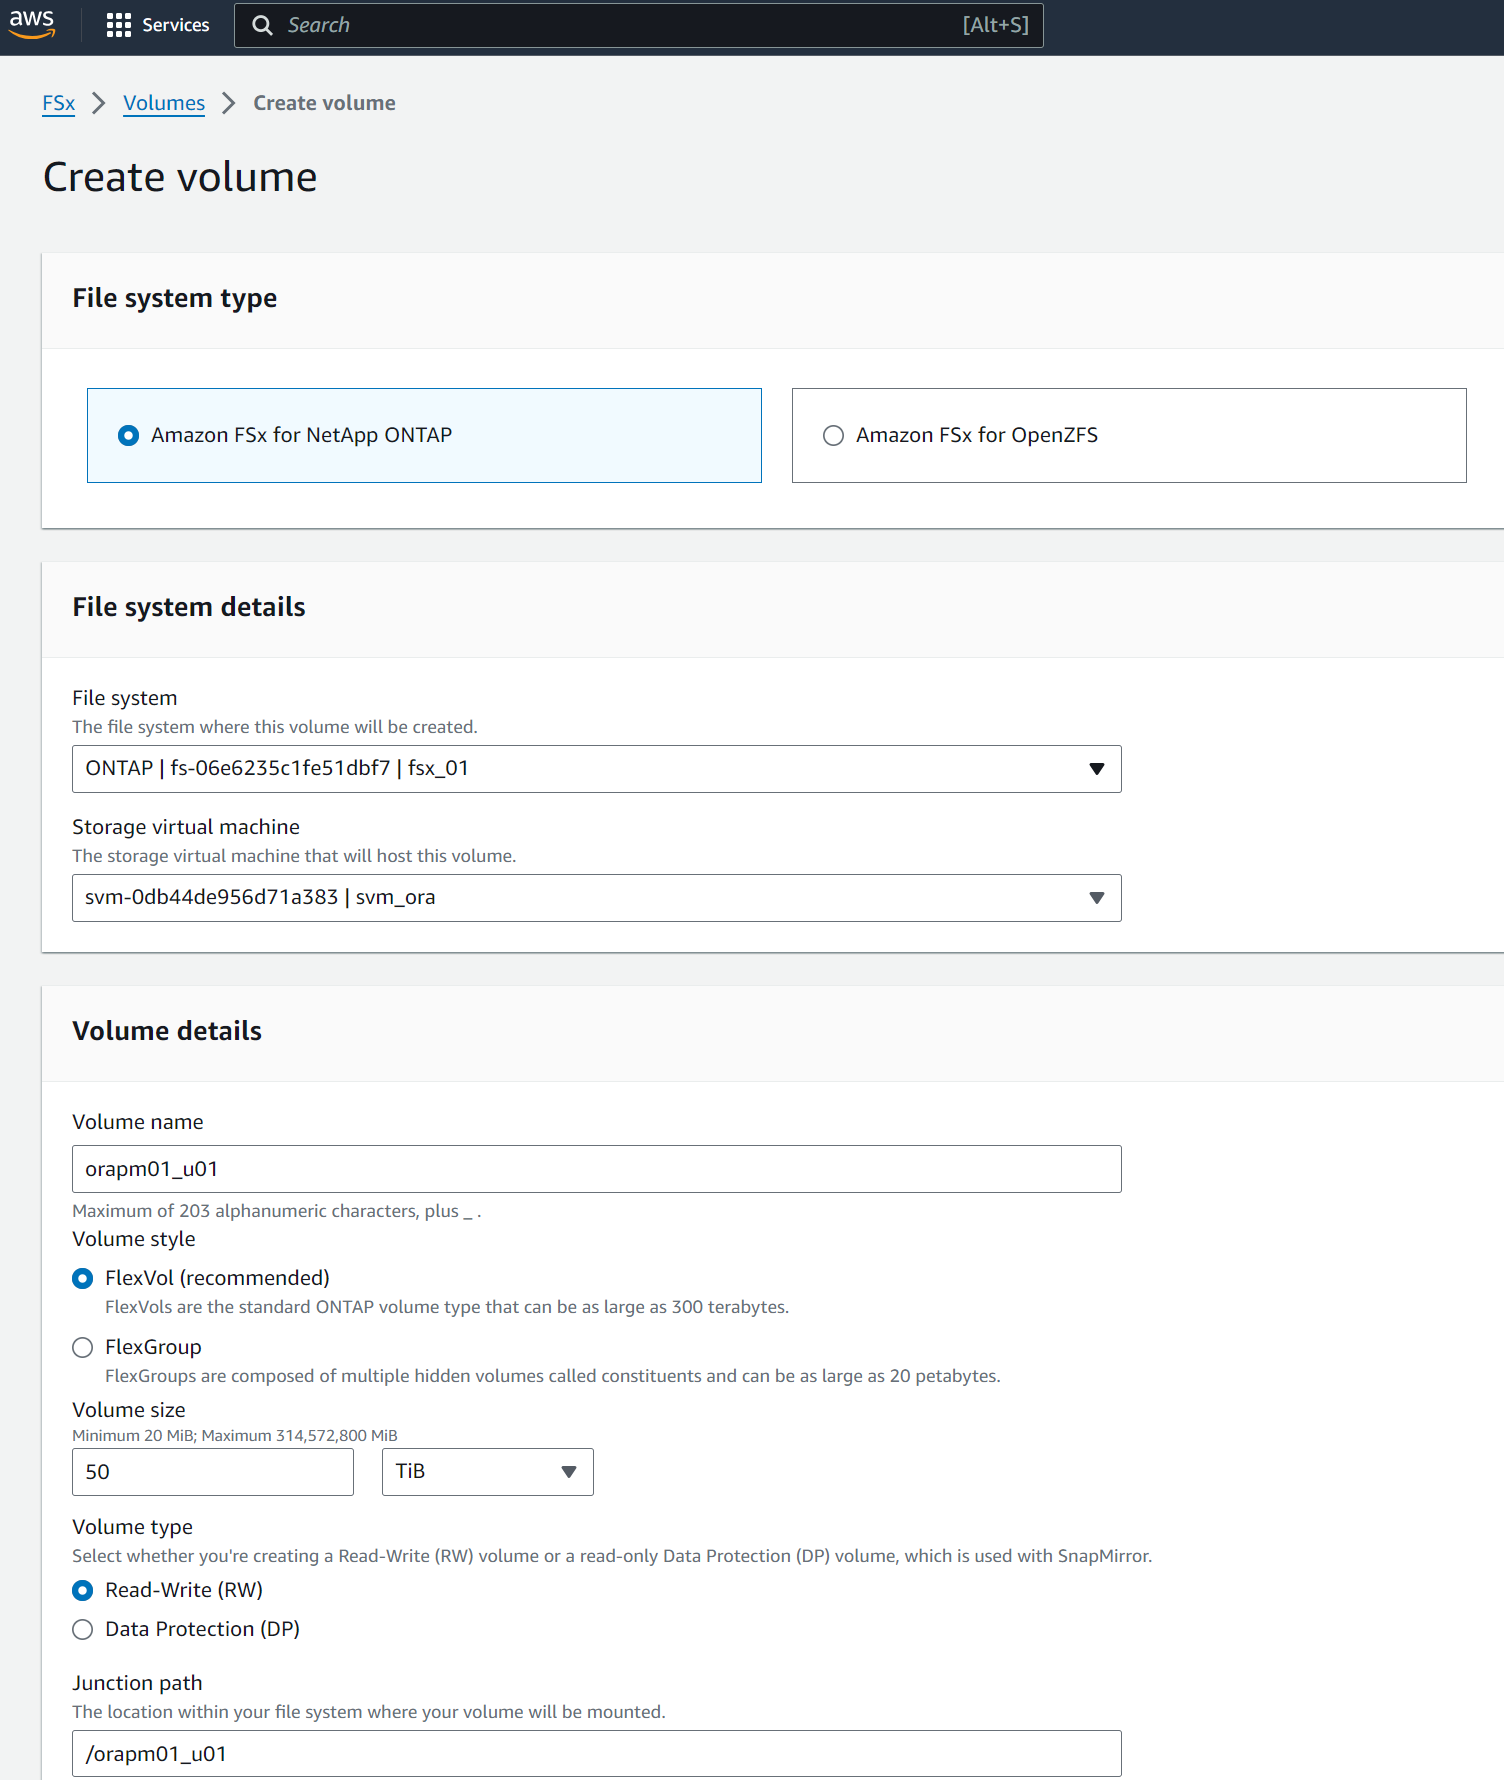
Crea volumi di database dalla console AWS FSx. Assicurarsi di utilizzare il nome host del nodo primario PCS (orapm01) come prefisso per i volumi, come illustrato di seguito.
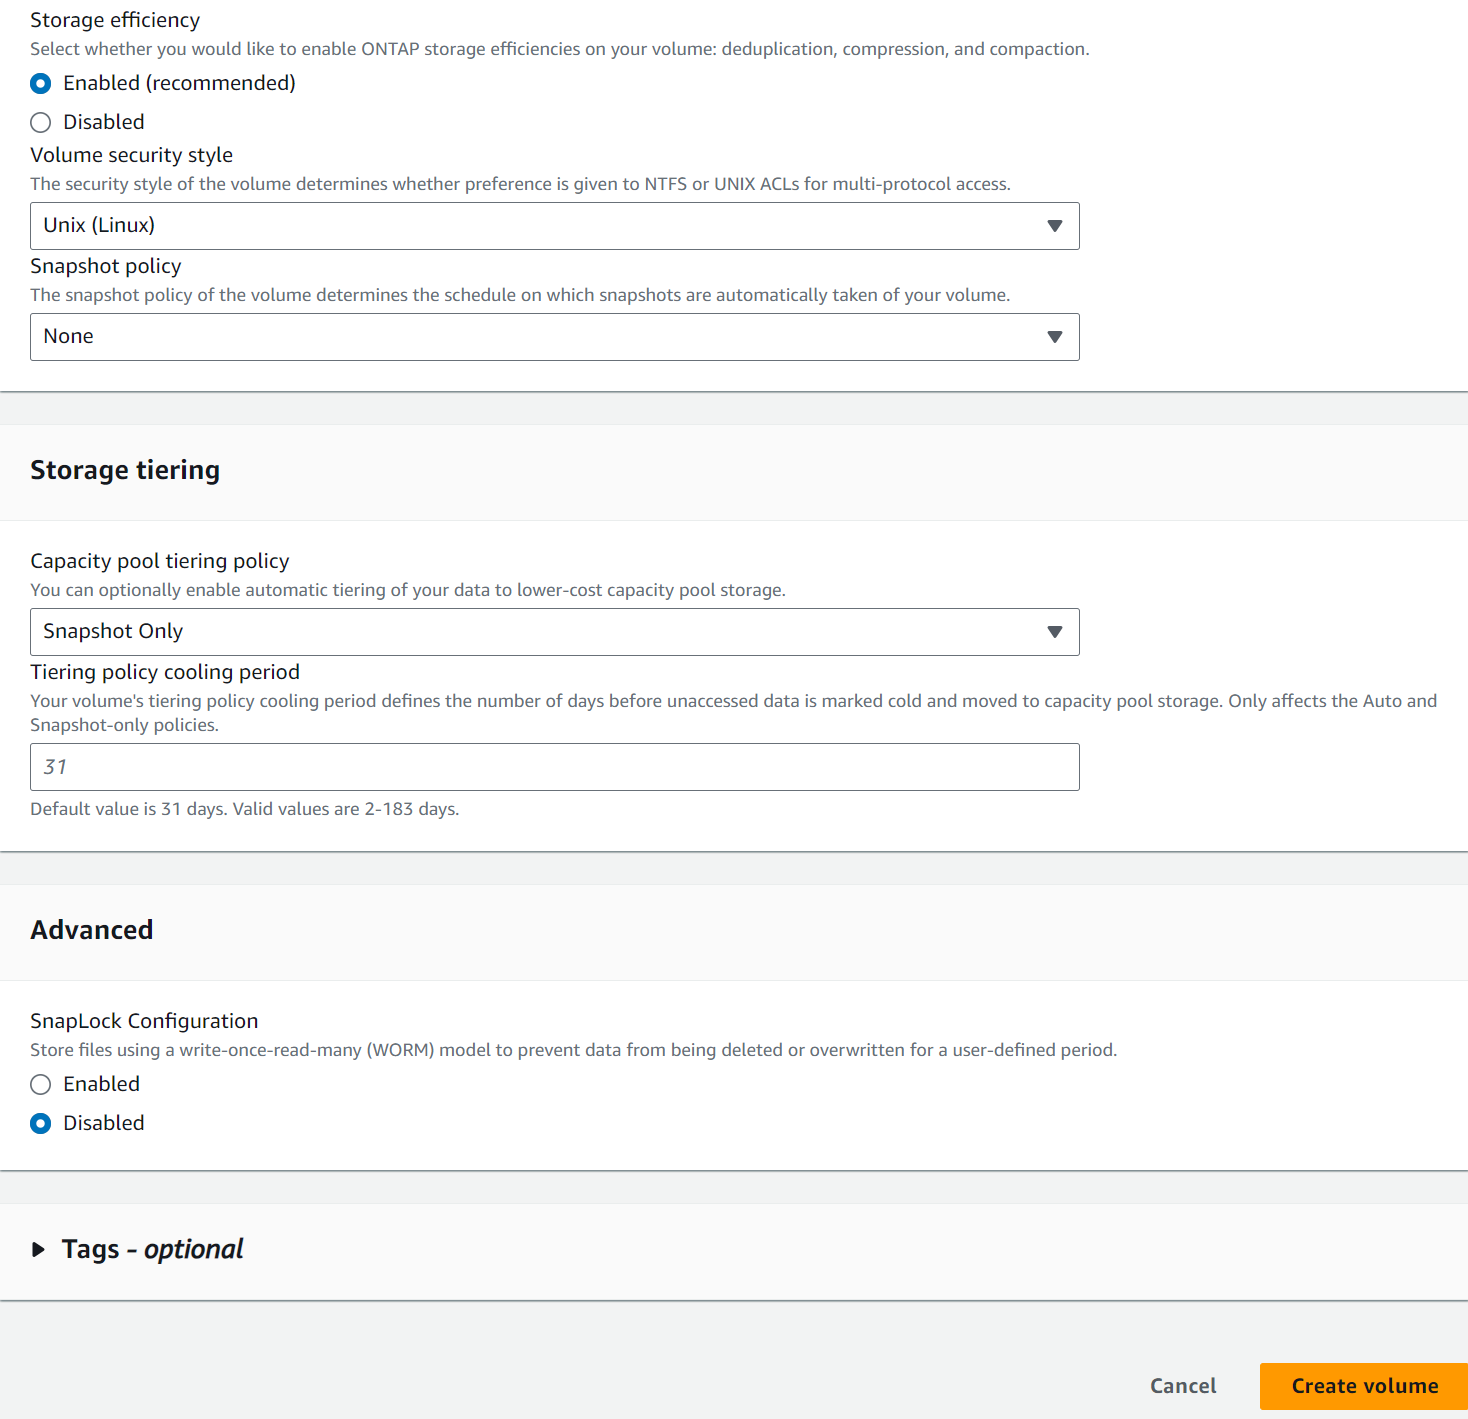
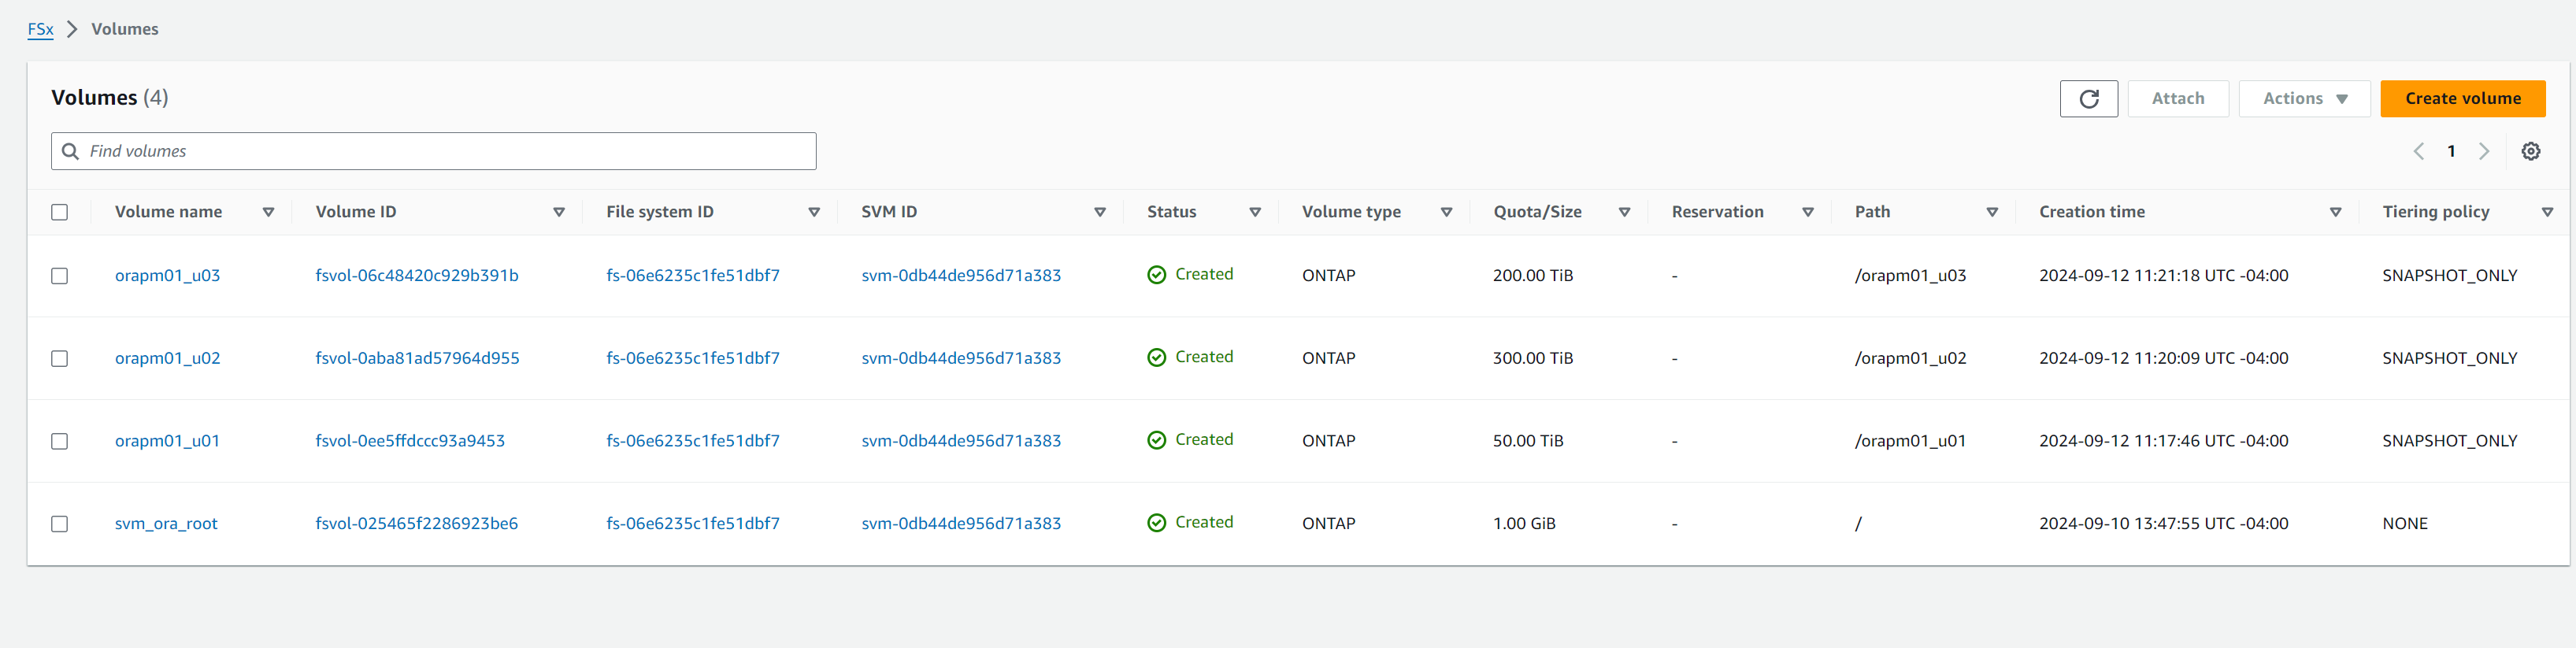
-
Fase successiva ai file di installazione di Oracle 19c sulla directory ip-172-30-15-111.ec2.internal /tmp/archive del nodo primario PCS con autorizzazione 777.
installer_archives:
  - "LINUX.X64_193000_db_home.zip"
  - "p34765931_190000_Linux-x86-64.zip"
  - "p6880880_190000_Linux-x86-64.zip"
-
Eseguire il playbook per la configurazione Linux per
all nodes.ansible-playbook -i hosts 2-linux_config.yml -u ec2-user -e @vars/vars.yml[admin@ansiblectl na_oracle_deploy_nfs]$ ansible-playbook -i hosts 2-linux_config.yml -u ec2-user -e @vars/vars.yml PLAY [Linux Setup and Storage Config for Oracle] **************************************************************************************************************************************************************************************************************************************************************************** TASK [Gathering Facts] ****************************************************************************************************************************************************************************************************************************************************************************************************** ok: [orapm01] ok: [orapm02] TASK [linux : Configure RedHat 7 for Oracle DB installation] **************************************************************************************************************************************************************************************************************************************************************** skipping: [orapm01] skipping: [orapm02] TASK [linux : Configure RedHat 8 for Oracle DB installation] **************************************************************************************************************************************************************************************************************************************************************** included: /home/admin/na_oracle_deploy_nfs/roles/linux/tasks/rhel8_config.yml for orapm01, orapm02 TASK [linux : Register subscriptions for RedHat Server] ********************************************************************************************************************************************************************************************************************************************************************* ok: [orapm01] ok: [orapm02] . . .
-
Eseguire il playbook per la configurazione Oracle
only on primary node(commentare il nodo standby nel file hosts).ansible-playbook -i hosts 4-oracle_config.yml -u ec2-user -e @vars/vars.yml --skip-tags "enable_db_start_shut"[admin@ansiblectl na_oracle_deploy_nfs]$ ansible-playbook -i hosts 4-oracle_config.yml -u ec2-user -e @vars/vars.yml --skip-tags "enable_db_start_shut" PLAY [Oracle installation and configuration] ******************************************************************************************************************************************************************************************************************************************************************************** TASK [Gathering Facts] ****************************************************************************************************************************************************************************************************************************************************************************************************** ok: [orapm01] TASK [oracle : Oracle software only install] ******************************************************************************************************************************************************************************************************************************************************************************** included: /home/admin/na_oracle_deploy_nfs/roles/oracle/tasks/oracle_install.yml for orapm01 TASK [oracle : Create mount points for NFS file systems / Mount NFS file systems on Oracle hosts] *************************************************************************************************************************************************************************************************************************** included: /home/admin/na_oracle_deploy_nfs/roles/oracle/tasks/oracle_mount_points.yml for orapm01 TASK [oracle : Create mount points for NFS file systems] ******************************************************************************************************************************************************************************************************************************************************************** changed: [orapm01] => (item=/u01) changed: [orapm01] => (item=/u02) changed: [orapm01] => (item=/u03) . . .
-
Dopo aver distribuito il database, commentare i mount /u01, /u02, /u03 in /etc/fstab sul nodo primario, poiché i punti di mount saranno gestiti solo da PCS.
sudo vi /etc/fstab[root@ip-172-30-15-111 ec2-user]# cat /etc/fstab UUID=eaa1f38e-de0f-4ed5-a5b5-2fa9db43bb38 / xfs defaults 0 0 /mnt/swapfile swap swap defaults 0 0 #172.30.15.95:/orapm01_u01 /u01 nfs rw,bg,hard,vers=3,proto=tcp,timeo=600,rsize=65536,wsize=65536 0 0 #172.30.15.95:/orapm01_u02 /u02 nfs rw,bg,hard,vers=3,proto=tcp,timeo=600,rsize=65536,wsize=65536 0 0 #172.30.15.95:/orapm01_u03 /u03 nfs rw,bg,hard,vers=3,proto=tcp,timeo=600,rsize=65536,wsize=65536 0 0
-
Copiare /etc/oratab /etc/oraInst.loc, /home/oracle/.bash_profile sul nodo standby. Assicurarsi di mantenere la proprietà e le autorizzazioni corrette dei file.
-
Arresta il database, l'ascoltatore e smonta /u01, /u02, /u03 sul nodo primario.
[root@ip-172-30-15-111 ec2-user]# su - oracle
Last login: Wed Sep 18 16:51:02 UTC 2024
[oracle@ip-172-30-15-111 ~]$ sqlplus / as sysdba

SQL*Plus: Release 19.0.0.0.0 - Production on Wed Sep 18 16:51:16 2024
Version 19.18.0.0.0

Copyright (c) 1982, 2022, Oracle.  All rights reserved.


Connected to:
Oracle Database 19c Enterprise Edition Release 19.0.0.0.0 - Production
Version 19.18.0.0.0

SQL> shutdown immediate;

SQL> exit
Disconnected from Oracle Database 19c Enterprise Edition Release 19.0.0.0.0 - Production
Version 19.18.0.0.0
[oracle@ip-172-30-15-111 ~]$ lsnrctl stop listener.ntap

[oracle@ip-172-30-15-111 ~]$ exit
logout
[root@ip-172-30-15-111 ec2-user]# umount /u01
[root@ip-172-30-15-111 ec2-user]# umount /u02
[root@ip-172-30-15-111 ec2-user]# umount /u03
-
Crea punti di montaggio sul nodo standby ip-172-30-15-5.
mkdir /u01 mkdir /u02 mkdir /u03 -
Montare i volumi del database FSx ONTAP sul nodo standby ip-172-30-15-5.
mount -t nfs 172.30.15.95:/orapm01_u01 /u01 -o rw,bg,hard,vers=3,proto=tcp,timeo=600,rsize=65536,wsize=65536mount -t nfs 172.30.15.95:/orapm01_u02 /u02 -o rw,bg,hard,vers=3,proto=tcp,timeo=600,rsize=65536,wsize=65536mount -t nfs 172.30.15.95:/orapm01_u03 /u03 -o rw,bg,hard,vers=3,proto=tcp,timeo=600,rsize=65536,wsize=65536[root@ip-172-30-15-5 ec2-user]# df -h Filesystem Size Used Avail Use% Mounted on devtmpfs 7.7G 0 7.7G 0% /dev tmpfs 7.7G 33M 7.7G 1% /dev/shm tmpfs 7.7G 17M 7.7G 1% /run tmpfs 7.7G 0 7.7G 0% /sys/fs/cgroup /dev/xvda2 50G 21G 30G 41% / tmpfs 1.6G 0 1.6G 0% /run/user/1000 172.30.15.95:/orapm01_u01 48T 47T 844G 99% /u01 172.30.15.95:/orapm01_u02 285T 285T 844G 100% /u02 172.30.15.95:/orapm01_u03 190T 190T 844G 100% /u03
-
Modificato in utente Oracle, ricollegamento binario.
[root@ip-172-30-15-5 ec2-user]# su - oracle
Last login: Thu Sep 12 18:09:03 UTC 2024 on pts/0
[oracle@ip-172-30-15-5 ~]$ env | grep ORA
ORACLE_SID=NTAP
ORACLE_HOME=/u01/app/oracle/product/19.0.0/NTAP
[oracle@ip-172-30-15-5 ~]$ cd $ORACLE_HOME/bin
[oracle@ip-172-30-15-5 bin]$ ./relink
writing relink log to: /u01/app/oracle/product/19.0.0/NTAP/install/relinkActions2024-09-12_06-21-40PM.log
-
Copiare la libreria dnfs nella cartella odm. Il ricollegamento potrebbe comportare la perdita del file della libreria dfns.
[oracle@ip-172-30-15-5 odm]$ cd /u01/app/oracle/product/19.0.0/NTAP/rdbms/lib/odm
[oracle@ip-172-30-15-5 odm]$ cp ../../../lib/libnfsodm19.so .
-
Avviare il database per convalidare sul nodo standby ip-172-30-15-5.
[oracle@ip-172-30-15-5 odm]$ sqlplus / as sysdba SQL*Plus: Release 19.0.0.0.0 - Production on Thu Sep 12 18:30:04 2024 Version 19.18.0.0.0 Copyright (c) 1982, 2022, Oracle. All rights reserved. Connected to an idle instance. SQL> startup; ORACLE instance started. Total System Global Area 6442449688 bytes Fixed Size 9177880 bytes Variable Size 1090519040 bytes Database Buffers 5335154688 bytes Redo Buffers 7598080 bytes Database mounted. Database opened. SQL> select name, open_mode from v$database; NAME OPEN_MODE --------- -------------------- NTAP READ WRITE SQL> show pdbs CON_ID CON_NAME OPEN MODE RESTRICTED ---------- ------------------------------ ---------- ---------- 2 PDB$SEED READ ONLY NO 3 NTAP_PDB1 READ WRITE NO 4 NTAP_PDB2 READ WRITE NO 5 NTAP_PDB3 READ WRITE NO -
Arresto del database e failback del database sul nodo primario ip-172-30-15-111.
SQL> shutdown immediate;
Database closed.
Database dismounted.
ORACLE instance shut down.
SQL> exit

[root@ip-172-30-15-5 ec2-user]# df -h
Filesystem                 Size  Used Avail Use% Mounted on
devtmpfs                   7.7G     0  7.7G   0% /dev
tmpfs                      7.7G   33M  7.7G   1% /dev/shm
tmpfs                      7.7G   17M  7.7G   1% /run
tmpfs                      7.7G     0  7.7G   0% /sys/fs/cgroup
/dev/xvda2                  50G   21G   30G  41% /
tmpfs                      1.6G     0  1.6G   0% /run/user/1000
172.30.15.95:/orapm01_u01   48T   47T  844G  99% /u01
172.30.15.95:/orapm01_u02  285T  285T  844G 100% /u02
172.30.15.95:/orapm01_u03  190T  190T  844G 100% /u03

[root@ip-172-30-15-5 ec2-user]# umount /u01
[root@ip-172-30-15-5 ec2-user]# umount /u02
[root@ip-172-30-15-5 ec2-user]# umount /u03

[root@ip-172-30-15-111 ec2-user]# mount -t nfs 172.30.15.95:/orapm01_u01 /u01 -o rw,bg,hard,vers=3,proto=tcp,timeo=600,rsize=65536,wsize=65536
mount: (hint) your fstab has been modified, but systemd still uses
       the old version; use 'systemctl daemon-reload' to reload.
[root@ip-172-30-15-111 ec2-user]# mount -t nfs 172.30.15.95:/orapm01_u02 /u02 -o rw,bg,hard,vers=3,proto=tcp,timeo=600,rsize=65536,wsize=65536
mount: (hint) your fstab has been modified, but systemd still uses
       the old version; use 'systemctl daemon-reload' to reload.
[root@ip-172-30-15-111 ec2-user]# mount -t nfs 172.30.15.95:/orapm01_u03 /u03 -o rw,bg,hard,vers=3,proto=tcp,timeo=600,rsize=65536,wsize=65536
mount: (hint) your fstab has been modified, but systemd still uses
       the old version; use 'systemctl daemon-reload' to reload.
[root@ip-172-30-15-111 ec2-user]# df -h
Filesystem                 Size  Used Avail Use% Mounted on
devtmpfs                   7.7G     0  7.7G   0% /dev
tmpfs                      7.8G   48M  7.7G   1% /dev/shm
tmpfs                      7.8G   33M  7.7G   1% /run
tmpfs                      7.8G     0  7.8G   0% /sys/fs/cgroup
/dev/xvda2                  50G   29G   22G  58% /
tmpfs                      1.6G     0  1.6G   0% /run/user/1000
172.30.15.95:/orapm01_u01   48T   47T  844G  99% /u01
172.30.15.95:/orapm01_u02  285T  285T  844G 100% /u02
172.30.15.95:/orapm01_u03  190T  190T  844G 100% /u03
[root@ip-172-30-15-111 ec2-user]# su - oracle
Last login: Thu Sep 12 18:13:34 UTC 2024 on pts/1
[oracle@ip-172-30-15-111 ~]$ sqlplus / as sysdba

SQL*Plus: Release 19.0.0.0.0 - Production on Thu Sep 12 18:38:46 2024
Version 19.18.0.0.0

Copyright (c) 1982, 2022, Oracle.  All rights reserved.

Connected to an idle instance.

SQL> startup;
ORACLE instance started.

Total System Global Area 6442449688 bytes
Fixed Size                  9177880 bytes
Variable Size            1090519040 bytes
Database Buffers         5335154688 bytes
Redo Buffers                7598080 bytes
Database mounted.
Database opened.
SQL> exit
Disconnected from Oracle Database 19c Enterprise Edition Release 19.0.0.0.0 - Production
Version 19.18.0.0.0
[oracle@ip-172-30-15-111 ~]$ lsnrctl start listener.ntap

LSNRCTL for Linux: Version 19.0.0.0.0 - Production on 12-SEP-2024 18:39:17

Copyright (c) 1991, 2022, Oracle.  All rights reserved.

Starting /u01/app/oracle/product/19.0.0/NTAP/bin/tnslsnr: please wait...

TNSLSNR for Linux: Version 19.0.0.0.0 - Production
System parameter file is /u01/app/oracle/product/19.0.0/NTAP/network/admin/listener.ora
Log messages written to /u01/app/oracle/diag/tnslsnr/ip-172-30-15-111/listener.ntap/alert/log.xml
Listening on: (DESCRIPTION=(ADDRESS=(PROTOCOL=tcp)(HOST=ip-172-30-15-111.ec2.internal)(PORT=1521)))
Listening on: (DESCRIPTION=(ADDRESS=(PROTOCOL=ipc)(KEY=EXTPROC1521)))

Connecting to (DESCRIPTION=(ADDRESS=(PROTOCOL=TCP)(HOST=ip-172-30-15-111.ec2.internal)(PORT=1521)))
STATUS of the LISTENER
------------------------
Alias                     listener.ntap
Version                   TNSLSNR for Linux: Version 19.0.0.0.0 - Production
Start Date                12-SEP-2024 18:39:17
Uptime                    0 days 0 hr. 0 min. 0 sec
Trace Level               off
Security                  ON: Local OS Authentication
SNMP                      OFF
Listener Parameter File   /u01/app/oracle/product/19.0.0/NTAP/network/admin/listener.ora
Listener Log File         /u01/app/oracle/diag/tnslsnr/ip-172-30-15-111/listener.ntap/alert/log.xml
Listening Endpoints Summary...
  (DESCRIPTION=(ADDRESS=(PROTOCOL=tcp)(HOST=ip-172-30-15-111.ec2.internal)(PORT=1521)))
  (DESCRIPTION=(ADDRESS=(PROTOCOL=ipc)(KEY=EXTPROC1521)))
The listener supports no services
The command completed successfully
Configurare le risorse Oracle per la gestione PCS
Details
L'obiettivo della configurazione del clustering Pacemaker è quello di impostare una soluzione ad alta disponibilità attiva/passiva per l'esecuzione di Oracle in ambiente AWS EC2 e FSx ONTAP con un intervento minimo da parte dell'utente in caso di errore. Di seguito viene illustrata la configurazione delle risorse Oracle per la gestione PCS.
-
Come utente root sull'istanza EC2 primaria ip-172-30-15-111, crea un indirizzo IP privato secondario con un indirizzo IP privato non utilizzato nel blocco CIDR VPC come IP mobile. Nel processo, crea un gruppo di risorse Oracle a cui apparterrà l'indirizzo IP privato secondario.
pcs resource create privip ocf:heartbeat:awsvip secondary_private_ip=172.30.15.33 --group oracle[root@ip-172-30-15-111 ec2-user]# pcs status Cluster name: ora_ec2nfsx Cluster Summary: * Stack: corosync (Pacemaker is running) * Current DC: ip-172-30-15-111.ec2.internal (version 2.1.7-5.1.el8_10-0f7f88312) - partition with quorum * Last updated: Fri Sep 13 16:25:35 2024 on ip-172-30-15-111.ec2.internal * Last change: Fri Sep 13 16:25:23 2024 by root via root on ip-172-30-15-111.ec2.internal * 2 nodes configured * 2 resource instances configured Node List: * Online: [ ip-172-30-15-5.ec2.internal ip-172-30-15-111.ec2.internal ] Full List of Resources: * clusterfence (stonith:fence_aws): Started ip-172-30-15-111.ec2.internal * Resource Group: oracle: * privip (ocf::heartbeat:awsvip): Started ip-172-30-15-5.ec2.internal Daemon Status: corosync: active/enabled pacemaker: active/enabled pcsd: active/enabled
Se il privilegio viene creato sul nodo del cluster di standby, spostarlo sul nodo primario come mostrato di seguito. -
Spostare una risorsa tra i nodi del cluster.
pcs resource move privip ip-172-30-15-111.ec2.internal[root@ip-172-30-15-111 ec2-user]# pcs resource move privip ip-172-30-15-111.ec2.internal Warning: A move constraint has been created and the resource 'privip' may or may not move depending on other configuration [root@ip-172-30-15-111 ec2-user]# pcs status Cluster name: ora_ec2nfsx WARNINGS: Following resources have been moved and their move constraints are still in place: 'privip' Run 'pcs constraint location' or 'pcs resource clear <resource id>' to view or remove the constraints, respectively Cluster Summary: * Stack: corosync (Pacemaker is running) * Current DC: ip-172-30-15-111.ec2.internal (version 2.1.7-5.1.el8_10-0f7f88312) - partition with quorum * Last updated: Fri Sep 13 16:26:38 2024 on ip-172-30-15-111.ec2.internal * Last change: Fri Sep 13 16:26:27 2024 by root via root on ip-172-30-15-111.ec2.internal * 2 nodes configured * 2 resource instances configured Node List: * Online: [ ip-172-30-15-5.ec2.internal ip-172-30-15-111.ec2.internal ] Full List of Resources: * clusterfence (stonith:fence_aws): Started ip-172-30-15-111.ec2.internal * Resource Group: oracle: * privip (ocf::heartbeat:awsvip): Started ip-172-30-15-111.ec2.internal (Monitoring) Daemon Status: corosync: active/enabled pacemaker: active/enabled pcsd: active/enabled -
Creare un IP virtuale (vip) per Oracle. L'IP virtuale fluttuerà tra il nodo primario e quello di standby a seconda delle necessità.
pcs resource create vip ocf:heartbeat:IPaddr2 ip=172.30.15.33 cidr_netmask=25 nic=eth0 op monitor interval=10s --group oracle[root@ip-172-30-15-111 ec2-user]# pcs resource create vip ocf:heartbeat:IPaddr2 ip=172.30.15.33 cidr_netmask=25 nic=eth0 op monitor interval=10s --group oracle [root@ip-172-30-15-111 ec2-user]# pcs status Cluster name: ora_ec2nfsx WARNINGS: Following resources have been moved and their move constraints are still in place: 'privip' Run 'pcs constraint location' or 'pcs resource clear <resource id>' to view or remove the constraints, respectively Cluster Summary: * Stack: corosync (Pacemaker is running) * Current DC: ip-172-30-15-111.ec2.internal (version 2.1.7-5.1.el8_10-0f7f88312) - partition with quorum * Last updated: Fri Sep 13 16:27:34 2024 on ip-172-30-15-111.ec2.internal * Last change: Fri Sep 13 16:27:24 2024 by root via root on ip-172-30-15-111.ec2.internal * 2 nodes configured * 3 resource instances configured Node List: * Online: [ ip-172-30-15-5.ec2.internal ip-172-30-15-111.ec2.internal ] Full List of Resources: * clusterfence (stonith:fence_aws): Started ip-172-30-15-111.ec2.internal * Resource Group: oracle: * privip (ocf::heartbeat:awsvip): Started ip-172-30-15-111.ec2.internal * vip (ocf::heartbeat:IPaddr2): Started ip-172-30-15-111.ec2.internal Daemon Status: corosync: active/enabled pacemaker: active/enabled pcsd: active/enabled -
Come utente Oracle, aggiorna i file listener.ora e tnsnames.ora in modo che puntino all'indirizzo VIP. Riavviare l'ascoltatore. Eseguire il bounce del database se necessario affinché il database si registri con l'ascoltatore.
vi $ORACLE_HOME/network/admin/listener.oravi $ORACLE_HOME/network/admin/tnsnames.ora[oracle@ip-172-30-15-111 admin]$ cat listener.ora # listener.ora Network Configuration File: /u01/app/oracle/product/19.0.0/NTAP/network/admin/listener.ora # Generated by Oracle configuration tools. LISTENER.NTAP = (DESCRIPTION_LIST = (DESCRIPTION = (ADDRESS = (PROTOCOL = TCP)(HOST = 172.30.15.33)(PORT = 1521)) (ADDRESS = (PROTOCOL = IPC)(KEY = EXTPROC1521)) ) ) [oracle@ip-172-30-15-111 admin]$ cat tnsnames.ora # tnsnames.ora Network Configuration File: /u01/app/oracle/product/19.0.0/NTAP/network/admin/tnsnames.ora # Generated by Oracle configuration tools. NTAP = (DESCRIPTION = (ADDRESS = (PROTOCOL = TCP)(HOST = 172.30.15.33)(PORT = 1521)) (CONNECT_DATA = (SERVER = DEDICATED) (SERVICE_NAME = NTAP.ec2.internal) ) ) LISTENER_NTAP = (ADDRESS = (PROTOCOL = TCP)(HOST = 172.30.15.33)(PORT = 1521)) [oracle@ip-172-30-15-111 admin]$ lsnrctl status listener.ntap LSNRCTL for Linux: Version 19.0.0.0.0 - Production on 13-SEP-2024 18:28:17 Copyright (c) 1991, 2022, Oracle. All rights reserved. Connecting to (DESCRIPTION=(ADDRESS=(PROTOCOL=TCP)(HOST=172.30.15.33)(PORT=1521))) STATUS of the LISTENER ------------------------ Alias listener.ntap Version TNSLSNR for Linux: Version 19.0.0.0.0 - Production Start Date 13-SEP-2024 18:15:51 Uptime 0 days 0 hr. 12 min. 25 sec Trace Level off Security ON: Local OS Authentication SNMP OFF Listener Parameter File /u01/app/oracle/product/19.0.0/NTAP/network/admin/listener.ora Listener Log File /u01/app/oracle/diag/tnslsnr/ip-172-30-15-111/listener.ntap/alert/log.xml Listening Endpoints Summary... (DESCRIPTION=(ADDRESS=(PROTOCOL=tcp)(HOST=172.30.15.33)(PORT=1521))) (DESCRIPTION=(ADDRESS=(PROTOCOL=ipc)(KEY=EXTPROC1521))) (DESCRIPTION=(ADDRESS=(PROTOCOL=tcps)(HOST=ip-172-30-15-111.ec2.internal)(PORT=5500))(Security=(my_wallet_directory=/u01/app/oracle/product/19.0.0/NTAP/admin/NTAP/xdb_wallet))(Presentation=HTTP)(Session=RAW)) Services Summary... Service "21f0b5cc1fa290e2e0636f0f1eacfd43.ec2.internal" has 1 instance(s). Instance "NTAP", status READY, has 1 handler(s) for this service... Service "21f0b74445329119e0636f0f1eacec03.ec2.internal" has 1 instance(s). Instance "NTAP", status READY, has 1 handler(s) for this service... Service "21f0b83929709164e0636f0f1eacacc3.ec2.internal" has 1 instance(s). Instance "NTAP", status READY, has 1 handler(s) for this service... Service "NTAP.ec2.internal" has 1 instance(s). Instance "NTAP", status READY, has 1 handler(s) for this service... Service "NTAPXDB.ec2.internal" has 1 instance(s). Instance "NTAP", status READY, has 1 handler(s) for this service... Service "ntap_pdb1.ec2.internal" has 1 instance(s). Instance "NTAP", status READY, has 1 handler(s) for this service... Service "ntap_pdb2.ec2.internal" has 1 instance(s). Instance "NTAP", status READY, has 1 handler(s) for this service... Service "ntap_pdb3.ec2.internal" has 1 instance(s). Instance "NTAP", status READY, has 1 handler(s) for this service... The command completed successfully **Oracle listener now listens on vip for database connection** -
Aggiungere i punti di montaggio /u01, /u02, /u03 al gruppo di risorse Oracle.
pcs resource create u01 ocf:heartbeat:Filesystem device='172.30.15.95:/orapm01_u01' directory='/u01' fstype='nfs' options='rw,bg,hard,vers=3,proto=tcp,timeo=600,rsize=65536,wsize=65536' --group oraclepcs resource create u02 ocf:heartbeat:Filesystem device='172.30.15.95:/orapm01_u02' directory='/u02' fstype='nfs' options='rw,bg,hard,vers=3,proto=tcp,timeo=600,rsize=65536,wsize=65536' --group oraclepcs resource create u03 ocf:heartbeat:Filesystem device='172.30.15.95:/orapm01_u03' directory='/u03' fstype='nfs' options='rw,bg,hard,vers=3,proto=tcp,timeo=600,rsize=65536,wsize=65536' --group oracle -
Creare un ID utente del monitor PCS in Oracle DB.
[root@ip-172-30-15-111 ec2-user]# su - oracle
Last login: Fri Sep 13 18:12:24 UTC 2024 on pts/0
[oracle@ip-172-30-15-111 ~]$ sqlplus / as sysdba

SQL*Plus: Release 19.0.0.0.0 - Production on Fri Sep 13 19:08:41 2024
Version 19.18.0.0.0

Copyright (c) 1982, 2022, Oracle.  All rights reserved.


Connected to:
Oracle Database 19c Enterprise Edition Release 19.0.0.0.0 - Production
Version 19.18.0.0.0

SQL> CREATE USER c##ocfmon IDENTIFIED BY "XXXXXXXX";

User created.

SQL> grant connect to c##ocfmon;

Grant succeeded.

SQL> exit
Disconnected from Oracle Database 19c Enterprise Edition Release 19.0.0.0.0 - Production
Version 19.18.0.0.0
-
Aggiungere il database al gruppo di risorse Oracle.
pcs resource create ntap ocf:heartbeat:oracle sid='NTAP' home='/u01/app/oracle/product/19.0.0/NTAP' user='oracle' monuser='C##OCFMON' monpassword='XXXXXXXX' monprofile='DEFAULT' --group oracle -
Aggiungere l'ascoltatore del database al gruppo di risorse Oracle.
pcs resource create listener ocf:heartbeat:oralsnr sid='NTAP' listener='listener.ntap' --group=oracle -
Aggiorna tutti i vincoli di posizione delle risorse nel gruppo di risorse Oracle sul nodo primario come nodo preferito.
pcs constraint location privip prefers ip-172-30-15-111.ec2.internal
pcs constraint location vip prefers ip-172-30-15-111.ec2.internal
pcs constraint location u01 prefers ip-172-30-15-111.ec2.internal
pcs constraint location u02 prefers ip-172-30-15-111.ec2.internal
pcs constraint location u03 prefers ip-172-30-15-111.ec2.internal
pcs constraint location ntap prefers ip-172-30-15-111.ec2.internal
pcs constraint location listener prefers ip-172-30-15-111.ec2.internal
[root@ip-172-30-15-111 ec2-user]# pcs constraint config Location Constraints: Resource: listener Enabled on: Node: ip-172-30-15-111.ec2.internal (score:INFINITY) Resource: ntap Enabled on: Node: ip-172-30-15-111.ec2.internal (score:INFINITY) Resource: privip Enabled on: Node: ip-172-30-15-111.ec2.internal (score:INFINITY) Resource: u01 Enabled on: Node: ip-172-30-15-111.ec2.internal (score:INFINITY) Resource: u02 Enabled on: Node: ip-172-30-15-111.ec2.internal (score:INFINITY) Resource: u03 Enabled on: Node: ip-172-30-15-111.ec2.internal (score:INFINITY) Resource: vip Enabled on: Node: ip-172-30-15-111.ec2.internal (score:INFINITY) Ordering Constraints: Colocation Constraints: Ticket Constraints: -
Convalida la configurazione delle risorse Oracle.
pcs status[root@ip-172-30-15-111 ec2-user]# pcs status Cluster name: ora_ec2nfsx Cluster Summary: * Stack: corosync (Pacemaker is running) * Current DC: ip-172-30-15-111.ec2.internal (version 2.1.7-5.1.el8_10-0f7f88312) - partition with quorum * Last updated: Fri Sep 13 19:25:32 2024 on ip-172-30-15-111.ec2.internal * Last change: Fri Sep 13 19:23:40 2024 by root via root on ip-172-30-15-111.ec2.internal * 2 nodes configured * 8 resource instances configured Node List: * Online: [ ip-172-30-15-5.ec2.internal ip-172-30-15-111.ec2.internal ] Full List of Resources: * clusterfence (stonith:fence_aws): Started ip-172-30-15-111.ec2.internal * Resource Group: oracle: * privip (ocf::heartbeat:awsvip): Started ip-172-30-15-111.ec2.internal * vip (ocf::heartbeat:IPaddr2): Started ip-172-30-15-111.ec2.internal * u01 (ocf::heartbeat:Filesystem): Started ip-172-30-15-111.ec2.internal * u02 (ocf::heartbeat:Filesystem): Started ip-172-30-15-111.ec2.internal * u03 (ocf::heartbeat:Filesystem): Started ip-172-30-15-111.ec2.internal * ntap (ocf::heartbeat:oracle): Started ip-172-30-15-111.ec2.internal * listener (ocf::heartbeat:oralsnr): Started ip-172-30-15-111.ec2.internal Daemon Status: corosync: active/enabled pacemaker: active/enabled pcsd: active/enabled
Convalida HA post-distribuzione
Details
Dopo la distribuzione, è fondamentale eseguire alcuni test e convalide per garantire che il cluster di failover del database Oracle PCS sia configurato correttamente e funzioni come previsto. La convalida del test include il failover gestito e la simulazione di guasti imprevisti delle risorse e il ripristino da parte del meccanismo di protezione del cluster.
-
Convalidare la recinzione del nodo attivando manualmente la recinzione del nodo standby e osservare che il nodo standby è stato portato offline e riavviato dopo un timeout.
pcs stonith fence <standbynodename>[root@ip-172-30-15-111 ec2-user]# pcs stonith fence ip-172-30-15-5.ec2.internal Node: ip-172-30-15-5.ec2.internal fenced [root@ip-172-30-15-111 ec2-user]# pcs status Cluster name: ora_ec2nfsx Cluster Summary: * Stack: corosync (Pacemaker is running) * Current DC: ip-172-30-15-111.ec2.internal (version 2.1.7-5.1.el8_10-0f7f88312) - partition with quorum * Last updated: Fri Sep 13 21:58:45 2024 on ip-172-30-15-111.ec2.internal * Last change: Fri Sep 13 21:55:12 2024 by root via root on ip-172-30-15-111.ec2.internal * 2 nodes configured * 8 resource instances configured Node List: * Online: [ ip-172-30-15-111.ec2.internal ] * OFFLINE: [ ip-172-30-15-5.ec2.internal ] Full List of Resources: * clusterfence (stonith:fence_aws): Started ip-172-30-15-111.ec2.internal * Resource Group: oracle: * privip (ocf::heartbeat:awsvip): Started ip-172-30-15-111.ec2.internal * vip (ocf::heartbeat:IPaddr2): Started ip-172-30-15-111.ec2.internal * u01 (ocf::heartbeat:Filesystem): Started ip-172-30-15-111.ec2.internal * u02 (ocf::heartbeat:Filesystem): Started ip-172-30-15-111.ec2.internal * u03 (ocf::heartbeat:Filesystem): Started ip-172-30-15-111.ec2.internal * ntap (ocf::heartbeat:oracle): Started ip-172-30-15-111.ec2.internal * listener (ocf::heartbeat:oralsnr): Started ip-172-30-15-111.ec2.internal Daemon Status: corosync: active/enabled pacemaker: active/enabled pcsd: active/enabled -
Simula un errore dell'ascoltatore del database interrompendo il processo dell'ascoltatore e osserva che PCS ha monitorato l'errore dell'ascoltatore e lo ha riavviato in pochi secondi.
[root@ip-172-30-15-111 ec2-user]# ps -ef | grep lsnr
oracle    154895       1  0 18:15 ?        00:00:00 /u01/app/oracle/product/19.0.0/NTAP/bin/tnslsnr listener.ntap -inherit
root      217779  120186  0 19:36 pts/0    00:00:00 grep --color=auto lsnr
[root@ip-172-30-15-111 ec2-user]# kill -9 154895

[root@ip-172-30-15-111 ec2-user]# su - oracle
Last login: Thu Sep 19 14:58:54 UTC 2024
[oracle@ip-172-30-15-111 ~]$ lsnrctl status listener.ntap

LSNRCTL for Linux: Version 19.0.0.0.0 - Production on 13-SEP-2024 19:36:51

Copyright (c) 1991, 2022, Oracle.  All rights reserved.

Connecting to (DESCRIPTION=(ADDRESS=(PROTOCOL=TCP)(HOST=172.30.15.33)(PORT=1521)))
TNS-12541: TNS:no listener
 TNS-12560: TNS:protocol adapter error
  TNS-00511: No listener
   Linux Error: 111: Connection refused
Connecting to (DESCRIPTION=(ADDRESS=(PROTOCOL=IPC)(KEY=EXTPROC1521)))
TNS-12541: TNS:no listener
 TNS-12560: TNS:protocol adapter error
  TNS-00511: No listener
   Linux Error: 111: Connection refused

[oracle@ip-172-30-15-111 ~]$ lsnrctl status listener.ntap

LSNRCTL for Linux: Version 19.0.0.0.0 - Production on 19-SEP-2024 15:00:10

Copyright (c) 1991, 2022, Oracle.  All rights reserved.

Connecting to (DESCRIPTION=(ADDRESS=(PROTOCOL=TCP)(HOST=172.30.15.33)(PORT=1521)))
STATUS of the LISTENER
------------------------
Alias                     listener.ntap
Version                   TNSLSNR for Linux: Version 19.0.0.0.0 - Production
Start Date                16-SEP-2024 14:00:14
Uptime                    3 days 0 hr. 59 min. 56 sec
Trace Level               off
Security                  ON: Local OS Authentication
SNMP                      OFF
Listener Parameter File   /u01/app/oracle/product/19.0.0/NTAP/network/admin/listener.ora
Listener Log File         /u01/app/oracle/diag/tnslsnr/ip-172-30-15-111/listener.ntap/alert/log.xml
Listening Endpoints Summary...
  (DESCRIPTION=(ADDRESS=(PROTOCOL=tcp)(HOST=172.30.15.33)(PORT=1521)))
  (DESCRIPTION=(ADDRESS=(PROTOCOL=ipc)(KEY=EXTPROC1521)))
  (DESCRIPTION=(ADDRESS=(PROTOCOL=tcps)(HOST=ip-172-30-15-111.ec2.internal)(PORT=5500))(Security=(my_wallet_directory=/u01/app/oracle/product/19.0.0/NTAP/admin/NTAP/xdb_wallet))(Presentation=HTTP)(Session=RAW))
Services Summary...
Service "21f0b5cc1fa290e2e0636f0f1eacfd43.ec2.internal" has 1 instance(s).
  Instance "NTAP", status READY, has 1 handler(s) for this service...
Service "21f0b74445329119e0636f0f1eacec03.ec2.internal" has 1 instance(s).
  Instance "NTAP", status READY, has 1 handler(s) for this service...
Service "21f0b83929709164e0636f0f1eacacc3.ec2.internal" has 1 instance(s).
  Instance "NTAP", status READY, has 1 handler(s) for this service...
Service "NTAP.ec2.internal" has 1 instance(s).
  Instance "NTAP", status READY, has 1 handler(s) for this service...
Service "NTAPXDB.ec2.internal" has 1 instance(s).
  Instance "NTAP", status READY, has 1 handler(s) for this service...
Service "ntap_pdb1.ec2.internal" has 1 instance(s).
  Instance "NTAP", status READY, has 1 handler(s) for this service...
Service "ntap_pdb2.ec2.internal" has 1 instance(s).
  Instance "NTAP", status READY, has 1 handler(s) for this service...
Service "ntap_pdb3.ec2.internal" has 1 instance(s).
  Instance "NTAP", status READY, has 1 handler(s) for this service...
The command completed successfully
-
Simula un errore del database interrompendo il processo pmon e osserva che PCS ha monitorato l'errore del database e lo ha riavviato in pochi secondi.
**Make a remote connection to ntap database**

[oracle@ora_01 ~]$ sqlplus system@//172.30.15.33:1521/NTAP.ec2.internal

SQL*Plus: Release 19.0.0.0.0 - Production on Fri Sep 13 15:42:42 2024
Version 19.18.0.0.0

Copyright (c) 1982, 2022, Oracle.  All rights reserved.

Enter password:
Last Successful login time: Thu Sep 12 2024 13:37:28 -04:00

Connected to:
Oracle Database 19c Enterprise Edition Release 19.0.0.0.0 - Production
Version 19.18.0.0.0

SQL> select instance_name, host_name from v$instance;

INSTANCE_NAME
----------------
HOST_NAME
----------------------------------------------------------------
NTAP
ip-172-30-15-111.ec2.internal


SQL>

**Kill ntap pmon process to simulate a failure**

[root@ip-172-30-15-111 ec2-user]# ps -ef | grep pmon
oracle    159247       1  0 18:27 ?        00:00:00 ora_pmon_NTAP
root      230595  120186  0 19:44 pts/0    00:00:00 grep --color=auto pmon
[root@ip-172-30-15-111 ec2-user]# kill -9 159247

**Observe the DB failure**

SQL> /
select instance_name, host_name from v$instance
*
ERROR at line 1:
ORA-03113: end-of-file on communication channel
Process ID: 227424
Session ID: 396 Serial number: 4913


SQL> exit
Disconnected from Oracle Database 19c Enterprise Edition Release 19.0.0.0.0 - Production
Version 19.18.0.0.0

**Reconnect to DB after reboot**

[oracle@ora_01 ~]$ sqlplus system@//172.30.15.33:1521/NTAP.ec2.internal

SQL*Plus: Release 19.0.0.0.0 - Production on Fri Sep 13 15:47:24 2024
Version 19.18.0.0.0

Copyright (c) 1982, 2022, Oracle.  All rights reserved.

Enter password:
Last Successful login time: Fri Sep 13 2024 15:42:47 -04:00

Connected to:
Oracle Database 19c Enterprise Edition Release 19.0.0.0.0 - Production
Version 19.18.0.0.0

SQL> select instance_name, host_name from v$instance;

INSTANCE_NAME
----------------
HOST_NAME
----------------------------------------------------------------
NTAP
ip-172-30-15-111.ec2.internal


SQL>
-
Convalida un failover di database gestito dal nodo primario a quello di standby impostando il nodo primario in modalità standby per eseguire il failover delle risorse Oracle sul nodo di standby.
pcs node standby <nodename>**Stopping Oracle resources on primary node in reverse order** [root@ip-172-30-15-111 ec2-user]# pcs node standby ip-172-30-15-111.ec2.internal [root@ip-172-30-15-111 ec2-user]# pcs status Cluster name: ora_ec2nfsx Cluster Summary: * Stack: corosync (Pacemaker is running) * Current DC: ip-172-30-15-111.ec2.internal (version 2.1.7-5.1.el8_10-0f7f88312) - partition with quorum * Last updated: Fri Sep 13 20:01:16 2024 on ip-172-30-15-111.ec2.internal * Last change: Fri Sep 13 20:01:08 2024 by root via root on ip-172-30-15-111.ec2.internal * 2 nodes configured * 8 resource instances configured Node List: * Node ip-172-30-15-111.ec2.internal: standby (with active resources) * Online: [ ip-172-30-15-5.ec2.internal ] Full List of Resources: * clusterfence (stonith:fence_aws): Started ip-172-30-15-5.ec2.internal * Resource Group: oracle: * privip (ocf::heartbeat:awsvip): Started ip-172-30-15-111.ec2.internal * vip (ocf::heartbeat:IPaddr2): Started ip-172-30-15-111.ec2.internal * u01 (ocf::heartbeat:Filesystem): Stopping ip-172-30-15-111.ec2.internal * u02 (ocf::heartbeat:Filesystem): Stopped * u03 (ocf::heartbeat:Filesystem): Stopped * ntap (ocf::heartbeat:oracle): Stopped * listener (ocf::heartbeat:oralsnr): Stopped Daemon Status: corosync: active/enabled pacemaker: active/enabled pcsd: active/enabled **Starting Oracle resources on standby node in sequencial order** [root@ip-172-30-15-111 ec2-user]# pcs status Cluster name: ora_ec2nfsx Cluster Summary: * Stack: corosync (Pacemaker is running) * Current DC: ip-172-30-15-111.ec2.internal (version 2.1.7-5.1.el8_10-0f7f88312) - partition with quorum * Last updated: Fri Sep 13 20:01:34 2024 on ip-172-30-15-111.ec2.internal * Last change: Fri Sep 13 20:01:08 2024 by root via root on ip-172-30-15-111.ec2.internal * 2 nodes configured * 8 resource instances configured Node List: * Node ip-172-30-15-111.ec2.internal: standby * Online: [ ip-172-30-15-5.ec2.internal ] Full List of Resources: * clusterfence (stonith:fence_aws): Started ip-172-30-15-5.ec2.internal * Resource Group: oracle: * privip (ocf::heartbeat:awsvip): Started ip-172-30-15-5.ec2.internal * vip (ocf::heartbeat:IPaddr2): Started ip-172-30-15-5.ec2.internal * u01 (ocf::heartbeat:Filesystem): Started ip-172-30-15-5.ec2.internal * u02 (ocf::heartbeat:Filesystem): Started ip-172-30-15-5.ec2.internal * u03 (ocf::heartbeat:Filesystem): Started ip-172-30-15-5.ec2.internal * ntap (ocf::heartbeat:oracle): Starting ip-172-30-15-5.ec2.internal * listener (ocf::heartbeat:oralsnr): Stopped Daemon Status: corosync: active/enabled pacemaker: active/enabled pcsd: active/enabled **NFS mount points mounted on standby node** [root@ip-172-30-15-5 ec2-user]# df -h Filesystem Size Used Avail Use% Mounted on devtmpfs 7.7G 0 7.7G 0% /dev tmpfs 7.7G 33M 7.7G 1% /dev/shm tmpfs 7.7G 17M 7.7G 1% /run tmpfs 7.7G 0 7.7G 0% /sys/fs/cgroup /dev/xvda2 50G 21G 30G 41% / tmpfs 1.6G 0 1.6G 0% /run/user/1000 172.30.15.95:/orapm01_u01 48T 47T 840G 99% /u01 172.30.15.95:/orapm01_u02 285T 285T 840G 100% /u02 172.30.15.95:/orapm01_u03 190T 190T 840G 100% /u03 tmpfs 1.6G 0 1.6G 0% /run/user/54321 **Database opened on standby node** [oracle@ora_01 ~]$ sqlplus system@//172.30.15.33:1521/NTAP.ec2.internal SQL*Plus: Release 19.0.0.0.0 - Production on Fri Sep 13 16:34:08 2024 Version 19.18.0.0.0 Copyright (c) 1982, 2022, Oracle. All rights reserved. Enter password: Last Successful login time: Fri Sep 13 2024 15:47:28 -04:00 Connected to: Oracle Database 19c Enterprise Edition Release 19.0.0.0.0 - Production Version 19.18.0.0.0 SQL> select name, open_mode from v$database; NAME OPEN_MODE --------- -------------------- NTAP READ WRITE SQL> select instance_name, host_name from v$instance; INSTANCE_NAME ---------------- HOST_NAME ---------------------------------------------------------------- NTAP ip-172-30-15-5.ec2.internal SQL> -
Convalida un failback del database gestito da standby a primario tramite un nodo primario non in standby e osserva che le risorse Oracle eseguono il failback automaticamente a causa dell'impostazione del nodo preferito.
pcs node unstandby <nodename>**Stopping Oracle resources on standby node for failback to primary** [root@ip-172-30-15-111 ec2-user]# pcs node unstandby ip-172-30-15-111.ec2.internal [root@ip-172-30-15-111 ec2-user]# pcs status Cluster name: ora_ec2nfsx Cluster Summary: * Stack: corosync (Pacemaker is running) * Current DC: ip-172-30-15-111.ec2.internal (version 2.1.7-5.1.el8_10-0f7f88312) - partition with quorum * Last updated: Fri Sep 13 20:41:30 2024 on ip-172-30-15-111.ec2.internal * Last change: Fri Sep 13 20:41:18 2024 by root via root on ip-172-30-15-111.ec2.internal * 2 nodes configured * 8 resource instances configured Node List: * Online: [ ip-172-30-15-5.ec2.internal ip-172-30-15-111.ec2.internal ] Full List of Resources: * clusterfence (stonith:fence_aws): Started ip-172-30-15-5.ec2.internal * Resource Group: oracle: * privip (ocf::heartbeat:awsvip): Stopping ip-172-30-15-5.ec2.internal * vip (ocf::heartbeat:IPaddr2): Stopped * u01 (ocf::heartbeat:Filesystem): Stopped * u02 (ocf::heartbeat:Filesystem): Stopped * u03 (ocf::heartbeat:Filesystem): Stopped * ntap (ocf::heartbeat:oracle): Stopped * listener (ocf::heartbeat:oralsnr): Stopped Daemon Status: corosync: active/enabled pacemaker: active/enabled pcsd: active/enabled **Starting Oracle resources on primary node for failback** [root@ip-172-30-15-111 ec2-user]# pcs status Cluster name: ora_ec2nfsx Cluster Summary: * Stack: corosync (Pacemaker is running) * Current DC: ip-172-30-15-111.ec2.internal (version 2.1.7-5.1.el8_10-0f7f88312) - partition with quorum * Last updated: Fri Sep 13 20:41:45 2024 on ip-172-30-15-111.ec2.internal * Last change: Fri Sep 13 20:41:18 2024 by root via root on ip-172-30-15-111.ec2.internal * 2 nodes configured * 8 resource instances configured Node List: * Online: [ ip-172-30-15-5.ec2.internal ip-172-30-15-111.ec2.internal ] Full List of Resources: * clusterfence (stonith:fence_aws): Started ip-172-30-15-5.ec2.internal * Resource Group: oracle: * privip (ocf::heartbeat:awsvip): Started ip-172-30-15-111.ec2.internal * vip (ocf::heartbeat:IPaddr2): Started ip-172-30-15-111.ec2.internal * u01 (ocf::heartbeat:Filesystem): Started ip-172-30-15-111.ec2.internal * u02 (ocf::heartbeat:Filesystem): Started ip-172-30-15-111.ec2.internal * u03 (ocf::heartbeat:Filesystem): Started ip-172-30-15-111.ec2.internal * ntap (ocf::heartbeat:oracle): Starting ip-172-30-15-111.ec2.internal * listener (ocf::heartbeat:oralsnr): Stopped Daemon Status: corosync: active/enabled pacemaker: active/enabled pcsd: active/enabled **Database now accepts connection on primary node** [oracle@ora_01 ~]$ sqlplus system@//172.30.15.33:1521/NTAP.ec2.internal SQL*Plus: Release 19.0.0.0.0 - Production on Fri Sep 13 16:46:07 2024 Version 19.18.0.0.0 Copyright (c) 1982, 2022, Oracle. All rights reserved. Enter password: Last Successful login time: Fri Sep 13 2024 16:34:12 -04:00 Connected to: Oracle Database 19c Enterprise Edition Release 19.0.0.0.0 - Production Version 19.18.0.0.0 SQL> select instance_name, host_name from v$instance; INSTANCE_NAME ---------------- HOST_NAME ---------------------------------------------------------------- NTAP ip-172-30-15-111.ec2.internal SQL>
Questo completa la convalida di Oracle HA e la dimostrazione della soluzione in AWS EC2 con il clustering Pacemaker e Amazon FSx ONTAP come backend di archiviazione del database.
Backup, ripristino e clonazione di Oracle con SnapCenter
Details
NetApp consiglia lo strumento SnapCenter UI per gestire il database Oracle distribuito in AWS EC2 e Amazon FSx ONTAP. Fare riferimento a TR-4979"Oracle semplificato e autogestito in VMware Cloud su AWS con FSx ONTAP montato su guest" sezione Oracle backup, restore, and clone with SnapCenter per i dettagli sulla configurazione SnapCenter e sull'esecuzione dei flussi di lavoro di backup, ripristino e clonazione del database.
Dove trovare ulteriori informazioni
Per saperne di più sulle informazioni descritte nel presente documento, consultare i seguenti documenti e/o siti web: