Trident Protectを使用したOpenShift Container Platformのコンテナアプリのデータ保護
 変更を提案
変更を提案
このリファレンスドキュメントのこのセクションでは、Trident Protect を使用して Container Apps のスナップショットおよびバックアップを作成する方法の詳細を提供します。NetApp Trident Protect は、NetApp ONTAP ストレージシステムおよび NetApp Trident CSI ストレージプロビジョナーによってサポートされるステートフルな Kubernetes アプリケーションの機能性と可用性を強化する高度なアプリケーションデータ管理機能を提供します。Trident Protect はアプリケーションのスナップショットおよびバックアップを作成します。つまり、永続ボリューム内のアプリケーションデータだけでなく、アプリケーションメタデータについてもスナップショットおよびバックアップが作成されます。Trident Protect によって作成されたスナップショットおよびバックアップは、以下のいずれかのオブジェクトストレージに保存でき、後でそこからリストアすることができます。
-
AWS S3
-
Azure BLOB ストレージ
-
Google Cloud Storage
-
ONTAP S3
-
ストレージグリッド
-
その他の S3 互換ストレージ
Trident Protect は Kubernetes モデルのロールベースアクセス制御(RBAC)を使用します。デフォルトでは、Trident Protect は trident-protect と呼ばれる単一のシステムネームスペースと、それに関連付けられたデフォルトのサービスアカウントを提供します。多数のユーザーを抱える組織や特定のセキュリティニーズを持つ組織の場合は、Trident Protect の RBAC 機能を使用して、リソースとネームスペースへのアクセスをより細かく制御できます。
Trident Protect のロールベースアクセス制御に関する追加情報については、"Trident Protect ドキュメント"を参照してください。

|
クラスター管理者は、デフォルトの trident-protect 名前空間内のリソースにアクセスでき、他のすべての名前空間内のリソースにもアクセスできます。ユーザーは、trident-protect 名前空間にスナップショットやバックアップ CR などのアプリケーション データ管理カスタム リソース (CR) を作成することはできません。ベストプラクティスとして、ユーザーはアプリケーション名前空間にこれらの CR を作成する必要があります。 |
Trident Protect はドキュメントに記載されている手順に従ってインストールできます"ここをクリックしてください。"。このセクションでは、Trident Protect を使用したコンテナアプリケーションのデータ保護とアプリケーションの復元のワークフローを示します。1.Snapshot の作成(オンデマンドまたはスケジュール)2.Snapshot からの復元(同じ名前空間と異なる名前空間への復元)3.バックアップ作成 4.バックアップからの復元
前提条件
アプリケーションのスナップショットとバックアップを作成する前に、スナップショットとバックアップを保存するために Trident Protect でオブジェクトストレージを設定する必要があります。これはバケット CR を使用して行われます。バケット CR を作成して設定できるのは管理者のみです。バケット CR は Trident Protect では AppVault として知られています。AppVault オブジェクトは、ストレージバケットの宣言的な Kubernetes ワークフロー表現です。AppVault CR には、バックアップ、スナップショット、リストア操作、SnapMirror レプリケーションなどの保護操作でバケットを使用するために必要な設定が含まれています。
この例では、ONTAP S3 をオブジェクトストレージとして使用する方法を示します。ONTAP S3 用の AppVault CR を作成するワークフローは次のとおりです:1.ONTAP クラスタの SVM に S3 オブジェクトストアサーバーを作成します。2.オブジェクトストアサーバーにバケットを作成します。3.SVM に S3 ユーザーを作成します。アクセスキーとシークレットキーを安全な場所に保管してください。4.OpenShift で、ONTAP S3 クレデンシャルを格納するシークレットを作成します。5.ONTAP S3 用の AppVault オブジェクトを作成します
ONTAP S3用のTrident Protect AppVaultを設定
ONTAP S3をAppVaultとして使用してTrident Protectを設定するためのサンプルYAMLファイル
# alias tp='tridentctl-protect'

appvault-secret.yaml

apiVersion: v1
stringData:
  accessKeyID: "<access key id created for a user to access ONTAP S3 bucket>"
  secretAccessKey: "corresponding Secret Access Key"
#data:
# base 64 encoded values
#  accessKeyID: <base64 access key id created for a user to access ONTAP S3 bucket>
#  secretAccessKey: <base 64  Secret Access Key>
kind: Secret
metadata:
  name: appvault-secret
  namespace: trident-protect
type: Opaque

appvault.yaml

apiVersion: protect.trident.netapp.io/v1
kind: AppVault
metadata:
  name: ontap-s3-appvault
  namespace: trident-protect
spec:
  providerConfig:
    azure:
      accountName: ""
      bucketName: ""
      endpoint: ""
    gcp:
      bucketName: ""
      projectID: ""
    s3:
      bucketName: <bucket-name for storing the snapshots and backups>
      endpoint: <endpoint IP for S3>
      secure: "false"
      skipCertValidation: "true"
  providerCredentials:
    accessKeyID:
      valueFromSecret:
        key: accessKeyID
        name: appvault-secret
    secretAccessKey:
      valueFromSecret:
        key: secretAccessKey
        name: appvault-secret
  providerType: OntapS3

# oc create -f appvault-secret.yaml -n trident-protect
# oc create -f appvault.yaml -n trident-protect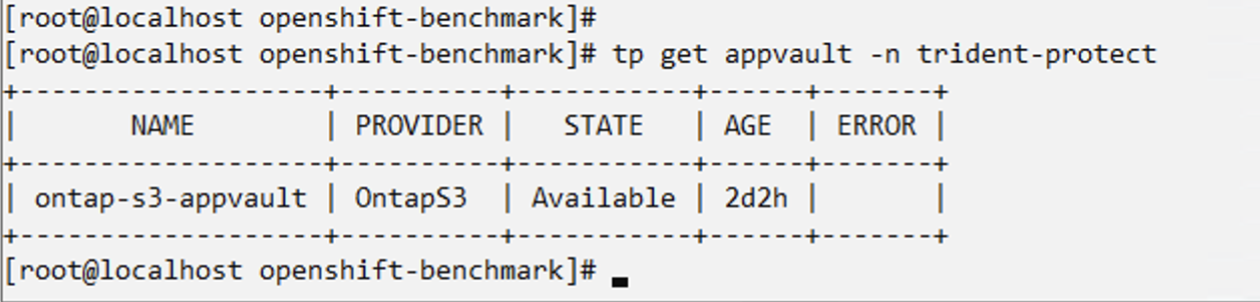
postgresql アプリをインストールするためのサンプル yaml ファイル
postgres.yaml
apiVersion: apps/v1
kind: Deployment
metadata:
name: postgres
spec:
replicas: 1
selector:
matchLabels:
app: postgres
template:
metadata:
labels:
app: postgres
spec:
containers:
- name: postgres
image: postgres:14
env:
- name: POSTGRES_USER
#value: "myuser"
value: "admin"
- name: POSTGRES_PASSWORD
#value: "mypassword"
value: "adminpass"
- name: POSTGRES_DB
value: "mydb"
- name: PGDATA
value: "/var/lib/postgresql/data/pgdata"
ports:
- containerPort: 5432
volumeMounts:
- name: postgres-storage
mountPath: /var/lib/postgresql/data
volumes:
- name: postgres-storage
persistentVolumeClaim:
claimName: postgres-pvc
---
apiVersion: v1
kind: PersistentVolumeClaim
metadata:
name: postgres-pvc
spec:
accessModes:
- ReadWriteOnce
resources:
requests:
storage: 5Gi
---
apiVersion: v1
kind: Service
metadata:
name: postgres
spec:
selector:
app: postgres
ports:
- protocol: TCP
port: 5432
targetPort: 5432
type: ClusterIP
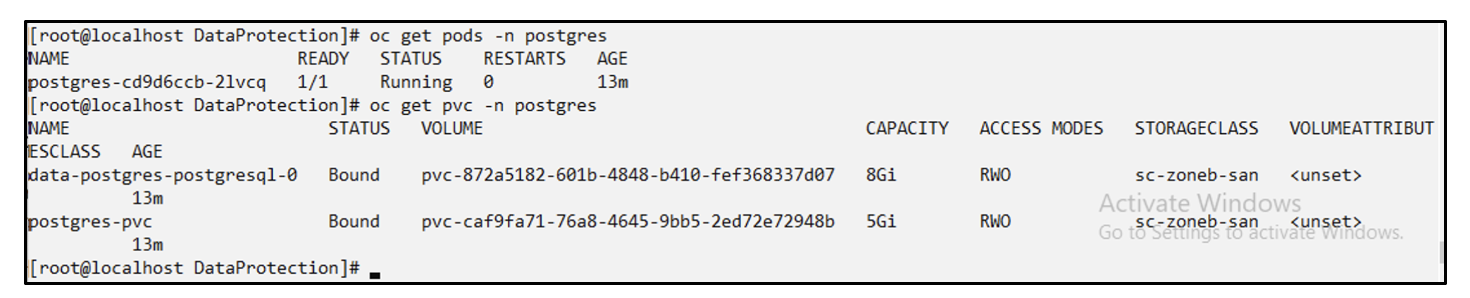
Now create the Trident Protect application CR for the postgres app. Include the objects in the namespace postgres and create it in the postgres namespace.
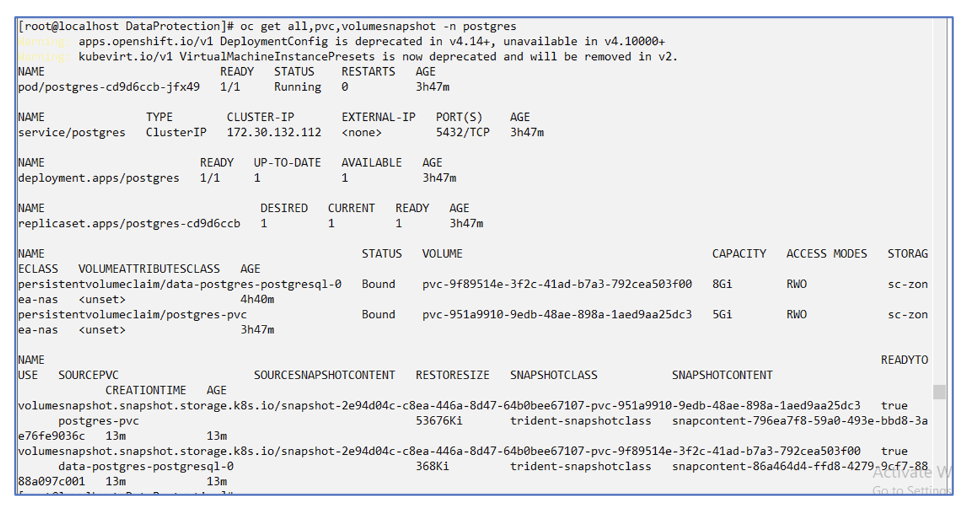
# tp create app postgres-app --namespaces postgres -n postgres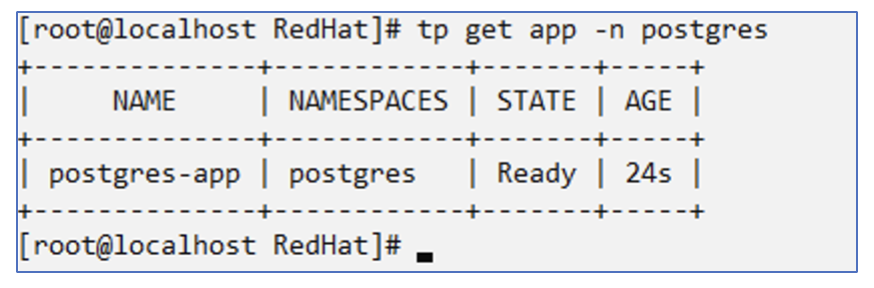
スナップショットを作成する
オンデマンド スナップショットの作成
# tp create snapshot postgres-snap1 --app postgres-app --appvault ontap-s3-appvault -n postgres
Snapshot "postgres-snap1" created.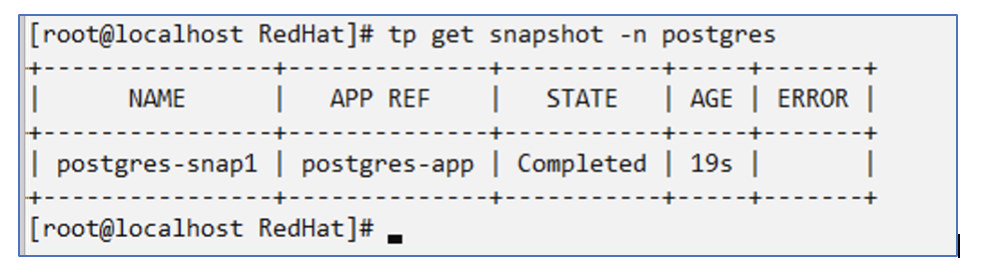
スケジュールの作成 次のコマンドを使用すると、スナップショットは毎日 15:33 に作成され、2 つのスナップショットとバックアップが保持されます。
# tp create schedule schedule1 --app postgres-app --appvault ontap-s3-appvault --backup-retention 2 --snapshot-retention 2 --granularity Daily --hour 15 --minute 33 --data-mover Restic -n postgres
Schedule "schedule1" created.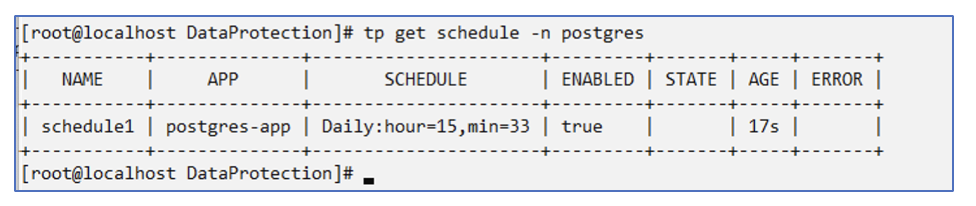
yaml を使用してスケジュールを作成する
# tp create schedule schedule2 --app postgres-app --appvault ontap-s3-appvault --backup-retention 2 --snapshot-retention 2 --granularity Daily --hour 15 --minute 33 --data-mover Restic -n postgres --dry-run > hourly-snapshotschedule.yaml

cat hourly-snapshotschedule.yaml

apiVersion: protect.trident.netapp.io/v1
kind: Schedule
metadata:
  creationTimestamp: null
  name: schedule2
  namespace: postgres
spec:
  appVaultRef: ontap-s3-appvault
  applicationRef: postgres-app
  backupRetention: "2"
  dataMover: Restic
  dayOfMonth: ""
  dayOfWeek: ""
  enabled: true
  granularity: Hourly
  #hour: "15"
  minute: "33"
  recurrenceRule: ""
  snapshotRetention: "2"
status: {}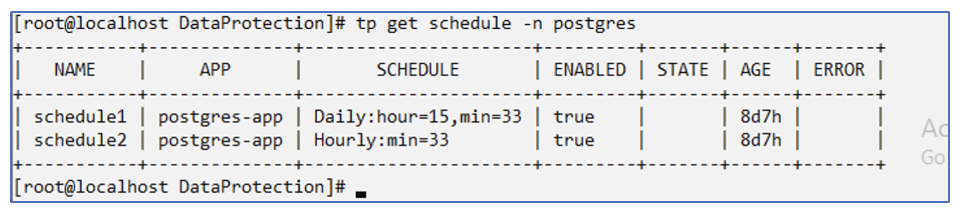
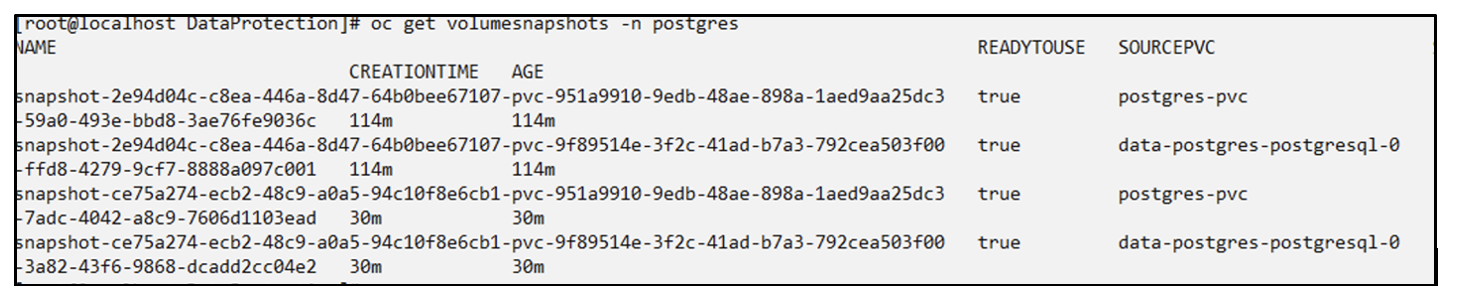
このスケジュールで作成されたスナップショットを表示できます。
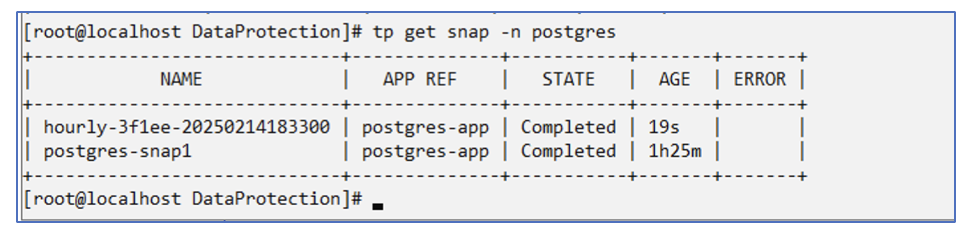
ボリュームのスナップショットも作成されます。
アプリケーションを削除してアプリケーションの損失をシミュレートします
# oc delete deployment/postgres -n postgres
# oc get pod,pvc -n postgres
No resources found in postgres namespace.
スナップショットから同じ名前空間に復元する
# tp create sir postgres-sir --snapshot postgres/hourly-3f1ee-20250214183300 -n postgres
SnapshotInplaceRestore "postgres-sir" created.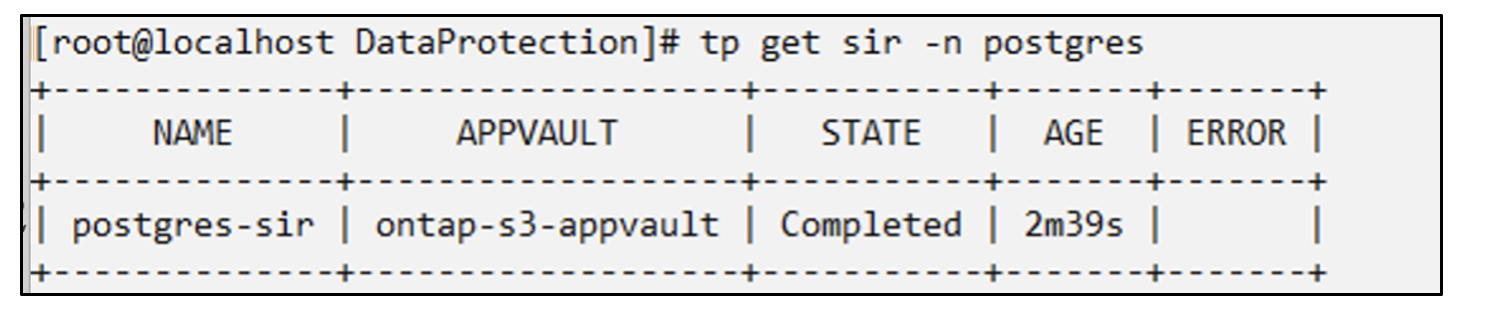
アプリケーションとその PVC は同じ名前空間に復元されます。

スナップショットから別の名前空間に復元する
# tp create snapshotrestore postgres-restore --snapshot postgres/hourly-3f1ee-20250214183300 --namespace-mapping postgres:postgres-restore -n postgres-restore
SnapshotRestore "postgres-restore" created.
アプリケーションが新しい名前空間に復元されたことがわかります。

バックアップを作成する
オンデマンド バックアップの作成
# tp create backup postgres-backup1 --app postgres-app --appvault ontap-s3-appvault -n postgres
Backup "postgres-backup1" created.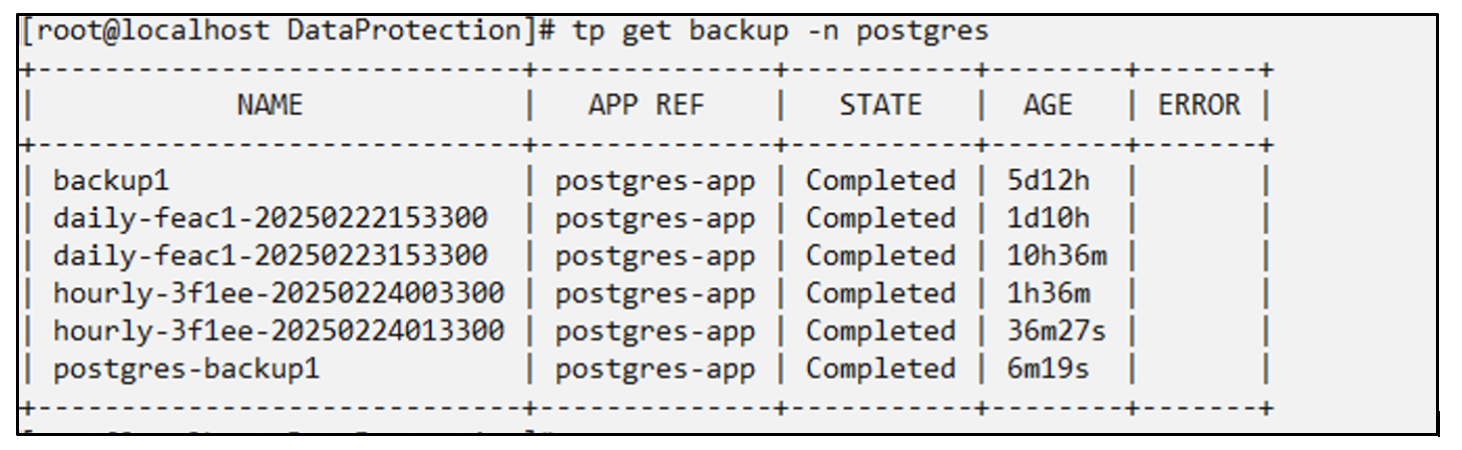
バックアップのスケジュールを作成
上記のリストにある毎日のバックアップと毎時のバックアップは、以前に設定されたスケジュールから作成されます。
# tp create schedule schedule1 --app postgres-app --appvault ontap-s3-appvault --backup-retention 2 --snapshot-retention 2 --granularity Daily --hour 15 --minute 33 --data-mover Restic -n postgres
Schedule "schedule1" created.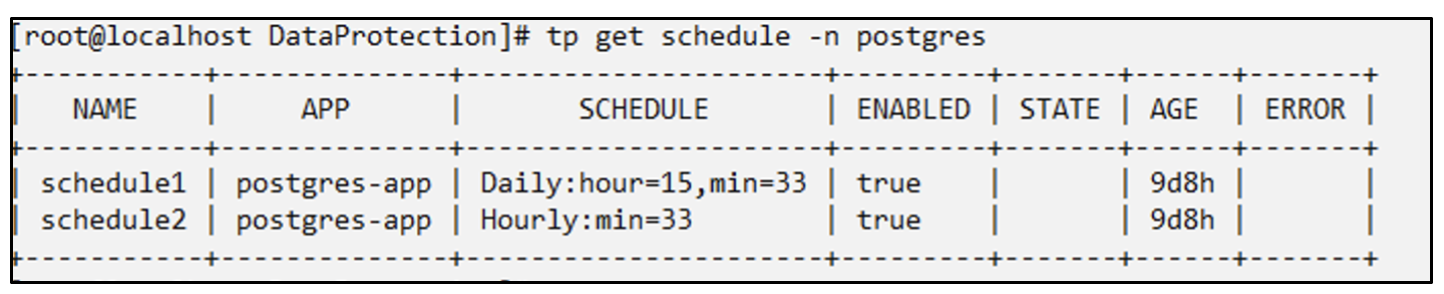
バックアップからの復元
データ損失をシミュレートするには、アプリケーションと PVC を削除します。

同じ名前空間に復元 #tp create bir postgres-bir --backup postgres/hourly-3f1ee-20250224023300 -n postgres BackupInplaceRestore "postgres-bir" が作成されました。
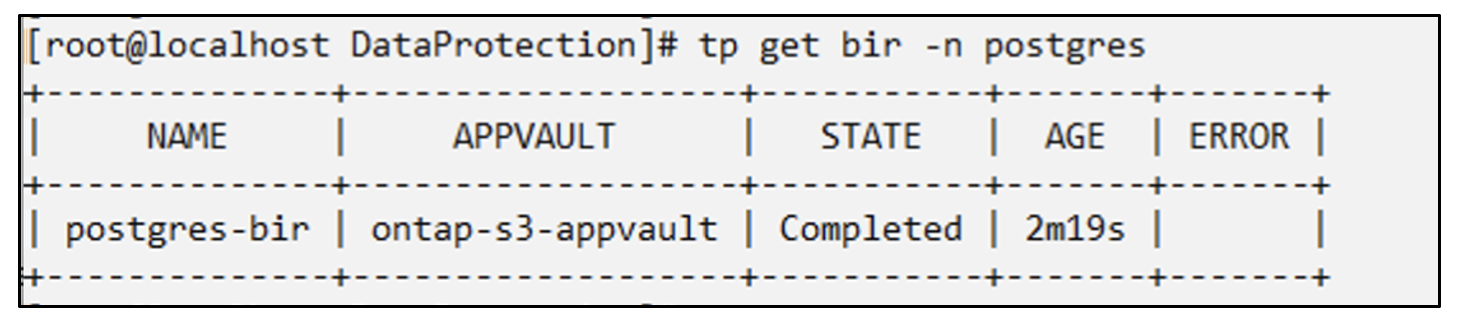
アプリケーションと PVC は同じ名前空間に復元されます。

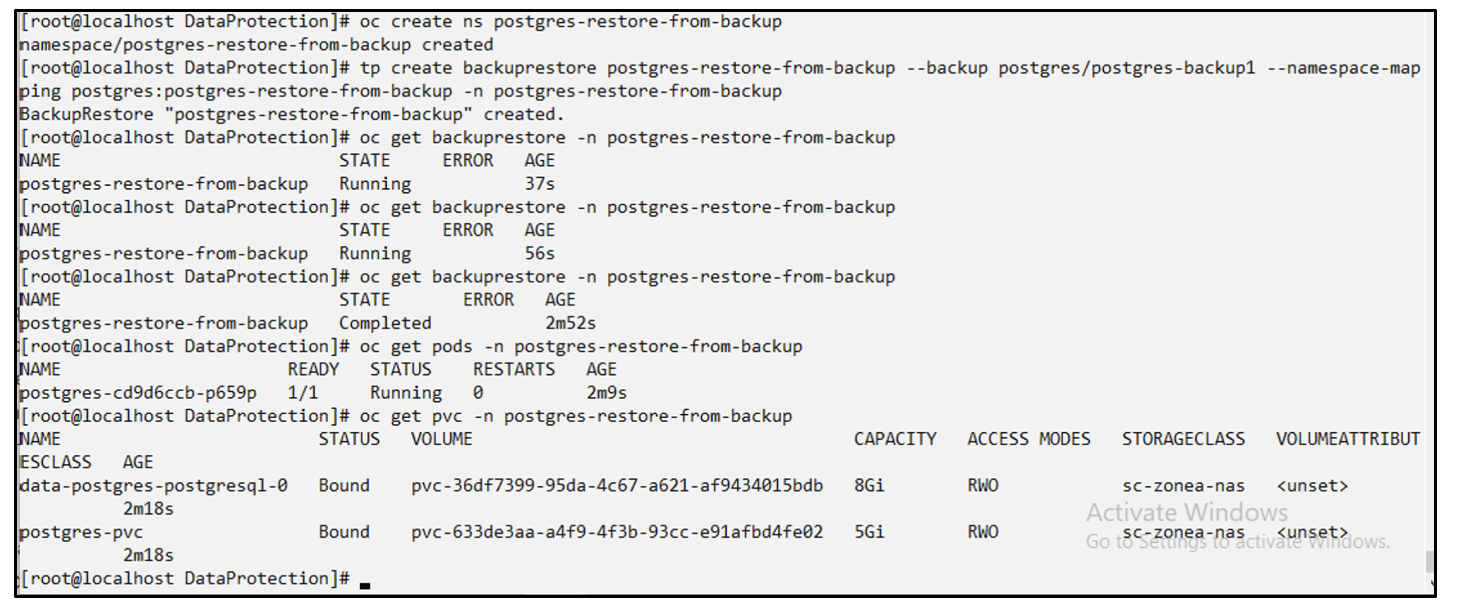
別の名前空間に復元 新しい名前空間を作成します。バックアップから新しい名前空間に復元します。
アプリケーションの移行
アプリケーションを別のクラスタに複製または移行するには(クラスタ間複製を実行する)、ソース クラスタでバックアップを作成し、そのバックアップを別のクラスタにリストアします。Trident Protectがデスティネーション クラスタにインストールされていることを確認してください。
ソース クラスターで、次の図に示す手順を実行します。

ソース クラスターから、コンテキストを宛先クラスターに切り替えます。次に、宛先クラスター コンテキストから AppVault にアクセスできることを確認し、宛先クラスターから AppVault の内容を取得します。
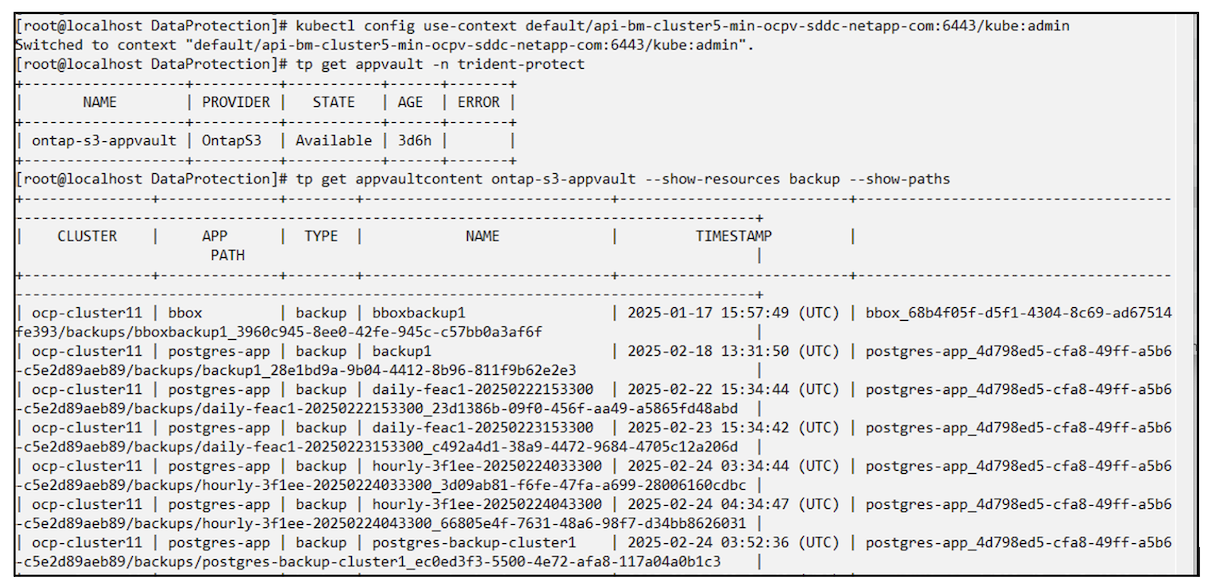
リストのバックアップ パスを使用して、以下のコマンドに示すように、backuprestore CR オブジェクトを作成します。
# tp create backuprestore backup-restore-cluster2 --namespace-mapping postgres:postgres --appvault ontap-s3-appvault --path postgres-app_4d798ed5-cfa8-49ff-a5b6-c5e2d89aeb89/backups/postgres-backup-cluster1_ec0ed3f3-5500-4e72-afa8-117a04a0b1c3 -n postgres
BackupRestore "backup-restore-cluster2" created.
アプリケーション ポッドと PVC が宛先クラスターに作成されたことがわかります。