

테스트 절차
 변경 제안
변경 제안
이 섹션에서는 검증을 완료하는 데 필요한 작업을 설명합니다.
필수 조건
시나리오 1 – JupyterLab에서의 주문형 추론
-
AI/ML 추론 워크로드를 위한 Kubernetes 네임스페이스를 만듭니다.
$ kubectl create namespace inference
namespace/inference created
-
NetApp DataOps Toolkit을 사용하여 추론을 수행할 데이터를 저장할 영구 볼륨을 프로비저닝합니다.
$ netapp_dataops_k8s_cli.py create volume --namespace=inference --pvc-name=inference-data --size=50Gi
Creating PersistentVolumeClaim (PVC) 'inference-data' in namespace 'inference'.
PersistentVolumeClaim (PVC) 'inference-data' created. Waiting for Kubernetes to bind volume to PVC.
Volume successfully created and bound to PersistentVolumeClaim (PVC) 'inference-data' in namespace 'inference'.
-
NetApp DataOps Toolkit을 사용하여 새로운 JupyterLab 작업 공간을 만듭니다. 이전 단계에서 생성된 영구 볼륨을 다음을 사용하여 마운트합니다.
--mount- pvc옵션. 필요에 따라 NVIDIA GPU를 작업 공간에 할당하려면 다음을 사용하십시오.-- nvidia-gpu옵션.다음 예에서는 영구 볼륨
inference-dataJupyterLab 작업 공간 컨테이너에 마운트됩니다./home/jovyan/data. 공식 Project Jupyter 컨테이너 이미지를 사용하는 경우/home/jovyanJupyterLab 웹 인터페이스 내의 최상위 디렉토리로 표시됩니다.$ netapp_dataops_k8s_cli.py create jupyterlab --namespace=inference --workspace-name=live-inference --size=50Gi --nvidia-gpu=2 --mount-pvc=inference-data:/home/jovyan/data Set workspace password (this password will be required in order to access the workspace): Re-enter password: Creating persistent volume for workspace... Creating PersistentVolumeClaim (PVC) 'ntap-dsutil-jupyterlab-live-inference' in namespace 'inference'. PersistentVolumeClaim (PVC) 'ntap-dsutil-jupyterlab-live-inference' created. Waiting for Kubernetes to bind volume to PVC. Volume successfully created and bound to PersistentVolumeClaim (PVC) 'ntap-dsutil-jupyterlab-live-inference' in namespace 'inference'. Creating Service 'ntap-dsutil-jupyterlab-live-inference' in namespace 'inference'. Service successfully created. Attaching Additional PVC: 'inference-data' at mount_path: '/home/jovyan/data'. Creating Deployment 'ntap-dsutil-jupyterlab-live-inference' in namespace 'inference'. Deployment 'ntap-dsutil-jupyterlab-live-inference' created. Waiting for Deployment 'ntap-dsutil-jupyterlab-live-inference' to reach Ready state. Deployment successfully created. Workspace successfully created. To access workspace, navigate to http://192.168.0.152:32721
-
출력에 지정된 URL을 사용하여 JupyterLab 작업 공간에 액세스합니다.
create jupyterlab명령. 데이터 디렉토리는 작업 공간에 마운트된 영구 볼륨을 나타냅니다.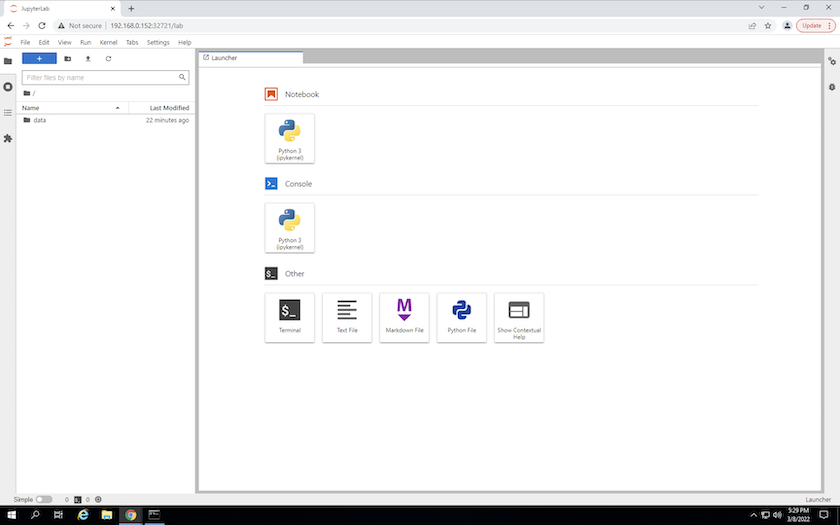
-
열기
data디렉토리로 가서 추론을 수행할 파일을 업로드합니다. 파일이 데이터 디렉토리에 업로드되면 해당 파일은 작업 공간에 마운트된 영구 볼륨에 자동으로 저장됩니다. 파일을 업로드하려면 다음 이미지에 표시된 대로 파일 업로드 아이콘을 클릭하세요.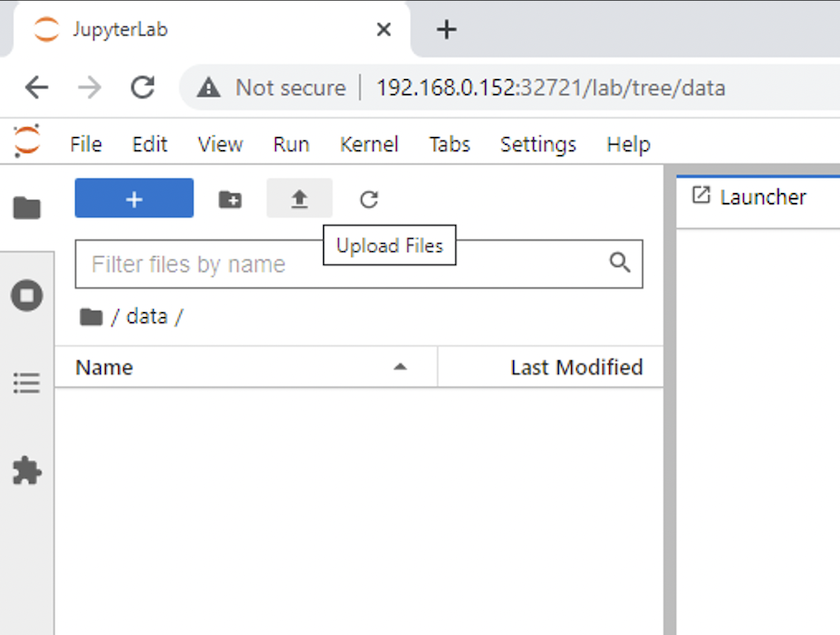
-
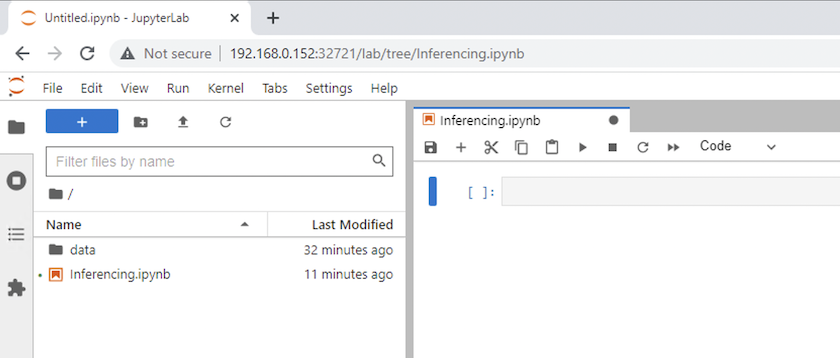
최상위 디렉토리로 돌아가서 새로운 노트북을 만듭니다.
-
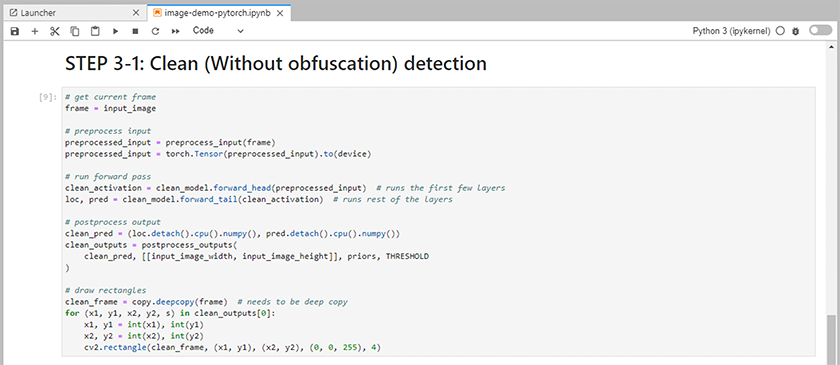
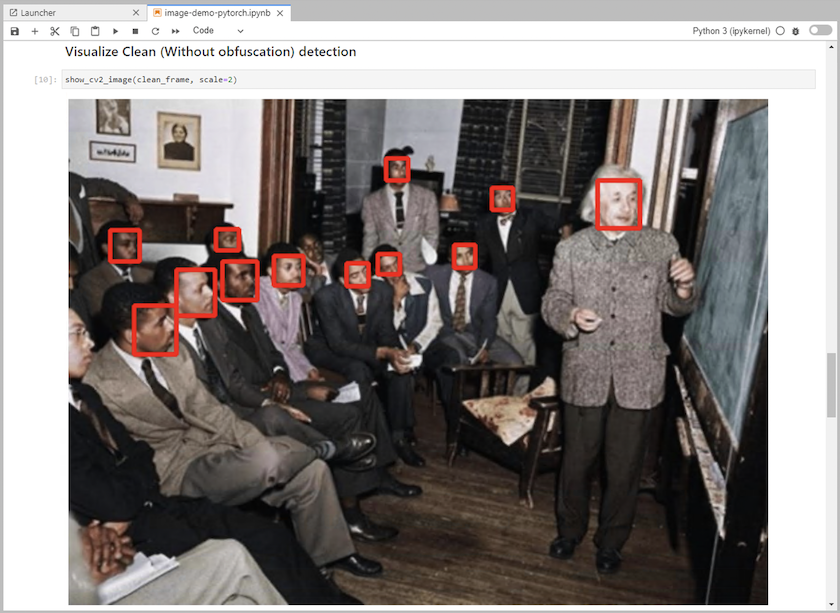
노트북에 추론 코드를 추가합니다. 다음 예제는 이미지 감지 사용 사례에 대한 추론 코드를 보여줍니다.
-
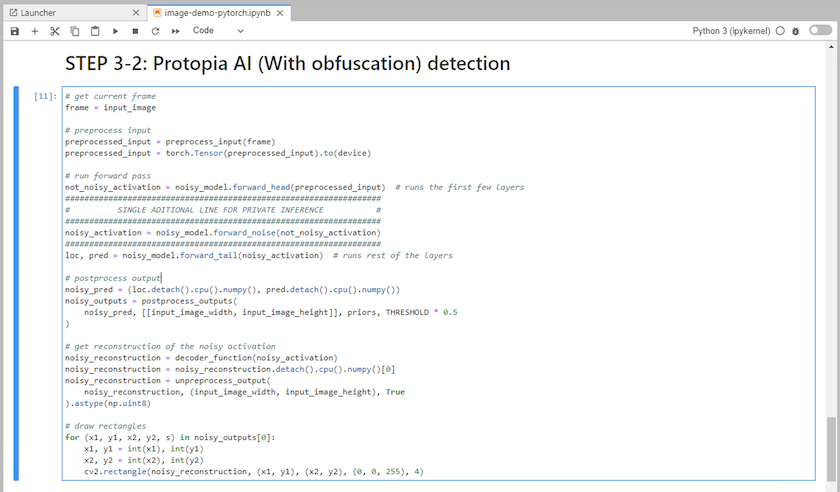
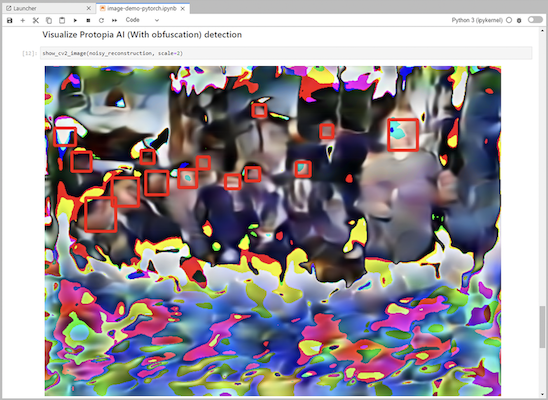
추론 코드에 Protopia 난독화를 추가하세요. Protopia는 고객과 직접 협력하여 사용 사례별 문서를 제공하며, 이는 본 기술 보고서의 범위를 벗어납니다. 다음 예제에서는 Protopia 난독화가 추가된 이미지 감지 사용 사례에 대한 추론 코드를 보여줍니다.
시나리오 2 – Kubernetes에서의 일괄 추론
-
AI/ML 추론 워크로드를 위한 Kubernetes 네임스페이스를 만듭니다.
$ kubectl create namespace inference
namespace/inference created
-
NetApp DataOps Toolkit을 사용하여 추론을 수행할 데이터를 저장할 영구 볼륨을 프로비저닝합니다.
$ netapp_dataops_k8s_cli.py create volume --namespace=inference --pvc-name=inference-data --size=50Gi
Creating PersistentVolumeClaim (PVC) 'inference-data' in namespace 'inference'.
PersistentVolumeClaim (PVC) 'inference-data' created. Waiting for Kubernetes to bind volume to PVC.
Volume successfully created and bound to PersistentVolumeClaim (PVC) 'inference-data' in namespace 'inference'.
-
추론을 수행할 데이터로 새 영구 볼륨을 채웁니다.
PVC에 데이터를 로드하는 방법에는 여러 가지가 있습니다. 데이터가 현재 NetApp StorageGRID 또는 Amazon S3와 같은 S3 호환 개체 스토리지 플랫폼에 저장되어 있는 경우 다음을 사용할 수 있습니다. "NetApp DataOps Toolkit S3 Data Mover 기능" . 또 다른 간단한 방법은 JupyterLab 작업 공간을 만든 다음 "3~5단계" 섹션에 설명된 대로 JupyterLab 웹 인터페이스를 통해 파일을 업로드하는 것입니다.시나리오 1 – JupyterLab에서의 주문형 추론 ."
-
일괄 추론 작업을 위한 Kubernetes 작업을 만듭니다. 다음 예에서는 이미지 감지 사용 사례에 대한 일괄 추론 작업을 보여줍니다. 이 작업은 이미지 세트의 각 이미지에 대한 추론을 수행하고 추론 정확도 측정 항목을 stdout에 기록합니다.
$ vi inference-job-raw.yaml apiVersion: batch/v1 kind: Job metadata: name: netapp-inference-raw namespace: inference spec: backoffLimit: 5 template: spec: volumes: - name: data persistentVolumeClaim: claimName: inference-data - name: dshm emptyDir: medium: Memory containers: - name: inference image: netapp-protopia-inference:latest imagePullPolicy: IfNotPresent command: ["python3", "run-accuracy-measurement.py", "--dataset", "/data/netapp-face-detection/FDDB"] resources: limits: nvidia.com/gpu: 2 volumeMounts: - mountPath: /data name: data - mountPath: /dev/shm name: dshm restartPolicy: Never $ kubectl create -f inference-job-raw.yaml job.batch/netapp-inference-raw created -
추론 작업이 성공적으로 완료되었는지 확인하세요.
$ kubectl -n inference logs netapp-inference-raw-255sp
100%|██████████| 89/89 [00:52<00:00,  1.68it/s]
Reading Predictions : 100%|██████████| 10/10 [00:01<00:00,  6.23it/s]
Predicting ... : 100%|██████████| 10/10 [00:16<00:00,  1.64s/it]
==================== Results ====================
FDDB-fold-1 Val AP: 0.9491256561145955
FDDB-fold-2 Val AP: 0.9205024466101926
FDDB-fold-3 Val AP: 0.9253013871078468
FDDB-fold-4 Val AP: 0.9399781485863011
FDDB-fold-5 Val AP: 0.9504280149478732
FDDB-fold-6 Val AP: 0.9416473519339292
FDDB-fold-7 Val AP: 0.9241631566241117
FDDB-fold-8 Val AP: 0.9072663297546659
FDDB-fold-9 Val AP: 0.9339648715035469
FDDB-fold-10 Val AP: 0.9447707905560152
FDDB Dataset Average AP: 0.9337148153739079
=================================================
mAP: 0.9337148153739079
-
추론 작업에 Protopia 난독화를 추가하세요. Protopia 난독화를 Protopia에서 직접 추가하는 방법에 대한 사용 사례별 지침은 찾을 수 있지만, 이는 이 기술 보고서의 범위를 벗어납니다. 다음 예제에서는 ALPHA 값 0.8을 사용하여 Protopia 난독화를 추가한 얼굴 감지 사용 사례에 대한 일괄 추론 작업을 보여줍니다. 이 작업은 이미지 세트의 각 이미지에 대한 추론을 수행하기 전에 Protopia 난독화를 적용한 다음 추론 정확도 측정 항목을 stdout에 기록합니다.
우리는 ALPHA 값 0.05, 0.1, 0.2, 0.4, 0.6, 0.8, 0.9, 0.95에 대해 이 단계를 반복했습니다. 결과는 다음에서 볼 수 있습니다."추론 정확도 비교."
$ vi inference-job-protopia-0.8.yaml apiVersion: batch/v1 kind: Job metadata: name: netapp-inference-protopia-0.8 namespace: inference spec: backoffLimit: 5 template: spec: volumes: - name: data persistentVolumeClaim: claimName: inference-data - name: dshm emptyDir: medium: Memory containers: - name: inference image: netapp-protopia-inference:latest imagePullPolicy: IfNotPresent env: - name: ALPHA value: "0.8" command: ["python3", "run-accuracy-measurement.py", "--dataset", "/data/netapp-face-detection/FDDB", "--alpha", "$(ALPHA)", "--noisy"] resources: limits: nvidia.com/gpu: 2 volumeMounts: - mountPath: /data name: data - mountPath: /dev/shm name: dshm restartPolicy: Never $ kubectl create -f inference-job-protopia-0.8.yaml job.batch/netapp-inference-protopia-0.8 created -
추론 작업이 성공적으로 완료되었는지 확인하세요.
$ kubectl -n inference logs netapp-inference-protopia-0.8-b4dkz
100%|██████████| 89/89 [01:05<00:00,  1.37it/s]
Reading Predictions : 100%|██████████| 10/10 [00:02<00:00,  3.67it/s]
Predicting ... : 100%|██████████| 10/10 [00:22<00:00,  2.24s/it]
==================== Results ====================
FDDB-fold-1 Val AP: 0.8953066115834589
FDDB-fold-2 Val AP: 0.8819580264029936
FDDB-fold-3 Val AP: 0.8781107458462862
FDDB-fold-4 Val AP: 0.9085731346308461
FDDB-fold-5 Val AP: 0.9166445508275378
FDDB-fold-6 Val AP: 0.9101178994188819
FDDB-fold-7 Val AP: 0.8383443678423771
FDDB-fold-8 Val AP: 0.8476311547659464
FDDB-fold-9 Val AP: 0.8739624502111121
FDDB-fold-10 Val AP: 0.8905468076424851
FDDB Dataset Average AP: 0.8841195749171925
=================================================
mAP: 0.8841195749171925
시나리오 3 – NVIDIA Triton 추론 서버
-
AI/ML 추론 워크로드를 위한 Kubernetes 네임스페이스를 만듭니다.
$ kubectl create namespace inference
namespace/inference created
-
NetApp DataOps Toolkit을 사용하여 NVIDIA Triton Inference Server의 모델 저장소로 사용할 영구 볼륨을 프로비저닝합니다.
$ netapp_dataops_k8s_cli.py create volume --namespace=inference --pvc-name=triton-model-repo --size=100Gi
Creating PersistentVolumeClaim (PVC) 'triton-model-repo' in namespace 'inference'.
PersistentVolumeClaim (PVC) 'triton-model-repo' created. Waiting for Kubernetes to bind volume to PVC.
Volume successfully created and bound to PersistentVolumeClaim (PVC) 'triton-model-repo' in namespace 'inference'.
-
새 영구 볼륨에 모델을 저장합니다. "체재" NVIDIA Triton 추론 서버에서 인식됩니다.
PVC에 데이터를 로드하는 방법에는 여러 가지가 있습니다. 간단한 방법은 JupyterLab 작업 공간을 만든 다음 "3~5단계"에 설명된 대로 JupyterLab 웹 인터페이스를 통해 파일을 업로드하는 것입니다.시나리오 1 – JupyterLab에서의 주문형 추론 . "
-
NetApp DataOps Toolkit을 사용하여 새로운 NVIDIA Triton Inference Server 인스턴스를 배포합니다.
$ netapp_dataops_k8s_cli.py create triton-server --namespace=inference --server-name=netapp-inference --model-repo-pvc-name=triton-model-repo
Creating Service 'ntap-dsutil-triton-netapp-inference' in namespace 'inference'.
Service successfully created.
Creating Deployment 'ntap-dsutil-triton-netapp-inference' in namespace 'inference'.
Deployment 'ntap-dsutil-triton-netapp-inference' created.
Waiting for Deployment 'ntap-dsutil-triton-netapp-inference' to reach Ready state.
Deployment successfully created.
Server successfully created.
Server endpoints:
http: 192.168.0.152: 31208
grpc: 192.168.0.152: 32736
metrics: 192.168.0.152: 30009/metrics
-
Triton 클라이언트 SDK를 사용하여 추론 작업을 수행합니다. 다음 Python 코드 발췌 부분은 Triton Python 클라이언트 SDK를 사용하여 얼굴 감지 사용 사례에 대한 추론 작업을 수행합니다. 이 예제에서는 Triton API를 호출하고 추론을 위해 이미지를 전달합니다. 그러면 Triton 추론 서버는 요청을 수신하고, 모델을 호출하고, API 결과의 일부로 추론 출력을 반환합니다.
# get current frame frame = input_image # preprocess input preprocessed_input = preprocess_input(frame) preprocessed_input = torch.Tensor(preprocessed_input).to(device) # run forward pass clean_activation = clean_model_head(preprocessed_input) # runs the first few layers ###################################################################################### # pass clean image to Triton Inference Server API for inferencing # ###################################################################################### triton_client = httpclient.InferenceServerClient(url="192.168.0.152:31208", verbose=False) model_name = "face_detection_base" inputs = [] outputs = [] inputs.append(httpclient.InferInput("INPUT__0", [1, 128, 32, 32], "FP32")) inputs[0].set_data_from_numpy(clean_activation.detach().cpu().numpy(), binary_data=False) outputs.append(httpclient.InferRequestedOutput("OUTPUT__0", binary_data=False)) outputs.append(httpclient.InferRequestedOutput("OUTPUT__1", binary_data=False)) results = triton_client.infer( model_name, inputs, outputs=outputs, #query_params=query_params, headers=None, request_compression_algorithm=None, response_compression_algorithm=None) #print(results.get_response()) statistics = triton_client.get_inference_statistics(model_name=model_name, headers=None) print(statistics) if len(statistics["model_stats"]) != 1: print("FAILED: Inference Statistics") sys.exit(1) loc_numpy = results.as_numpy("OUTPUT__0") pred_numpy = results.as_numpy("OUTPUT__1") ###################################################################################### # postprocess output clean_pred = (loc_numpy, pred_numpy) clean_outputs = postprocess_outputs( clean_pred, [[input_image_width, input_image_height]], priors, THRESHOLD ) # draw rectangles clean_frame = copy.deepcopy(frame) # needs to be deep copy for (x1, y1, x2, y2, s) in clean_outputs[0]: x1, y1 = int(x1), int(y1) x2, y2 = int(x2), int(y2) cv2.rectangle(clean_frame, (x1, y1), (x2, y2), (0, 0, 255), 4) -
추론 코드에 Protopia 난독화를 추가하세요. Protopia에서 직접 Protopia 난독화를 추가하는 방법에 대한 사용 사례별 지침은 찾을 수 있습니다. 그러나 이 프로세스는 이 기술 보고서의 범위를 벗어납니다. 다음 예제는 이전 단계 5에서 보여준 것과 동일한 Python 코드를 보여주지만, Protopia 난독화가 추가되었습니다.
Protopia 난독화는 이미지가 Triton API로 전달되기 전에 적용된다는 점에 유의하세요. 따라서 난독화되지 않은 이미지는 로컬 머신을 벗어나지 않습니다. 난독화된 이미지만 네트워크를 통해 전달됩니다. 이 워크플로는 신뢰할 수 있는 영역 내에서 데이터를 수집한 후 추론을 위해 해당 신뢰할 수 있는 영역 외부로 데이터를 전달해야 하는 사용 사례에 적용할 수 있습니다. Protopia 난독화 없이는 민감한 데이터가 신뢰 영역을 벗어나지 않고 이러한 유형의 워크플로를 구현하는 것은 불가능합니다.
# get current frame
frame = input_image
# preprocess input
preprocessed_input = preprocess_input(frame)
preprocessed_input = torch.Tensor(preprocessed_input).to(device)
# run forward pass
not_noisy_activation = noisy_model_head(preprocessed_input)  # runs the first few layers
##################################################################
#          obfuscate image locally prior to inferencing          #
#          SINGLE ADITIONAL LINE FOR PRIVATE INFERENCE           #
##################################################################
noisy_activation = noisy_model_noise(not_noisy_activation)
##################################################################
###########################################################################################
#          pass obfuscated image to Triton Inference Server API for inferencing           #
###########################################################################################
triton_client = httpclient.InferenceServerClient(url="192.168.0.152:31208", verbose=False)
model_name = "face_detection_noisy"
inputs = []
outputs = []
inputs.append(httpclient.InferInput("INPUT__0", [1, 128, 32, 32], "FP32"))
inputs[0].set_data_from_numpy(noisy_activation.detach().cpu().numpy(), binary_data=False)
outputs.append(httpclient.InferRequestedOutput("OUTPUT__0", binary_data=False))
outputs.append(httpclient.InferRequestedOutput("OUTPUT__1", binary_data=False))
results = triton_client.infer(
    model_name,
    inputs,
    outputs=outputs,
    #query_params=query_params,
    headers=None,
    request_compression_algorithm=None,
    response_compression_algorithm=None)
#print(results.get_response())
statistics = triton_client.get_inference_statistics(model_name=model_name, headers=None)
print(statistics)
if len(statistics["model_stats"]) != 1:
    print("FAILED: Inference Statistics")
    sys.exit(1)

loc_numpy = results.as_numpy("OUTPUT__0")
pred_numpy = results.as_numpy("OUTPUT__1")
###########################################################################################

# postprocess output
noisy_pred = (loc_numpy, pred_numpy)
noisy_outputs = postprocess_outputs(
    noisy_pred, [[input_image_width, input_image_height]], priors, THRESHOLD * 0.5
)
# get reconstruction of the noisy activation
noisy_reconstruction = decoder_function(noisy_activation)
noisy_reconstruction = noisy_reconstruction.detach().cpu().numpy()[0]
noisy_reconstruction = unpreprocess_output(
    noisy_reconstruction, (input_image_width, input_image_height), True
).astype(np.uint8)
# draw rectangles
for (x1, y1, x2, y2, s) in noisy_outputs[0]:
    x1, y1 = int(x1), int(y1)
    x2, y2 = int(x2), int(y2)
    cv2.rectangle(noisy_reconstruction, (x1, y1), (x2, y2), (0, 0, 255), 4)