

Trident 개요
 변경 제안
변경 제안
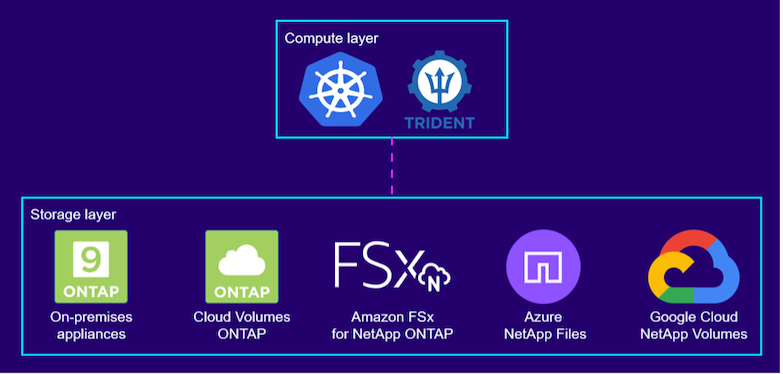
Trident Red Hat OpenShift를 포함한 컨테이너와 Kubernetes 배포판을 위한 오픈 소스이자 완벽하게 지원되는 스토리지 오케스트레이터입니다. Trident NetApp ONTAP 및 Element 스토리지 시스템을 포함한 전체 NetApp 스토리지 포트폴리오와 호환되며 NFS 및 iSCSI 연결도 지원합니다. Trident 최종 사용자가 스토리지 관리자의 개입 없이 NetApp 스토리지 시스템에서 스토리지를 프로비저닝하고 관리할 수 있도록 하여 DevOps 워크플로를 가속화합니다.
관리자는 프로젝트 요구 사항과 압축, 특정 디스크 유형 또는 특정 수준의 성능을 보장하는 QoS 수준 등의 고급 스토리지 기능을 활성화하는 스토리지 시스템 모델을 기반으로 여러 스토리지 백엔드를 구성할 수 있습니다. 백엔드가 정의되면 개발자는 프로젝트에서 이러한 백엔드를 사용하여 영구 볼륨 클레임(PVC)을 생성하고 필요에 따라 영구 저장소를 컨테이너에 연결할 수 있습니다.
Trident 는 개발 주기가 빠르며, Kubernetes와 마찬가지로 1년에 4번 출시됩니다.
어떤 Kubernetes 배포판에서 어떤 버전의 Trident 테스트되었는지에 대한 지원 매트릭스를 찾을 수 있습니다. "여기" .
참고해주세요"Trident 제품 설명서" 설치 및 구성 세부 정보
Trident 다운로드
배포된 사용자 클러스터에 Trident 설치하고 영구 볼륨을 프로비저닝하려면 다음 단계를 완료하세요.
-
설치 아카이브를 관리자 워크스테이션에 다운로드하고 내용을 추출합니다. Trident 의 현재 버전을 다운로드할 수 있습니다. "여기" .
-
다운로드한 번들에서 Trident 설치를 추출합니다.
[netapp-user@rhel7 ~]$ tar -xzf trident-installer-22.01.0.tar.gz
[netapp-user@rhel7 ~]$ cd trident-installer/
[netapp-user@rhel7 trident-installer]$
Helm과 함께 Trident Operator 설치
-
먼저 사용자 클러스터의 위치를 설정하세요.
kubeconfigTrident 에는 이 파일을 전달하는 옵션이 없으므로, 이 파일을 참조할 필요가 없도록 환경 변수로 파일을 지정합니다.[netapp-user@rhel7 trident-installer]$ export KUBECONFIG=~/ocp-install/auth/kubeconfig
-
사용자 클러스터에 trident 네임스페이스를 생성하는 동안 helm 디렉토리의 tarball에서 Helm 명령을 실행하여 Trident 운영자를 설치합니다.
[netapp-user@rhel7 trident-installer]$ helm install trident helm/trident-operator-22.01.0.tgz --create-namespace --namespace trident
NAME: trident
LAST DEPLOYED: Fri May  7 12:54:25 2021
NAMESPACE: trident
STATUS: deployed
REVISION: 1
TEST SUITE: None
NOTES:
Thank you for installing trident-operator, which will deploy and manage NetApp's Trident CSI
storage provisioner for Kubernetes.

Your release is named 'trident' and is installed into the 'trident' namespace.
Please note that there must be only one instance of Trident (and trident-operator) in a Kubernetes cluster.

To configure Trident to manage storage resources, you will need a copy of tridentctl, which is
available in pre-packaged Trident releases.  You may find all Trident releases and source code
online at https://github.com/NetApp/trident.

To learn more about the release, try:

  $ helm status trident
  $ helm get all trident
-
네임스페이스에서 실행 중인 포드를 확인하거나 tridentctl 바이너리를 사용하여 설치된 버전을 확인하여 Trident 성공적으로 설치되었는지 확인할 수 있습니다.
[netapp-user@rhel7 trident-installer]$ oc get pods -n trident
NAME                               READY   STATUS    RESTARTS   AGE
trident-csi-5z45l                  1/2     Running   2          30s
trident-csi-696b685cf8-htdb2       6/6     Running   0          30s
trident-csi-b74p2                  2/2     Running   0          30s
trident-csi-lrw4n                  2/2     Running   0          30s
trident-operator-7c748d957-gr2gw   1/1     Running   0          36s

[netapp-user@rhel7 trident-installer]$ ./tridentctl -n trident version
+----------------+----------------+
| SERVER VERSION | CLIENT VERSION |
+----------------+----------------+
| 22.01.0          | 22.01.0          |
+----------------+----------------+

|
어떤 경우에는 고객 환경에 따라 Trident 배포를 사용자 정의해야 할 수도 있습니다. 이러한 경우 Trident 운영자를 수동으로 설치하고 포함된 매니페스트를 업데이트하여 배포를 사용자 정의할 수도 있습니다. |
Trident Operator를 수동으로 설치하세요
-
먼저 사용자 클러스터의 위치를 설정합니다.
kubeconfigTrident 에는 이 파일을 전달하는 옵션이 없으므로, 이 파일을 참조할 필요가 없도록 환경 변수로 파일을 지정합니다.[netapp-user@rhel7 trident-installer]$ export KUBECONFIG=~/ocp-install/auth/kubeconfig
-
그만큼
trident-installer이 디렉토리에는 필요한 모든 리소스를 정의하는 매니페스트가 포함되어 있습니다. 적절한 매니페스트를 사용하여 다음을 생성합니다.TridentOrchestrator사용자 정의 리소스 정의.[netapp-user@rhel7 trident-installer]$ oc create -f deploy/crds/trident.netapp.io_tridentorchestrators_crd_post1.16.yaml customresourcedefinition.apiextensions.k8s.io/tridentorchestrators.trident.netapp.io created
-
해당 네임스페이스가 없으면 제공된 매니페스트를 사용하여 클러스터에 Trident 네임스페이스를 만듭니다.
[netapp-user@rhel7 trident-installer]$ oc apply -f deploy/namespace.yaml
namespace/trident created
-
Trident 운영자 배포에 필요한 리소스(예:
ServiceAccount운영자에게는ClusterRole그리고ClusterRoleBinding에게ServiceAccount, 헌신적인PodSecurityPolicy, 또는 운영자 자체.[netapp-user@rhel7 trident-installer]$ oc create -f deploy/bundle.yaml serviceaccount/trident-operator created clusterrole.rbac.authorization.k8s.io/trident-operator created clusterrolebinding.rbac.authorization.k8s.io/trident-operator created deployment.apps/trident-operator created podsecuritypolicy.policy/tridentoperatorpods created
-
다음 명령을 사용하면 배포된 후 운영자의 상태를 확인할 수 있습니다.
[netapp-user@rhel7 trident-installer]$ oc get deployment -n trident
NAME               READY   UP-TO-DATE   AVAILABLE   AGE
trident-operator   1/1     1            1           23s
[netapp-user@rhel7 trident-installer]$ oc get pods -n trident
NAME                                READY   STATUS    RESTARTS   AGE
trident-operator-66f48895cc-lzczk   1/1     Running   0          41s
-
운영자가 배포되었으므로 이제 이를 사용하여 Trident 설치할 수 있습니다. 이를 위해서는 다음을 생성해야 합니다.
TridentOrchestrator.[netapp-user@rhel7 trident-installer]$ oc create -f deploy/crds/tridentorchestrator_cr.yaml tridentorchestrator.trident.netapp.io/trident created [netapp-user@rhel7 trident-installer]$ oc describe torc trident Name: trident Namespace: Labels: <none> Annotations: <none> API Version: trident.netapp.io/v1 Kind: TridentOrchestrator Metadata: Creation Timestamp: 2021-05-07T17:00:28Z Generation: 1 Managed Fields: API Version: trident.netapp.io/v1 Fields Type: FieldsV1 fieldsV1: f:spec: .: f:debug: f:namespace: Manager: kubectl-create Operation: Update Time: 2021-05-07T17:00:28Z API Version: trident.netapp.io/v1 Fields Type: FieldsV1 fieldsV1: f:status: .: f:currentInstallationParams: .: f:IPv6: f:autosupportHostname: f:autosupportimage: f:autosupportProxy: f:autosupportSerialNumber: f:debug: f:enableNodePrep: f:imagePullSecrets: f:imageRegistry: f:k8sTimeout: f:kubeletDir: f:logFormat: f:silenceAutosupport: f:tridentimage: f:message: f:namespace: f:status: f:version: Manager: trident-operator Operation: Update Time: 2021-05-07T17:00:28Z Resource Version: 931421 Self Link: /apis/trident.netapp.io/v1/tridentorchestrators/trident UID: 8a26a7a6-dde8-4d55-9b66-a7126754d81f Spec: Debug: true Namespace: trident Status: Current Installation Params: IPv6: false Autosupport Hostname: Autosupport image: netapp/trident-autosupport:21.01 Autosupport Proxy: Autosupport Serial Number: Debug: true Enable Node Prep: false Image Pull Secrets: Image Registry: k8sTimeout: 30 Kubelet Dir: /var/lib/kubelet Log Format: text Silence Autosupport: false Trident image: netapp/trident:22.01.0 Message: Trident installed Namespace: trident Status: Installed Version: v22.01.0 Events: Type Reason Age From Message ---- ------ ---- ---- ------- Normal Installing 80s trident-operator.netapp.io Installing Trident Normal Installed 68s trident-operator.netapp.io Trident installed -
네임스페이스에서 실행 중인 포드를 확인하거나 tridentctl 바이너리를 사용하여 설치된 버전을 확인하여 Trident 성공적으로 설치되었는지 확인할 수 있습니다.
[netapp-user@rhel7 trident-installer]$ oc get pods -n trident
NAME                                READY   STATUS    RESTARTS   AGE
trident-csi-bb64c6cb4-lmd6h         6/6     Running   0          82s
trident-csi-gn59q                   2/2     Running   0          82s
trident-csi-m4szj                   2/2     Running   0          82s
trident-csi-sb9k9                   2/2     Running   0          82s
trident-operator-66f48895cc-lzczk   1/1     Running   0          2m39s

[netapp-user@rhel7 trident-installer]$ ./tridentctl -n trident version
+----------------+----------------+
| SERVER VERSION | CLIENT VERSION |
+----------------+----------------+
| 22.01.0          | 22.01.0          |
+----------------+----------------+
저장을 위한 작업자 노드 준비
NFS
대부분의 Kubernetes 배포판에는 Red Hat OpenShift를 포함하여 기본적으로 설치된 NFS 백엔드를 마운트하기 위한 패키지와 유틸리티가 함께 제공됩니다.
하지만 NFSv3의 경우 클라이언트와 서버 간의 동시성을 협상하는 메커니즘이 없습니다. 따라서 NFS 연결에 대한 최상의 성능을 보장하려면 서버에서 지원하는 값과 클라이언트 측 sunrpc 슬롯 테이블 항목의 최대 개수를 수동으로 동기화해야 하며, 이를 위해 서버가 연결 창 크기를 줄여야 합니다.
ONTAP 의 경우 지원되는 최대 sunrpc 슬롯 테이블 항목 수는 128개입니다. 즉, ONTAP 한 번에 128개의 동시 NFS 요청을 처리할 수 있습니다. 그러나 기본적으로 Red Hat CoreOS/Red Hat Enterprise Linux는 연결당 최대 65,536개의 sunrpc 슬롯 테이블 항목을 갖습니다. 이 값을 128로 설정해야 하며, 이는 OpenShift의 Machine Config Operator(MCO)를 사용하여 수행할 수 있습니다.
OpenShift 워커 노드에서 최대 sunrpc 슬롯 테이블 항목을 수정하려면 다음 단계를 완료하세요.
-
OCP 웹 콘솔에 로그인하고 컴퓨팅 > 머신 구성으로 이동합니다. 머신 구성 만들기를 클릭합니다. YAML 파일을 복사하여 붙여넣고 만들기를 클릭합니다.
apiVersion: machineconfiguration.openshift.io/v1 kind: MachineConfig metadata: name: 98-worker-nfs-rpc-slot-tables labels: machineconfiguration.openshift.io/role: worker spec: config: ignition: version: 3.2.0 storage: files: - contents: source: data:text/plain;charset=utf-8;base64,b3B0aW9ucyBzdW5ycGMgdGNwX21heF9zbG90X3RhYmxlX2VudHJpZXM9MTI4Cg== filesystem: root mode: 420 path: /etc/modprobe.d/sunrpc.conf -
MCO가 생성된 후에는 모든 워커 노드에 구성을 적용하고 하나씩 재부팅해야 합니다. 전체 과정은 약 20~30분 정도 걸립니다. 다음을 사용하여 머신 구성이 적용되는지 확인하세요.
oc get mcp그리고 작업자의 머신 구성 풀이 업데이트되었는지 확인하세요.[netapp-user@rhel7 openshift-deploy]$ oc get mcp NAME CONFIG UPDATED UPDATING DEGRADED master rendered-master-a520ae930e1d135e0dee7168 True False False worker rendered-worker-de321b36eeba62df41feb7bc True False False
iSCSI
iSCSI 프로토콜을 통해 블록 스토리지 볼륨을 매핑할 수 있도록 작업자 노드를 준비하려면 해당 기능을 지원하는 데 필요한 패키지를 설치해야 합니다.
Red Hat OpenShift에서는 배포 후 클러스터에 MCO(Machine Config Operator)를 적용하여 이를 처리합니다.
iSCSI 서비스를 실행하도록 작업자 노드를 구성하려면 다음 단계를 완료하세요.
-
OCP 웹 콘솔에 로그인하고 컴퓨팅 > 머신 구성으로 이동합니다. 머신 구성 만들기를 클릭합니다. YAML 파일을 복사하여 붙여넣고 만들기를 클릭합니다.
멀티패스를 사용하지 않을 때:
apiVersion: machineconfiguration.openshift.io/v1
kind: MachineConfig
metadata:
  labels:
    machineconfiguration.openshift.io/role: worker
  name: 99-worker-element-iscsi
spec:
  config:
    ignition:
      version: 3.2.0
    systemd:
      units:
        - name: iscsid.service
          enabled: true
          state: started
  osImageURL: ""
멀티패스를 사용하는 경우:
apiVersion: machineconfiguration.openshift.io/v1 kind: MachineConfig metadata: name: 99-worker-ontap-iscsi labels: machineconfiguration.openshift.io/role: worker spec: config: ignition: version: 3.2.0 storage: files: - contents: source: data:text/plain;charset=utf-8;base64,ZGVmYXVsdHMgewogICAgICAgIHVzZXJfZnJpZW5kbHlfbmFtZXMgbm8KICAgICAgICBmaW5kX211bHRpcGF0aHMgbm8KfQoKYmxhY2tsaXN0X2V4Y2VwdGlvbnMgewogICAgICAgIHByb3BlcnR5ICIoU0NTSV9JREVOVF98SURfV1dOKSIKfQoKYmxhY2tsaXN0IHsKfQoK verification: {} filesystem: root mode: 400 path: /etc/multipath.conf systemd: units: - name: iscsid.service enabled: true state: started - name: multipathd.service enabled: true state: started osImageURL: "" -
구성이 생성된 후, 워커 노드에 구성을 적용하고 다시 로드하는 데 약 20~30분이 걸립니다. 다음을 사용하여 머신 구성이 적용되는지 확인하세요.
oc get mcp그리고 작업자의 머신 구성 풀이 업데이트되었는지 확인하세요. 또한 작업자 노드에 로그인하여 iscsid 서비스가 실행 중인지 확인할 수 있습니다(멀티패스를 사용하는 경우 multipathd 서비스도 실행 중인지 확인할 수 있습니다).[netapp-user@rhel7 openshift-deploy]$ oc get mcp NAME CONFIG UPDATED UPDATING DEGRADED master rendered-master-a520ae930e1d135e0dee7168 True False False worker rendered-worker-de321b36eeba62df41feb7bc True False False [netapp-user@rhel7 openshift-deploy]$ ssh core@10.61.181.22 sudo systemctl status iscsid ● iscsid.service - Open-iSCSI Loaded: loaded (/usr/lib/systemd/system/iscsid.service; enabled; vendor preset: disabled) Active: active (running) since Tue 2021-05-26 13:36:22 UTC; 3 min ago Docs: man:iscsid(8) man:iscsiadm(8) Main PID: 1242 (iscsid) Status: "Ready to process requests" Tasks: 1 Memory: 4.9M CPU: 9ms CGroup: /system.slice/iscsid.service └─1242 /usr/sbin/iscsid -f [netapp-user@rhel7 openshift-deploy]$ ssh core@10.61.181.22 sudo systemctl status multipathd ● multipathd.service - Device-Mapper Multipath Device Controller Loaded: loaded (/usr/lib/systemd/system/multipathd.service; enabled; vendor preset: enabled) Active: active (running) since Tue 2021-05-26 13:36:22 UTC; 3 min ago Main PID: 918 (multipathd) Status: "up" Tasks: 7 Memory: 13.7M CPU: 57ms CGroup: /system.slice/multipathd.service └─918 /sbin/multipathd -d -s
MachineConfig가 성공적으로 적용되었고 서비스가 예상대로 시작되었는지 확인하려면 다음을 실행하세요. oc debug적절한 플래그를 사용하여 명령을 실행합니다.
스토리지 시스템 백엔드 생성
Trident Operator 설치를 완료한 후에는 사용 중인 특정 NetApp 스토리지 플랫폼에 대한 백엔드를 구성해야 합니다. Trident 의 설정 및 구성을 계속하려면 아래 링크를 따르세요.