

Back up Microsoft SQL Server workloads with BlueXP backup and recovery
 Suggest changes
Back up Microsoft SQL Server applications data from on-premises ONTAP systems to Amazon Web Services, Microsoft Azure, and StorageGRID to ensure that your data is protected. Backups are automatically generated and stored in an object store in your public or private cloud account.
-
To back up workloads on a schedule, create policies that govern the backup and restore operations. See Create policies for instructions.
-
Configure the log directory for discovered hosts before you initiate a backup.
-
Back up workloads now (create an on-demand backup now).
View workload protection status
Before you initiate a backup, view the protection status of your workloads.
Required BlueXP role
Organization admin, Folder or project admin, Backup and Recovery super admin, Backup and Recovery backup admin, Backup and Recovery restore admin, Backup and Recovery clone admin, or Backup and Recovery viewer role. Learn about Backup and recovery roles and privileges. Learn about BlueXP access roles for all services.
-
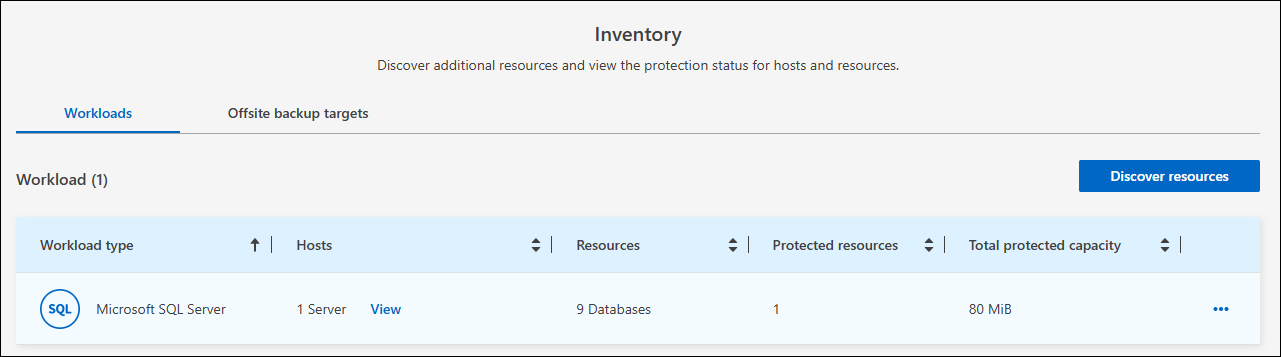
From the BlueXP backup and recovery menu, select Inventory.
-
Select a workload to view the protection details.
-
Select the Actions icon
 > View details.
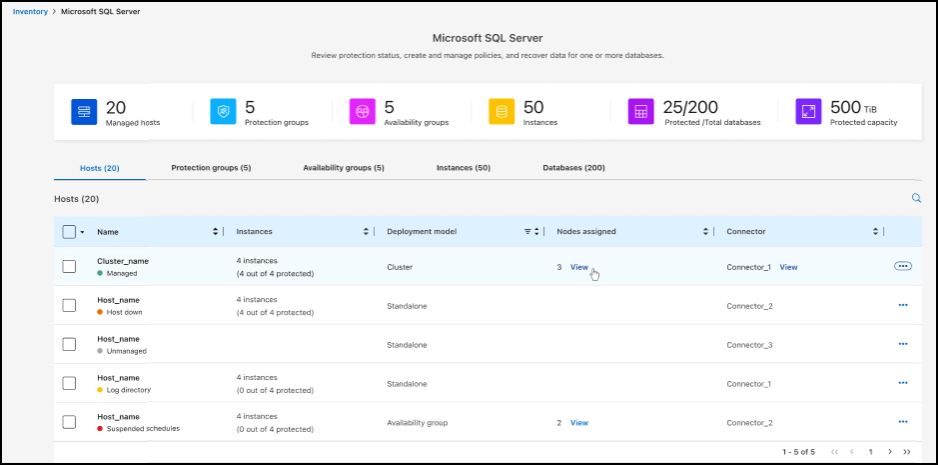
-
Review details on the Hosts, Protection groups, Availability groups, Instances, and Databases tabs.
Configure the log directory for discovered hosts
Before you back up your workloads, set the path for the activity logs for discovered hosts. This helps you to track the status of operations.
Required BlueXP role
Organization admin, Folder or project admin, Backup and Recovery super admin, Backup and Recovery backup admin, or Backup and Recovery restore admin role. Learn about BlueXP access roles for all services.
-
From the BlueXP backup and recovery menu, select Inventory.
-
Select a workload to view the protection details.
-
Select the Actions icon
> View details. -
Select a host.
-
Select the Actions icon
> Configure log directory.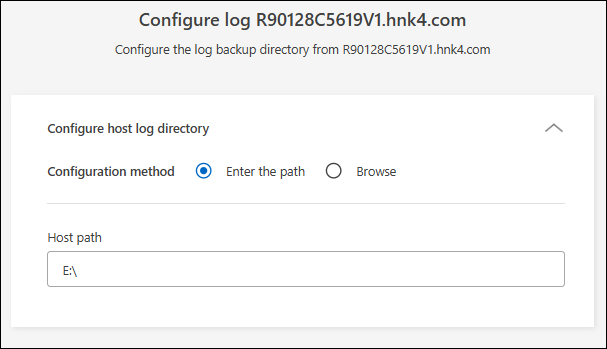
-
Provide the host path or browse through a list of hosts or nodes hosts on the host to locate where you want the host log to be stored.
-
Select those on which you want to store the logs.

The fields that appear differ depending on the selected deployment model, for example, failover cluster instance or standalone. -
Select Save.
Create a protection group
You can create a protection group to manage the backup and restore operations for a set of workloads. A protection group is a logical grouping of workloads that you want to protect together.
Required BlueXP role
Organization admin, Folder or project admin, Backup and Recovery super admin, or Backup and Recovery backup admin role. Learn about BlueXP access roles for all services.
-
From the BlueXP backup and recovery menu, select Inventory.
-
Select a workload to view the protection details.
-
Select the Actions icon
> View details. -
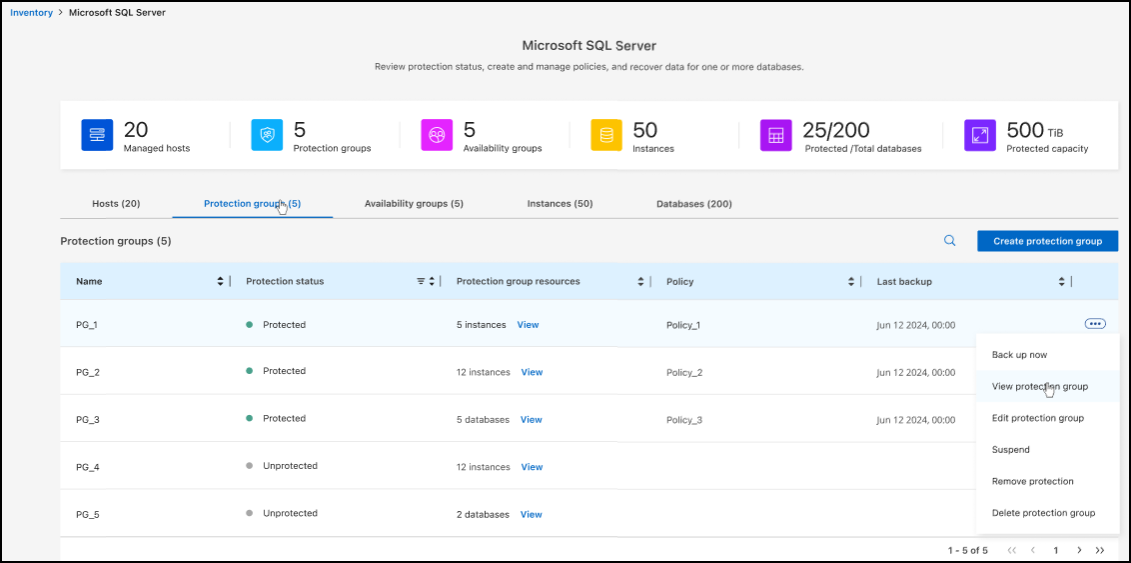
Select the Protection groups tab.
-
Select Create protection group.
-
Provide a name for the protection group.
-
Select the instances or databases that you want to include in the protection group.
-
Select Next.
-
Select the Backup policy that you want to apply to the protection group.
If you want to create a policy, select Create new policy and follow the prompts to create a policy. See Create policies for more information.
-
Select Next.
-
Review the configuration.
-
Select Create to create the protection group.
Back up workloads now with an on-demand backup
Create an on-demand backup immediately. You might want to run an on-demand backup if you're about to make changes to your system and want to ensure that you have a backup before you start.
Required BlueXP role
Organization admin, Folder or project admin, Backup and Recovery super admin, or Backup and Recovery backup admin role. Learn about BlueXP access roles for all services.
-
From the menu, select Inventory.
-
Select a workload to view the protection details.
-
Select the Actions icon
> View details. -
Select the Protection Group, Instances or Databases tab.
-
Select the instance or database you want to back up.
-
Select the Actions icon
> Back up now. -
Select the policy that you want to apply to the backup.
-
Select the schedule tier.
-
Select Back up now.
Suspend the backup schedule
Suspending the schedule prevents the backup from running at the scheduled time temporarily. You might want to do this if you're performing maintenance on the system or if you're experiencing issues with the backup.
Required BlueXP role
Organization admin, Folder or project admin, Backup and Recovery super admin, Backup and Recovery backup admin, Backup and Recovery restore admin, or Backup and Recovery clone admin role. Learn about BlueXP access roles for all services.
-
From the BlueXP backup and recovery menu, select Inventory.
-
Select a workload to view the protection details.
-
Select the Actions icon
> View details. -
Select the Protection Group, Instances or Databases tab.
-
Select the protection group, instance, or database you want to suspend.
-
Select the Actions icon
> Suspend.
Delete a protection group
You can create a protection group to manage the backup and restore operations for a set of workloads. A protection group is a logical grouping of workloads that you want to protect together.
Required BlueXP role
Organization admin, Folder or project admin, Backup and Recovery super admin, or Backup and Recovery backup admin role. Learn about BlueXP access roles for all services.
-
From the BlueXP backup and recovery menu, select Inventory.
-
Select a workload to view the protection details.
-
Select the Actions icon
> View details. -
Select the Protection groups tab.
-
Select the Actions icon
> Delete protection group.
Remove protection from a workload
You can remove protection from a workload if you no longer want to back it up or if you want to stop managing it in BlueXP backup and recovery.
Required BlueXP role
Organization admin, Folder or project admin, Backup and Recovery super admin, or Backup and Recovery backup admin role. Learn about BlueXP access roles for all services.
-
From the BlueXP backup and recovery menu, select Inventory.
-
Select a workload to view the protection details.
-
Select the Actions icon
> View details. -
Select the Protection Group, Instances or Databases tab.
-
Select the protection group, instance, or database.
-
Select the Actions icon
> Remove protection. -
In the Remove protection dialog box, select whether you want to keep backups and metadata or delete them.
-
Select Remove to confirm the action.