

Create and manage policies to govern backups in BlueXP backup and recovery
 Suggest changes
In BlueXP backup and recovery, create your own policies that govern the backup frequency, the time the backup is taken, and the number of backup files that are retained.

|
Some of these options and configuration sections are not available for all workloads. |
If you import resources from SnapCenter, you might encounter some differences with policies used in SnapCenter and those used in BlueXP backup and recovery. See Policy differences between SnapCenter and BlueXP backup and recovery.
You can accomplish the following goals related to policies:
-
Create a local snapshot policy
-
Create a policy for replication to secondary storage
-
Create a policy for object storage settings
-
Configure advanced policy settings
-
Edit policies (not available for VMware Preview workloads)
-
Delete policies
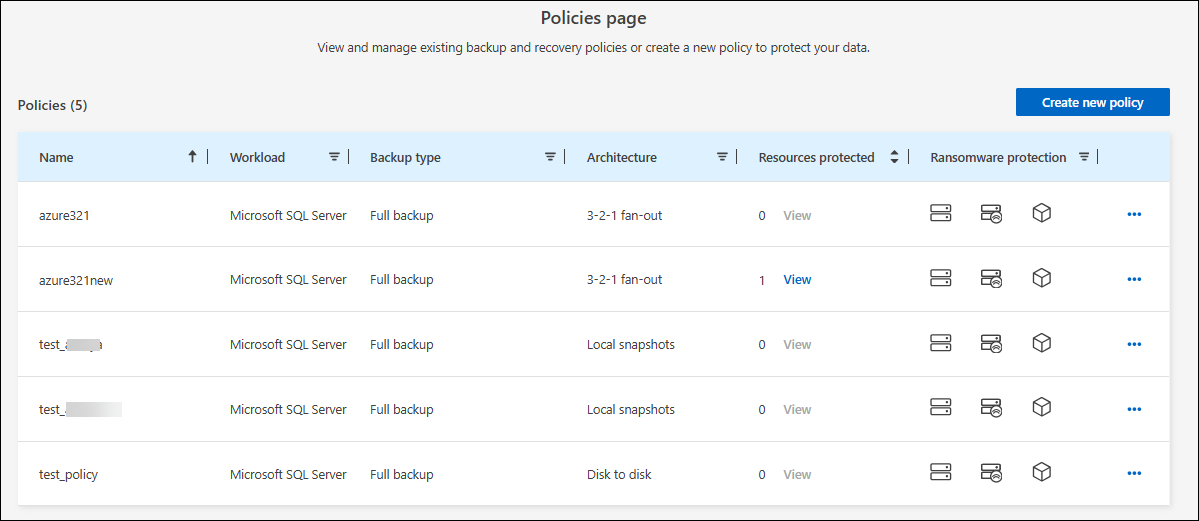
View policies
-
From the BlueXP backup and recovery menu, select Policies.
-
Review these policy details.
-
Workload: Examples include Microsoft SQL Server, Volumes, VMware, or Kubernetes.
-
Backup type: Examples include full backup and log backup.
-
Architecture: Examples include local snapshot, fan-out, cascading, disk to disk, and disk to object store.
-
Resources protected: Shows how many resources out of the total resources on that workload are protected.
-
Ransomware protection: Shows if the policy includes snapshot locking on the local snapshot, snapshot locking on secondary storage, or DataLock locking on object storage.
-
Create a policy
You can create policies that govern your local snapshots, replications to secondary storage, and backups to object storage. Part of your 3-2-1 strategy involves creating a snapshot copy of the Microsoft SQL Server instances or databases on the primary storage system.
Required BlueXP role
Organization admin, Folder or project admin, Backup and Recovery super admin, Backup and Recovery backup admin. Learn about Backup and recovery roles and privileges. Learn about BlueXP access roles for all services.
If you plan on replicating to secondary storage and want to use snapshot locking on local snapshots or on remote ONTAP secondary storage, you first need to initialize the ONTAP compliance clock on the cluster level. This is a requirement for enabling snapshot locking in the policy.
For instructions on how to do this, refer to Initialize the compliance clock in ONTAP.
For information about snapshot locking in general, refer to Snapshot locking in ONTAP.
-
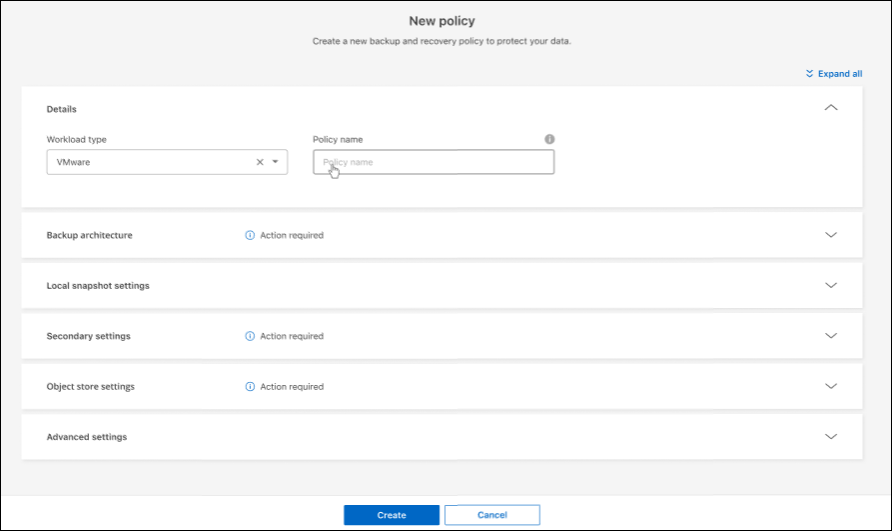
From the BlueXP backup and recovery menu, select Policies.
-
From the Policies page, select Create new policy.
-
In the Policies page, provide the following information.
-
Details section:
-
Workload type: Select "Microsoft SQL Server", VMware, or Kubernetes.
-
Enter a policy name.

For a list of characters to avoid, see the hover tip.
-
-
Backup architecture section: Select the down arrow and choose the architecture for the backup, such as fan-out, cascading, and disk to disk.
-
Local snapshot: Local snapshot on the selected volume (Microsoft SQL Server). Local snapshots are a key component of data protection strategies, capturing the state of your data at specific points in time. This creates read-only, point-in-time copies of production volumes where your workloads are running. The snapshot consumes minimal storage space and incurs negligible performance overhead because it records only changes to files since the last snapshot. You can use local snapshots to recover from data loss or corruption, as well as to create backups for disaster recovery purposes.
For VMware workloads, this configures the local snapshot on the datastores or VMwares on the primary storage system.
-
3-2-1 fanout: (Not available for Kubernetes workloads) Primary storage (disk) to secondary storage (disk) to cloud (object store). Creates multiple copies of data across different storage systems, such as ONTAP to ONTAP and ONTAP to object-store configurations. This can be a cloud hyperscaler object store or a private object store — StorageGRID. These configurations help in achieving optimal data protection and disaster recovery.
This option is not available for Amazon FSx for NetApp ONTAP. For VMware workloads, this is not available in the VMware preview.
For VMware workloads, this configures the local snapshot on the datastores or VMs on the primary and replicates from primary disk storage to secondary disk storage as well as replicates from primary to cloud object storage.
-
3-2-1 cascaded: (Not available for Kubernetes workloads) Primary storage (disk) to secondary storage (disk) and primary storage (disk) to cloud storage (object store). This can be a cloud hyperscaler object store or a private object store — StorageGRID. This creates a chain of data replication across multiple systems to ensure redundancy and reliability.
This option is not available for Amazon FSx for NetApp ONTAP. For VMware workloads, this configures the local snapshot on the datastores or VMs on the primary storage and a cascade from primary disk storage to secondary disk storage and then to cloud object storage.
-
Disk to disk: (Not available for Kubernetes workloads) Primary storage (disk) to secondary storage (disk). The ONTAP to ONTAP data protection strategy replicates data between two ONTAP systems to ensure high availability and disaster recovery. This is typically achieved using SnapMirror, which supports both synchronous and asynchronous replication. This method ensures that your data is continuously updated and available across multiple locations, providing robust protection against data loss.
For VMware workloads, this configures the local snapshot on the datastores or VMwares on the primary storage system and then replicates the data from the primary disk storage system to the secondary disk storage system.
-
Disk-to-object store: Primary storage (disk) to cloud (object store). This replicates data from an ONTAP system to an object storage system, such as AWS S3, Azure Blob Storage or StorageGRID. This is typically achieved using SnapMirror Cloud, which provides incremental forever backups by transferring only changed data blocks after the initial baseline transfer. This can be a cloud hyperscaler object store or a private object store — StorageGRID. This method is ideal for long-term data retention and archiving, offering a cost-effective and scalable solution for data protection.
For VMWare workloads, this configures the local snapshot on the datastores or VMs on the primary and replication from primary disk storage to cloud object storage.
-
Disk-to-disk fanout: (Not available for Kubernetes workloads) Primary storage (disk) to secondary storage (disk) and primary storage (disk) to secondary storage (disk).
You can configure multiple secondary settings for the disk-to-disk fanout option. For VMware workloads, this configures the primary disk storage to secondary disk storage and replicates primary disk storage to secondary disk storage.
-
-
Create a local snapshot policy
Provide information for the local snapshot.
-
Select the Add schedule option to select the snapshot schedule or schedules. You can have a maximum of 5 schedules.
-
Snapshot frequency: Select the frequency of hourly, daily, weekly, monthly, or yearly. The yearly frequency is not available for Kubernetes workloads.
-
Snapshot retention: Enter the number of snapshots to keep.
-
Enable log backup: (Applies to Microsoft SQL Server workloads. Not available for VMware or Kubernetes workloads) Check the option to back up logs and set the frequency and retention of the log backups. To do this, you must have already configured a log backup. See Configure log directories.
-
Provider: (Kubernetes workloads only) Select the storage provider that hosts the Kubernetes application resources.
-
Backup target: (Kubernetes workloads only) Select the storage bucket that hosts the Kubernetes application resources. The application resource definitions at the time of the snapshot are stored in this bucket. Ensure that the bucket is accessible within your backup environment.
-
Optionally, select Advanced at the right of the schedule to set the SnapMirror label and enable snapshot locking (not available for Kubernetes workloads).
-
SnapMirror label: The label serves as a marker for transferring a specified snapshot according to the retention rules of the relationship. Adding a label to a snapshot marks it as a target for SnapMirror replication.
-
Offset from an hour: Enter the number of minutes to offset the snapshot from the start of the hour. For example, if you enter 15, the snapshot will be taken at 15 minutes past the hour. Available only for hourly schedules.
-
Enable silent hours: Select whether you want to enable silent hours. Silent hours are a period during which no snapshots are taken, allowing for maintenance or other operations without interference from backup processes. This is useful for reducing the load on the system during peak usage times or maintenance windows. Available only for hourly schedules.
-
Enable snapshot locking: Select whether you want to enable tamper-proof snapshots. Enabling this option ensures that the snapshots cannot be deleted or altered until the specified retention period has expired. This feature, which uses SnapLock technology, is crucial for protecting your data against ransomware attacks and ensuring data integrity.
-
Snapshot locking period: Enter the number of days, months, or years that you want to lock the snapshot.
-
Create a policy for secondary settings (replication to secondary storage)
Provide information for the replication to secondary storage. Schedule information from the local snapshot settings appears for you in the secondary settings. These settings are not available for Kubernetes workloads.
-
Backup: Select the frequency of hourly, daily, weekly, monthly, or yearly.
-
Backup target: Select the target system on secondary storage for the backup.
-
Retention: Enter the number of snapshots to keep.
-
Enable snapshot locking: Select whether you want to enable tamper-proof snapshots.
-
Snapshot locking period: Enter the number of days, months, or years that you want to lock the snapshot.
-
Transfer to secondary:
-
The ONTAP transfer schedule - Inline option is selected by default and that indicates that snapshots are transferred to the secondary storage system immediately. You don't need to schedule the backup.
-
Other options: If you choose a deferred transfer, the transfers are not immediate and you can set a schedule.
-
-
SnapMirror and SnapVault SMAS secondary relationship: Use SnapMirror and SnapVault SMAS secondary relationships for SQL Server workloads.
Create a policy for object storage settings
Provide information for the backup to object storage. These settings are called "Backup settings" for Kubernetes workloads.
|
|
The fields that appear differ depending on the provider and architecture selected. |
Create a policy for AWS object storage
Enter information in these fields:
-
Provider: Select AWS.
-
AWS account: Select the AWS account.
-
Backup target: Select a registered S3 object storage target. Ensure that the target is accessible within your backup environment.
-
IPspace: Select the IPspace to use for the backup operations. This is useful if you have multiple IPspaces and want to control which one is used for backups.
-
Schedule settings: Select the schedule that was set for the local snapshots. You can remove a schedule, but you cannot add one because the schedules are set according to the local snapshot schedules.
-
Retention copies: Enter the number of snapshots to keep.
-
Run at: Choose the ONTAP transfer schedule to back up data to object storage.
-
Tier your backups from object store to archival storage: If you choose to tier backups to archive storage (for example, AWS Glacier), select the tier option and the number of days to archive.
-
Enable integrity scan: (Not available for Kubernetes workloads) Select whether you want to enable integrity scans (snapshot locking) on the object storage. This ensures that the backups are valid and can be restored successfully. The integrity scan frequency is set to 7 days by default. To protect your backups from being modified or deleted, select the Integrity scan option. The scan occurs only on the latest snapshot. You can enable or disable integrity scans on the latest snapshot.
Create a policy for Microsoft Azure object storage
Enter information in these fields:
-
Provider: Select Azure.
-
Azure subscription: Select the Azure subscription from those discovered.
-
Azure resource group: Select the Azure resource group from those discovered.
-
Backup target: Select a registered object storage target. Ensure that the target is accessible within your backup environment.
-
IPspace: Select the IPspace to use for the backup operations. This is useful if you have multiple IPspaces and want to control which one is used for backups.
-
Schedule settings: Select the schedule that was set for the local snapshots. You can remove a schedule, but you cannot add one because the schedules are set according to the local snapshot schedules.
-
Retention copies: Enter the number of snapshots to keep.
-
Run at: Choose the ONTAP transfer schedule to back up data to object storage.
-
Tier your backups from object store to archival storage: If you choose to tier backups to archive storage, select the tier option and the number of days to archive.
-
Enable integrity scan: (Not available for Kubernetes workloads) Select whether you want to enable integrity scans (snapshot locking) on the object storage. This ensures that the backups are valid and can be restored successfully. The integrity scan frequency is set to 7 days by default. To protect your backups from being modified or deleted, select the Integrity scan option. The scan occurs only on the latest snapshot. You can enable or disable integrity scans on the latest snapshot.
Create a policy for StorageGRID object storage
Enter information in these fields:
-
Provider: Select StorageGRID.
-
StorageGRID credentials: Select the StorageGRID credentials from those discovered. These credentials are used to access the StorageGRID object storage system and were entered in the Settings option.
-
Backup target: Select a registered S3 object storage target. Ensure that the target is accessible within your backup environment.
-
IPspace: Select the IPspace to use for the backup operations. This is useful if you have multiple IPspaces and want to control which one is used for backups.
-
Schedule settings: Select the schedule that was set for the local snapshots. You can remove a schedule, but you cannot add one because the schedules are set according to the local snapshot schedules.
-
Retention copies: Enter the number of snapshots to keep for each frequency.
-
Transfer schedule for object storage: (Not available for Kubernetes workloads) Choose the ONTAP transfer schedule to back up data to object storage.
-
Enable integrity scan: (Not available for Kubernetes workloads) Select whether you want to enable integrity scans (snapshot locking) on the object storage. This ensures that the backups are valid and can be restored successfully. The integrity scan frequency is set to 7 days by default. To protect your backups from being modified or deleted, select the Integrity scan option. The scan occurs only on the latest snapshot. You can enable or disable integrity scans on the latest snapshot.
-
Tier your backups from object store to archival storage: (Not available for Kubernetes workloads) If you choose to tier backups to archive storage, select the tier option and the number of days to archive.
Configure advanced settings in the policy
Optionally, you can configure advanced settings in the policy. These settings are available for all backup architectures, including local snapshots, replication to secondary storage, and backups to object storage. These settings are not available for Kubernetes workloads.

-
From the BlueXP backup and recovery menu, select Policies.
-
From the Policies page, select Create new policy.
-
In the Policy > Advanced settings section, select the down arrow and select the option.
-
Provide the following information:
-
Copy only backup: Choose copy-only backup (a type of Microsoft SQL Server backup) that lets you back up your resources by using another backup application.
-
Availability group settings: Select preferred backup replicas or specify a particular replica. This setting is useful if you have a SQL Server availability group and want to control which replica is used for backups.
-
Maximum transfer rate: To not set a limit on bandwidth usage, select Unlimited. If you want to limit the transfer rate, select Limited and select the network bandwidth between 1 and 1,000 Mbps allocated to upload backups to object storage. By default, ONTAP can use an unlimited amount of bandwidth to transfer the backup data from volumes in the working environment to object storage. If you notice backup traffic is affecting normal user workloads, consider decreasing the amount of network bandwidth that is used during the transfer.
-
Backup retries: (Not applicable to VMware Preview workloads) To retry the job in case of a failure or interruption, select Enable job retries during failure. Enter the maximum number of snapshot and backup job retries and the retry time interval. The recount must be less than 10. This setting is useful if you want to ensure that the backup job is retried in case of a failure or interruption.
If the snapshot frequency is set to 1 hour, the maximum delay along with the retry count shouldn't exceed 45 minutes. -
Enable VM-consistent snapshot: (Applies to VMware workloads only) Select whether you want to enable VM-consistent snapshots. This ensures that the newly created snapshots are consistent with the state of the virtual machine at the time of the snapshot. This is useful for ensuring that the backups can be restored successfully and that the data is in a consistent state. This does not apply to existing snapshots.
-
-
Ransomware scan: Select whether you want to enable ransomware scanning on each bucket. This requires DataLock locking on object storage. Enter the frequency of the scan in days. This option applies to AWS and Microsoft Azure object storage. Note that this option might incur additional charges, depending on the cloud provider.
-
Backup verification: (Not applicable to VMware Preview workloads) Select whether you want to enable backup verification and whether you want it immediately or later. This feature ensures that the backups are valid and can be restored successfully. We recommend that you enable this option to ensure the integrity of your backups. By default, backup verification runs from secondary storage if secondary storage is configured. If secondary storage isn't configured, backup verification runs from primary storage.
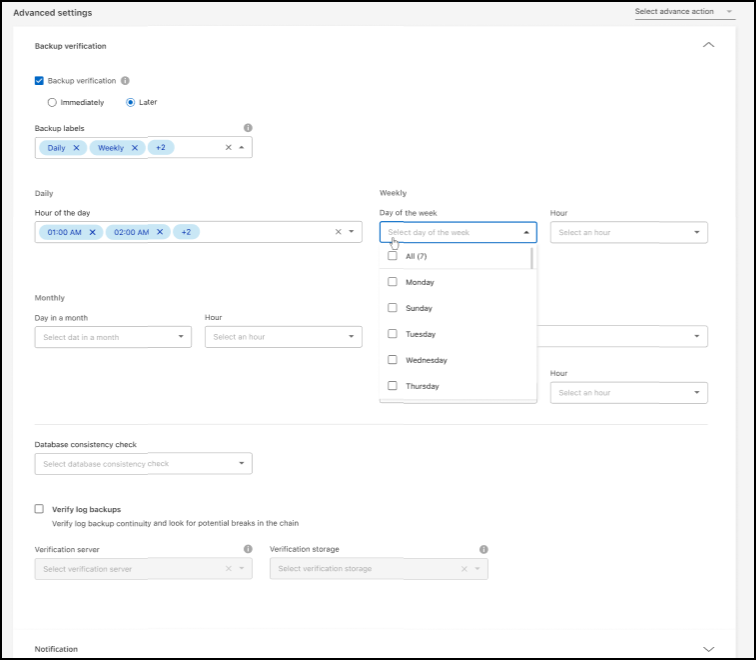
Additionally, configure the following options:
-
Daily, Weekly, Monthly, or Yearly verification: If you chose Later as the backup verification, select the frequency of backup verification. This ensures that backups are regularly checked for integrity and can be restored successfully.
-
Backup labels: Enter a label for the backup. This label is used to identify the backup in the system and can be useful for tracking and managing backups.
-
Database consistency check: (Not applicable to VMware Preview workloads) Select whether you want to enable database consistency checks. This option ensures that the databases are in a consistent state before the backup is taken, which is crucial for ensuring data integrity.
-
Verify log backups: (Not applicable to VMware Preview workloads) Select whether you want to verify log backups. Select the verification server. If you chose disk-to-disk or 3-2-1, also select the verification storage location. This option ensures that the log backups are valid and can be restored successfully, which is important for maintaining the integrity of your databases.
-
-
Networking: Select the network interface to use for the backup operations. This is useful if you have multiple network interfaces and want to control which one is used for backups.
-
IPspace: Select the IPspace to use for the backup operations. This is useful if you have multiple IPspaces and want to control which one is used for backups.
-
Private endpoint configuration: If you are using a private endpoint for your object storage, select the private endpoint configuration to use for the backup operations. This is useful if you want to ensure that the backups are transferred securely over a private network connection.
-
-
Notification: Select whether you want to enable email notifications for backup operations. This is useful if you want to be notified when a backup operation starts, completes, or fails.
-
Independent disks: (Applicable to VMware Preview workloads) Check this to include in the backup any datastores with independent disks that contain temporary data. An independent disk is a VM disk that not included in VMware snapshots.
-
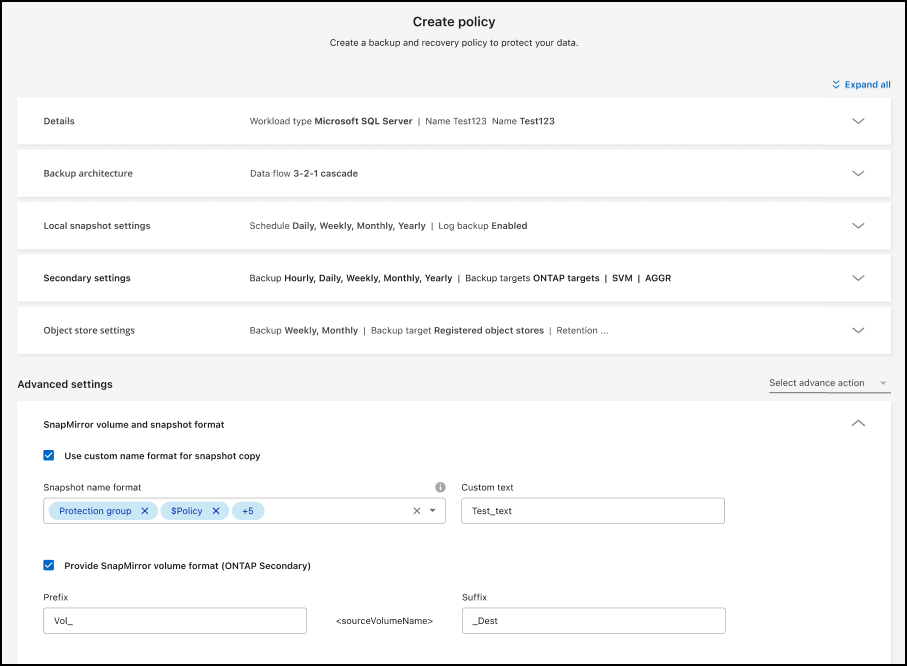
SnapMirror and snapshot format: Optionally, enter your own snapshot name in a policy that governs the backups for Microsoft SQL Server workloads. Enter the format and custom text. If you chose to backup to secondary storage, you can also add a SnapMirror volume prefix and suffix.
Edit a policy
You can edit backup architecture, backup frequency, retention policy, and other settings for a policy.
|
|
This feature is not available for VMware Preview workloads. |
You can add another protection level when you edit a policy, but you cannot remove a protection level. For example, if the policy is only protecting local snapshots, you can add replication to secondary storage or backups to object storage. If you have local snapshots and replication, you can add object storage. However, if you have local snapshots, replication, and object storage, you cannot remove one of these levels.
If you are editing a policy that backs up to object storage, you can enable archival.
If you imported resources from SnapCenter, you might encounter some differences policies used in SnapCenter and those used in BlueXP backup and recovery. See Policy differences between SnapCenter and BlueXP backup and recovery.
Organization admin or Folder or project admin. Learn about BlueXP access roles for all services.
-
In BlueXP, got to Protection > Backup and recovery.
-
Select the Policies tab.
-
Select the policy that you want to edit.
-
Select the Actions
 icon, and select Edit.
Delete a policy
You can delete a policy if you no longer need it.
|
|
You cannot delete a policy that is associated with a workload. |
-
In BlueXP, got to Protection > Backup and recovery.
-
Select the Policies tab.
-
Select the policy that you want to delete.
-
Select the Actions
icon, and select Delete. -
Review the information in the confirmation dialog box, and select Delete.