

Manage NSS credentials associated with NetApp Console
 Suggest changes
Associate a NetApp Support Site account with your Console organization to enable key workflows for storage management. These NSS credentials are associated with the entire organization.
The Console also supports associating one NSS account per user account. Learn how to manage user-level credentials.
Overview
Associating NetApp Support Site credentials with your specific Console account serial number is required to enable the following tasks:
-
Deploying Cloud Volumes ONTAP when you bring your own license (BYOL)
Providing your NSS account is required so that the Console can upload your license key and to enable the subscription for the term that you purchased. This includes automatic updates for term renewals.
-
Registering pay-as-you-go Cloud Volumes ONTAP systems
Providing your NSS account is required to activate support for your system and to gain access to NetApp technical support resources.
-
Upgrading Cloud Volumes ONTAP software to the latest release
These credentials are associated with your specific Console account serial number. Users can access these credentials from Support > NSS Management.
Add an NSS account
You can add and manage your NetApp Support Site accounts for use with the Console from the Support Dashboard within the Console.
When you have added your NSS account, the Console uses this information for things like license downloads, software upgrade verification, and future support registrations.
You can associate multiple NSS accounts with your organization; however, you cannot have customer accounts and partner accounts within the same organization.

|
NetApp uses Microsoft Entra ID as the identity provider for authentication services specific to support and licensing. |
-
Select Administration > Support.
-
Select NSS Management.
-
Select Add NSS Account.
-
Select Continue to be redirected to a Microsoft login page.
-
At the login page, provide your NetApp Support Site registered email address and password.
Upon successful login, NetApp will store the NSS user name.
This is a system-generated ID that maps to your email. On the NSS Management page, you can display your email from the
 menu.
menu.-
If you ever need to refresh your login credential tokens, there is also an Update Credentials option in the
menu.Using this option prompts you to log in again. Note that the token for these accounts expires after 90 days. A notification will be posted to alert you of this.
-
Users can now select the account when creating new Cloud Volumes ONTAP systems and when registering existing Cloud Volumes ONTAP systems.
Update NSS credentials
For security reasons, you must update your NSS credentials every 90 days. You'll be notified in the Console notification center if your NSS credential has expired. Learn about the Notification Center.
Expired credentials can disrupt the following, but are not limited to:
-
License updates, which mean you won't be able to take advantage of newly purchased capacity.
-
Ability to submit and track support cases.
Additionally, you can update the NSS credentials associated with your organization if you want to change the NSS account associated with your organization. For example, if the person associated with your NSS account has left your company.
-
Select Administration > Support.
-
Select NSS Management.
-
For the NSS account that you want to update, select
 and then select Update Credentials.
 -
When you're prompted, select Continue to be redirected to a Microsoft login page.
NetApp uses Microsoft Entra ID as the identity provider for authentication services related to support and licensing.
-
At the login page, provide your NetApp Support Site registered email address and password.
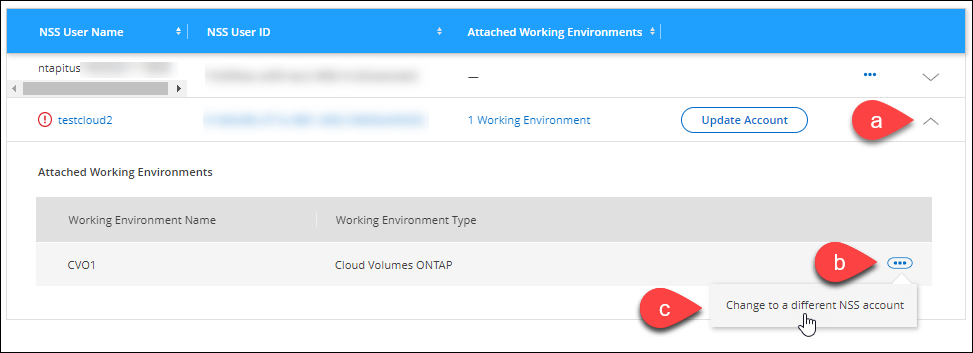
Attach a system to a different NSS account
If your organization has multiple NetApp Support Site accounts, you can change which account is associated with a Cloud Volumes ONTAP system.
You must first have associated the account with the Console.
-
Select Administration > Support.
-
Select NSS Management.
-
Complete the following steps to change the NSS account:
-
Expand the row for the NetApp Support Site account that the system is currently associated with.
-
For the system that you want to change the association for, select
-
Select Change to a different NSS account.
-
Select the account and then select Save.
-
Display the email address for an NSS account
For security, the email address associated with an NSS account is not displayed by default. You can view the email address and associated user name for an NSS account.

|
When you go to the NSS Management page, the Console generates a token for each account in the table. That token includes information about the associated email address. The token is removed when you leave the page. The information is never cached, which helps protect your privacy. |
-
Select Administration > Support.
-
Select NSS Management.
-
For the NSS account that you want to update, select
and then select Display Email Address. You can use the copy button to copy the email address.
Remove an NSS account
Delete any of the NSS accounts that you no longer want to use with the Console.
You can't delete an account that is currently associated with a Cloud Volumes ONTAP system. You first need to attach those systems to a different NSS account.
-
Select Administration > Support.
-
Select NSS Management.
-
For the NSS account that you want to delete, select
and then select Delete. -
Select Delete to confirm.