

Replace drives for storage nodes
 Suggest changes
If a drive is faulty or if the drive wear level falls below a threshold, you should replace it. Alarms in the Element software UI and VMware vSphere Web Client notify you when a drive has failed or is going to fail. You can hot-swap a failed drive.
This procedure is for replacing drives in H410S and H610S storage nodes. Removing a drive takes the drive offline. Any data on the drive is removed and migrated to other drives in the cluster. The data migration to other active drives in the system can take a few minutes to an hour depending on capacity utilization and active I/O on the cluster.
Best practices for handling drives
You should follow these best practices for handling drives:
-
Keep the drive in the ESD bag until you are ready to install it.
-
Open the ESD bag by hand or cut the top off with a pair of scissors.
-
Always wear an ESD wrist strap grounded to an unpainted surface on your chassis.
-
Always use both hands when removing, installing, or carrying a drive.
-
Never force a drive into the chassis.
-
Always use approved packaging when shipping drives.
-
Do not stack drives on top of each other.
Best practices for adding and removing drives
You should follow these best practices for adding drives to the cluster and removing drives from the cluster:
-
Add all the block drives and ensure that block syncing is complete before you add the slice drives.
-
For Element software 10.x and later, add all the block drives at once. Ensure that you don't this for more than three nodes at once.
-
For Element software 9.x and earlier, add three drives at once allowing them to completely sync before adding the next group of three.
-
Remove the slice drive and ensure that slice syncing is complete before removing the block drives.
-
Remove all the block drives from a single node at once. Ensure that all block syncing is complete before you move on to the next node.
-
Remove the drive from the cluster using either the NetApp Element software UI or the NetApp Element Management extension point in Element plug-in for vCenter server.
Option Steps Using the Element UI
-
From the Element UI, Select Cluster > Drives.
-
Click Failed to view the list of failed drives.
-
Make a note of the slot number of the failed drive. You need this information to locate the failed drive in the chassis.
-
Click Actions for the drive you want to remove.
-
Click Remove.
You can now physically remove the drive from the chassis.
Using the Element plug-in for vCenter server UI
-
From the NetApp Element Management extension point of the vSphere Web Client, select NetApp Element Management > Cluster.
-
If two or more clusters are added, ensure that the cluster you intend to use for the task is selected in the navigation bar.
-
Select All from the drop-down list to view the complete list of drives.
-
Select the check box for each drive you want to remove.
-
Select Remove Drives.
-
Confirm the action.

If there is not enough capacity to remove active drives before removing a node, an error message appears when you confirm the drive removal. After you resolve the error, you can now physically remove the drive from the chassis.
-
-
Replace the drive from the chassis:
-
Unpack the replacement drive, and place it on a flat, static-free surface near the rack.
Save the packing materials for when you return the failed drive to NetApp.
Here is the front view of the H610S and H410S storage nodes with the drives: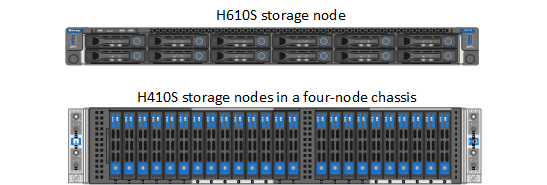
-
Perform the steps based on the node model:
Node model Steps H410S
-
Identify the node by matching the serial number (service tag) with the number you noted down from the Element UI.
The serial number is on a sticker at the back of each node.
After you identify the node, you can use the slot information to identify the slot that the failed drive is in. Drives are arranged alphabetically from A through D and from 0 through 5. -
Remove the bezel.
-
Press the release button on the failed drive:
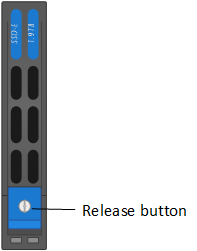
When you press the release button, the cam handle on the drive springs open partially, and the drive releases from the midplane.
-
Open the cam handle, and slide the drive out carefully using both hands.
-
Place the drive on an antistatic, level surface.
-
Insert the replacement drive into the slot all the way into the chassis using both hands.
-
Press down the cam handle until it clicks.
-
Reinstall the bezel.
-
Notify NetApp Support about the drive replacement.
NetApp Support will provide instructions for returning the failed drive.
H610S
-
Match the slot number of the failed drive from the Element UI with the number on the chassis.
The LED on the failed drive is lit amber. -
Remove the bezel.
-
Press the release button, and remove the failed drive as shown in the following illustration:
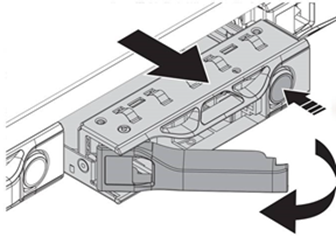
Ensure that the tray handle is fully open before you attempt to slide the drive out of the chassis. -
Slide the drive out, and place it on a static-free, level surface.
-
Press the release button on the replacement drive before you insert it into the drive bay.
The drive tray handle springs open.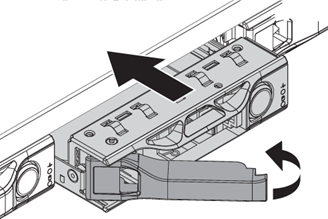
-
Insert the replacement drive without using excessive force.
When the drive is inserted fully, you hear a click. -
Close the drive tray handle carefully.
-
Reinstall the bezel.
-
Notify NetApp Support about the drive replacement.
NetApp Support will provide instructions for returning the failed drive.
-
-
-
Add the drive back to the cluster using either the Element UI or the NetApp Element Management extension point in Element plug-in for vCenter server.
When you install a new drive in an existing node, the drive automatically registers as Available in the Element UI. You should add the drive to the cluster before it can participate in the cluster. Option Steps Using the Element UI
-
From the Element UI, select Cluster > Drives.
-
Select Available to view the list of available drives.
-
Select the Actions icon for the drive you want to add, and select Add.
Using the Element plug-in for vCenter server UI
-
From the NetApp Element Management extension point of the vSphere Web Client, select NetApp Element Management > Cluster > Drives.
-
From the Available drop-down list, select the drive, and select Add.
-
Confirm the action.
-