


Manually deploy the Shift operator (Standard mode)

 Suggest changes

 PDFs
PDFs
Manually deploy the NetApp Shift toolkit as a containerized service with NetApp Trident CSI and Migration Toolkit for Virtualization (MTV). This process enables automated storage provisioning and virtual machine disk migration, leveraging annotations and labels to route requests appropriately between components.
Architecture components
Understand how NetApp Shift toolkit, Trident CSI, and Migration Toolkit for Virtualization work together to enable automated storage provisioning and VM disk migration in your OpenShift environment.
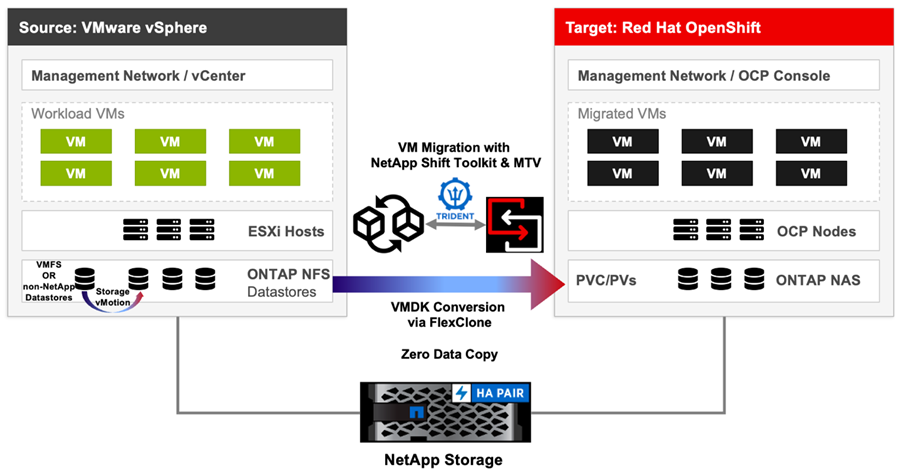
NetApp Shift toolkit
-
Deployed as a containerized service via an image registry
-
Exposes an endpoint that listens for Persistent Volume Claim (PVC) requests originating from MTV with a specific annotation
-
Responsible for processing VM disk migration tasks, including format conversions
NetApp Trident CSI (Version 26.06 or later)
-
Acts as the Container Storage Interface (CSI) provisioner
-
Receives PVC import requests from Shift toolkit
-
Applies logic based on PVC annotations and labels to determine whether to process the request directly or redirect it to Shift
Migration Toolkit for Virtualization (MTV 2.12 or later)
-
Orchestrates virtual machine migration plans
-
Issues PVC requests required for storage provisioning during VM migration
-
Adds annotations to guide downstream processing
Before you begin
Verify that your OpenShift environment has the required components installed and configured before deploying the Shift operator.
-
Migration Toolkit for Virtualization Operator is running 2.12 or later
-
Trident is installed via OpenShift OperatorHub - Trident installation guide
-
NetApp Shift is deployed as a container with the Shift endpoint accessible to NetApp Trident
-
A Storage Class is created and annotated specifically for Shift toolkit usage
-
The annotations identify Shift toolkit as the intended handler and specify the target Trident backend
-
MTV includes the following annotation on PVCs:
forklift.konveyor.io/netapp-shift: "true"
Step 1: Download and extract the Shift installer
The Shift installer package contains everything required to deploy the Shift operator and install Shift.

|
If your cluster does not have access to quay.io, skip this step and follow the Offline installation (air-gapped clusters) procedure instead. Return to step 2 once you have completed the offline image import. |
-
Download the latest version of the Shift installer from NetApp Support Site Toolchest.
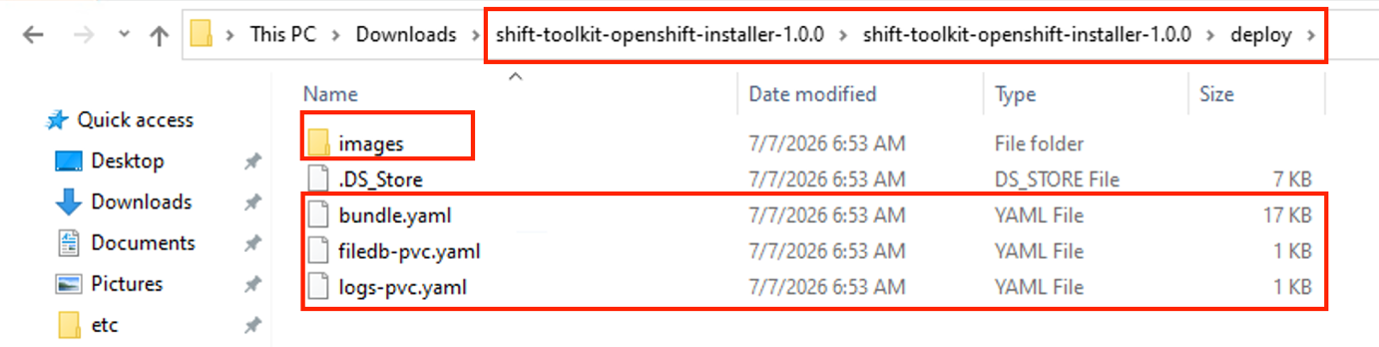
-
Extract the installer package:
tar -xf Shift-installer-1.0.0.tar.gz -
Change to the installer directory:
cd shift-installer
Step 2: Create the Shift namespace and API credentials
Set up a dedicated namespace for the Shift operator and create the credentials needed for secure API access.
-
Create the Shift namespace:
oc create ns shift -
Create the secret for Shift API access within the Shift namespace. Replace the example values with a unique username and a strong password for your environment:
oc create secret generic shift-credentials -n shift \
  --from-literal=username='admin' \
  --from-literal=password='admin'
|
|
Replace the password with a preferred value. |
Step 3: Create TLS certificate ConfigMaps
Create the ConfigMaps that provide the TLS certificate and private key the Shift service uses to serve HTTPS traffic.
The certificate must be issued with the CN/SAN set to shift-toolkit-service.shift.svc.cluster.local. The certificate and key files must be named server.cert and server.key, respectively.
-
Create the ConfigMap for the TLS certificate:
oc create configmap shift-toolkit-service-server-crt -n shift \ --from-file=server.cert=server.cert -
Create the ConfigMap for the TLS private key:
oc create configmap shift-toolkit-service-server-key -n shift \
  --from-file=server.key=server.key
|
|
If HTTPS is not being used, set INSECURE_TLS=true in bundle.yaml. The required ConfigMaps should still be created as described above, even when HTTPS is disabled and the TLS certificates are not actively used.
|
Step 4: Create the CA bundle ConfigMap
Create the ConfigMap that provides the CA bundle the PVC listener uses to verify the Shift service's TLS certificate.
-
Point
--from-fileat theserver.certPEM file.The key in the ConfigMap must be
ca.crt. With this ConfigMap in place, the listener runs withINSECURE_TLS=falseand verifies the Shift certificate against this bundle usingSHIFT_CA_CERT_FILE. -
Create the ConfigMap for the CA bundle:
oc create configmap shift-toolkit-service-ca -n shift \
  --from-file=ca.crt=ca.cert
Step 5: Create persistent volume claims
Create the PVCs required for the Shift filedb (database) and logs before deploying the bundle.
-
Before applying the PVC definitions, update
deploy/filedb-pvc.yamlanddeploy/logs-pvc.yamlto specify the appropriatestorageClassNamefor your cluster (for example,ontap-storageclass).
These PVCs must be created and available before the bundle is deployed in Step 6: Deploy the Shift operator. -
Apply the filedb PVC manifest:
oc apply -f deploy/filedb-pvc.yaml -
Apply the logs PVC manifest:
oc apply -f deploy/logs-pvc.yaml
Step 6: Deploy the Shift operator
Apply the Shift operator configuration to your OpenShift cluster and verify that the required pods are running successfully.
-
From the shift-installer directory, run the deploy command:
oc apply -f deploy/shift-bundle.yaml -
Verify the installation using the pod creation status:
oc get pods -n shiftExample output:
NAME                                     READY   STATUS    RESTARTS   AGE
shift-68ccd597c-dtsj7                    1/1     Running   0          18s
shift-pvc-listener-57d546f6b8-r9mgc      1/1     Running   0          18s
|
|
To undeploy, run oc delete -f deploy/bundle.yaml --ignore-not-found. This command removes the resources deployed by bundle.yaml while preserving the namespace and secret.
|
Step 7: Configure the Storage Class for Shift integration
Create a new Storage Class or update an existing Storage Class with the required annotations for Shift integration.
The Storage Class must include the following annotations:
-
shift.netapp.io/storage-class-type -
shift.netapp.io/trident-backend-uuid
-
Patch the storage class with the required annotations:
oc patch storageclass nimnas1172 \
  --type=merge \
  -p '{
    "metadata": {
      "annotations": {
        "shift.netapp.io/storage-class-type": "shift",
        "shift.netapp.io/trident-backend-uuid": "facc3aad-83bb-423a-b6a1-ba0fb8811217"
      }
    }
  }'
Example output:
storageclass.storage.k8s.io/nimnas1172 patched
The backend UUID can be fetched by running oc get tbc -n trident -
Verify the existing storage classes:
oc get scExample output:
nimnas1172 (default) csi.trident.netapp.io Delete Immediate true
Step 8: Create and trigger the MTV plan
After completing the Shift operator deployment and storage class configuration, you can create and trigger the MTV plan.
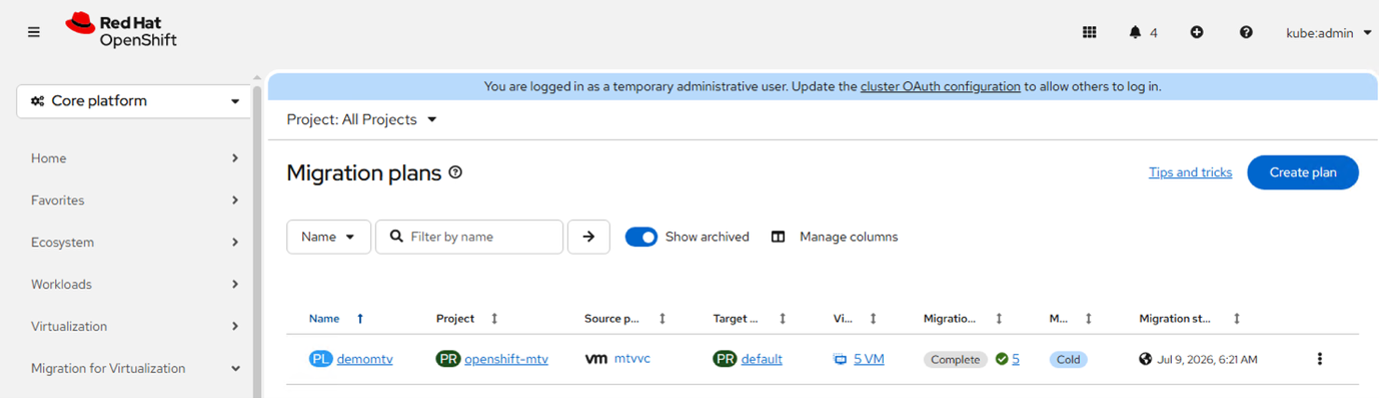
For detailed information about creating the MTV plan, refer to the Migration Toolkit for Virtualization documentation.
The following screenshot shows the sequence of steps executed when the migration plan is triggered.
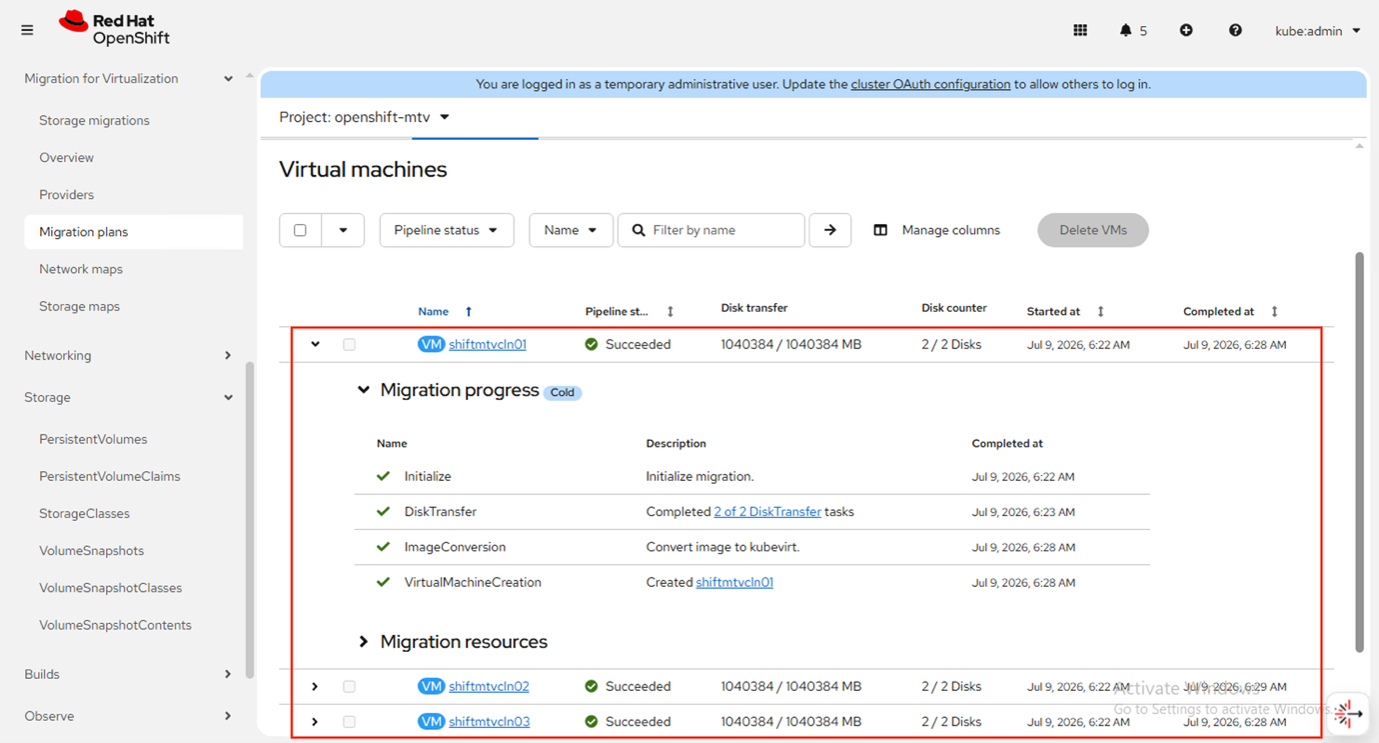
The following screenshot shows the PVCs converted using the Shift toolkit and subsequently imported by NetApp Trident.
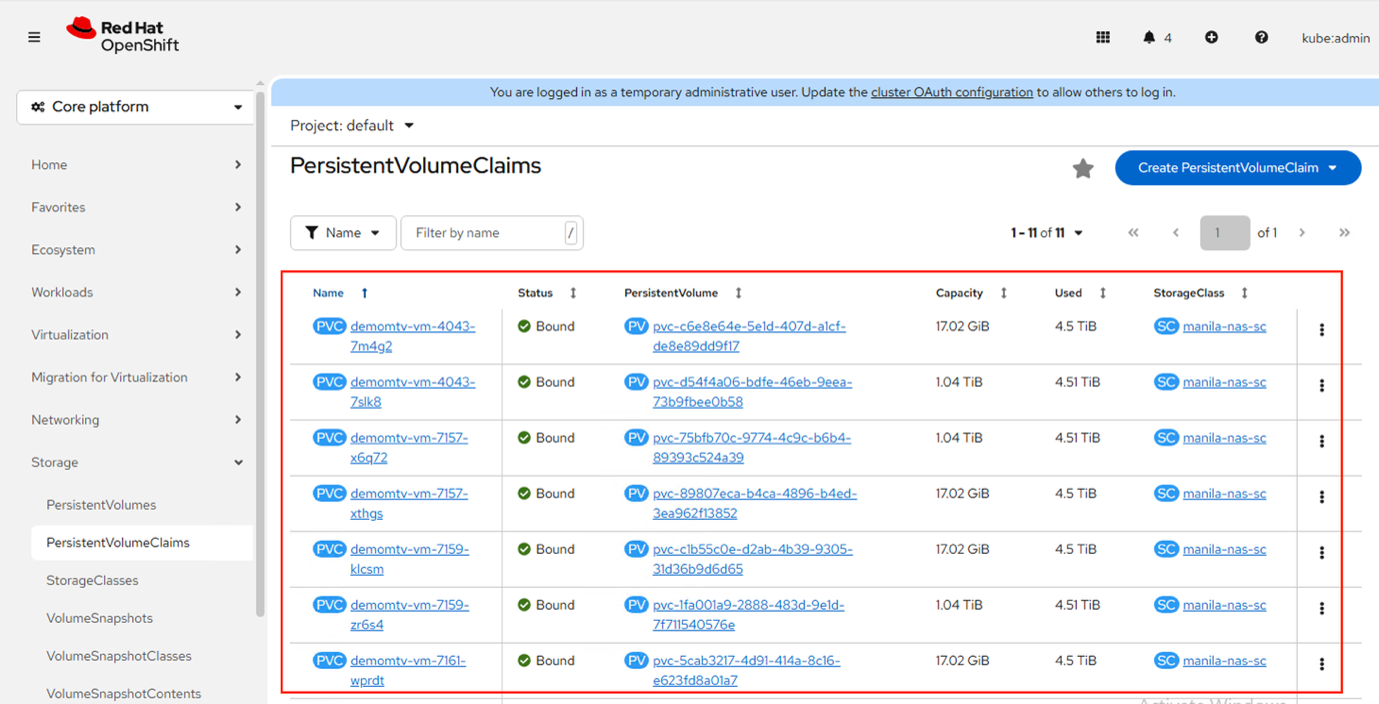
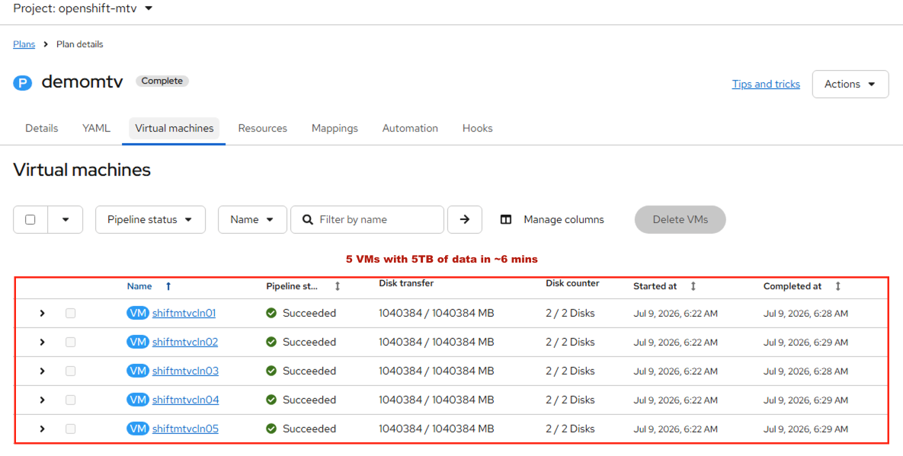
Migration plan completed successfully — 5 virtual machines and approximately 5 TB of data migrated in approximately 6 minutes.
After the migration is complete, each clone volume must be detached. The detachment method depends on the ONTAP version: use clone split for ONTAP 9.17.1 and later, or vol move for earlier versions.
Both clone split and vol move are background operations and do not impact production workloads while they are running. A script to initiate the detach process is available in the Post Migrate Detach widget within the NetApp Console Automation Catalog.
Offline installation (air-gapped clusters)
This section describes an alternative installation path for clusters that do not have access to quay.io. If your cluster can reach quay.io, follow steps 1–8 instead.
For clusters without access to quay.io, import the image tarballs into the OpenShift internal registry before deploying the bundle.
No external registry route is required. Both the image push operations and bundle image references use image-registry.openshift-image-registry.svc:5000, which is accessible through the cluster network and secured by the cluster CA.
-
ocCLI logged in with cluster-admin privileges -
skopeoinstalled -
Image tarballs available on the host:
-
shift-toolkit-1.0.0-image.tar -
shift-toolkit-listener-1.0.0-image.tar
-
-
Enable the internal registry (one-time step; skip if already configured):
oc patch configs.imageregistry.operator.openshift.io cluster \ --type=merge -p '{"spec":{"defaultRoute":true}}' oc get route default-route -n openshift-image-registry -
Generate registry credentials using the active
ocsession:Do not use a raw service account token, as it can fail during blob uploads. Use
oc registry loginto create an authentication file compatible with the registry redirect flow.REGISTRY=image-registry.openshift-image-registry.svc:5000 oc registry login --skip-check \ --registry=$REGISTRY \ --to=/tmp/registry-auth.json -
Push the Shift toolkit image to the internal registry:
skopeo copy \ docker-archive:shift-toolkit-1.0.0-image.tar \ docker://$REGISTRY/shift/shift-toolkit:1.0.0 \ --dest-tls-verify=false \ --dest-authfile=/tmp/registry-auth.json -
Push the Shift toolkit listener image to the internal registry:
skopeo copy \ docker-archive:shift-toolkit-listener-1.0.0-image.tar \ docker://$REGISTRY/shift/shift-toolkit-listener:1.0.0 \ --dest-tls-verify=false \ --dest-authfile=/tmp/registry-auth.json -
Update the image references in
deploy/bundle.yamlto use the internal registry:sed -i \ -e "s|quay.io/netapp/shift-toolkit:1.0.0|$REGISTRY/shift/shift-toolkit:1.0.0|g" \ -e "s|quay.io/netapp/shift-toolkit-listener:1.0.0|$REGISTRY/shift/shift-toolkit-listener:1.0.0|g" \ -e "s|imagePullPolicy: Always|imagePullPolicy: IfNotPresent|g" \ deploy/bundle.yaml -
Deploy the bundle:
oc apply -f deploy/bundle.yaml