

Migrate VMs from VMware ESXi to Red Hat OpenShift Virtualization
 Suggest changes
Migrate VMs from VMware ESXi to Red Hat OpenShift Virtualization using the Shift Toolkit by preparing VMs, converting disk formats, and configuring the target environment.
The Shift Toolkit enables VM migration between virtualization platforms through disk format conversion and network reconfiguration on the destination environment.
Before you begin
Verify that the following prerequisites are met before starting the migration.
-
OpenShift Cluster endpoint with the following operators installed:
-
OpenShift Virtualization operator
-
NetApp Trident CSI driver
-
NMstate
-
-
NetApp Trident CSI configured with appropriate backends and storage classes
-
NodeNetworkConfigurationPolicy and NetworkAttachmentDefinitions (NAD) configured with proper VLANs
-
OpenShift cluster is network reachable with current host file entries
-
Administrator level privileges on the cluster
-
Kubeconfig file downloaded
-
VMDKs can be configured in multiple ways: all VMDKs can reside on a single NFSv3 volume (eliminating the need for Storage vMotion), each VMDK can be placed on its own individual volume, or multiple VMDKs can be organized within a qtree inside a volume.

The Shift Toolkit automatically detects the layout and selects the appropriate cloning method and NAS storage drivers.
When VMDKs are placed within a qtree, Shift Toolkit utilizes the ONTAP-NAS-economy driver. -
VMware tools are running on guest VMs
-
VMs to be migrated are in a RUNNING state for preparation
-
VMs must be powered off before triggering migration
-
VMware tools removal happens on the destination hypervisor once VMs are powered on
-
ONTAP-NAS: VMDKs can all reside on a single volume or each VMDK can be on its own individual volume. VM selection can be at the datastore level or at the VM level.
-
ONTAP-NAS-Economy: VMDKs must reside on a single volume, and the volume name must adhere to the following naming convention:
trident_qtree_pool_<storage-prefix>_<10 random characters>. VM selection within a resource group is at the datastore level only.
For ONTAP-NAS-Economy, the volume with the naming convention specified above must pre-exist and must be used as a datastore on VMware vCenter. This means the VM should be Storage vMotioned to this specific datastore, or an existing datastore should be renamed to match the naming convention: trident_qtree_pool_<storage-prefix>_<10 random characters>.
For ONTAP-NAS-Economy, the Trident backend configuration (TBC) should have the parameter Deny New Volume Poolsset totrue. The storage class used should also restrict the storagePools totbc name: <aggr name where the trident_qtree_pool_<storage-prefix>_<10 random characters> resides>.Sample TBC config for ONTAP-NAS-Economy driver
apiVersion: v1
kind: Secret
metadata:
	name: nas-eco-data-1172-secret
	namespace: trident
type: Opaque
stringData:
	username: <svm-admin-username>
	password: <svm-admin-password>
---
apiVersion: trident.netapp.io/v1
kind: TridentBackendConfig
metadata:
	name: nas-eco-data-1172
	namespace: trident
spec:
	backendName: nas-eco-data-1172
	credentials:
		name: nas-eco-data-1172-secret
	dataLIF: "192.168.1.100"
	denyNewVolumePools: "False"
	managementLIF: "192.168.1.50"
	storageDriverName: ontap-nas-economy
	svm: data_1172
	version: 1
The parameter denyNewVolumePoolsshould be set totrueright aftertrident_qtree_pool_<storage-prefix>_<10 random characters>is created as part of the initial PVC creation. Setting this value totrueensures Trident uses the existing qtree pool for placing qtree-based PVCs.The TBC can be patched using the following command:
oc patch tbc nas-eco-data-1172 -n trident --type=merge -p '{"spec":{"denyNewVolumePools":"true"}}'Sample YAML for storage class
apiVersion: storage.k8s.io/v1 kind: StorageClass metadata: name: nas-eco-data-1172 annotations: storageclass.kubernetes.io/is-default-class: "true" provisioner: csi.trident.netapp.io parameters: backendType: ontap-nas-economy fsType: nfs storagePools: "nas-eco-data-1172:NSOL_NetApp_C800_T18U13_02_SSD_CAP_1" allowVolumeExpansion: true reclaimPolicy: Delete volumeBindingMode: Immediate -
ONTAP-SAN: VMDKs should be placed on individual volumes (mimicking VMDK to a PVC/PV construct) using Storage vMotion. VM selection is at the VM level.
-
ONTAP-SAN-Economy: VMDKs must reside on a single NFSv3 volume, and the volume name must adhere to the following naming convention:
trident_lun_. VM selection within a resource group is at the datastore level only.
For ONTAP-SAN-Economy, the volume with the naming convention trident_lun_must pre-exist and must be used as a datastore on VMware vCenter. This means the VM should be Storage vMotioned to this specific datastore, or an existing datastore should be renamed to match the naming conventiontrident_lun_.Sample TBC config for ONTAP-SAN-Economy
apiVersion: v1
kind: Secret
metadata:
	name: ontap-san800-eco-secret
	namespace: trident
type: Opaque
stringData:
	username: <svm-admin-username>
	password: <svm-admin-password>
---
apiVersion: trident.netapp.io/v1
kind: TridentBackendConfig
metadata:
	name: ontap-san800-eco
	namespace: trident
spec:
	backendName: ontap-san800-eco
	aggregate: NSOL_NetApp_C800_T18U13_01_SSD_CAP_1
	credentials:
		name: ontap-san800-eco-secret
	dataLIF: "192.168.1.110"
	defaults:
		protocol: iSCSI
		snapshotPolicy: none
		spaceAllocate: "true"
		spaceReserve: none
		tieringPolicy: none
	managementLIF: "192.168.1.60"
	storage:
		- labels:
			backend: san800-eco
	storageDriverName: ontap-san-economy
	svm: data_1172
	version: 1
Sample storage class config for ONTAP-SAN-Economy
apiVersion: storage.k8s.io/v1
kind: StorageClass
metadata:
	name: sc-ontap-san-eco
provisioner: csi.trident.netapp.io
parameters:
	backendType: ontap-san-economy
	selector: "backend=san800-eco"
allowVolumeExpansion: true
reclaimPolicy: Delete
volumeBindingMode: Immediate
For ONTAP-SAN and ONTAP-SAN-Economy, VMs should be Storage vMotioned from any block-based datastores to ONTAP NFSv3 volumes first. The Shift Toolkit will then convert the VMDKs to LUNs and import them as PVCs to the respective namespace.
VM selection for resource groups can be at the VM level or at the datastore level. Depending on the selection, the workflow selects the appropriate ONTAP NAS or SAN storage driver. For instance, if a single VM is selected, then the ONTAP-NAS driver is used. If multiple VMDKs reside on the same volume, then either the ONTAP-NAS or ONTAP-NAS-Economy driver is used based on the source volume and its SVM, along with the TBC and storage class configured on the OpenShift side.
-
For Windows VMs: Use local administrator credentials
-
For Linux VMs: Use a user with permissions to execute sudo commands without password prompt
-
For Windows VMs: Mount the VirtIO ISO to the VM (download from here)
The preparation script uses the .msi package to install drivers and qemu-guest-agents.
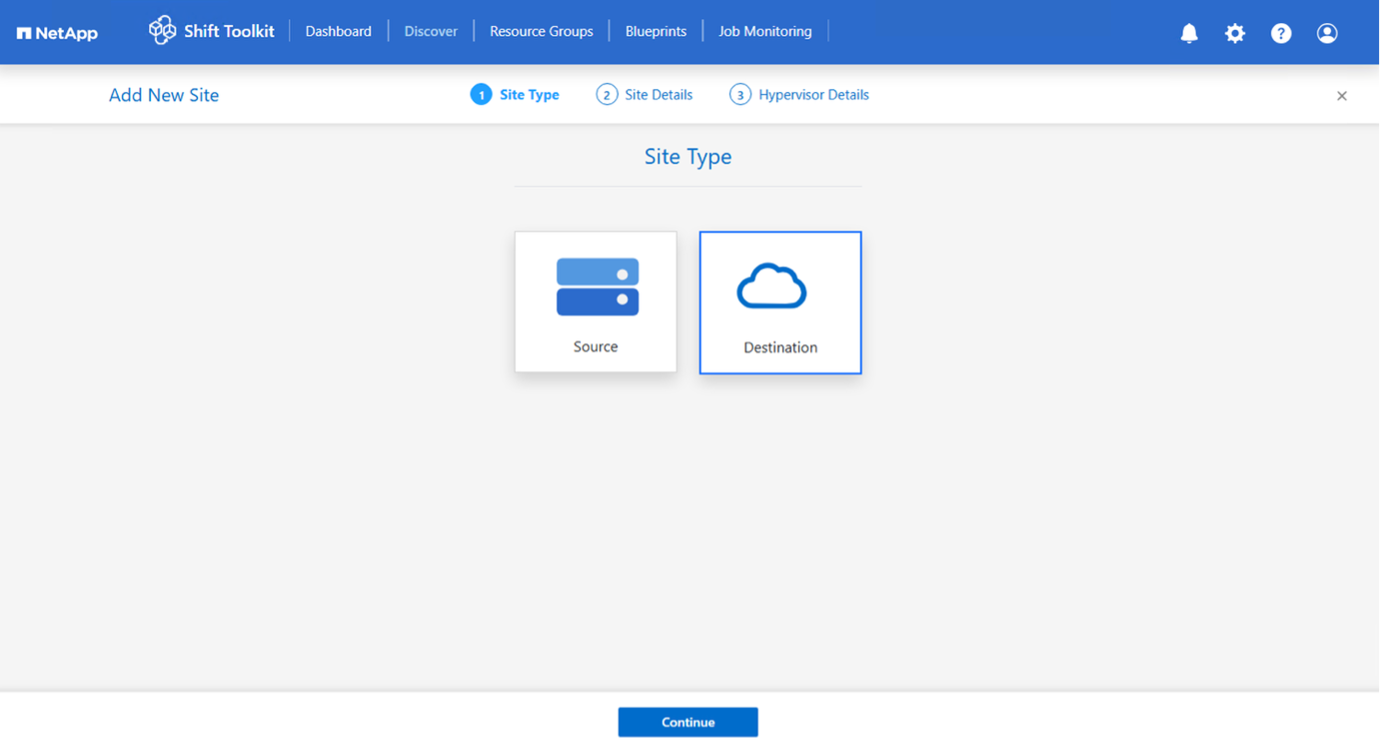
Step 1: Add the destination site (OpenShift)
Add the destination OpenShift Virtualization environment to the Shift Toolkit.
-
Click Add New Site and select Destination.
Show example
-
Enter the destination site details:
-
Site Name: Provide a name for the site
-
Hypervisor: Select OpenShift
-
Site Location: Select the default option
-
Connector: Select the default selection
-
-
Click Continue.
Show example

-
Enter the OpenShift details:
-
Endpoint: FQDN of OpenShift Cluster endpoint (for example, api.demomigsno.demoval.com)
-
Upload Kubeconfig file: Use the kubeconfig file with minimal permissions
The file extension must be yaml. Show example
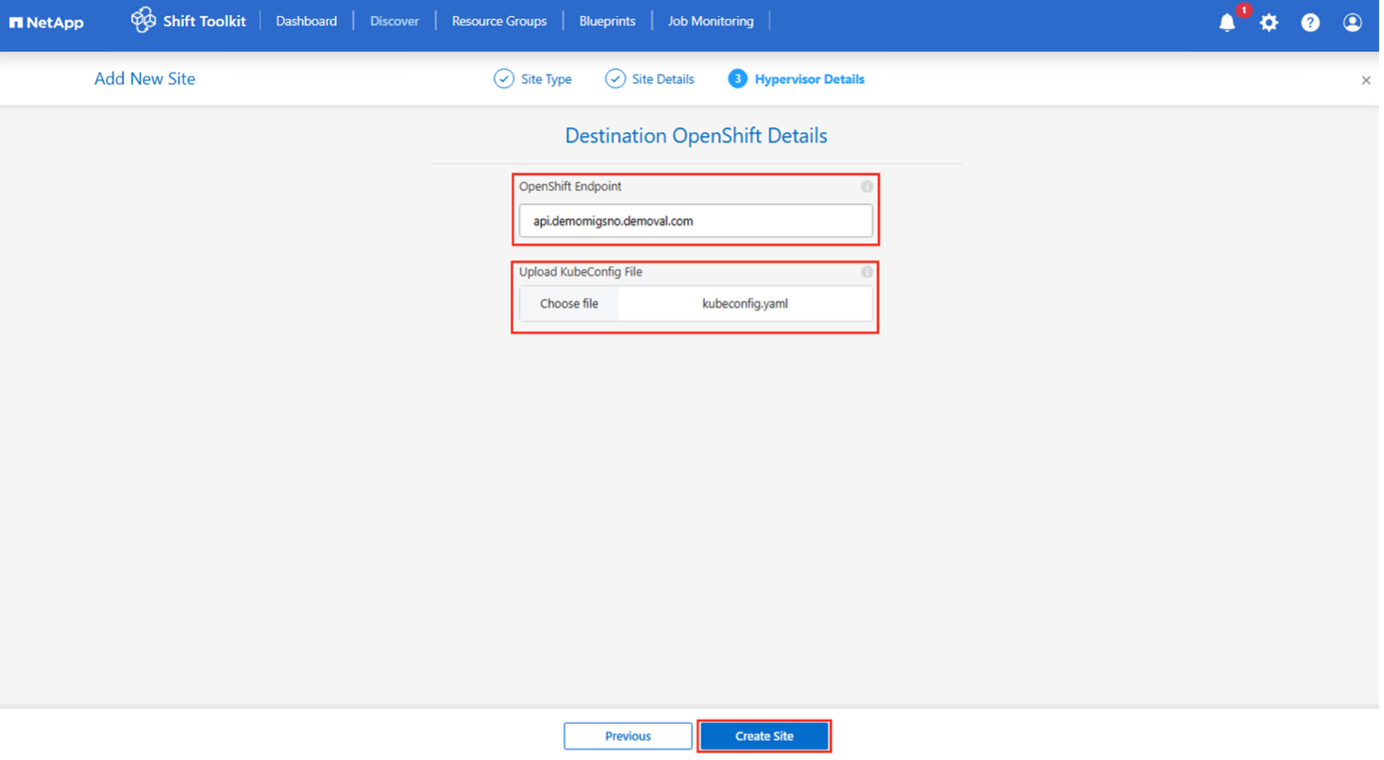
-
-
Click Create Site.
Show example

The source and destination volume will be the same as the disk format conversion happens at the volume level within the same volume.
Step 2: Create resource groups
Organize VMs into resource groups to preserve boot order and boot delay configurations.
Ensure VM VMDKs are moved to individual datastore volumes on a newly created ONTAP SVM.
-
Navigate to Resource Groups and click Create New Resource Group.
-
Select the source site from the dropdown and click Create.
-
Provide resource group details and select the workflow:
-
Clone based Migration: Performs end-to-end migration from source to destination hypervisor
-
Clone based Conversion: Converts disk format to the selected hypervisor type
-
-
Click Continue.
-
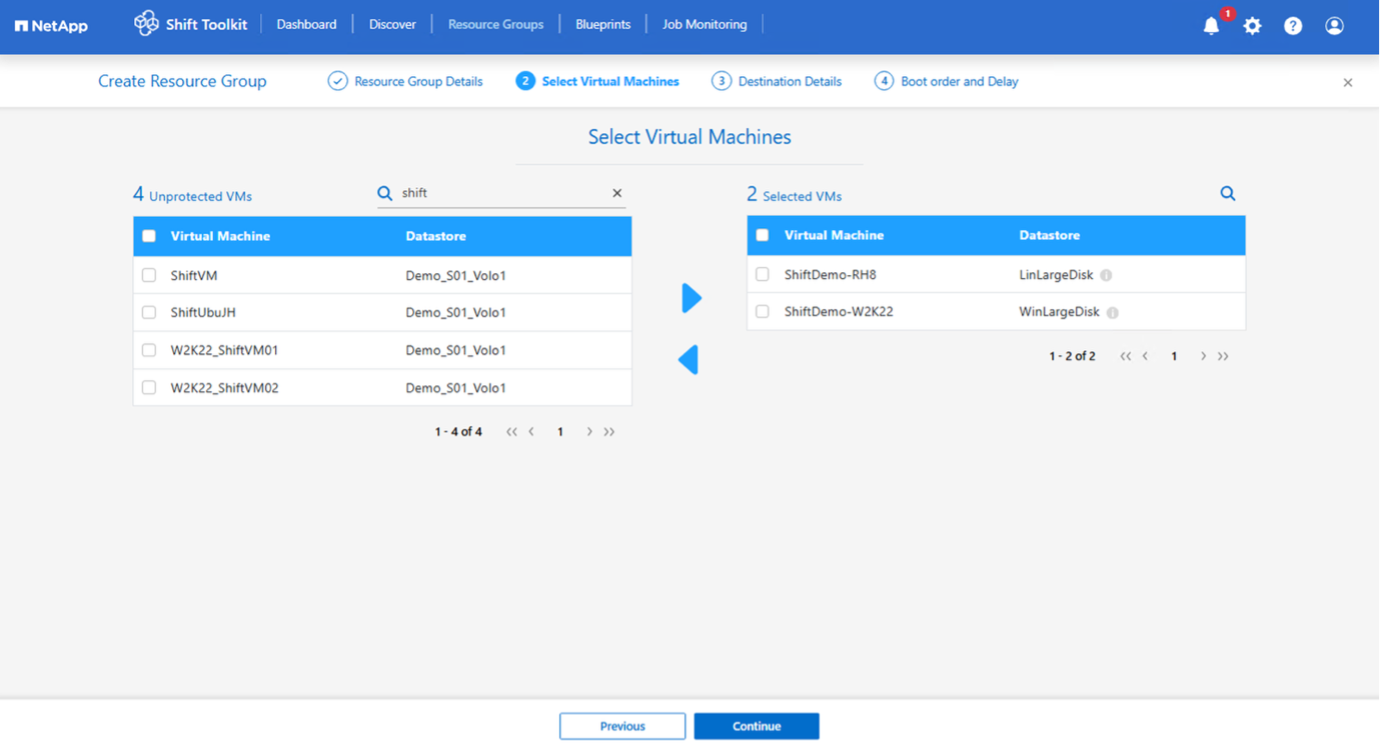
Select VMs using the search option.
VM selection for resource groups is based on virtual machine and not at the datastore level. Show example
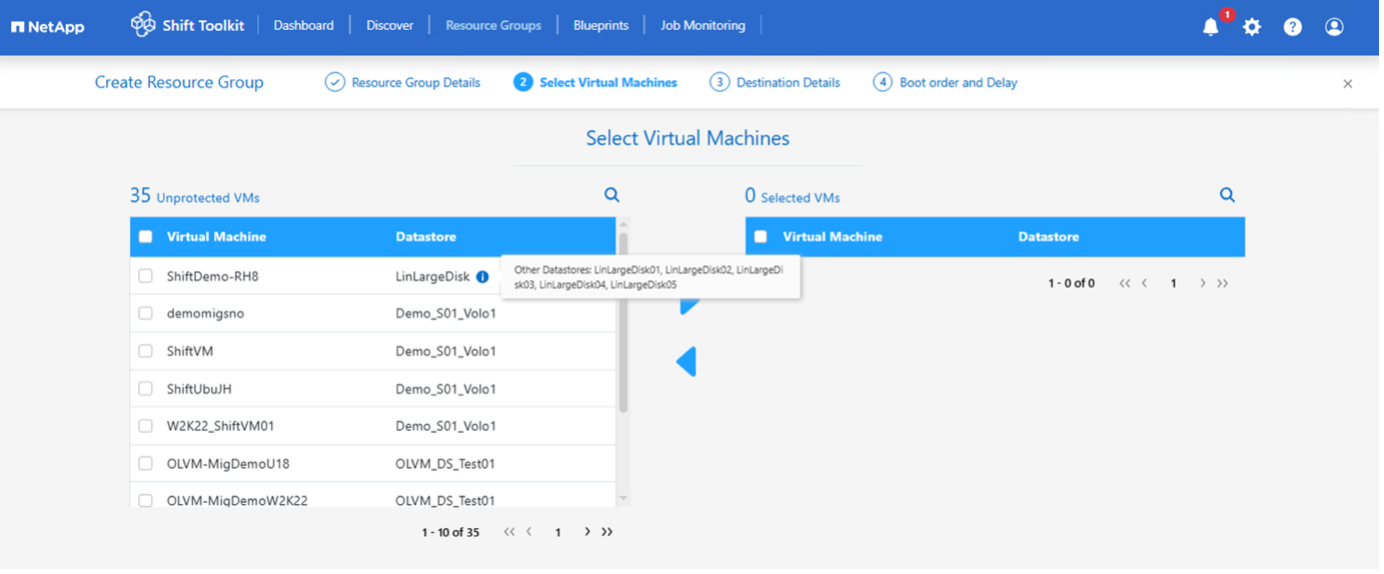
Show example
-
Update migration details:
-
Select Destination Site
-
Select Destination OpenShift entry
-
Select the storage class
Show example
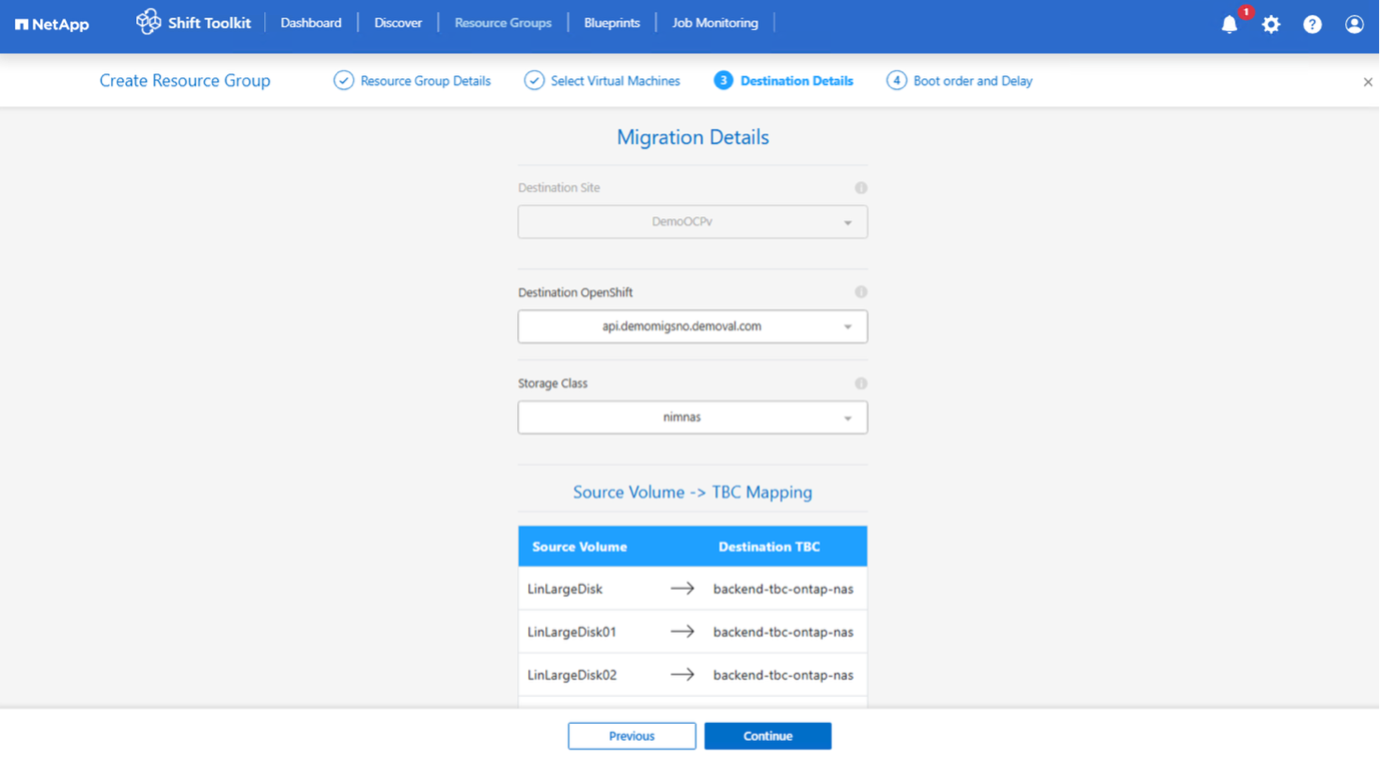
The Trident backend will be mapped to the source volume automatically if there is only one TBC; however, if there are multiple TBCs, the backend can be selected.
-
-
Configure boot order and boot delay for all selected VMs:
-
1: First VM to power on
-
3: Default
-
5: Last VM to power on
-
-
Click Create Resource Group.
Show example
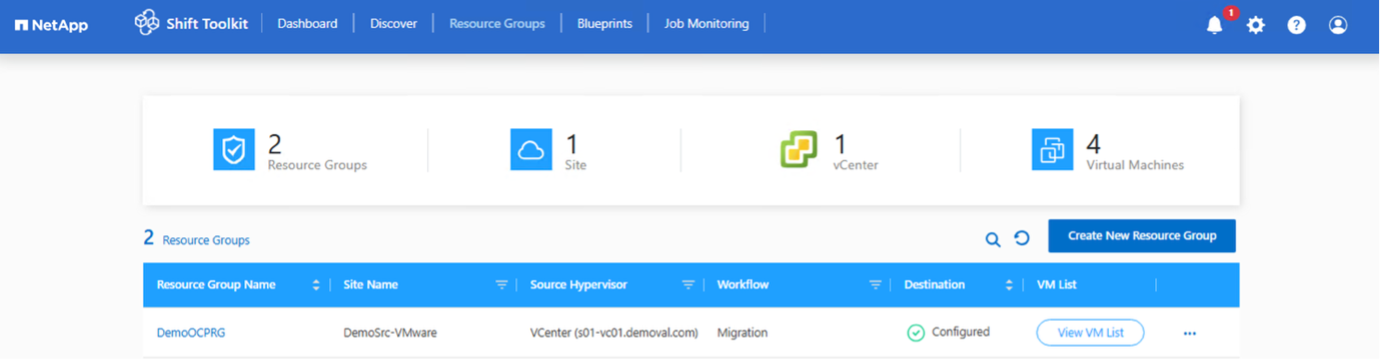
The resource group is created and ready for blueprint configuration.
Step 3: Create a migration blueprint
Create a blueprint to define the migration plan, including platform mappings, network configuration, and VM settings.
-
Navigate to Blueprints and click Create New Blueprint.
-
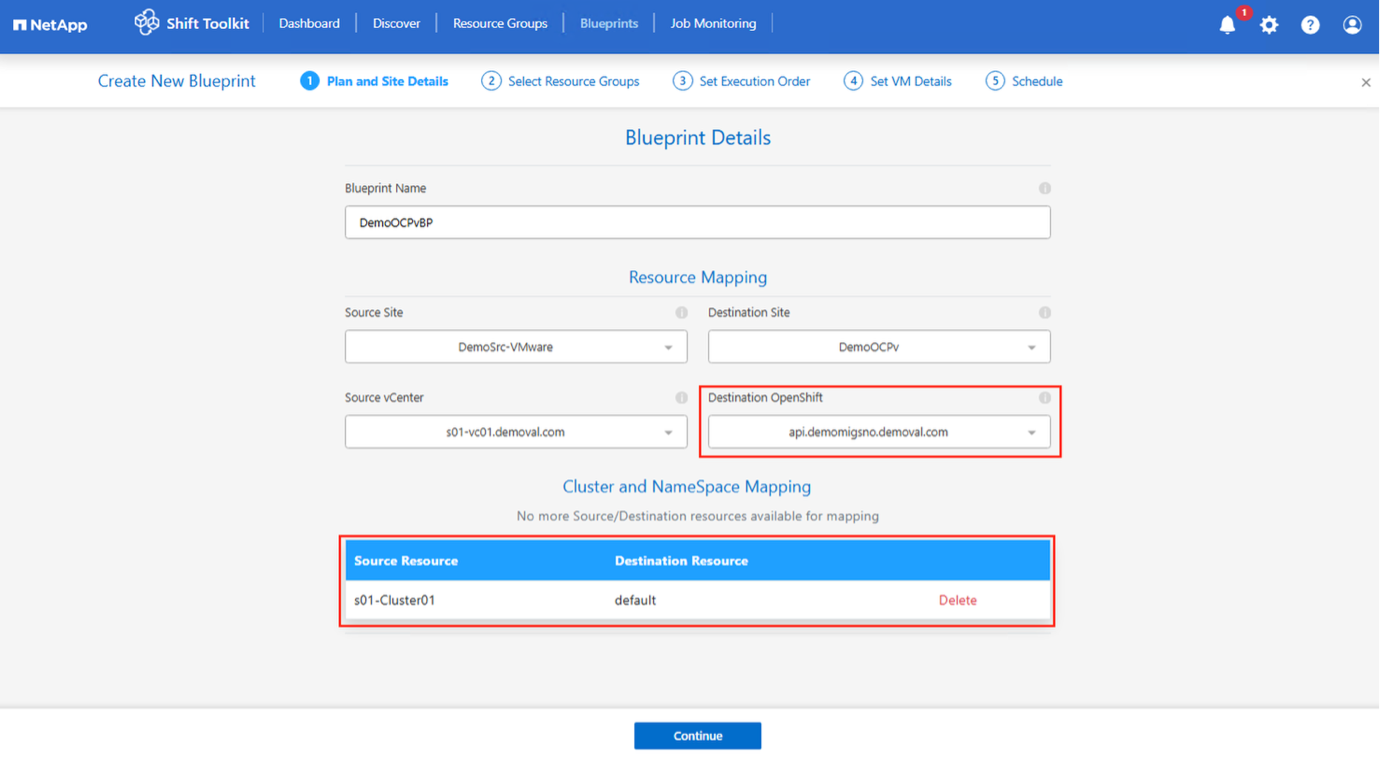
Provide a name for the blueprint and configure host mappings:
-
Select Source Site and associated vCenter
-
Select Destination Site and associated OpenShift target
-
Configure cluster and host mapping
Show example
-
-
Select resource group details and click Continue.
-
Set execution order for resource groups if multiple groups exist.
-
Configure network mapping to appropriate logical networks.
Network attachment definitions should already be provisioned within the OpenShift cluster with the appropriate VLAN and trunk options. For test migration, select "Do not configure Network" to avoid production network conflicts; manually assign network settings after conversion. Show example
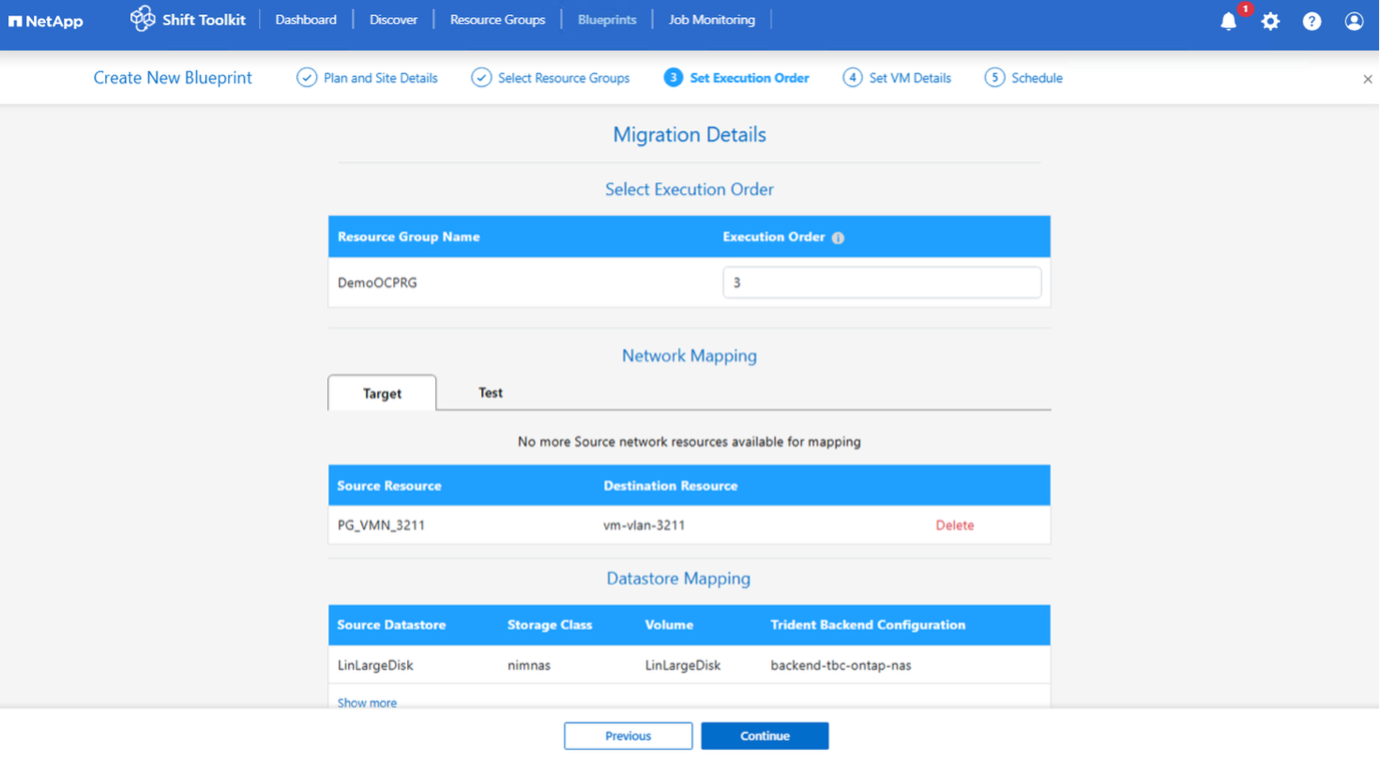
-
Review storage class and backend mappings (automatically selected based on VM selection).
Ensure VMDKs are svmotioned to individual volumes beforehand so the virtual machine can be created and powered on from the PVC. -
Under VM details, select configuration details and provide service account credentials for each OS type:
-
Windows: Use a user with local administrator privileges (domain credentials can also be used)
-
Linux: Use a user that can execute sudo commands without password prompt
Show example
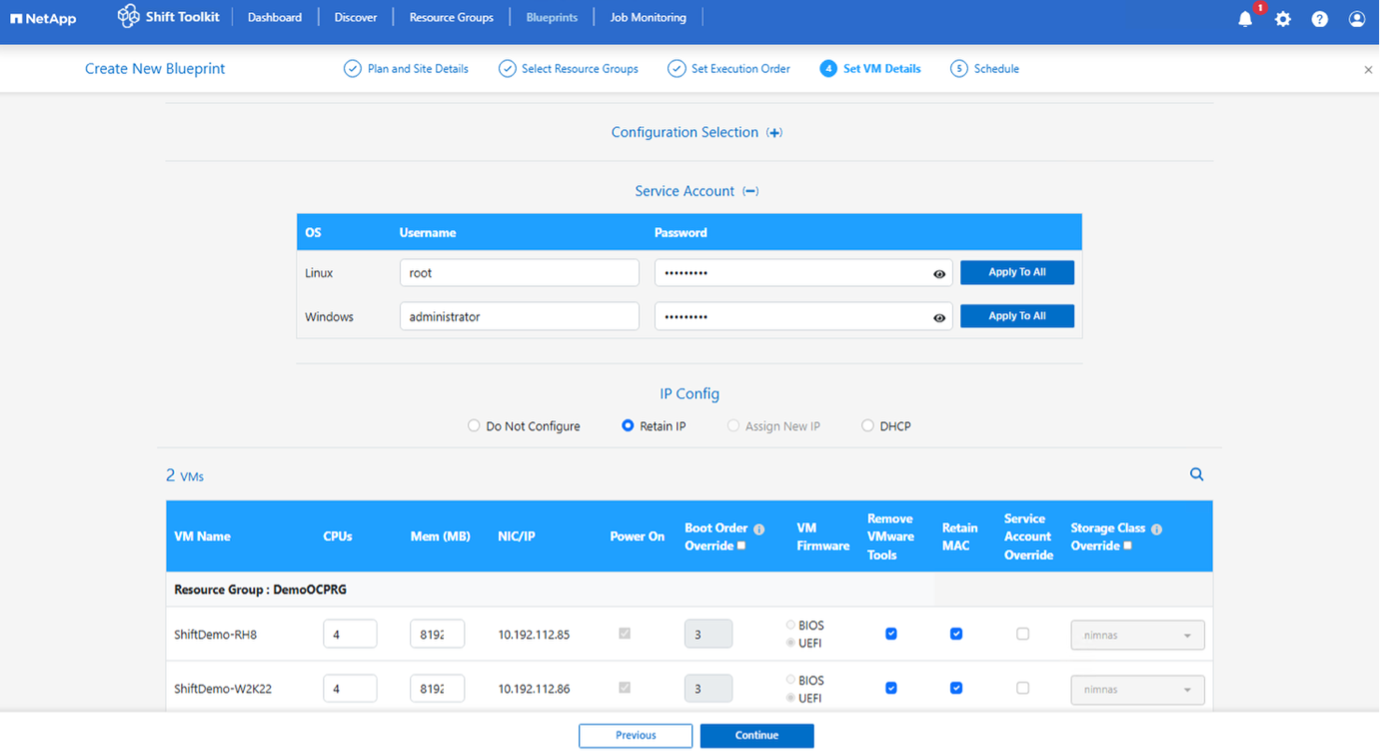
The configuration selection allows you to select the disk image format, skip override prepareVM, and choose whether to split the volume from the parent. By default, split clone is disabled and the workflow defaults to RAW format.
-
-
Configure IP settings:
-
Do not configure: Default option
-
Retain IP: Keep same IPs from source system
-
DHCP: Assign DHCP on target VMs
Ensure VMs are powered on during prepareVM phase and VMware Tools are installed.
-
-
Configure VM settings:
-
Resize CPU/RAM parameters (optional)
-
Modify boot order and boot delay
-
Power ON: Select to power on VMs after migration (default: ON)
-
Remove VMware tools: Remove VMware Tools after conversion (default: selected)
-
VM Firmware: BIOS > BIOS and EFI > EFI (automatic)
-
Retain MAC: Keep MAC addresses for licensing requirements
If interface name needs to be retained while retaining the MAC address, ensure appropriate udev rules are created on the source VM. -
Service Account override: Specify separate service account if needed
-
-
Click Continue.
-
(Optional) Schedule the migration by selecting a date and time.
Schedule migrations at least 30 minutes ahead to allow time for VM preparation. -
Click Create Blueprint.
The Shift Toolkit initiates a prepareVM job that runs scripts on source VMs to prepare them for migration.
Show example
The preparation process:
-
Injects scripts to update VirtIO drivers, install qemu-agent, remove VMware tools, backup IP details, and update fstab
-
Uses PowerCLI to connect to guest VMs (Linux or Windows) and update VirtIO drivers
-
For Windows VMs: Stores scripts in
C:\NetApp -
For Linux VMs: Stores scripts in
/NetAppand/opt
|
|
For any supported VM OSes, the Shift Toolkit automatically installs necessary VirtIO drivers before disk conversion to ensure successful boot after conversion. |
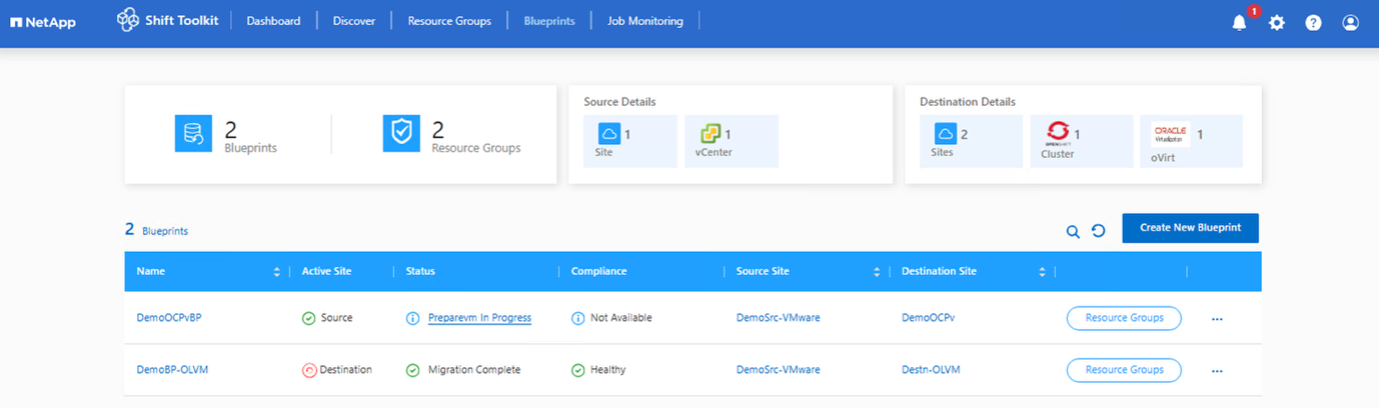
When prepareVM completes successfully, the blueprint status updates to "PrepareVM Complete." Migration will now happen at the scheduled time or can be started manually by clicking the Migrate option.
Show example
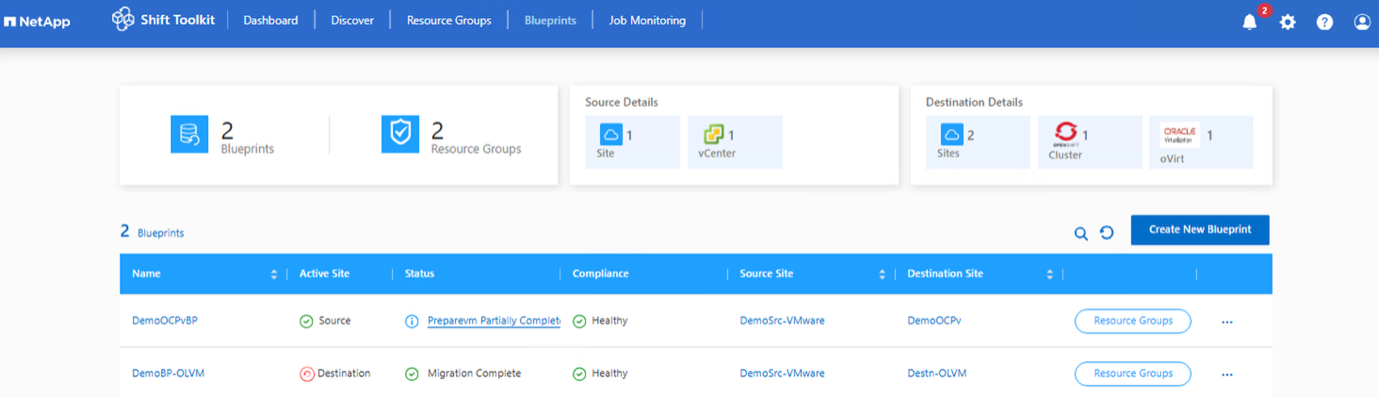
Show example
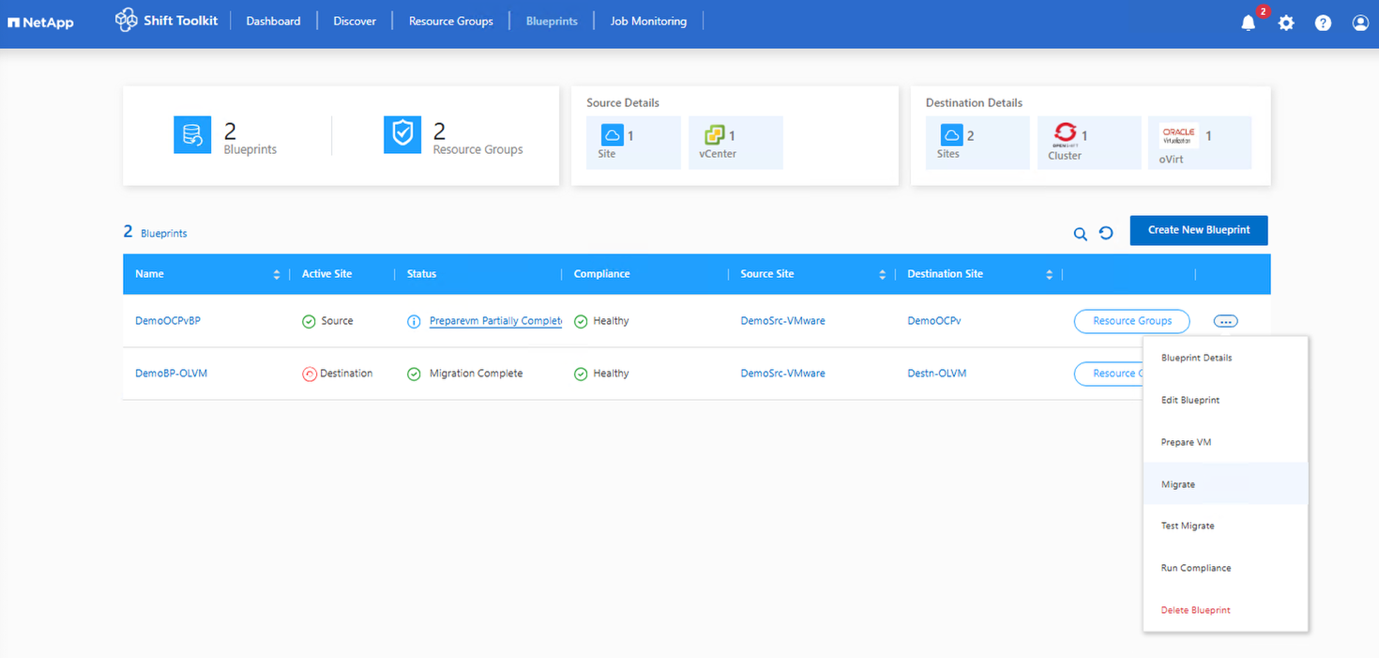
Step 4: Execute the migration
Trigger the migration workflow to convert VMs from VMware ESXi to OpenShift Virtualization.
All VMs are gracefully powered off according to the planned maintenance schedule.
-
On the blueprint, click Migrate.
Show example
-
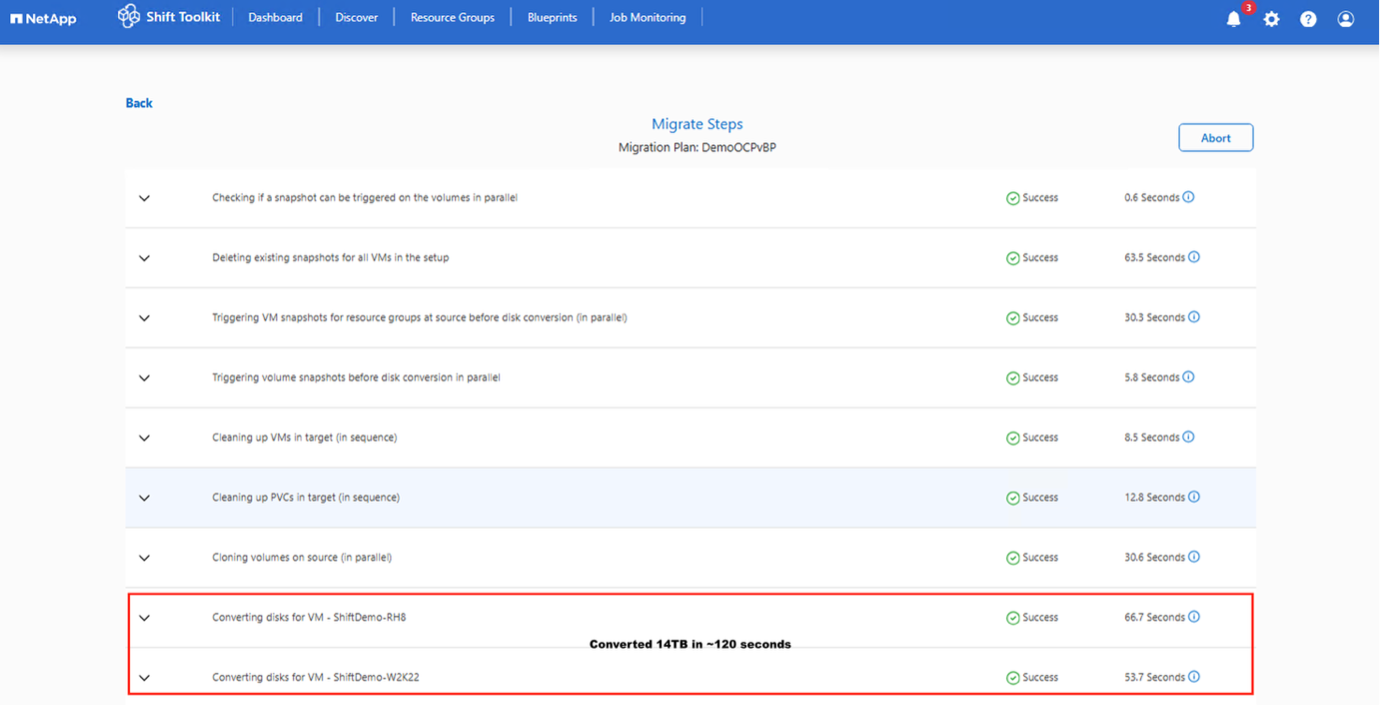
The Shift Toolkit performs the following steps:
-
Deletes existing snapshots for all VMs in the blueprint
-
Triggers VM snapshots at the source
-
Triggers volume snapshot before disk conversion
-
Clones the individual volumes
-
Converts VMDK to RAW format for each VMDK
The Shift Toolkit automatically finds all VMDKs associated with each VM, including the primary boot disk.
-
|
|
If there are multiple VMDK files, each VMDK will be converted and placed in its own PVC based on the storage driver used. |
-
Cleans up the volumes to have just the disk.img file
With the virtual machine disk image converted to RAW format, the Shift Toolkit cleans up the volumes, renames the raw file to disk.img, and assigns necessary permissions.
-
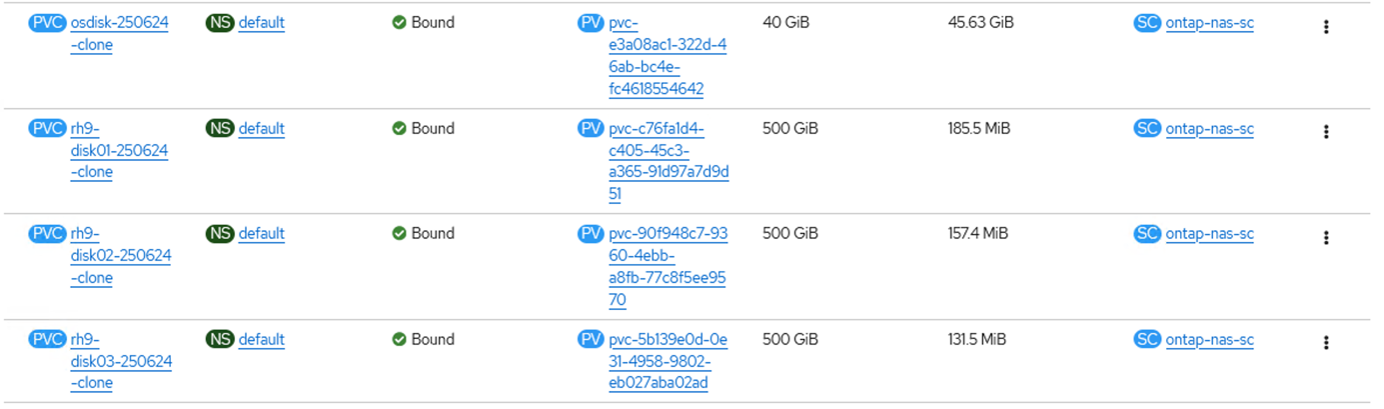
Imports the volumes as PVCs using Trident import
The volumes are then imported as PVCs using NetApp Trident APIs.
-
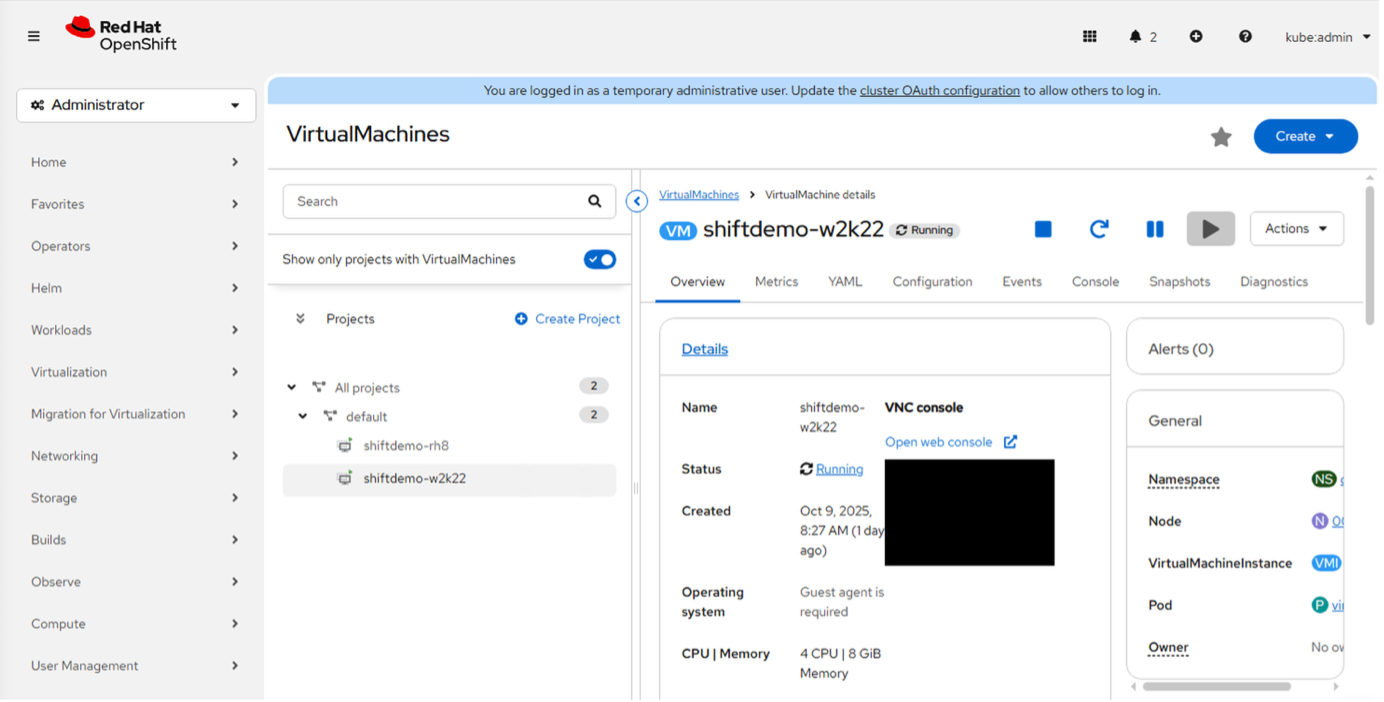
Creates VMs using VM-specific yaml files
Once the PVCs are imported and PVs are in place, the Shift Toolkit uses OC CLI to create each VM depending on the OS using yaml files.
|
|
VMs are created under the "Default" namespace. |
-
Powers on VMs at the target
Depending on the VM OS, the Shift Toolkit auto-assigns the VM boot option along with storage controller interfaces. For Linux distributions, VirtIO or VirtIO SCSI is used. For Windows, the VM powers on with SATA interface, then the scheduled script auto-installs VirtIO drivers and changes the interface to VirtIO.
-
Registers networks on each VM
Networks are assigned based on the blueprint selection.
-
Removes VMware tools and assigns IP addresses using cron jobs
Show example
|
|
The verify option can be exercised against the blueprint once the job is complete. For more information, refer to Verify Migration. |
Use Migration Toolkit for Virtualization with Shift Toolkit (scripted approach)
This section describes how to use Migration Toolkit for Virtualization (MTV) with NetApp Shift Toolkit for seamless migration to Red Hat OpenShift Virtualization.
Ensure the following prerequisites are met:
-
OpenShift cluster with OpenShift Virtualization operator and NetApp Trident CSI driver installed
-
MTV 2.9.4 (which includes conversion mode)
-
Shift Toolkit installed
Since only Shift Toolkit API is used, there is no need to configure Shift Toolkit resource groups or blueprints. -
Administrator level privileges on the OpenShift cluster
-
A Linux instance with OC command line tool installed
-
Kubeconfig exported or OC login executed to connect to the cluster
-
Download the script named "Shift-VM-to-OpenShift-MTV" from Shift Toolkit UI (Settings > Developer Access > Script Blocker)
-
Unzip the file:
unzip Shift-VM-to-OpenShift-MTV.zip -
Ensure Python3 is installed:
dnf install python3 -
Install OpenJDK 8 or later:
yum install java-1.8.0-openjdk -
Install requirements:
pip install -r requirements.txt
-
-
Virtual Machine requirements for MTV: VMDKs can be organized in different ways: they may all be placed within a single volume (avoiding the need for Storage vMotion), assigned individually to separate volumes, or grouped together within a qtree inside a NFS volume. The script automatically detects the layout and selects the appropriate cloning method and NAS storage drivers based on the TBC UUID.
-
Create migration plans using MTV.
To leverage fast VMDK conversion, create a migration plan for the VMs and ensure the following parameters are in the YAML:
-
targetNamespace: default -
type: conversion -
storage: {}
The plan should be created beforehand to ensure preserve IP settings are configured by MTV.
-
-
Map VMs from vCenter and volumes on ONTAP storage.
Use the script to create necessary PVCs and import them to the OpenShift cluster. The PVCs must have the following labels and annotations:
Labels:
-
vmID and vmUUID in the PVC (Forklift looks for these values)
Annotation:
-
The vmdk disk name for
forklift.konveyor.io/disk-sourceThe script ensures these attributes are set for every PVC and updates disk.img permissions:
-
"owner": { "id": 107 } -
"group": { "id": 107 } -
"mode": "0655"
-
-
Update the JSON file with the following details:
-
ONTAP Cluster: Can be a SVM; vsadmin can be used. Set splitclone to "False" if clone volume doesn't need immediate detachment
-
vCenter: Minimum RBAC rights to discover VMs and associated VMDK files
-
Trident storage class: Should be NFS backend with correct version in yaml
-
OpenShift: Specify the project name (default is used as an example)
Keep the rest of the values as default.
-
-
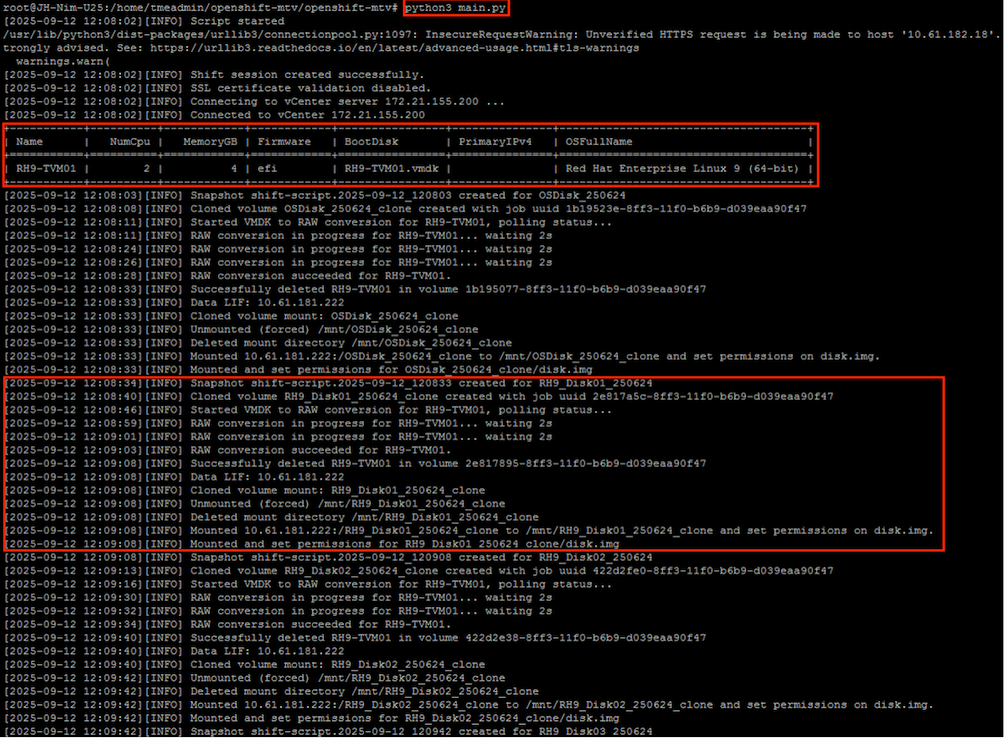
Once prerequisites are met, execute
python3 main.pyto create PVCs and import them to the OpenShift Cluster. -
Once PVCs are imported, trigger migration using MTV to create the VM with the appropriate specification.
Show example
Show example
-
Convert VMDK with MTV.
The script automatically finds all VMDKs associated with each VM, including the primary boot disk.
If there are multiple VMDK files, each VMDK will be converted. -
Upload RAW image to OpenShift Virtualization.
The script uses Trident CSI to import volumes as PVCs to the cluster. The PVC yaml is populated with labels and annotations.
-
Create virtual machine with MTV.
After import, call the MTV plan to start migration. The UI shows as "Cold," but based on the yaml specification of conversion, MTV checks for each PVC and the vmID/vmUUID, maps them, and initializes the migration.
Show example
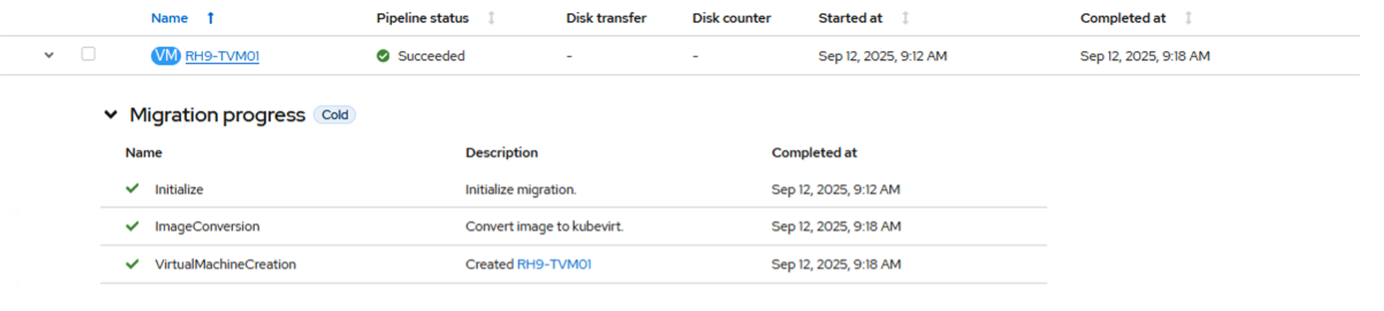
VMs are created under "Default" project for virtual machines, but this can be modified within the MTV migration plan YAML. -
Boot VM for the first time with MTV.
Depending on the VM OS, MTV auto-assigns the VM boot option along with storage controller interfaces.
Show example

Migration completed in 6 minutes for a VM with 1.5TB data disk (spread across 3 PVCs). This showcases a streamlined, low-impact approach to re-homing VMs using ONTAP storage.
The script can be executed using a config file or by specifying parameters. An example of executing the script using parameters is shown below:
The script also supports cross-SVM cloning, enabling it to create PVCs across different SVMs based on the provided input parameters. python3 main.py --mode params --ontap-server 10.192.102.56 --ontap-username admin --ontap-password 'correct password' --ontap-source-vserver manila --ontap-target-vserver manila --ontap-data-lif 10.63.172.249 --ontap-skip-ssl --vcenter-server 10.63.172.125 --vcenter-username administrator@demoenv.com --vcenter-password 'correct password' --vcenter-skip-ssl --shift-server 10.61.187.117 --shift-username admin --shift-password 'correct password' --trident-backend-name tbc-ontap-manila-nimo --trident-backend-uuid 778245f4-1f50-453c-b81c-3dd82e166bbc --trident-storage-class nimmanila --mtv-project openshift-mtv --mtv-plan casetst --ocp-server https://api.demomigsno.demoval.com:6443 --ocp-token sha256~co89ATebn-ktVyrMbNJUGByVWph_kjLamYtIOPmqfQM --ocp-project default --import-volume --execution-mode clone_shrink --snapshot-prefix ""After the migration is finished, the clone volume needs to be detached. The method used depends on the ONTAP version: use clone split for ONTAP 9.17.1 and later, or vol move for earlier versions. A script to initiate the detach process is available in the “Post migrate” folder within the provided ZIP package.
Video demonstration
The following video demonstrates the process outlined in this solution.