

Configure and use Storage Manager for Proxmox
 Suggest changes
Storage Manager for Proxmox (SMP) provides comprehensive storage provisioning and lifecycle management for virtual machines in Proxmox environments using NetApp ONTAP storage systems. SMP enables administrators to manage storage directly, simplifying operations through automated provisioning, backup, restore, and cloning capabilities.
Learn about Storage Manager for Proxmox
Storage Manager for Proxmox (SMP) offers end-to-end storage management for virtual machines within Proxmox environments that utilize NetApp storage systems. By allowing administrators to directly manage storage, SMP simplifies both storage and data management tasks in Proxmox environments.
Key features
-
End-to-end storage management: SMP provides complete lifecycle management for virtual machines, from provisioning storage to backup and recovery.
-
Direct storage management: Proxmox administrators can manage storage directly, streamlining operations and reducing complexity.
-
Standalone installer: SMP is delivered as a standalone installer that seamlessly connects to Proxmox nodes via APIs.
Capabilities
Each component of SMP is designed to enhance storage management efficiency:
-
Storage provisioning: Easily allocate and manage storage resources for Proxmox hosts and associated virtual machines.
-
NFS storage provisioning: Set up and configure ONTAP NFS storage to be used with your Proxmox environment.
-
iSCSI storage provisioning: Implement thick LVM with multipath for robust and efficient iSCSI storage management.
-
-
Backup and recovery: Perform reliable backups and swift recoveries to ensure data integrity and availability.
-
Crash-consistent and file-consistent backups: Ensure data integrity by setting up both crash-consistent and file-consistent backup mechanisms.
-
VM restore operations: Execute virtual machine restore processes to recover data and maintain system availability.
-
-
Storage efficiency: ONTAP provides a comprehensive suite of storage efficiency technologies designed to minimize the storage required for data. These technologies not only reduce storage consumption but also enhance system performance, delivering:
-
Rapid VM provisioning: Streamline the provisioning of virtual machines for quicker deployment.
-
Quicker Dataset Copies: Speed up the duplication of datasets for efficient data management.
-
Prerequisites
Ensure you have completed the following before proceeding:
-
Working Proxmox Virtual Environment (PVE) 9.x or later cluster.
-
ONTAP All Flash FAS (AFF) storage with NFS and iSCSI protocol enabled at the SVM level. For instructions, see Configure NFS datastores with ONTAP and Configure Proxmox VE 9.x for iSCSI with ONTAP storage.

For iSCSI LUN configuration, the following should be enabled:
Install multipath and iSCSI on all Proxmox hosts:
apt update
apt install open-iscsi multipath-tools -y
systemctl enable --now iscsid multipathd
Configure iSCSI initiator and connect via iSCSI (on Proxmox hosts):
Create or update
/etc/multipath.conf:touch /etc/multipath.confOr use:
cat << 'EOF' > /etc/multipath.conf defaults { user_friendly_names yes find_multipaths yes } blacklist { devnode "^sd[a]$" } EOF -
Proxmox hosts and ONTAP storage are network reachable from the SMP host.
Install and set up Storage Manager for Proxmox
To get started with SMP, use a Windows operating system on a designated virtual machine. SMP can be run on Windows Server 2019, 2022, and 2025.
-
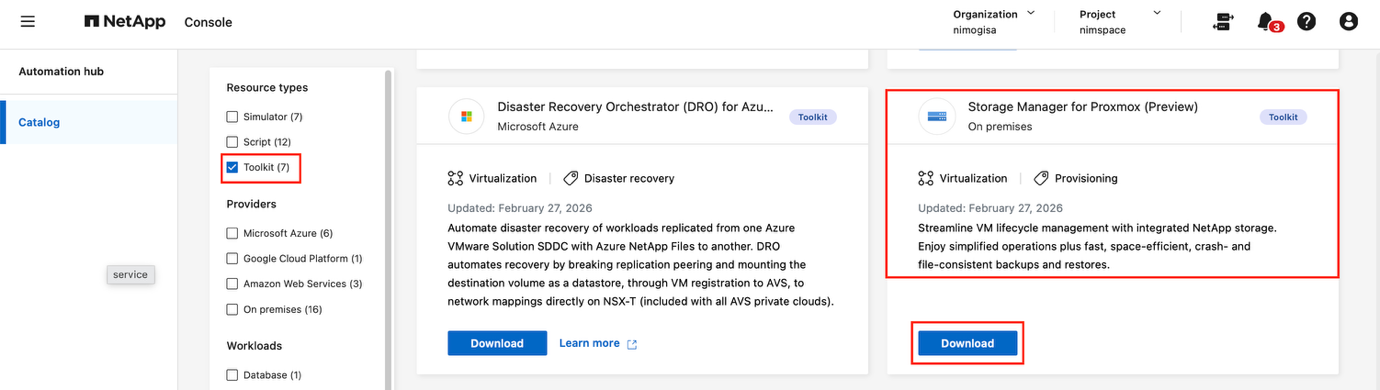
Download the SMP package (~17MB) from the NetApp Console Automation hub.
View SMP download page
-
Unzip the package.
-
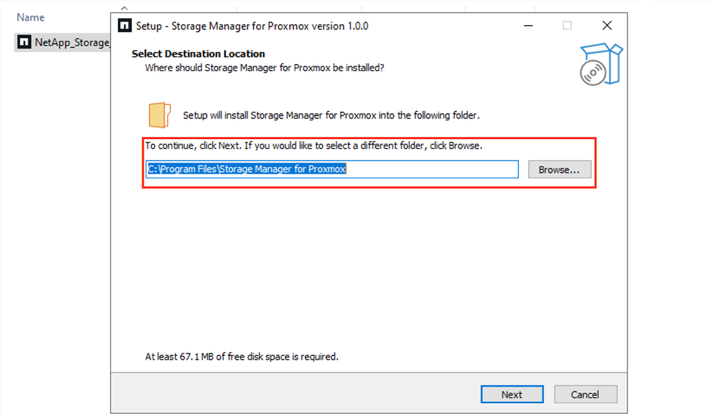
Run the executable file to install and start the service.
No extra package dependencies are required because SMP leverages the available APIs to orchestrate both provisioning and data protection workflows. View SMP installation wizard
Alternative installation using Shift toolkit
As an alternative to the standalone installer, you can install Proxmox VE Storage Manager using Shift toolkit:
-
Open Shift Toolkit.
-
Navigate to Settings > Advanced > Storage Manager.
-
Enable Proxmox VE using the toggle switch.
-
Wait for the system to automatically install the necessary components.
-
After installation is complete, access Storage Manager by clicking View or by opening a web browser to
https://<Shift_server_IP>:4001For example:
https://10.61.187.117:4001
-
-
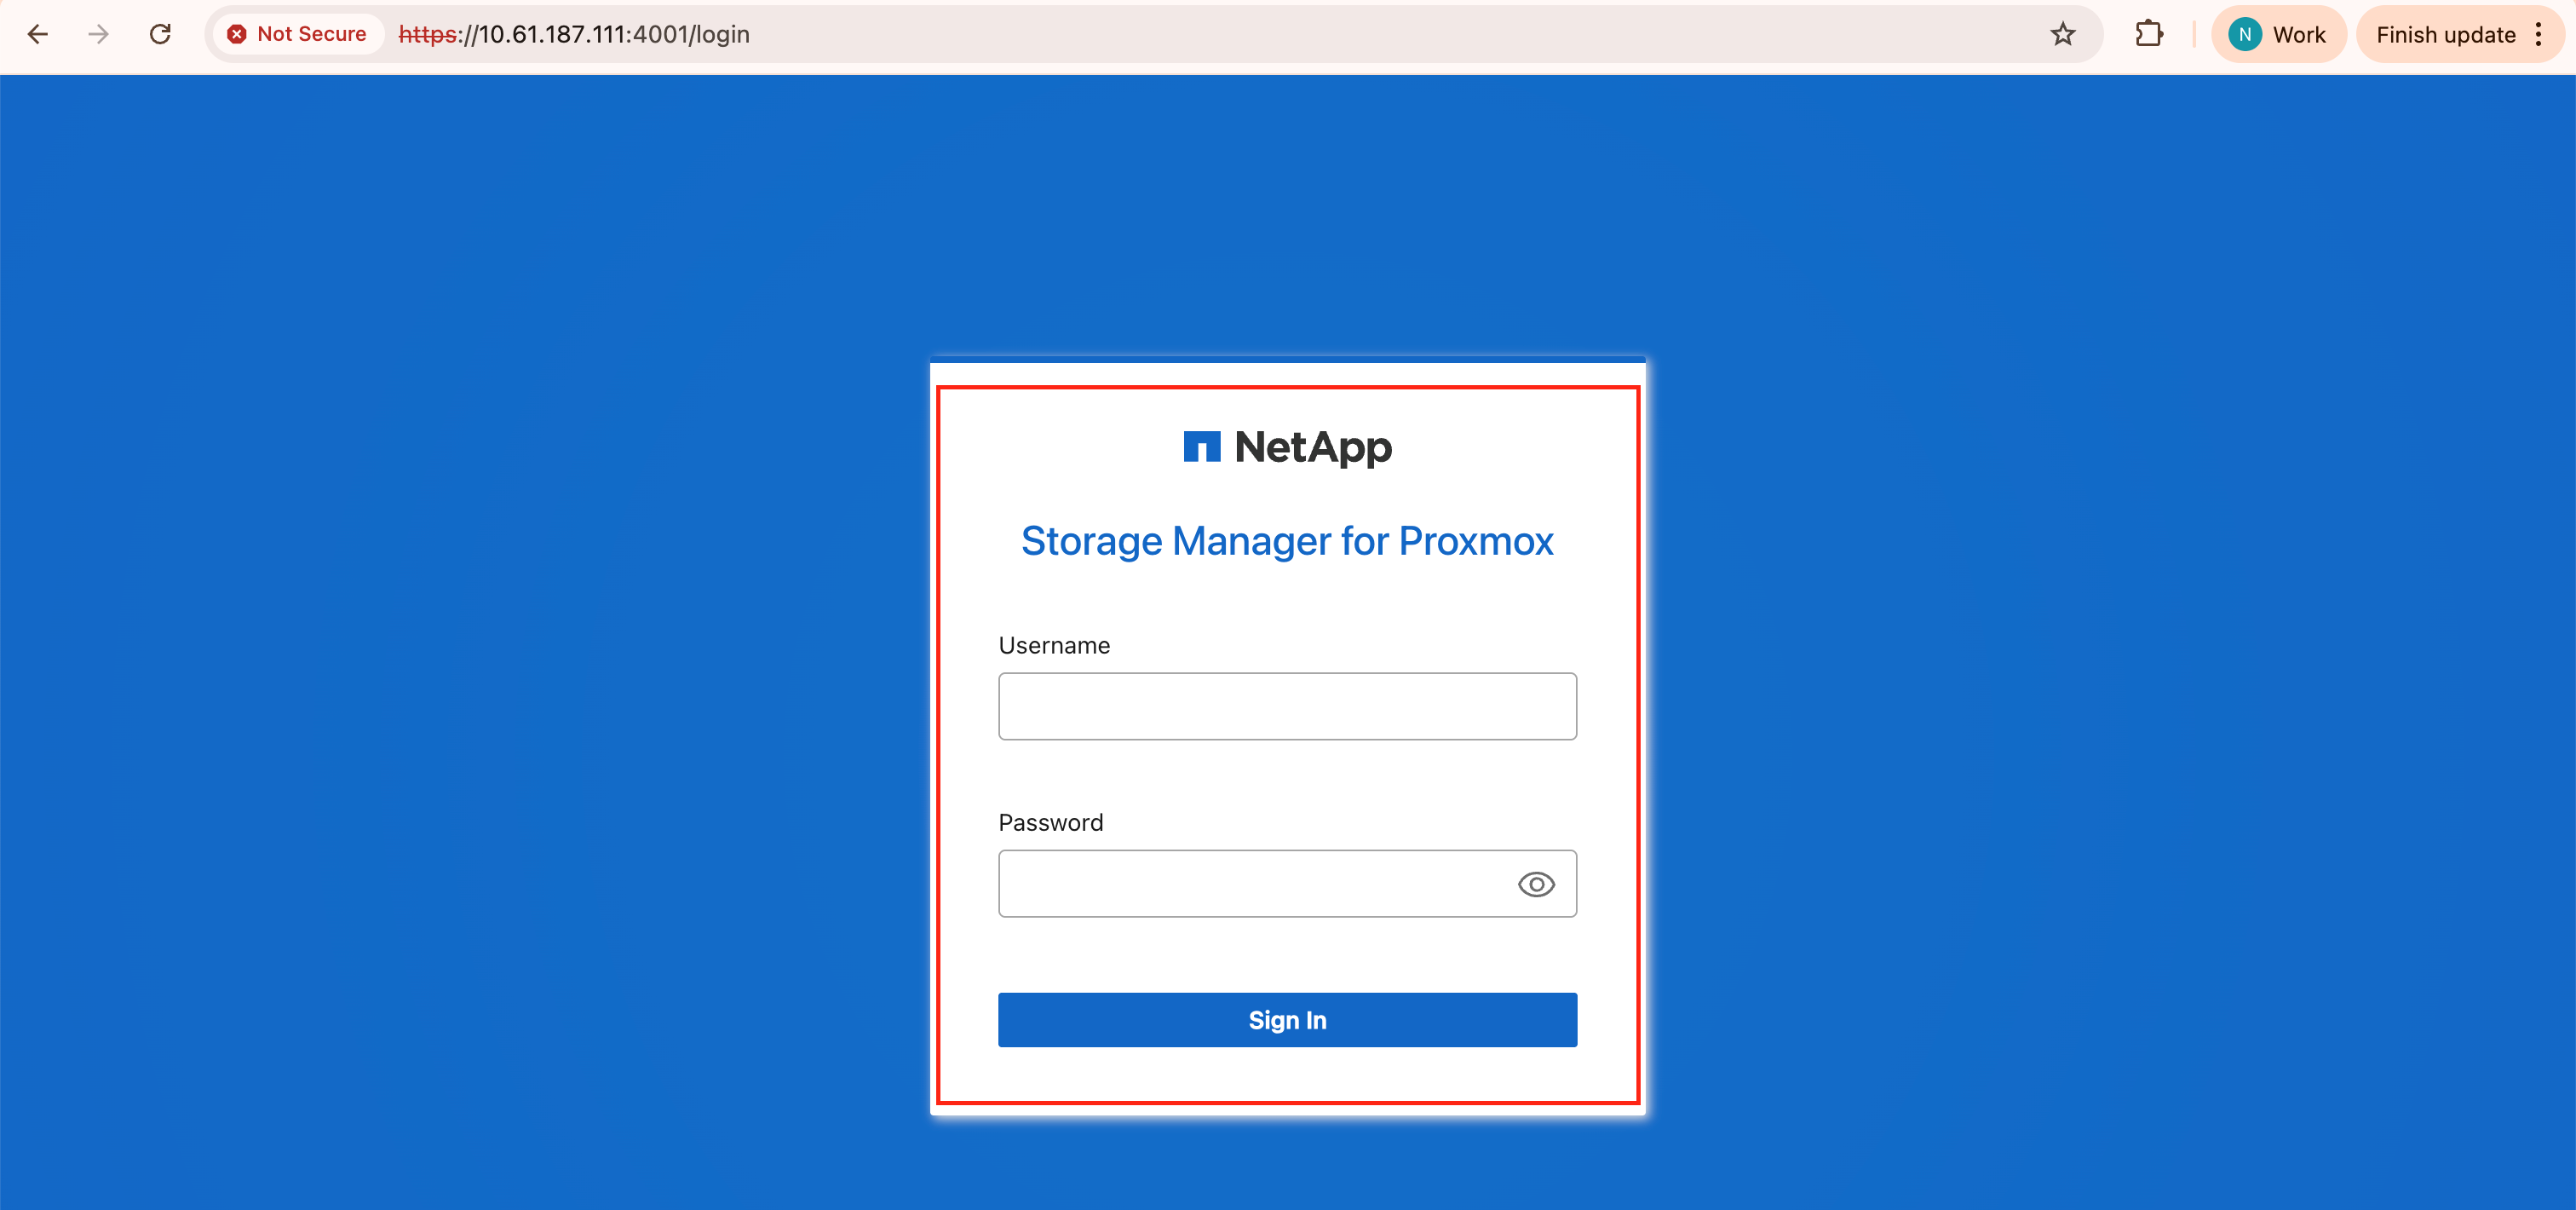
Open a web browser and access the SMP UI by entering
http://<IP address specified during installation>:4001View SMP login screen
View SMP home screen
Configure Storage Manager for Proxmox
When the storage and connectivity to both the storage and Proxmox nodes have been configured properly, configure SMP to automate the provisioning and protection of virtual machines leveraging ONTAP Snapshot and FlexClone functionalities.
The first step is to discover and add the ONTAP storage endpoint and then the target Proxmox nodes to SMP.
Ensure the following prerequisites are met:
-
SMP is installed
-
SMP instance has connectivity to the Proxmox nodes and storage systems
-
ONTAP cluster to provide NFS or iSCSI storage pools
-
DNS resolution is in place when using DNS names. Otherwise, use IP addresses for discovery.
-
The environment has supported versions of Proxmox Virtual Environment servers
After the connectivity is established between the hypervisor and storage, configuration takes a couple of clicks and about 2 minutes.
-
Log in to SMP.
-
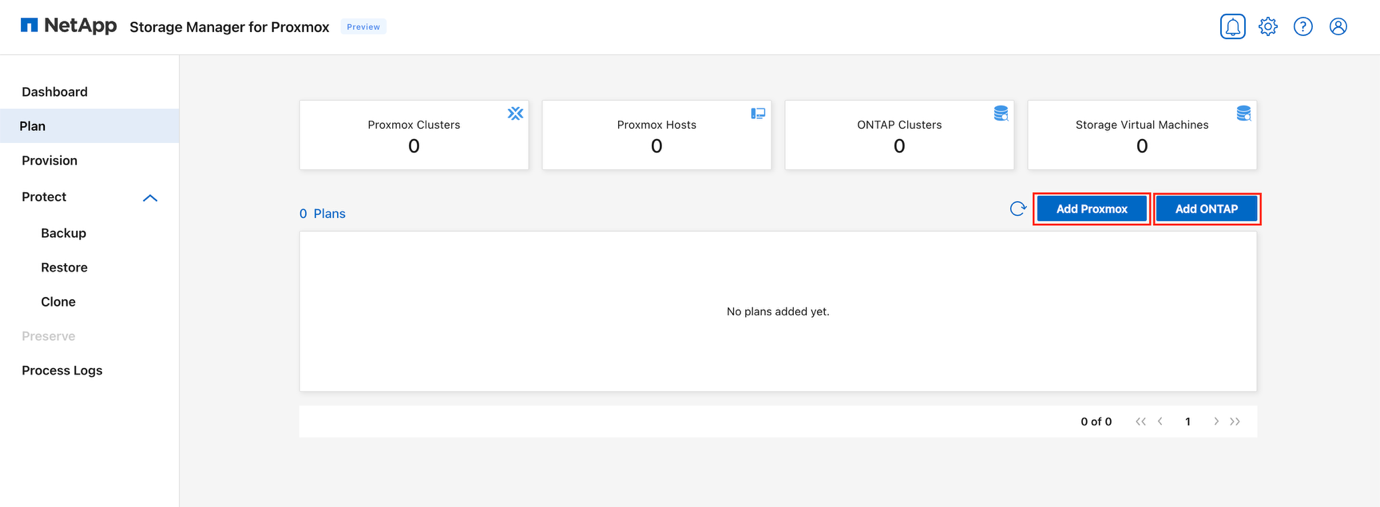
From the SMP left navigation, select Plan.
-
Click Add Plan.
View Add Plan
-
Click Add ONTAP to add the credentials of an ONTAP storage system.
You can add ONTAP using either the cluster endpoint or the SVM management LIF.
-
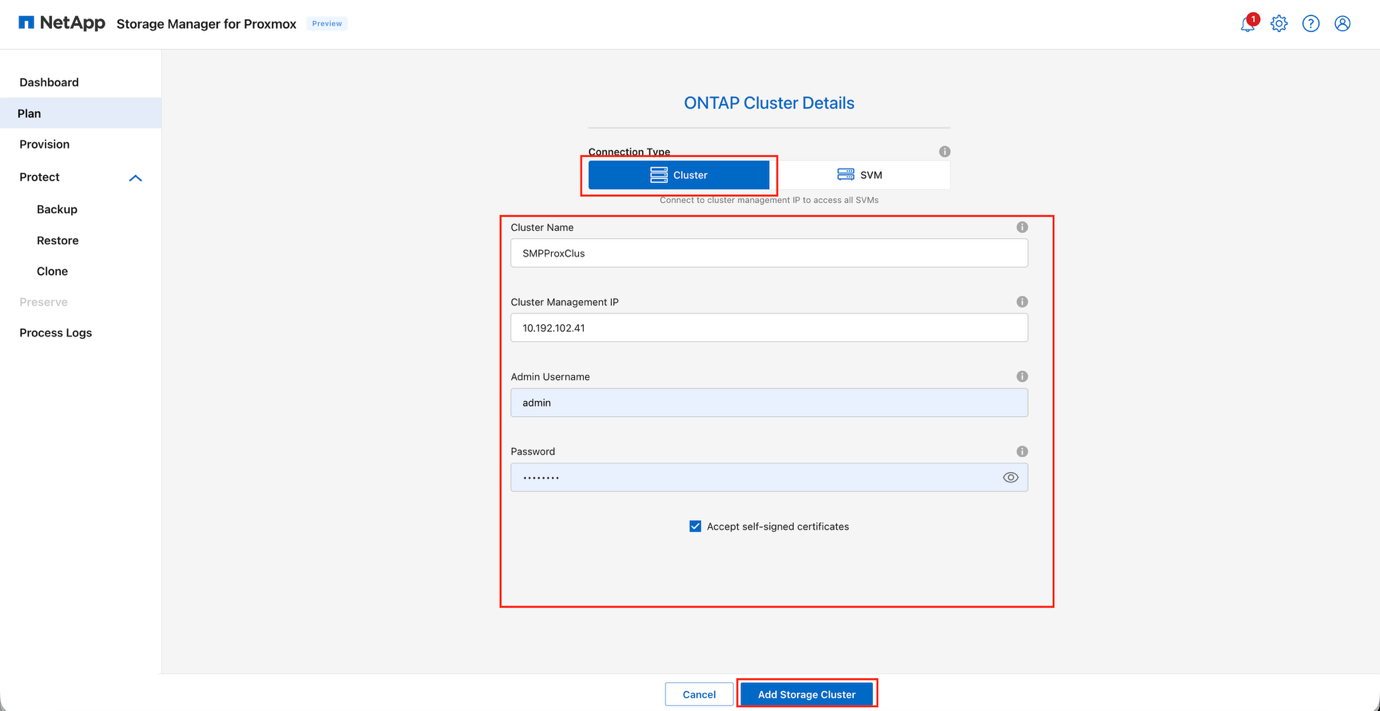
To add using the cluster endpoint, provide the following details:
-
Cluster IP address or FQDN
-
Username to access the ONTAP cluster
-
Password to access the ONTAP cluster
-
Select Accept self-signed certificate and click Add Storage Cluster
View Add ONTAP: cluster endpoint
-
-
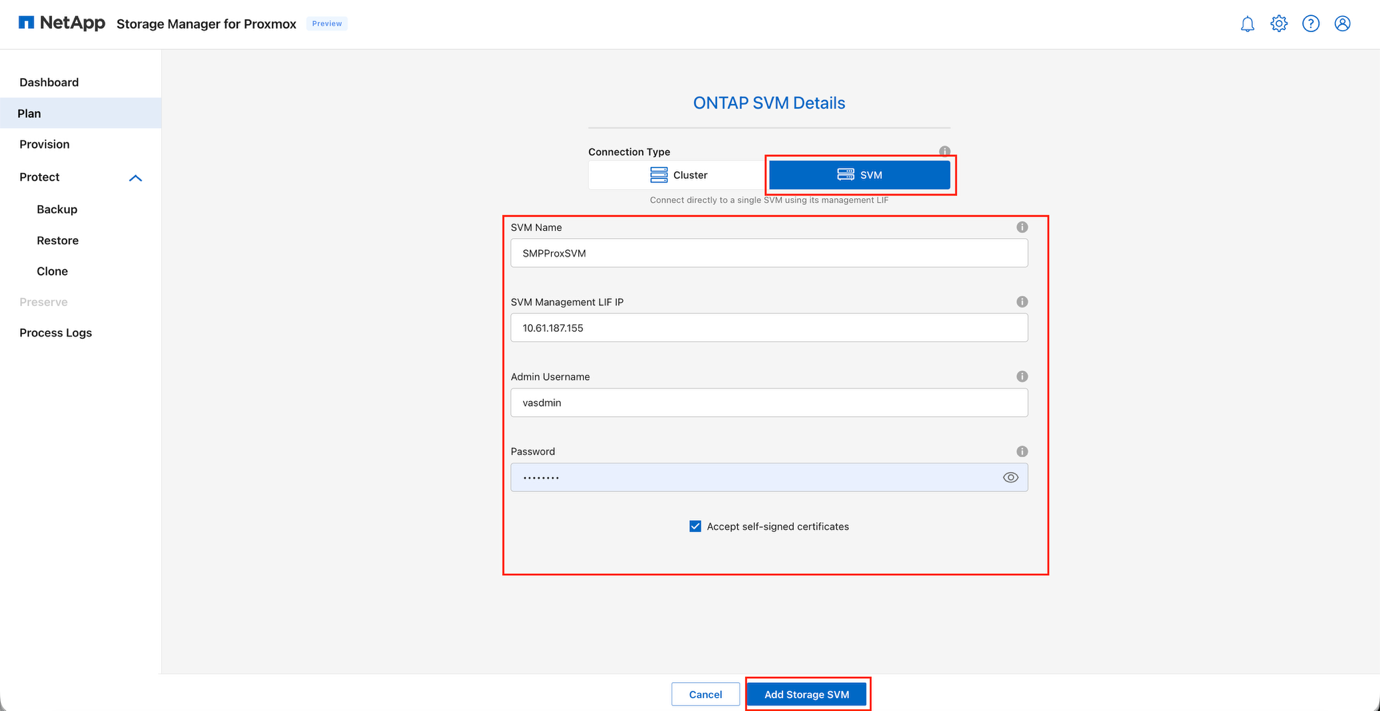
To add using the SVM management LIF, provide the following details:
-
SVM management LIF or FQDN
-
Username to access the SVM
-
Password to access the SVM
-
Select Accept self-signed certificate and click Add Storage Cluster
View Add ONTAP: SVM management LIF
-
-
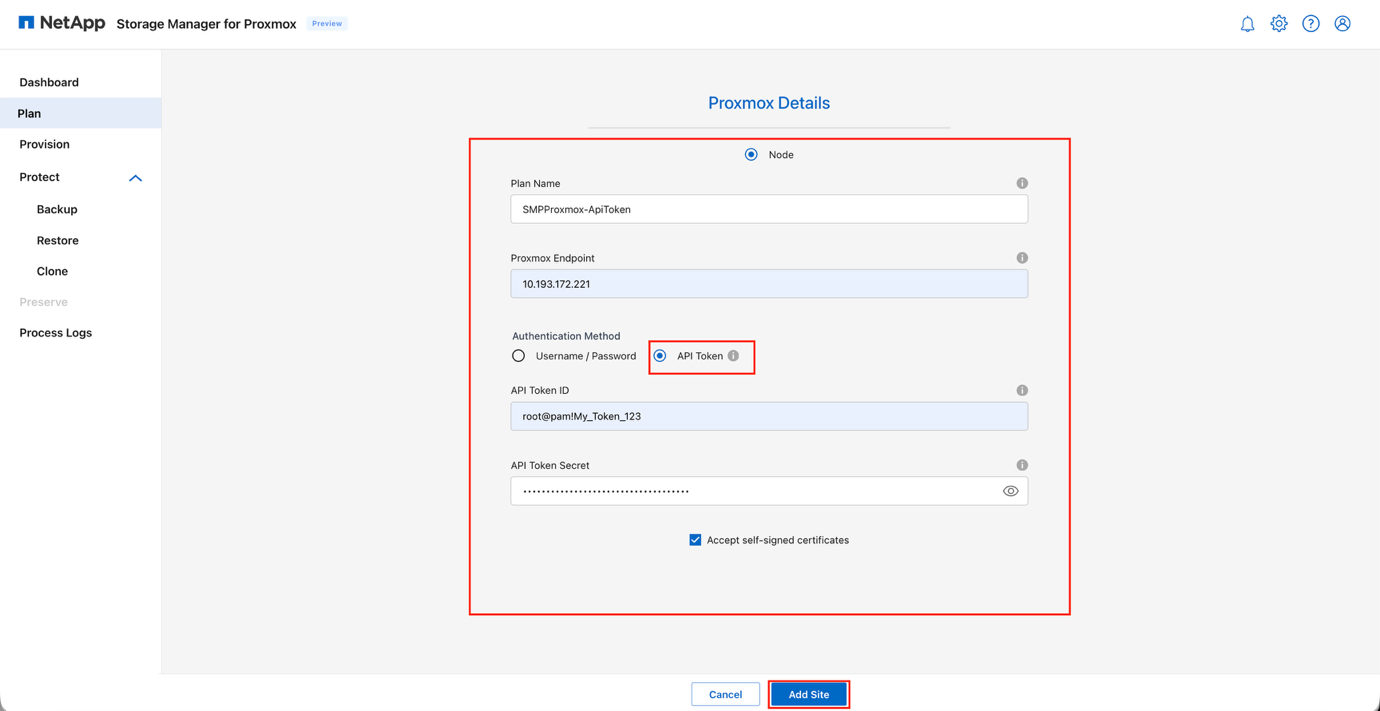
Click Add Proxmox to add the credentials of a Proxmox node to be registered with SMP.
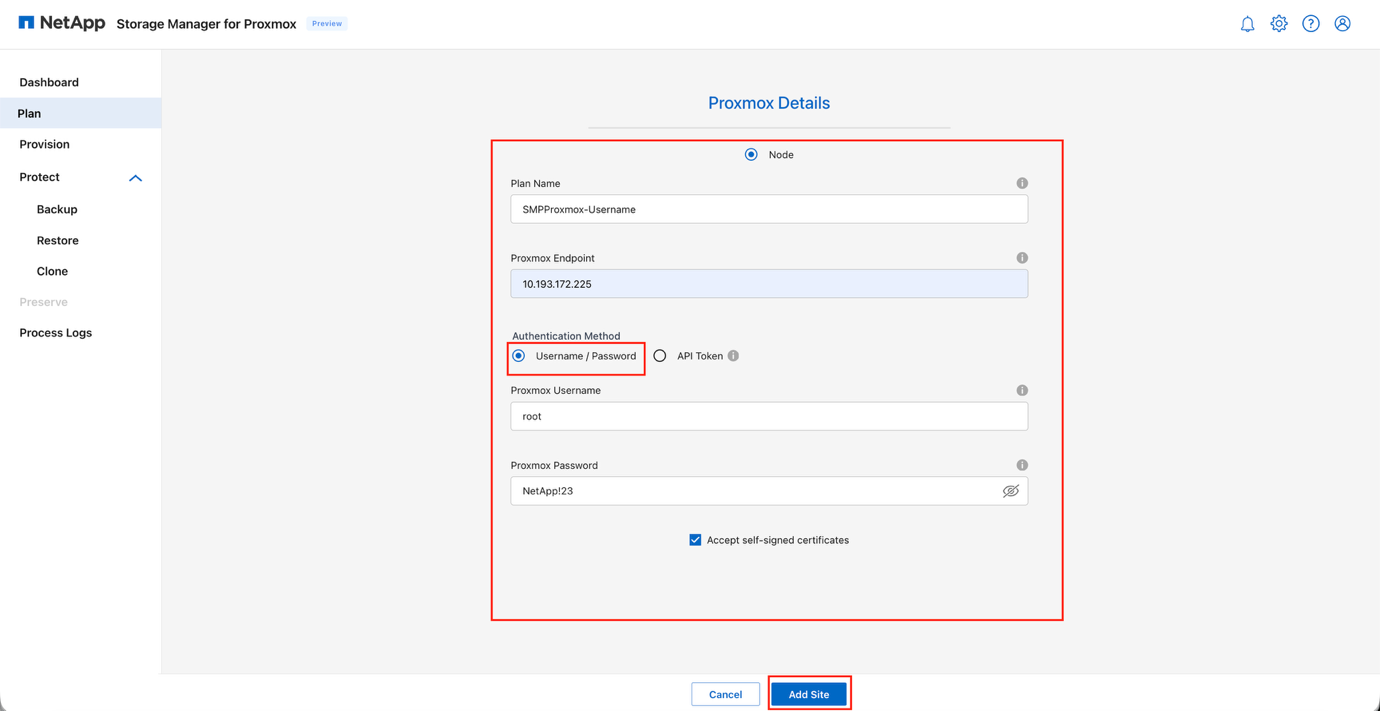
To add Proxmox nodes, specify the IP address of one of the existing Proxmox nodes. The discovery job automatically queries the cluster to gather all essential configuration details.
-
Provide the following details:
-
Proxmox standalone IP address or FQDN
-
Username to access Proxmox
-
Password to access Proxmox host for performing inventory of the resources
-
Select Accept self-signed certificate and click Continue
View Add Proxmox: node credentials
Alternatively, use an API token to access the APIs by providing:
-
API token ID
-
API token secret
In this release, API token is only allowed for NFS operations. View Add Proxmox: API token
-
-
-
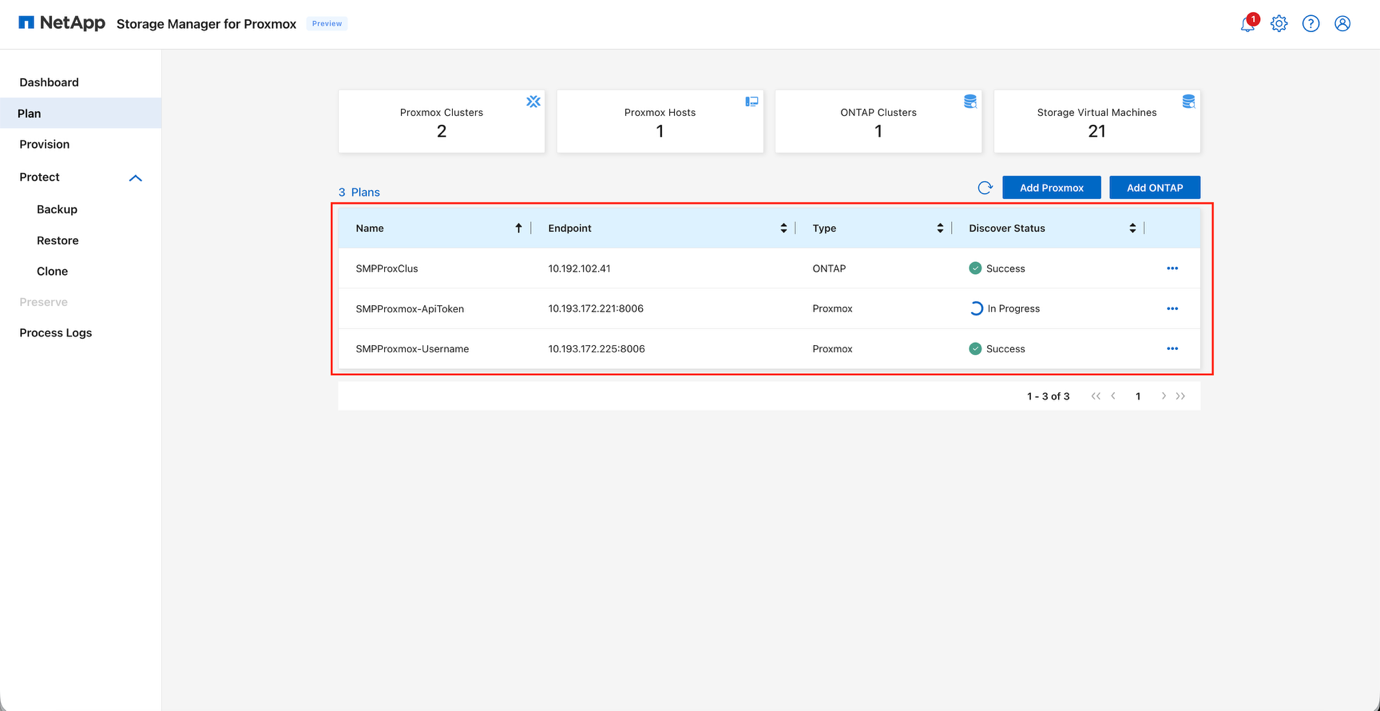
Verify that the discovery jobs are successful and the status for each plan is marked as Success.
Once added, SMP automatically performs a discovery scan and displays the VMs along with their associated metadata. Any existing storage volumes or mapped LUNs are also detected.
View Plan discovery results
-
If any modifications are made to the Proxmox nodes or storage, run the discovery to fetch the latest information. Click the three dots against the plan name and click Discover.
-
Ensure the ONTAP storage system is added first, so the discovery job can map existing resources accordingly. If Proxmox is added first, run a discovery job against ONTAP.
-
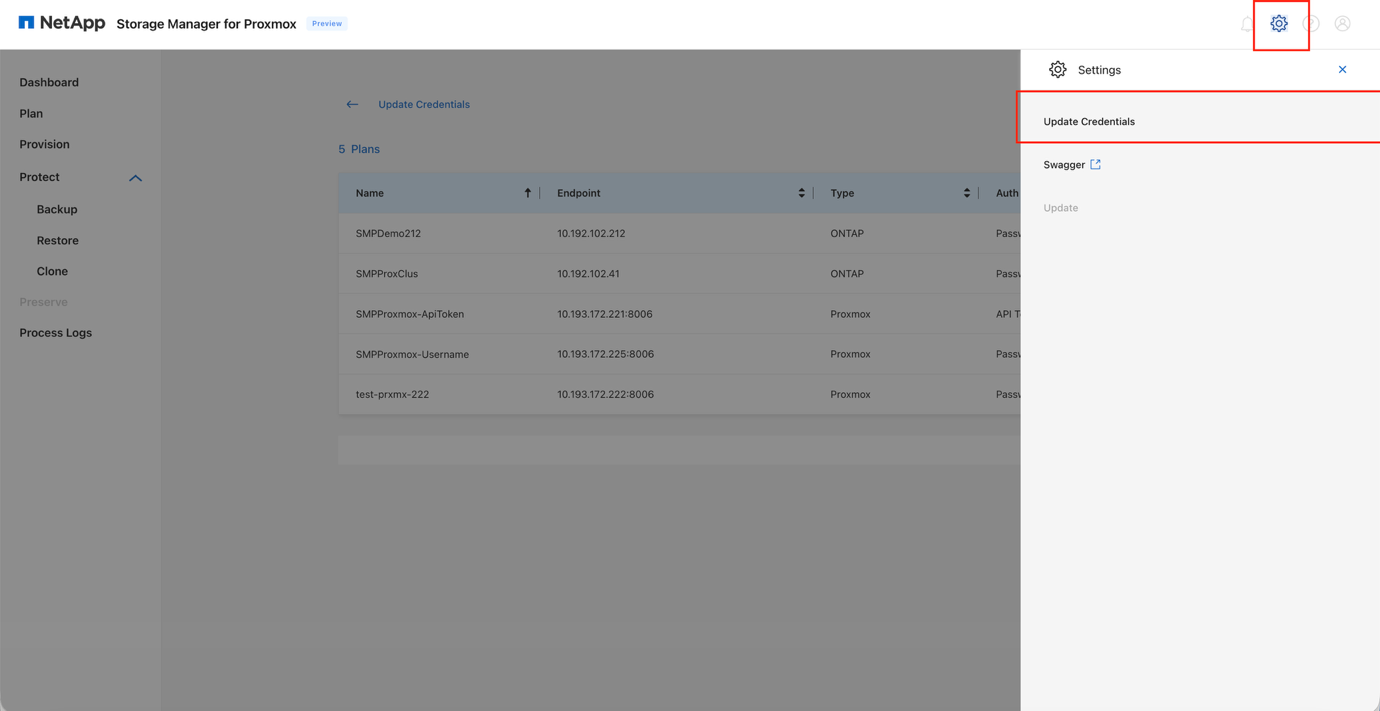
If the credential or API token requires an update later, navigate to Settings and select the Update Credentials option.
View Update Credentials
Provision storage
Provisioning a volume as a storage pool, commonly referred to as a datastore, creates a logical container for virtual machines and their virtual disks (QCOW2 or RAW). SMP enables provisioning a datastore and then attaching it either to a single host or to all hosts within a cluster.
Provision NFS storage
Use SMP to provision and mount an ONTAP volume as an NFS datastore.
-
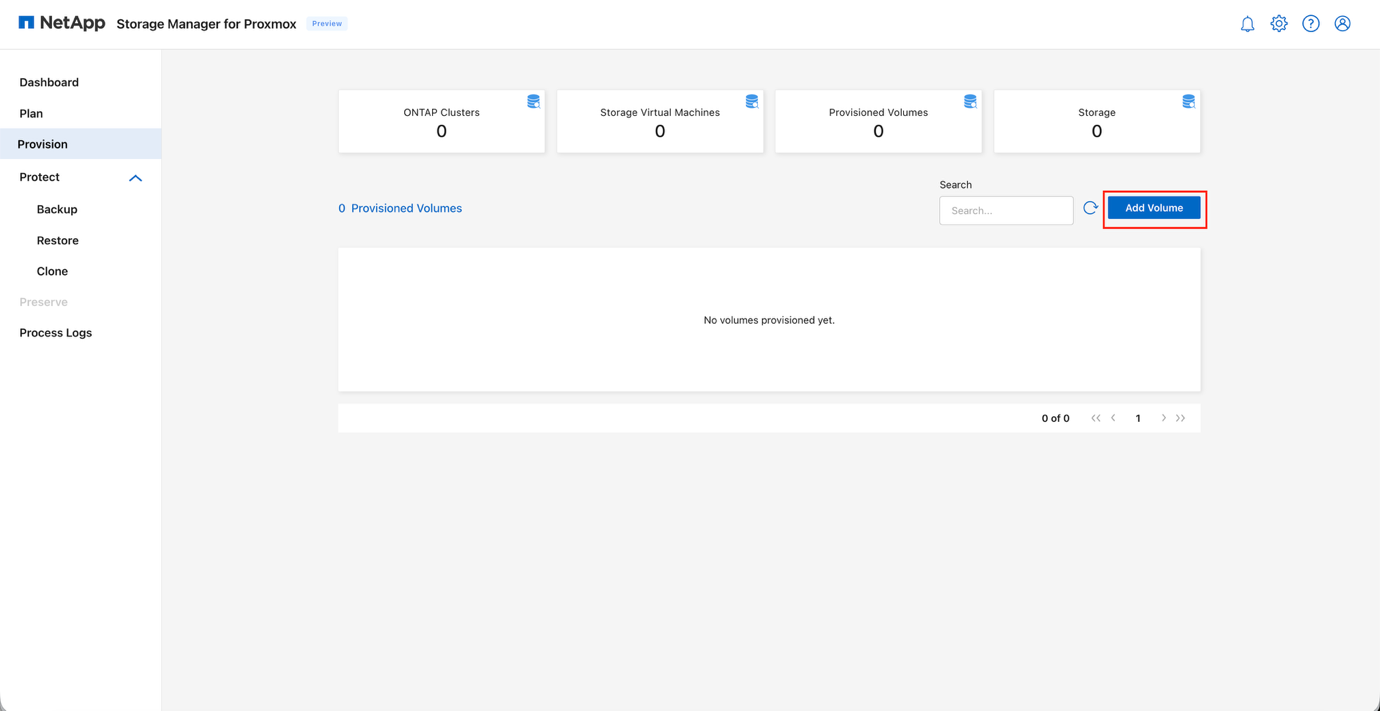
In the SMP GUI, go to the Provision tab.
-
Navigate to Add Volume.
View Provision tab: Add Volume
-
In the New Volume wizard, on the Quick Provision step, select NFS.
NFS is selected by default. Quick provisioning delivers a faster setup using default settings for standard deployments. Advanced provisioning offers expanded options for HA and BCDR capabilities, which will be introduced in future releases. View New Volume wizard: NFS

-
In the ONTAP Details section, provide the following information:
-
Select the ONTAP cluster or the designated Storage Virtual Machine (SVM) from the Storage Cluster dropdown
-
Provide a unique value in the Volume Name field
-
Enter the required capacity for the datastore volume in the Size field
-
Choose ONTAP storage resources by selecting the appropriate options for:
-
Aggregate Name
-
Storage Virtual Machine (SVM)
-
Preferred LIF to be used for datastore access
-
-
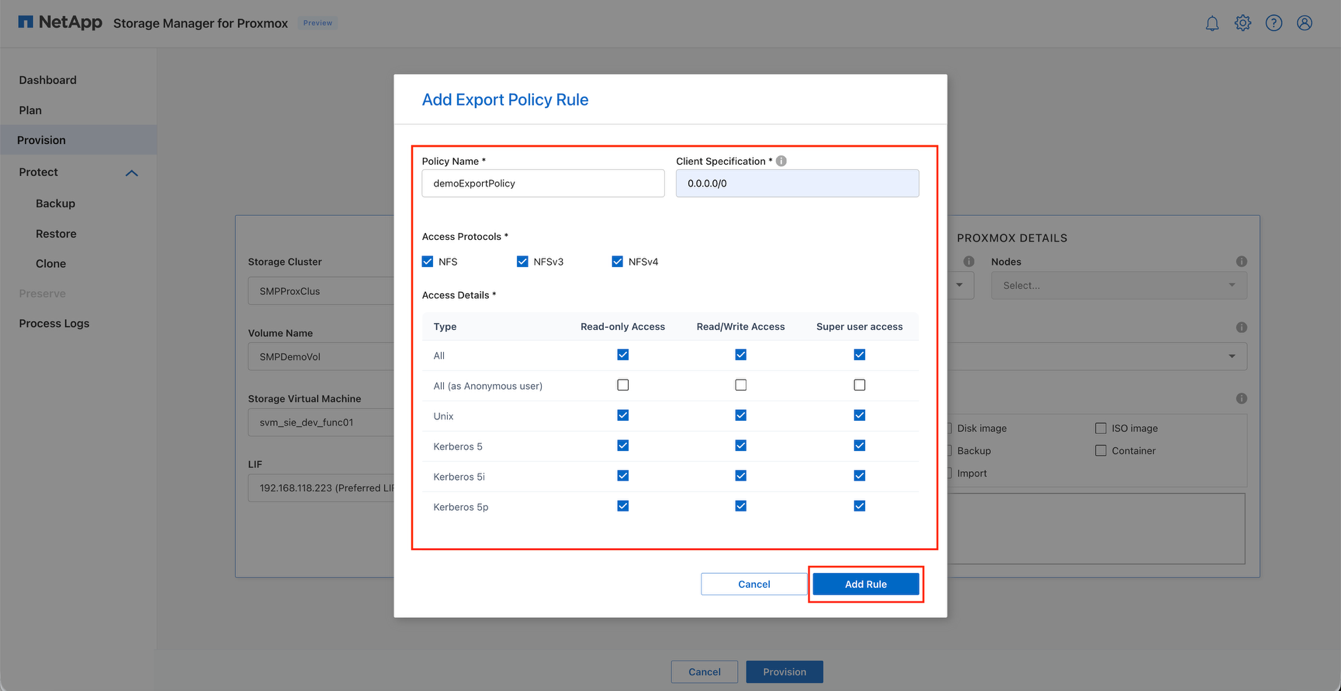
Select an existing Export Policy or create a custom policy by clicking the (+) as needed
View ONTAP Details: NFS
-
-
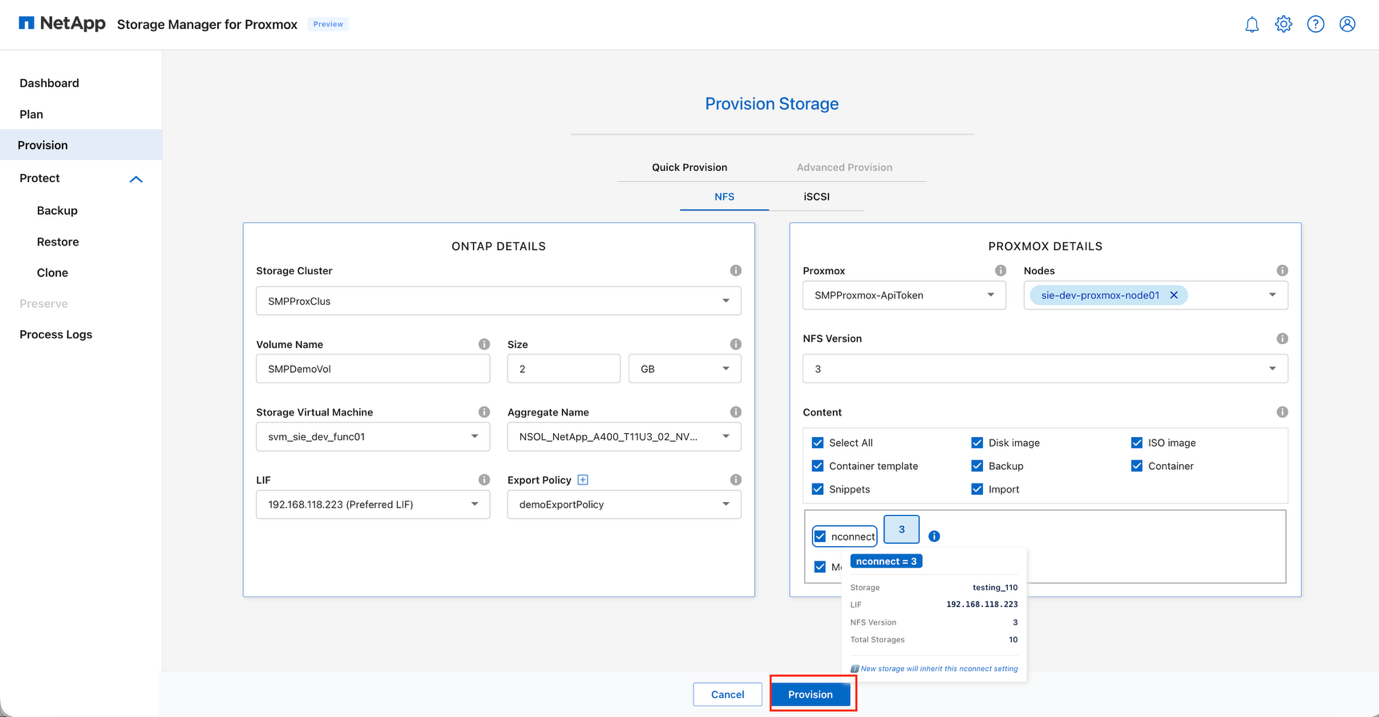
In the Proxmox Details section, provide the following information:
-
In the Proxmox field, choose the target cluster, then select all nodes that require access to the datastore
-
In the NFS Version field, select the preferred NFS protocol (NFS v3 or NFS v4.1)
-
In the Content section, select the content types to be enabled for this datastore:
-
Disk image
-
ISO image
-
Container template
-
Backup
-
Snippets
-
Import
-
Or select All content types
-
-
(Optional) Activate the nconnect option if multiple TCP connections are desired
-
Ensure Mount the datastore is checked so the datastore will be mounted across the selected Proxmox nodes
View Proxmox Details: NFS
-
-
Click Provision to create the ONTAP volume and register the datastore (storage pool) within the selected Proxmox cluster.
View NFS provisioning result

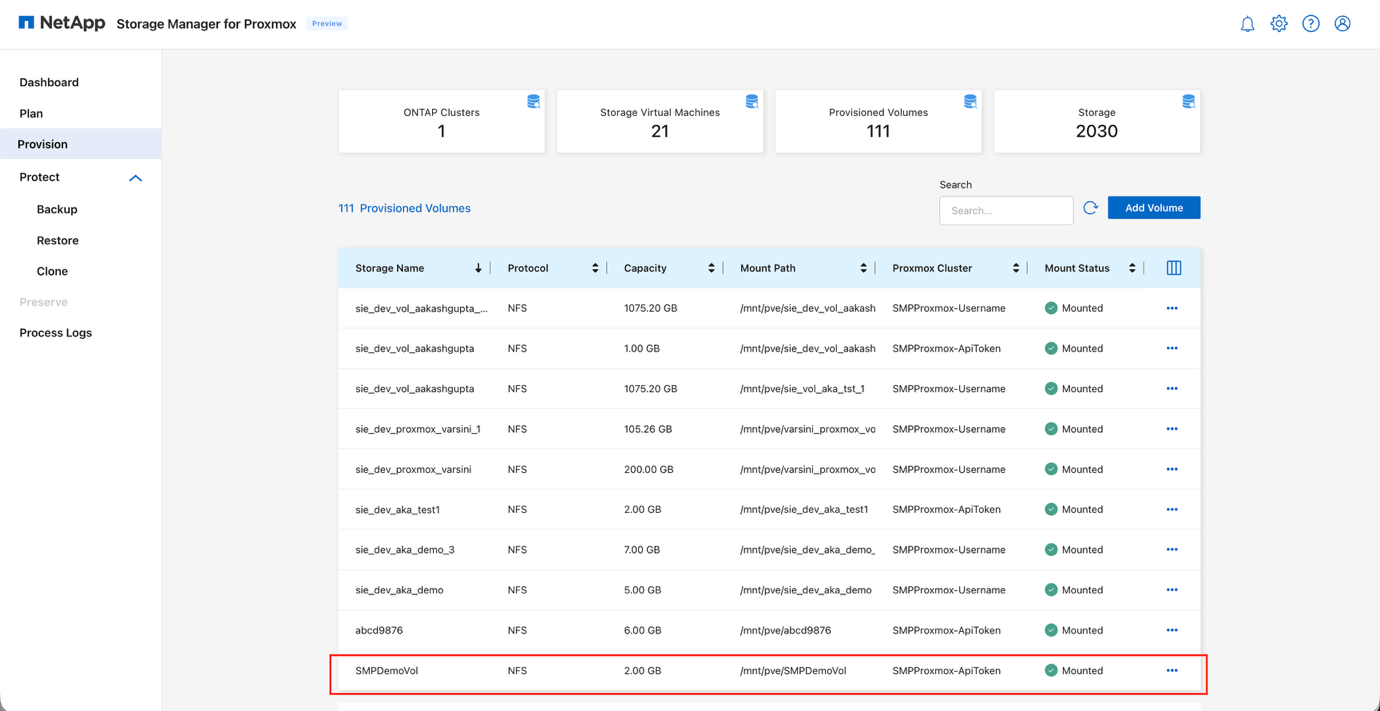
View NFS datastore in Proxmox

Edit a provisioned volume
Use SMP to modify volume settings after provisioning.
-
In the SMP GUI, locate the volume in the Provision tab.
-
Click the three vertical dots (⋮) next to the volume.
-
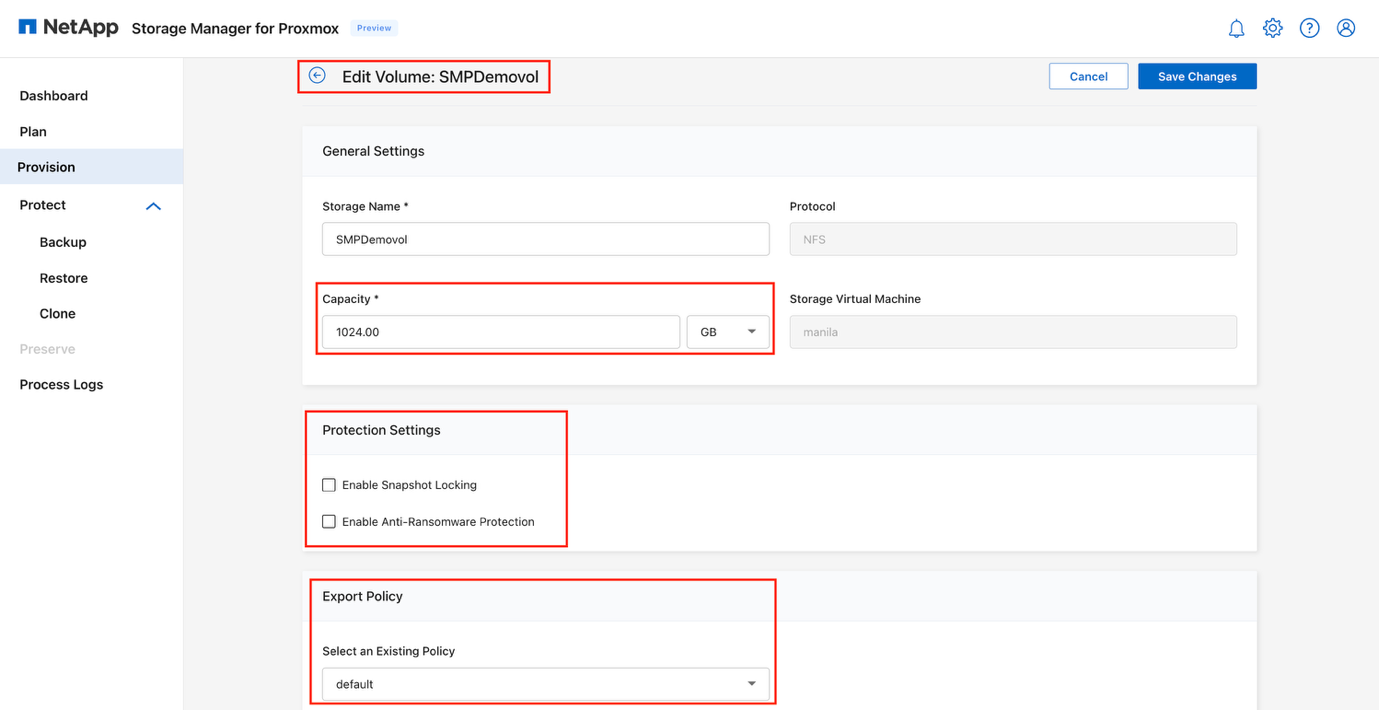
Select Edit from the context menu to open the volume settings.
View Edit Volume dialog
-
Modify the volume settings as needed:
-
Resize volume: Adjust the volume's storage capacity
Resizing is applicable to NFS volumes only. -
Snapshot Locking: Enable to prevent snapshots from being deleted or altered
This requires the SnapLock license to be installed on the cluster, and the cluster's compliance clock must be initialized. -
Anti-Ransomware Protection: Enable to proactively detect and alert on unusual activity that could signal a ransomware attack
-
Export policy: Update or modify the export policy
-
-
Click Save to apply the changes.
Provision iSCSI storage
Use SMP to set up an iSCSI backend for virtual machines.
-
In the SMP GUI, go to the Provision tab.
-
Navigate to Add Volume.
-
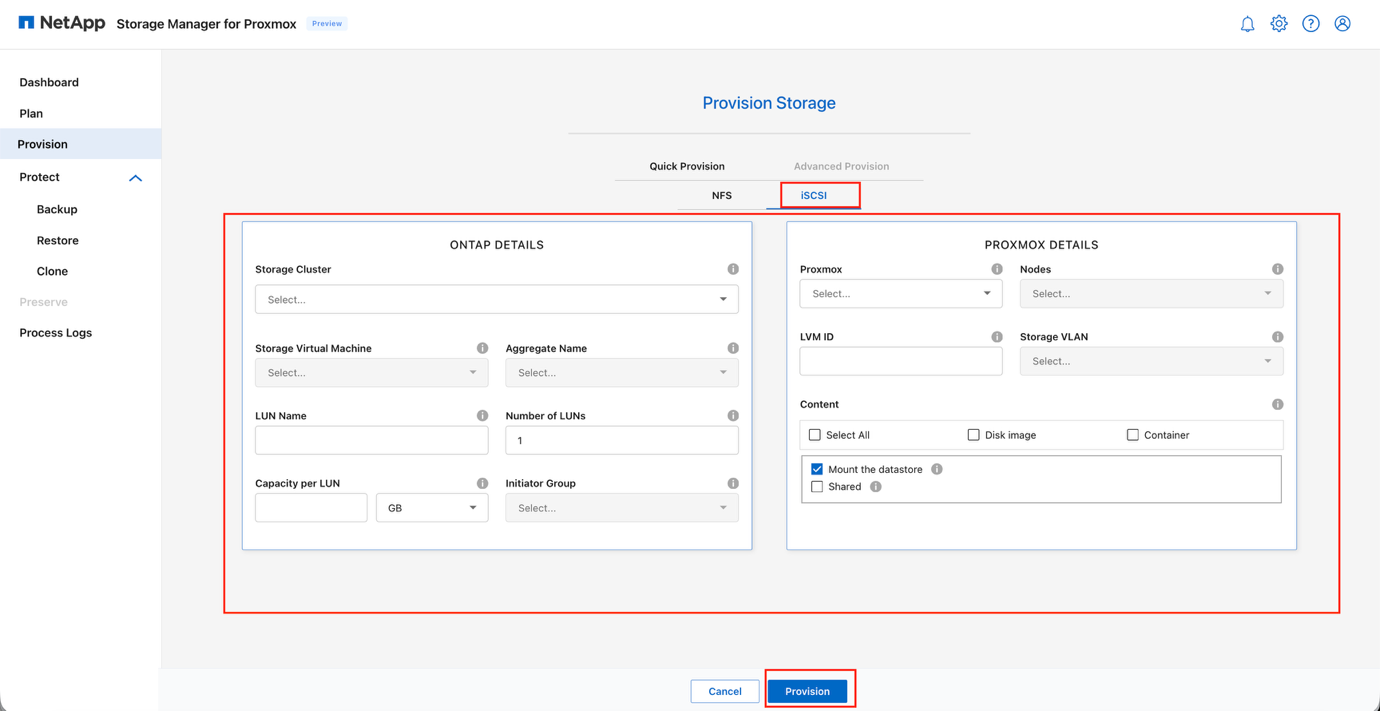
In the New Volume wizard, on the Quick Provision step, select iSCSI.
View New Volume wizard: iSCSI
-
Under iSCSI protocol, in the ONTAP Details section, provide the following information:
-
Choose the appropriate ONTAP cluster or the designated Storage Virtual Machine (SVM) from the Storage Cluster dropdown
-
Select the options for:
-
Aggregate Name
-
Storage Virtual Machine (SVM)
-
-
Enter a unique value in the LUN Name field
-
Provide the required number of LUNs in the Number of LUNs field (default is 1; additional LUNs of the same size can be created in parallel)
-
Enter the desired size for each LUN in the Capacity per LUN field
-
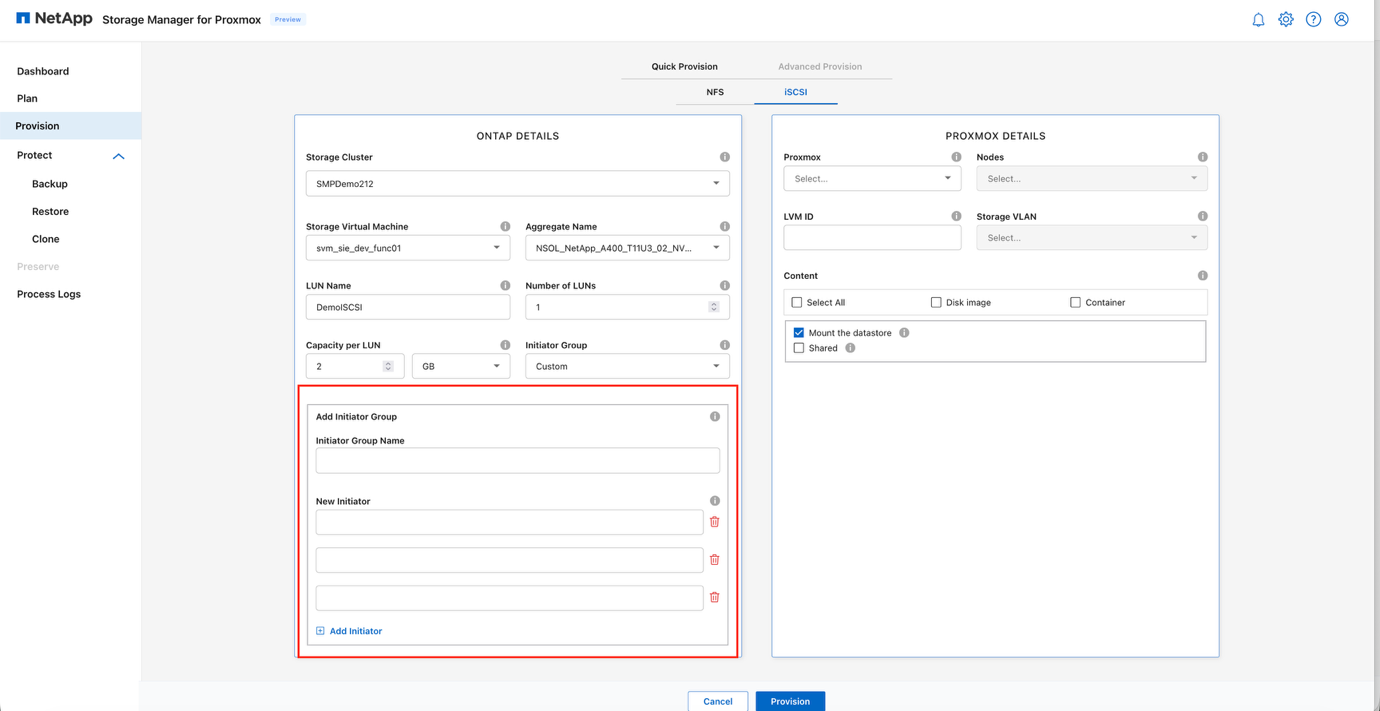
Choose an Initiator Group (igroup) for iSCSI access control. An existing igroup can be selected or a new igroup can be created.
View ONTAP Details: iSCSI LUN configuration
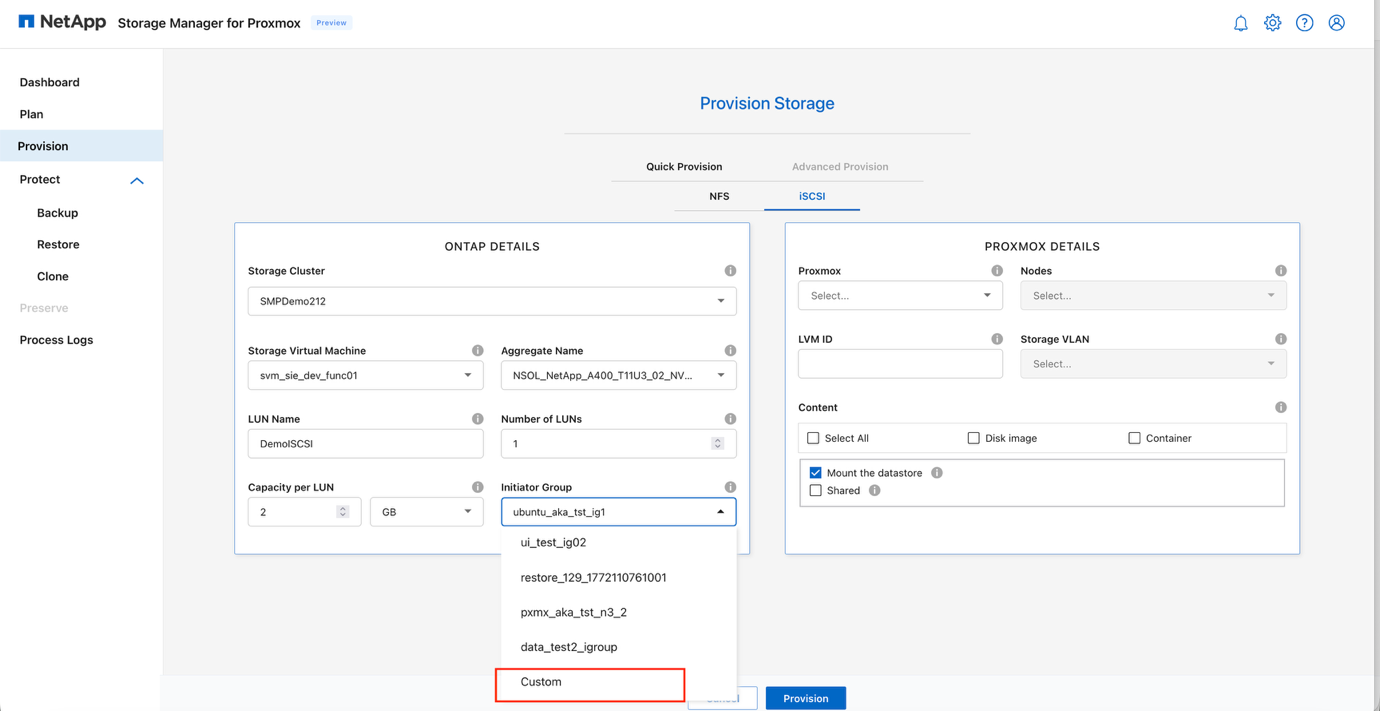
View iSCSI igroup selection
-
-
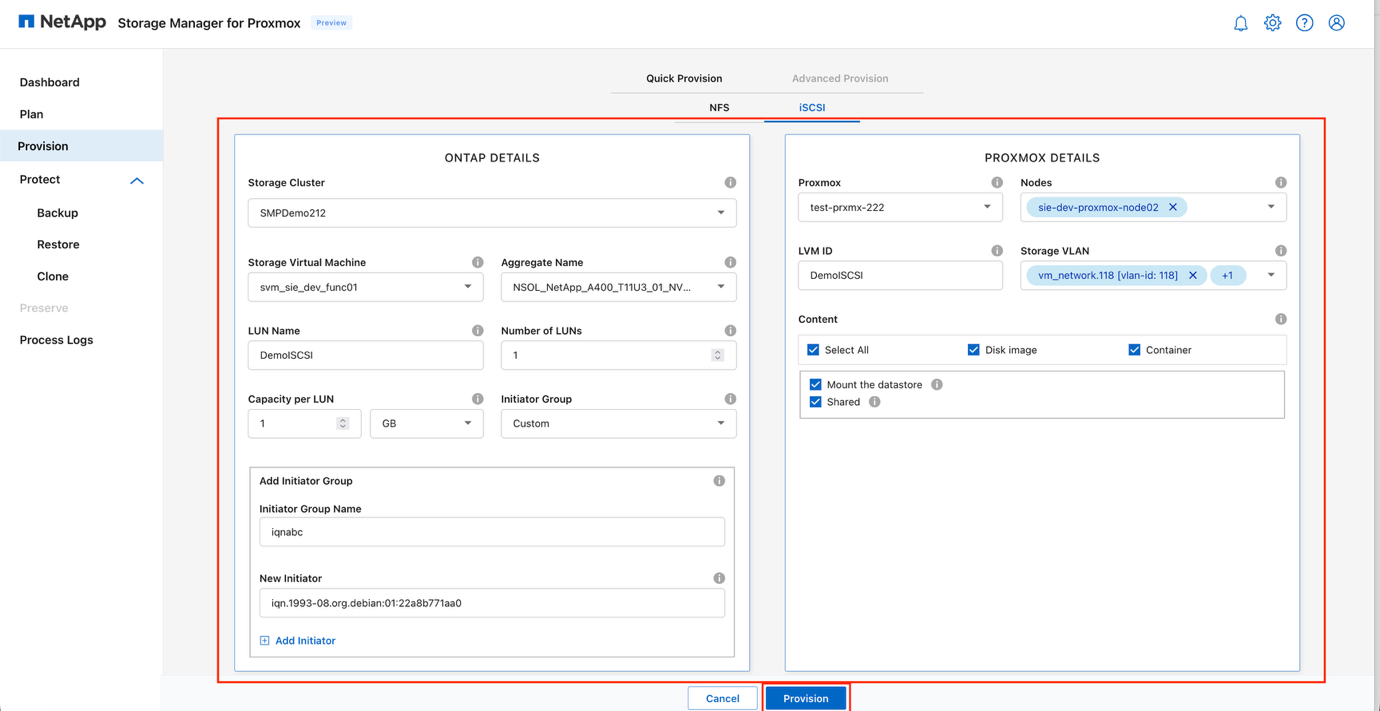
In the Proxmox Details section, provide the following information:
-
From the Proxmox dropdown, choose the target cluster, then select all nodes requiring access to the storage
-
Select the appropriate LVM ID that will represent the iSCSI-backed storage pool within Proxmox
-
In the Nodes field, choose all nodes that require access to the presented iSCSI targets
-
(Optional) If VLAN segmentation is required, choose the desired Storage VLAN
-
In the Content section, select the content types supported by this datastore:
-
Disk image
-
Container
-
Or select All content types
-
-
Ensure Mount the datastore is selected so the storage is available across the chosen Proxmox nodes
-
(Optional) Enable Shared if the storage pool will be accessed concurrently by multiple nodes
View Proxmox Details: iSCSI
-
-
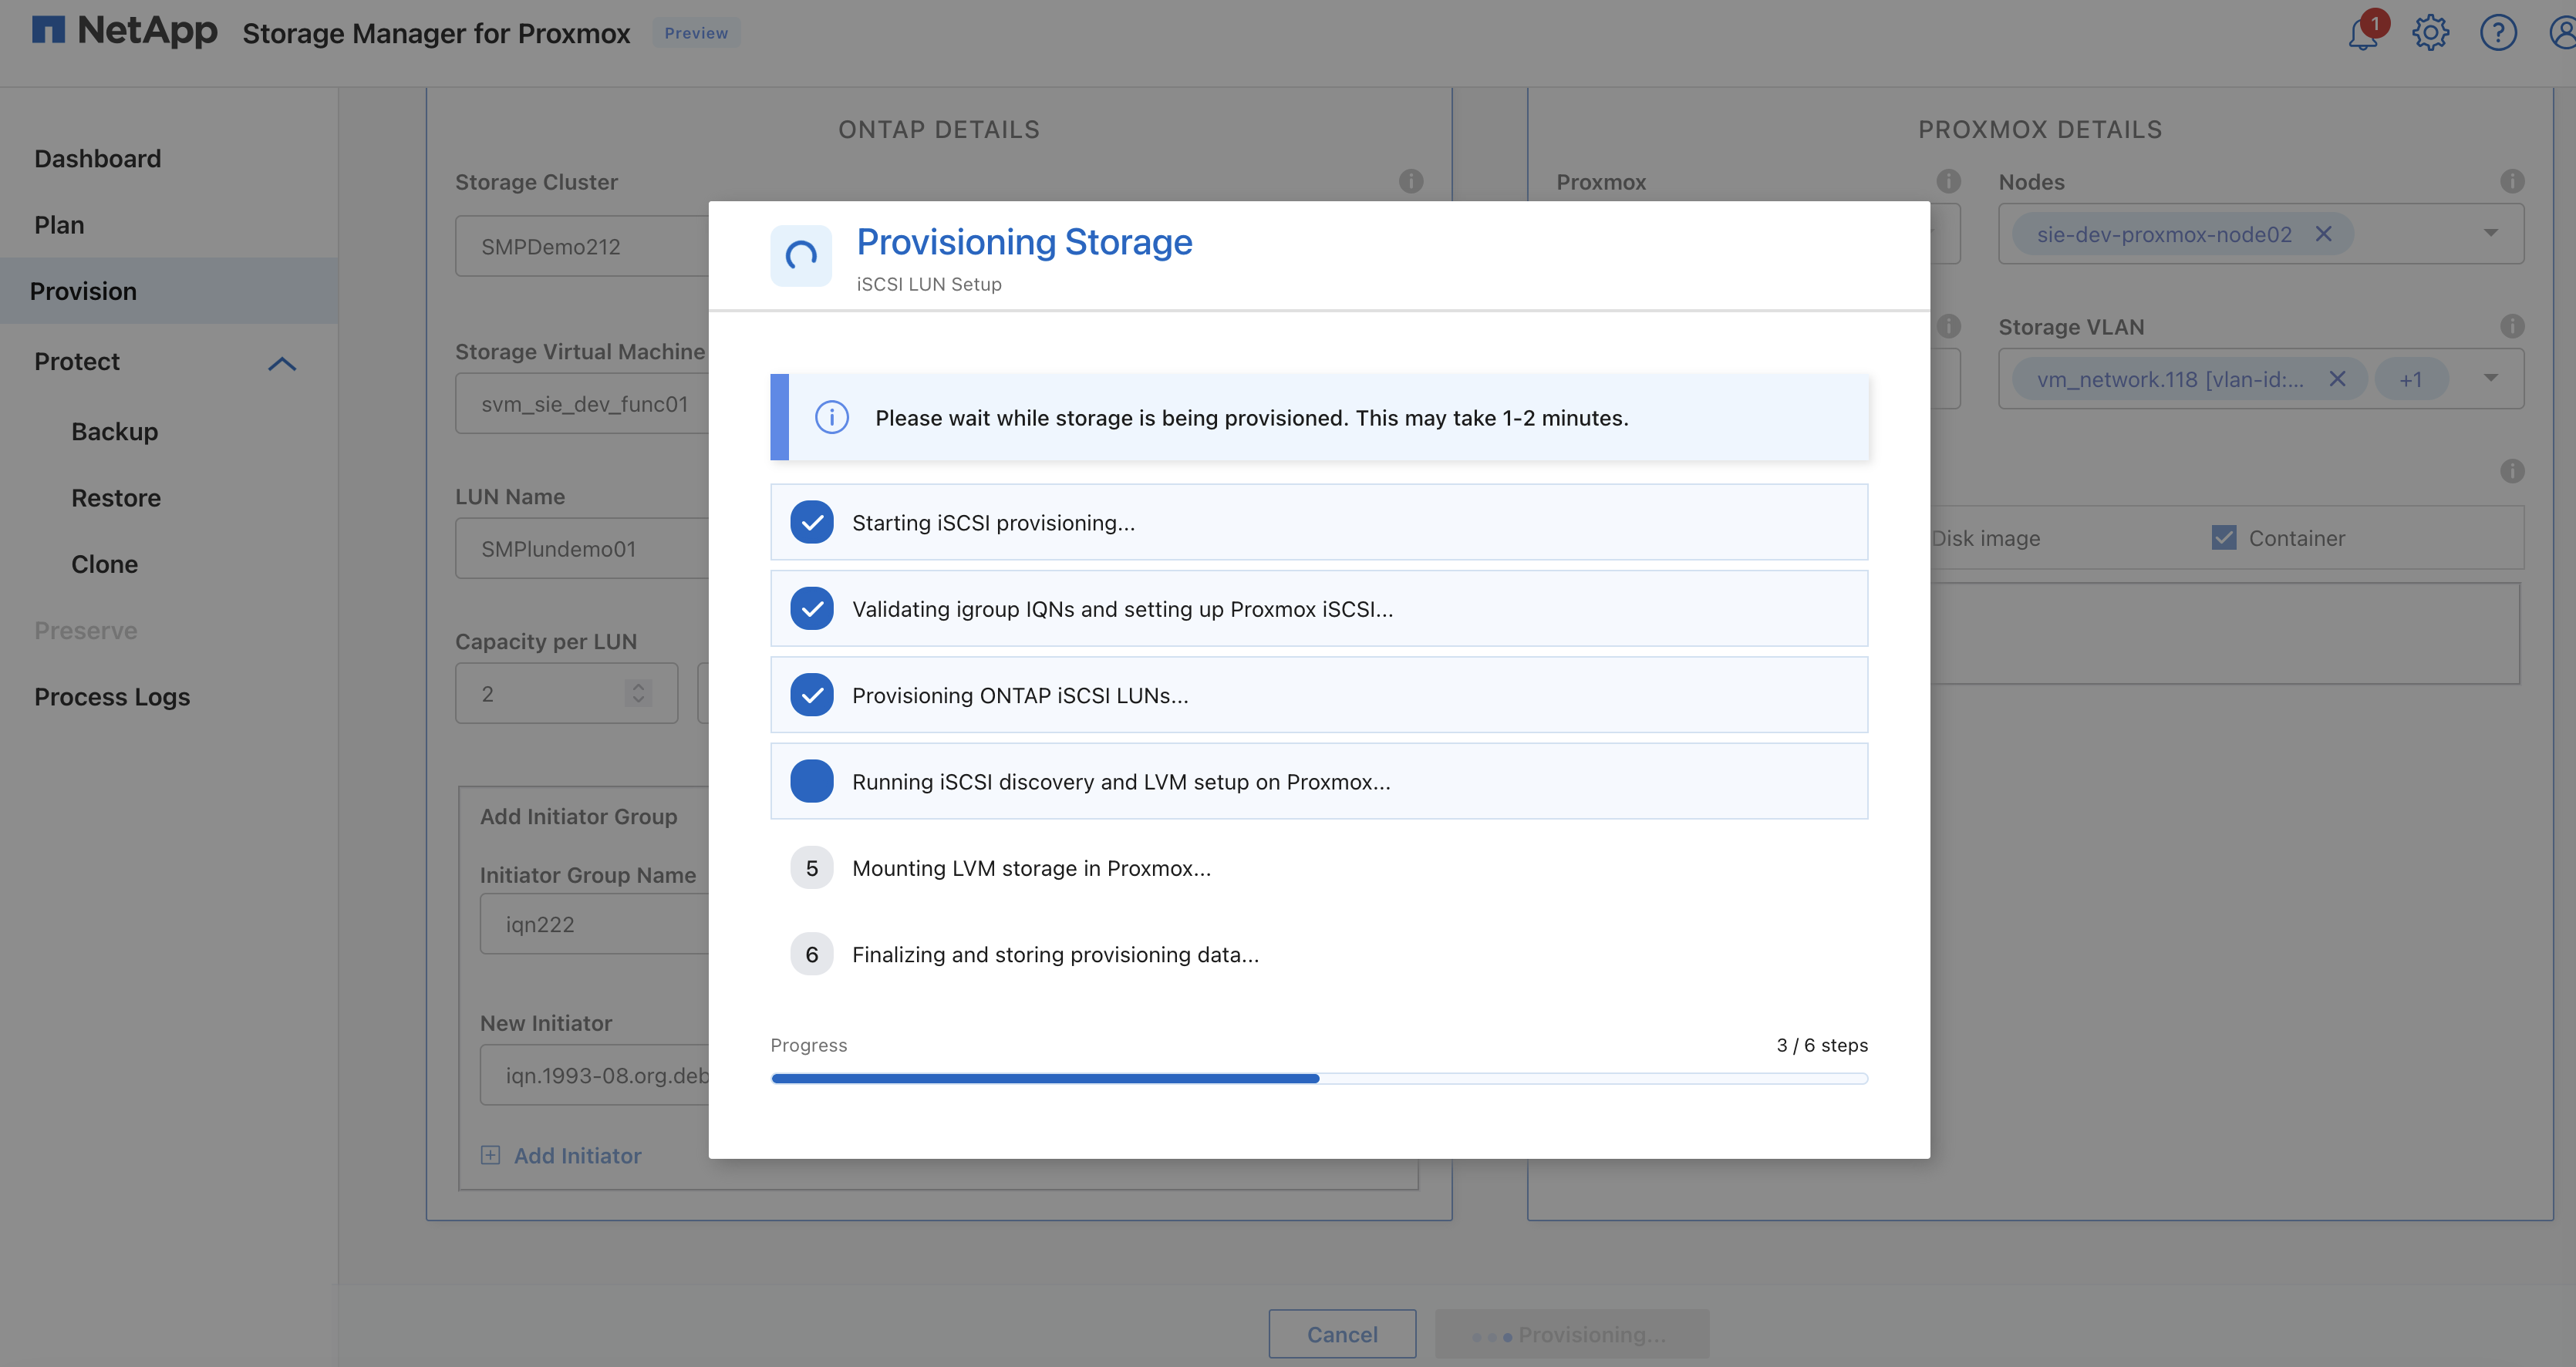
Click Provision to create the ONTAP LUN and register the datastore (storage pool) within the selected Proxmox cluster.
View iSCSI LUN provisioning
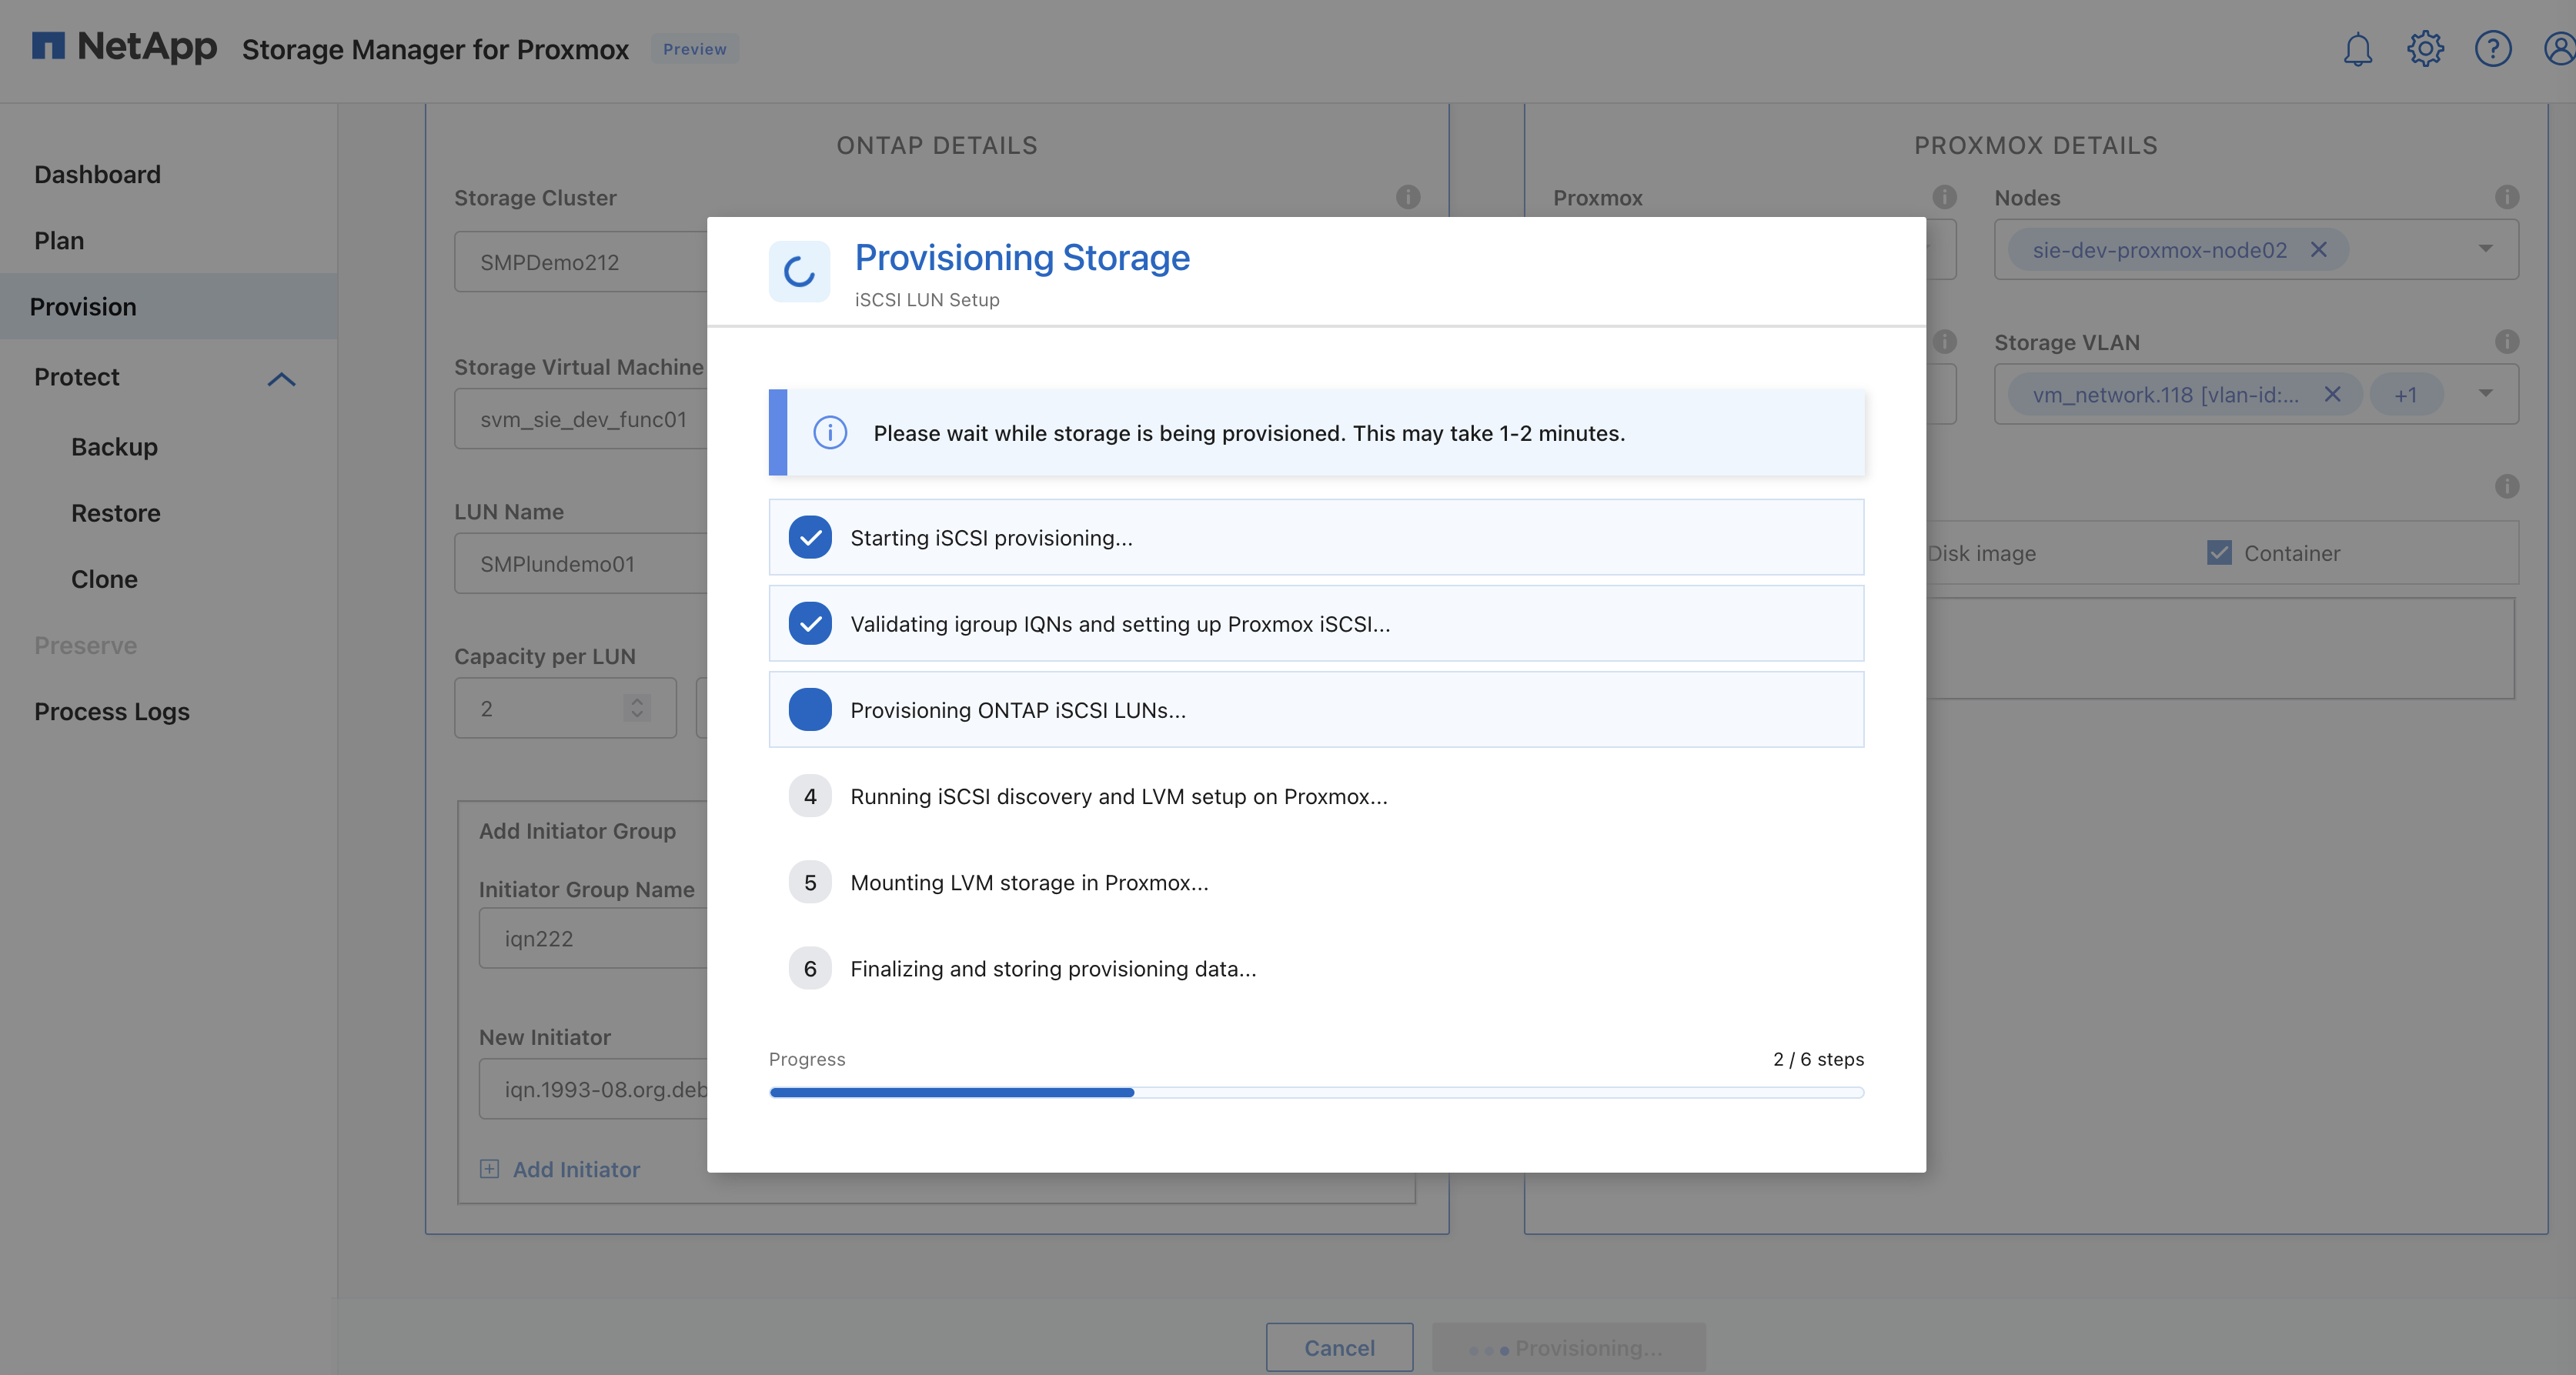
View iSCSI provisioning completed
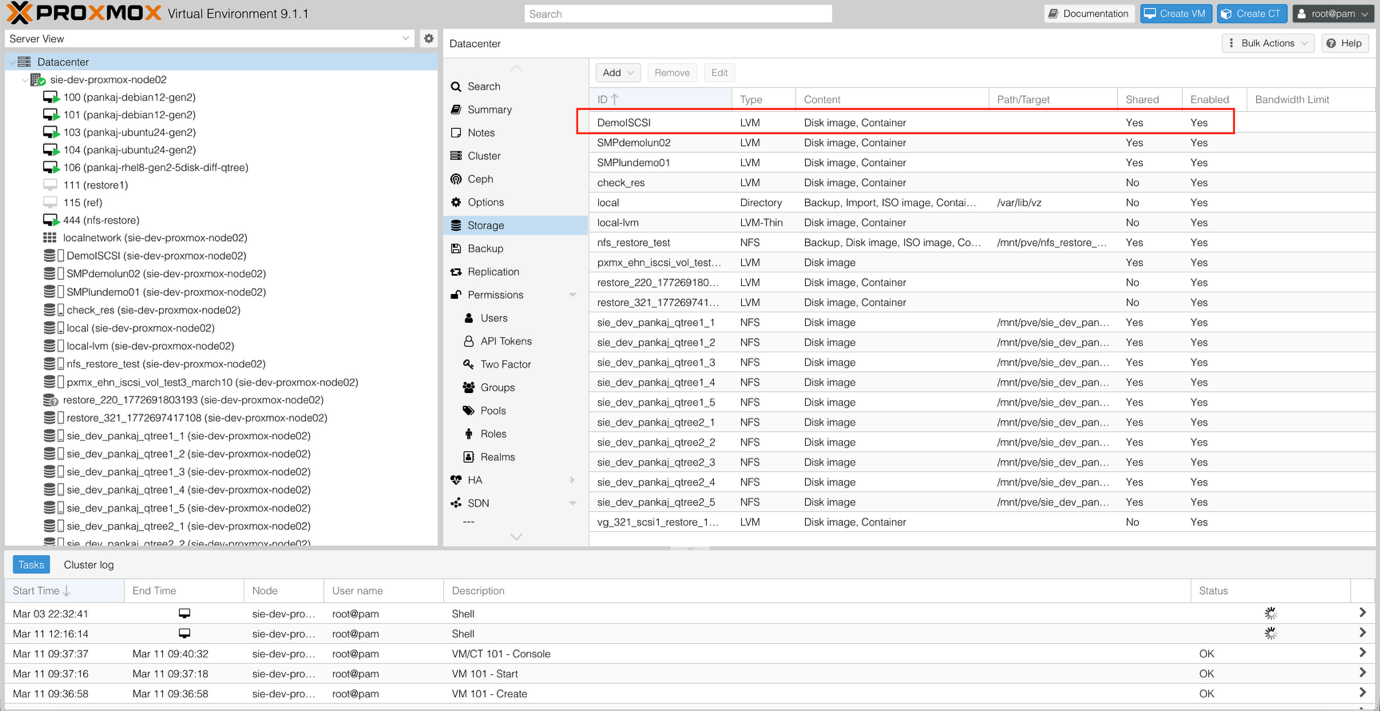
View iSCSI datastore in Proxmox

-
Validate that the NFS and iSCSI LUNs have been connected by accessing the Proxmox endpoint.
The attached storage is now available for provisioning virtual machines.
View Proxmox storage view
Volume configuration options
When SMP provisions new ONTAP FlexVol volumes and LUNs, several default configuration values are automatically applied:
| ONTAP Setting | Default Value |
|---|---|
Snapshot reserve (-percent-snapshot-space) |
0% |
Fractional reserve (-fractional-reserve) |
0% |
Access time update (-atime-update) |
Disabled |
Minimum readahead (-min-readahead) |
Disabled |
Scheduled snapshots |
None |
Storage efficiency |
Enabled |
Volume guarantee |
None (thin provisioned) |
Volume autosize |
grow_shrink |
LUN space reservation |
Disabled |
LUN space allocation |
Enabled |
NConnect behavior
When using NFS storage with Proxmox VE, be aware of specific behavior in the Linux NFS client (as used by Debian, the base OS for Proxmox VE). The Linux kernel may reuse the mount parameters from the first time an NFS export is mounted on a node. If the same export is mounted again with different mount options, those new options may not be applied.
As a best practice, create and mount separate exports and use different NFS server IP addresses, such as distinct data LIFs. SMP automatically detects existing connections along with their associated nconnect values and applies the appropriate nconnect value to any new connections.
Protect virtual machines
When virtual machines run on ONTAP-backed NFS datastores, the most streamlined protection approach is to let Proxmox establish filesystem consistency, while ONTAP captures the actual backup point at the storage layer. ONTAP snapshots provide fast, space-efficient, point-in-time copies of the datastore volume and can be used later to recover entire datastores, individual files, or VM content.
SMP provides a simple orchestrator for crash-consistent and VM-consistent data protection and clone management. This software simplifies backup, restore, and clone lifecycles through the creation of backup policies that can be applied to multiple jobs. These policies can define schedule, retention, replication, and other capabilities. They allow optional selection of file-consistent snapshots; this approach uses QEMU's ability to quiesce I/O before taking an ONTAP snapshot.
SMP allows protecting an entire datastore, where one ONTAP NFS volume contains multiple VMs, groups of VMs that may span several datastores, or at an individual VM level.
Back up virtual machines
Once the ONTAP volumes have been provisioned, use the Backup option to list all the VMs running on the Proxmox cluster and perform crash-consistent or file-consistent backup of the virtual machines.
-
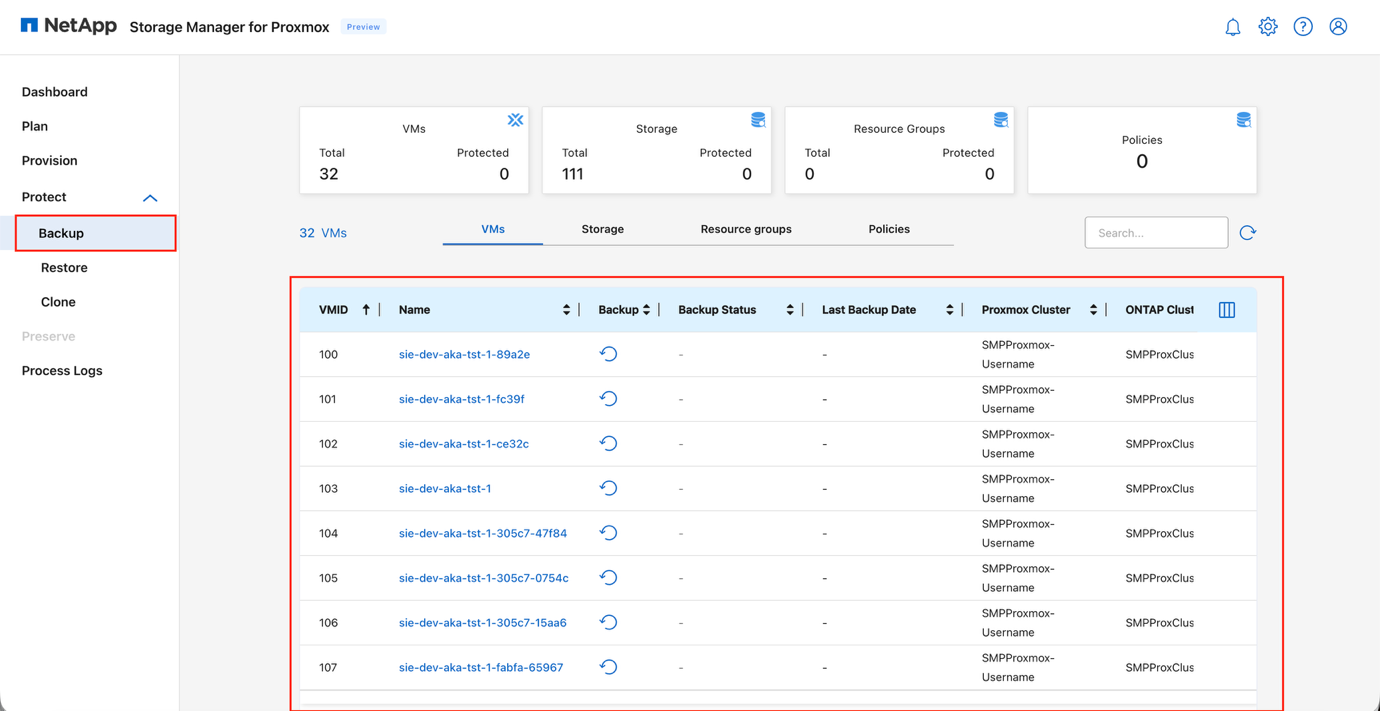
Access Protect > Backup from the left side navigation pane.
View Protect Backup page
-
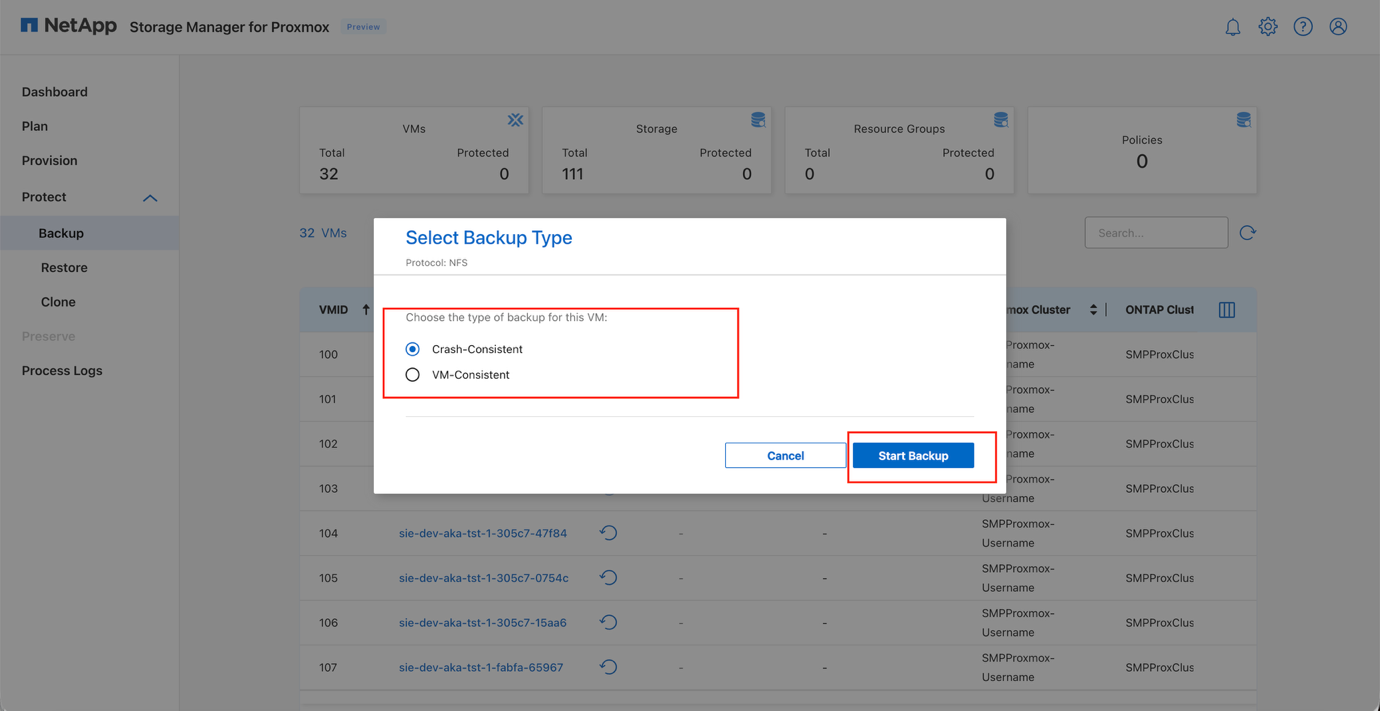
Select the virtual machine to back up and click Backup.
View Backup dialog: VM selection
-
The backup workflow allows selection between crash-consistent and file-consistent protection.
File-consistent mode optionally uses QEMU fsfreeze to ensure in-guest filesystem quiescence before the snapshot is taken. If fsfreeze fails, the system falls back to using a Proxmox snapshot.
This fallback mechanism applies only to virtual machines stored on NFS volumes. View Backup dialog: consistency options

View Backup progress

ONTAP snapshots are taken at the volume level, capturing all VM disks and configuration files within the NFS datastore in a single snapshot. When VM-consistent protection is selected, fsfreeze is issued only against the chosen VMs; all other VMs in the volume are included as crash-consistent within the same ONTAP snapshot.
-
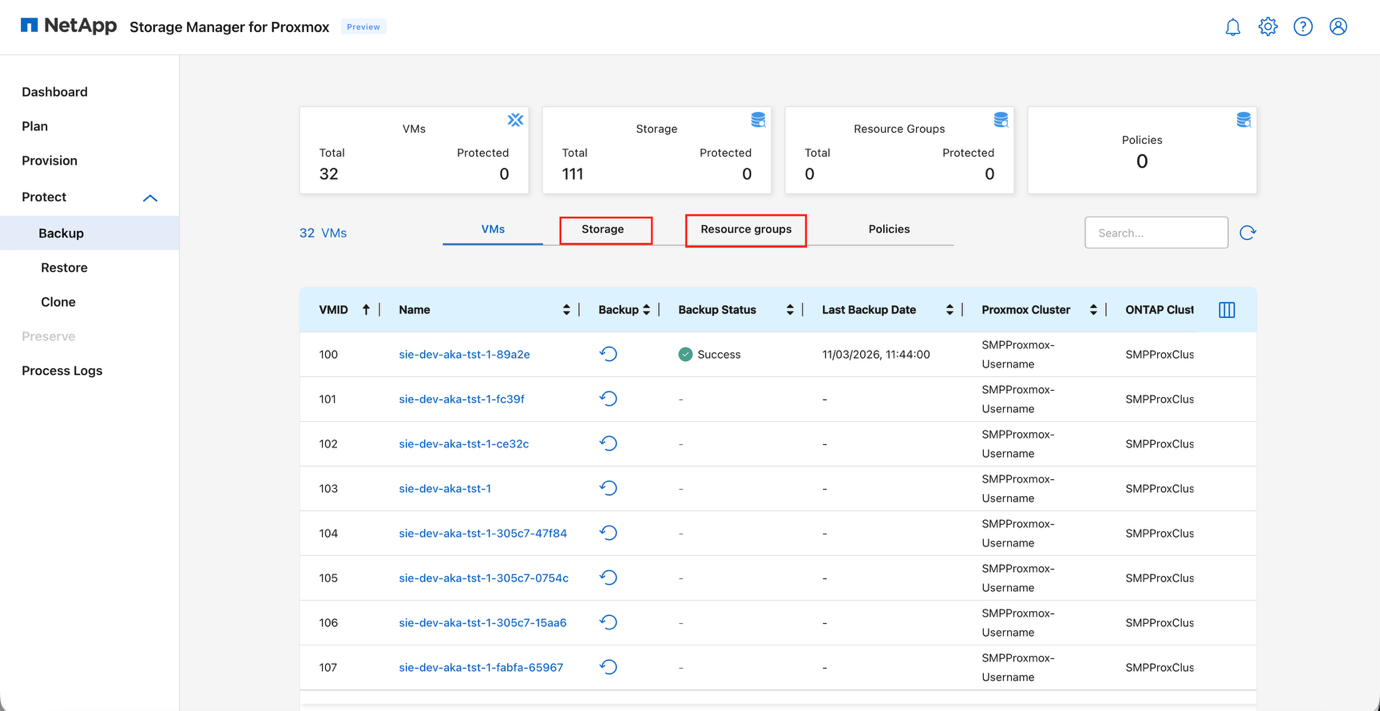
To back up a single datastore, select the Storage tab and choose the Backup option.
-
To back up multiple datastores as one unit or protect VM groups that span different datastores, use the Resource Group option. Resource groups allow datastores or VMs to be organized into logical protection sets.
View Resource Group tab
-
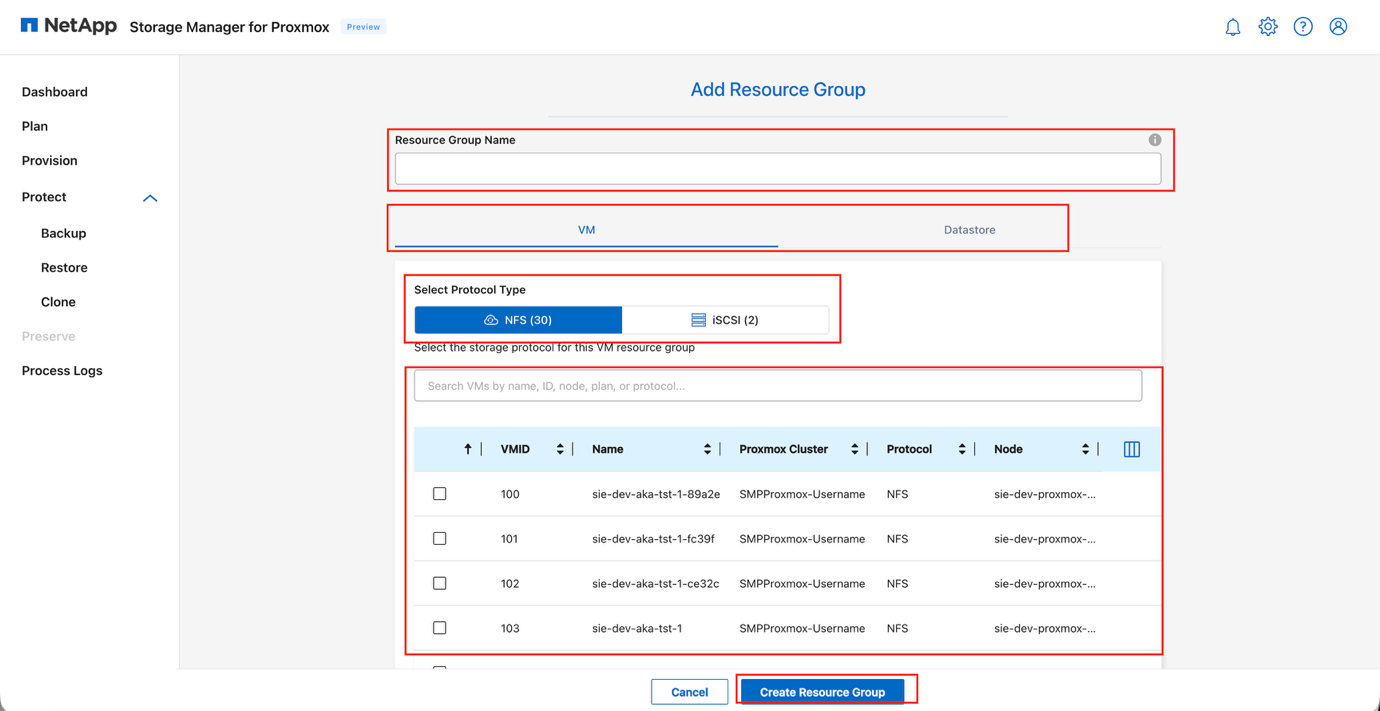
Open the Resource Group tab and select Add.
-
Enter a name for the new resource group.
-
Choose the resource type: VM or Datastore.
-
Select the appropriate Protocol.
-
Choose the specific VMs or datastores to include, based on the selected resource type.
-
Click Create Resource Group to complete the setup.
View Create Resource Group dialog
|
|
Backups taken at the datastore (volume) level are always crash-consistent. A resource group can contain only one resource type: either VMs or datastores. For iSCSI-based storage, backups are always crash-consistent. |
Backup workflow details
The high-level backup workflow includes:
-
Define the protection scope: Select whether the protection target is a datastore (ONTAP volume), a resource group (multiple volumes or VMs), or individual VM.
-
Confirm the consistency method: Choose how consistency is created before the ONTAP snapshot:
-
QEMU guest agent freeze/thaw for in-guest filesystem quiescing and Windows VSS integration.
-
-
Dump the VM config files.
-
Take the ONTAP snapshot: Capture an ONTAP snapshot of the datastore volume while the VMs are in a consistent state. This becomes the retained backup copy.
-
Remove temporary Proxmox snapshots: Delete the Proxmox snapshots after the ONTAP snapshot completes to prevent delta file growth.
-
Apply retention and replication policies (using policies): Apply the configured ONTAP retention policy and replicate the snapshot set if disaster recovery replication is enabled.
This approach minimizes storage space and network bandwidth by storing only changed information. Use Snapshot copies to make quick copies of the VM or datastore without affecting performance and then send them to a secondary system by using NetApp SnapMirror technology for longer-term, off-site data protection.
Automate VM backup tasks
Automate Proxmox VM backups by configuring a schedule. Creating regular backups is crucial for data protection and disaster recovery.
-
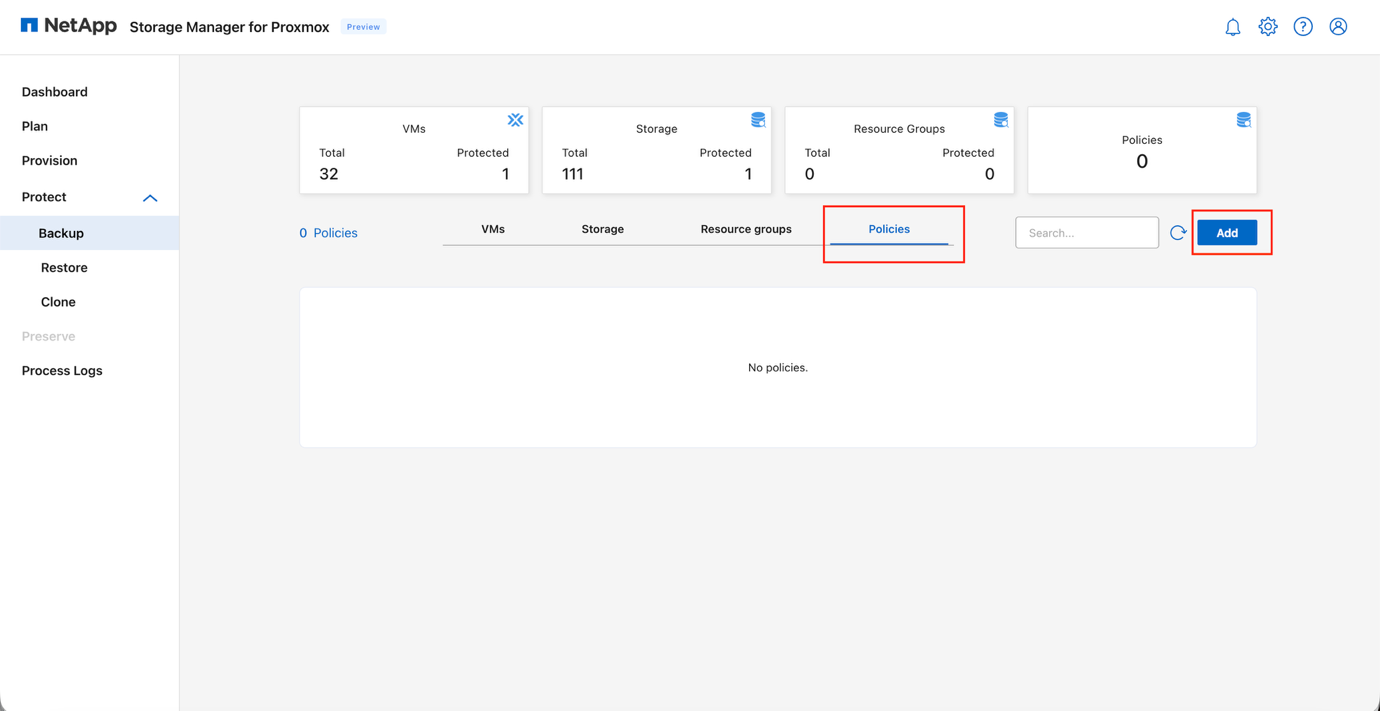
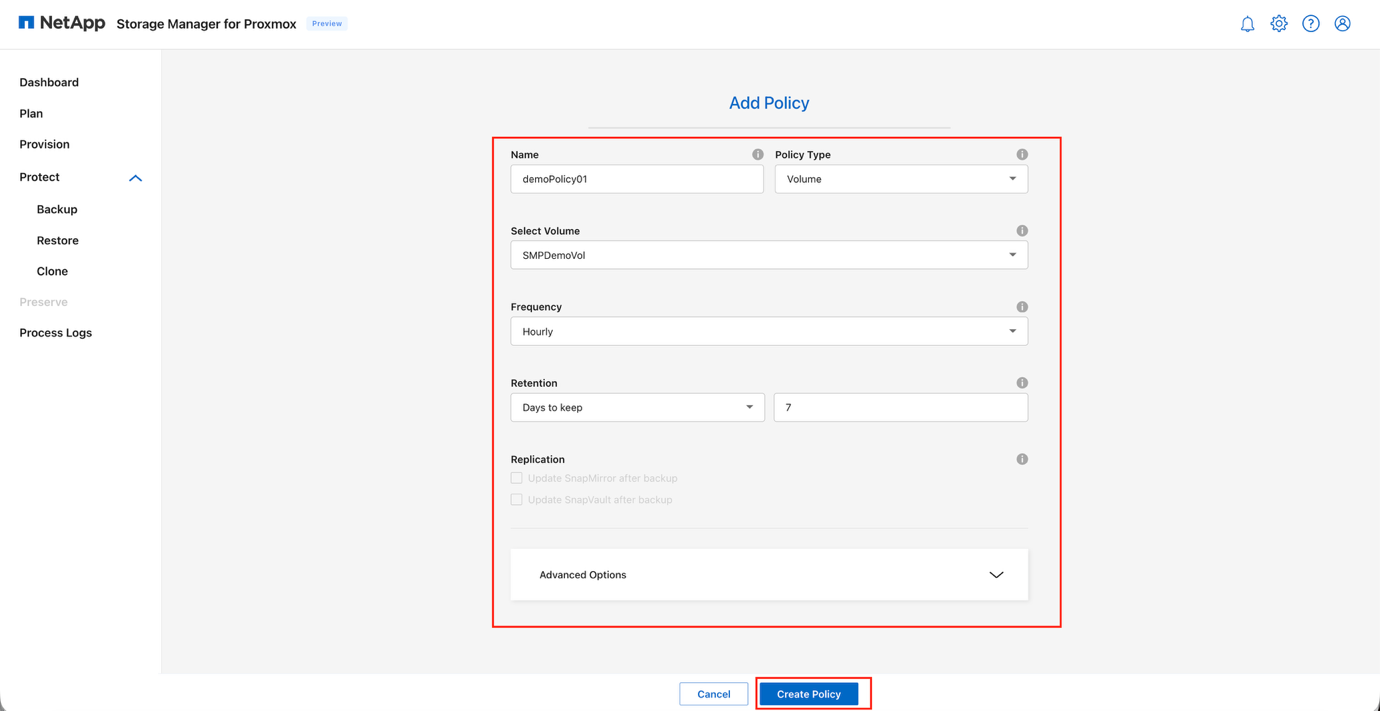
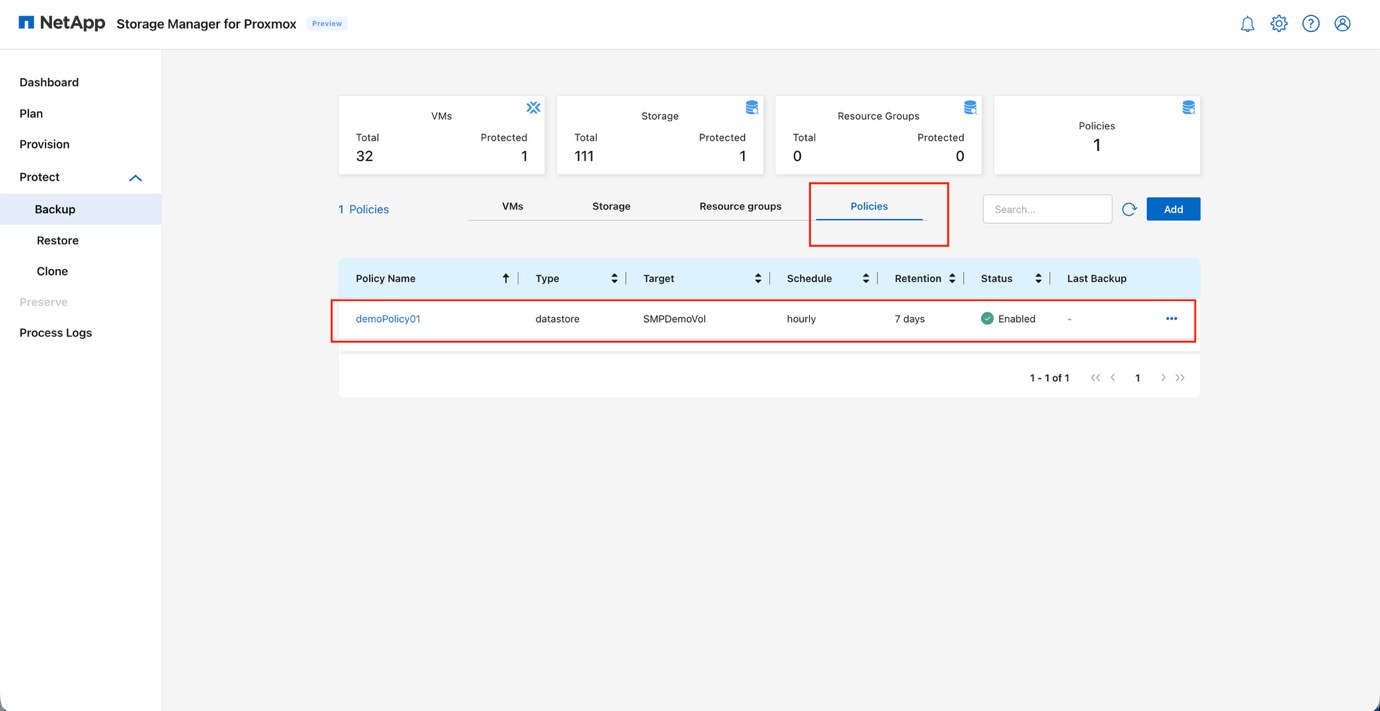
Go to Protect > Backup > Policies and click Add to add a new backup policy and schedule.
View Backup Policies page
-
Configure general settings:
-
Enter a name for the policy
-
Select the Policy Type (Volume or Resource Group)
-
Choose the Target based on the selected type
-
Set the Backup Frequency (hourly, daily, weekly, or monthly)
-
Configure Retention, using either "Days to Keep" or "Number to Keep" (default retention value is 7)
-
Choose the Replication Mode (disabled in the current release):
-
Update SnapMirror after backup
-
Update SnapVault after backup
SnapMirror replication must be configured in ONTAP using the CLI or System Manager.
-
-
-
In Advanced Options, enable VM Consistency if Proxmox snapshots or fsfreeze should be used before triggering the ONTAP snapshot.
-
Click Create Policy to save the configuration.
View Backup policy: schedule and retention
View Backup policy: replication and advanced options
|
|
A VM backup job can also be triggered immediately by clicking Backup, rather than waiting for a resource group's scheduled execution time. |
Restore virtual machines or datastores
Use SMP to restore a Proxmox VM from backup.
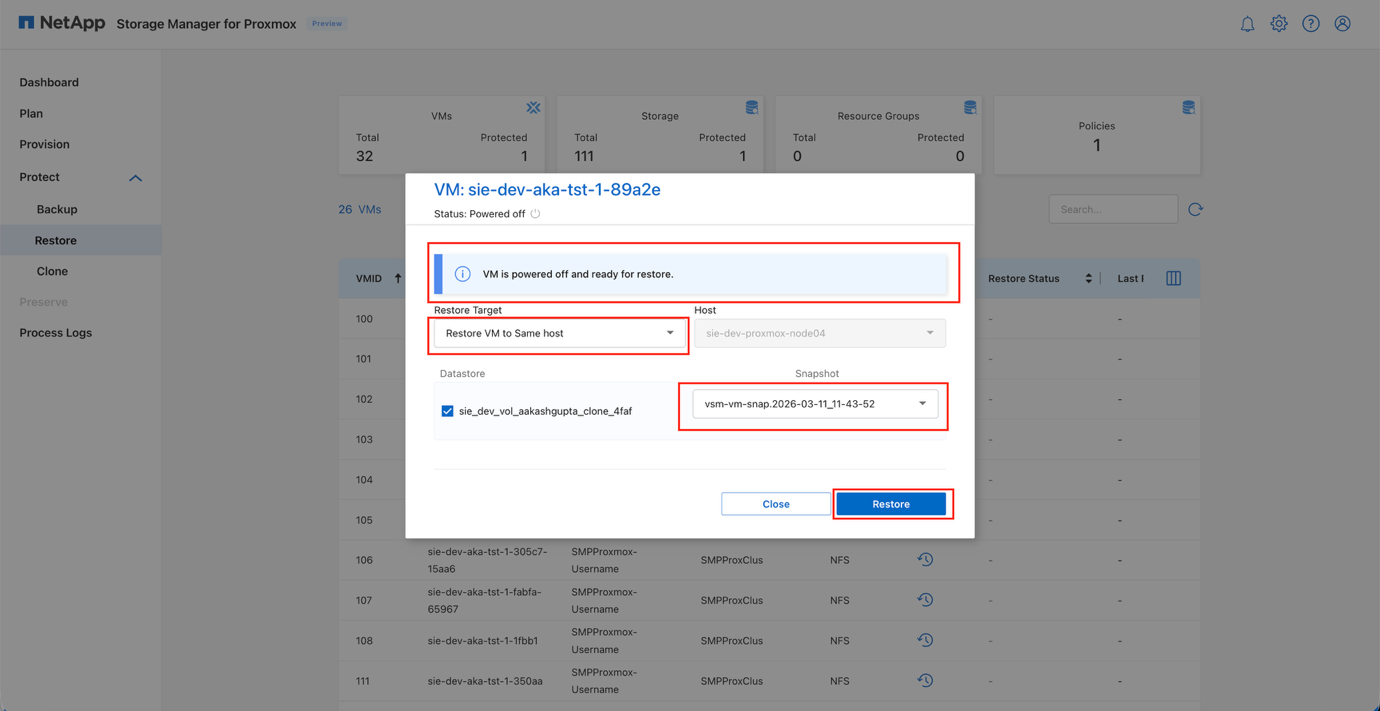
Virtual machines must be powered off before a restore operation is performed.
-
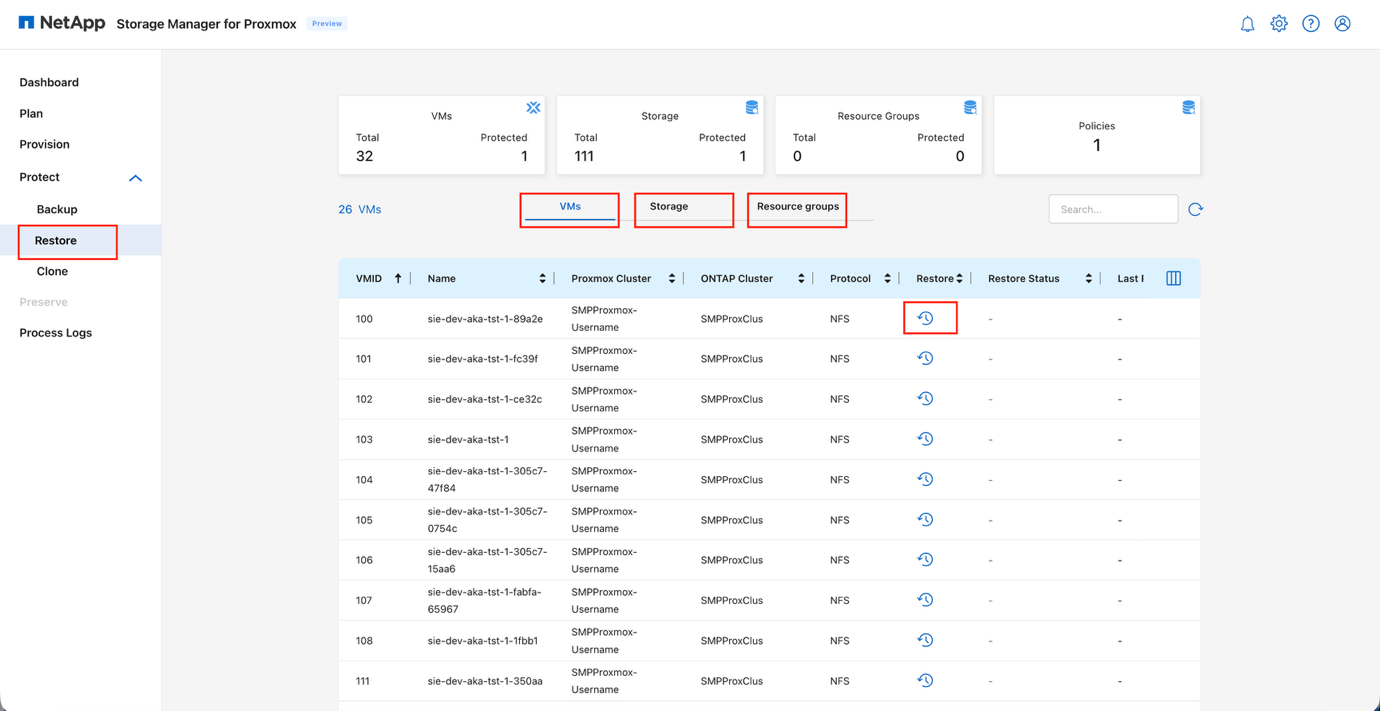
Select the Restore option from the navigation pane on the left side of the web interface.
-
Select the virtual machine, storage, or resource group that needs to be restored.
View Restore page
-
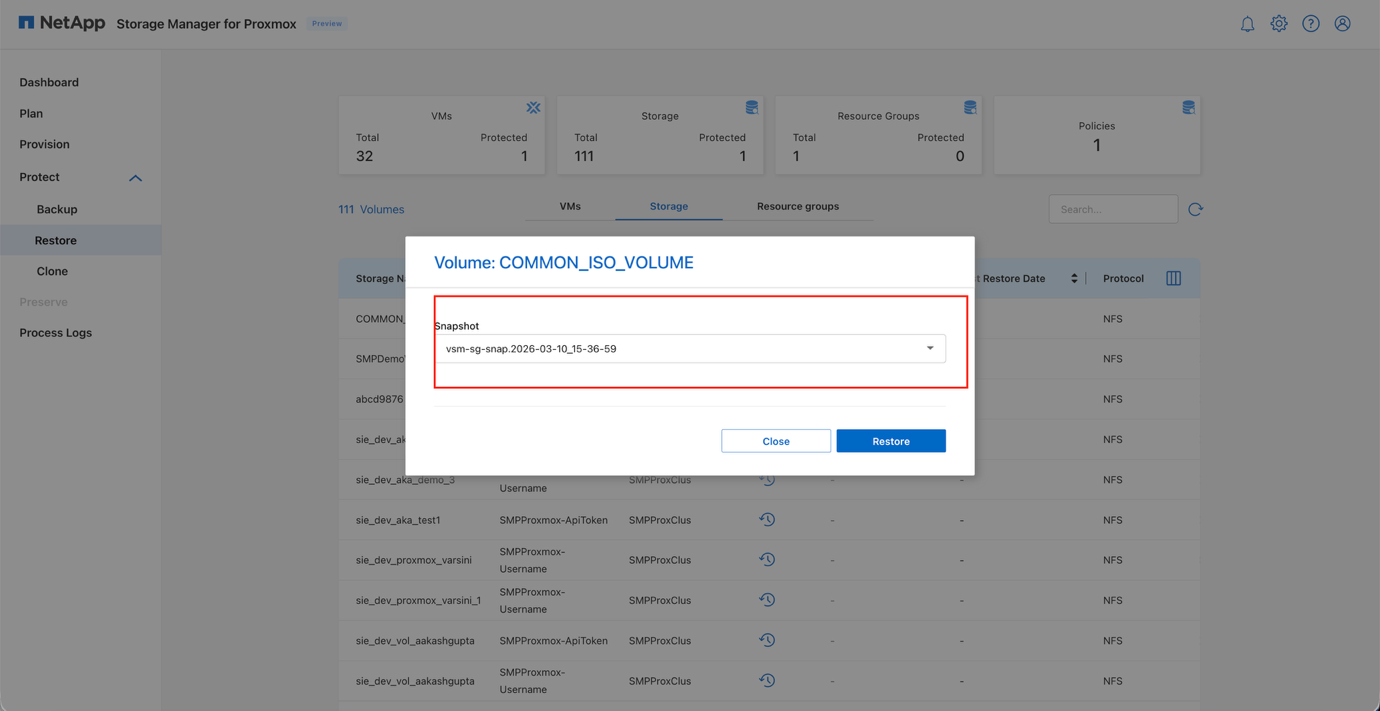
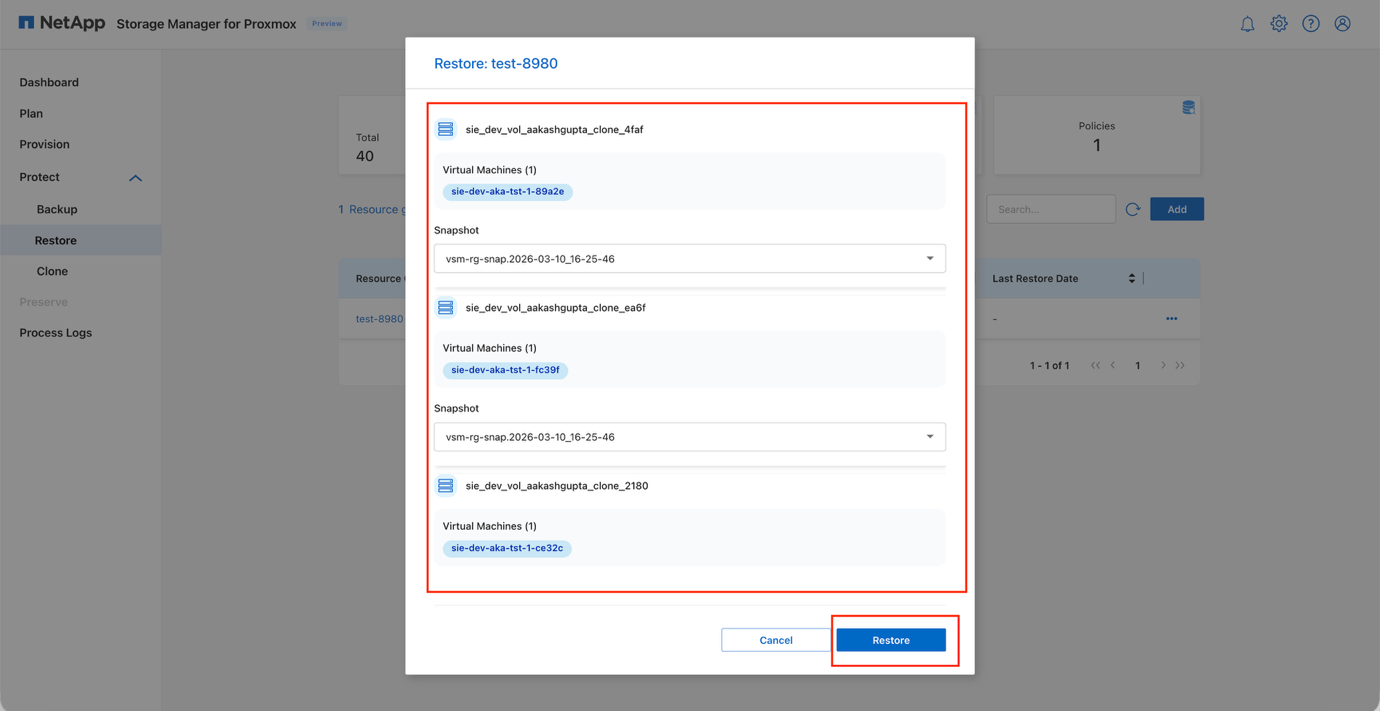
Click the Restore icon.
Depending on the selection (whether VM, Storage, or Resource Group), the restore pop-up window will open.
Depending on the resource selected, the snapshots created for the respective components will be shown. For instance, snapshots created at the resource group level will only be shown when a resource group is selected. The same applies to storage. However, for virtual machines, all the snapshots created across the components will be displayed for selection. View Restore dialog: snapshot selection
-
Select the required options:
-
Restore target: Option to restore to same host or alternate host
-
Host: If alternate host is selected, the dropdown allows you to select any available host within the cluster
-
Snapshot: Choose the appropriate snapshot for point-in-time restore
-
-
Click Restore.
View Restore in progress
View Restore completed
|
|
When a storage-level restore is initiated, all virtual machines on that volume or LUN are powered off, and the system restores the entire storage entity as a whole. |
View Storage-level restore

Restore workflow details
The restore workflow varies depending on the underlying storage type and involves the following key steps:
-
Define the restore scope: Select whether the protection target is a datastore (ONTAP volume), a resource group (multiple volumes or VMs), or individual VM.
-
Execute the restore operation: The VM restore process differs based on storage protocol:
-
NFS-based restores: When restoring a volume or datastore on NFS, SMP initiates a volume snap restore operation on the target volume. For VMs hosted on NFS volumes, SMP validates the restore parameters including VM ID, snapshot name, site IDs, and storage type. If the VM is running, SMP stops it by polling its status and issuing a stop command. The system then restores VM disks from the snapshot using a file-level restore operation.
-
iSCSI-based restores: For iSCSI datastores or LUNs, SMP restores the LUN from the snapshot, verifies the restored device, performs an iSCSI rescan across Proxmox nodes, and ensures device accessibility. For VMs residing on iSCSI storage, SMP clones the snapshot LUNs, maps the cloned LUNs to the Proxmox host, and performs iSCSI discovery to import them. The restored storage is then added, and VM configurations are updated. VM disks are moved back to their original storage with progress tracked per VM. The process concludes with cleanup activities, including the removal of temporary storage and deletion of cloned LUNs.
-
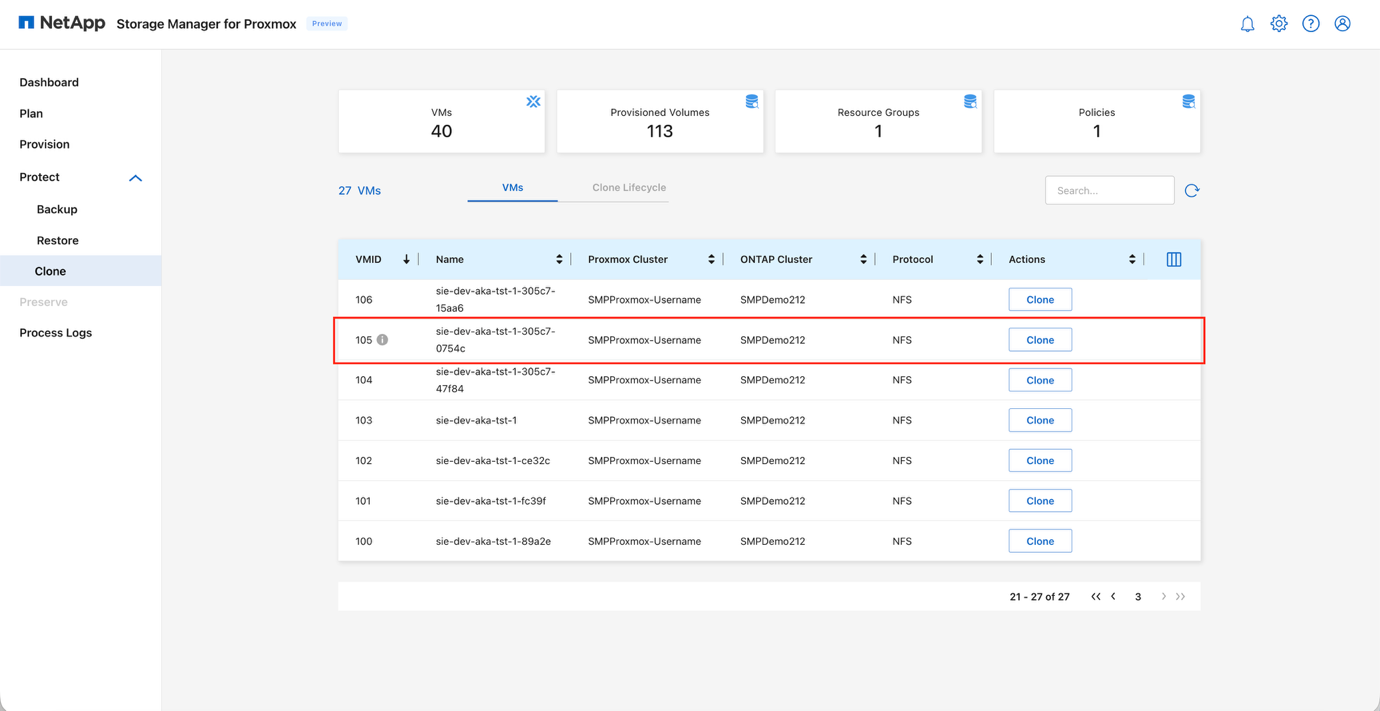
Clone virtual machines
Use SMP to create clones of virtual machines for development, testing, or rapid provisioning.
-
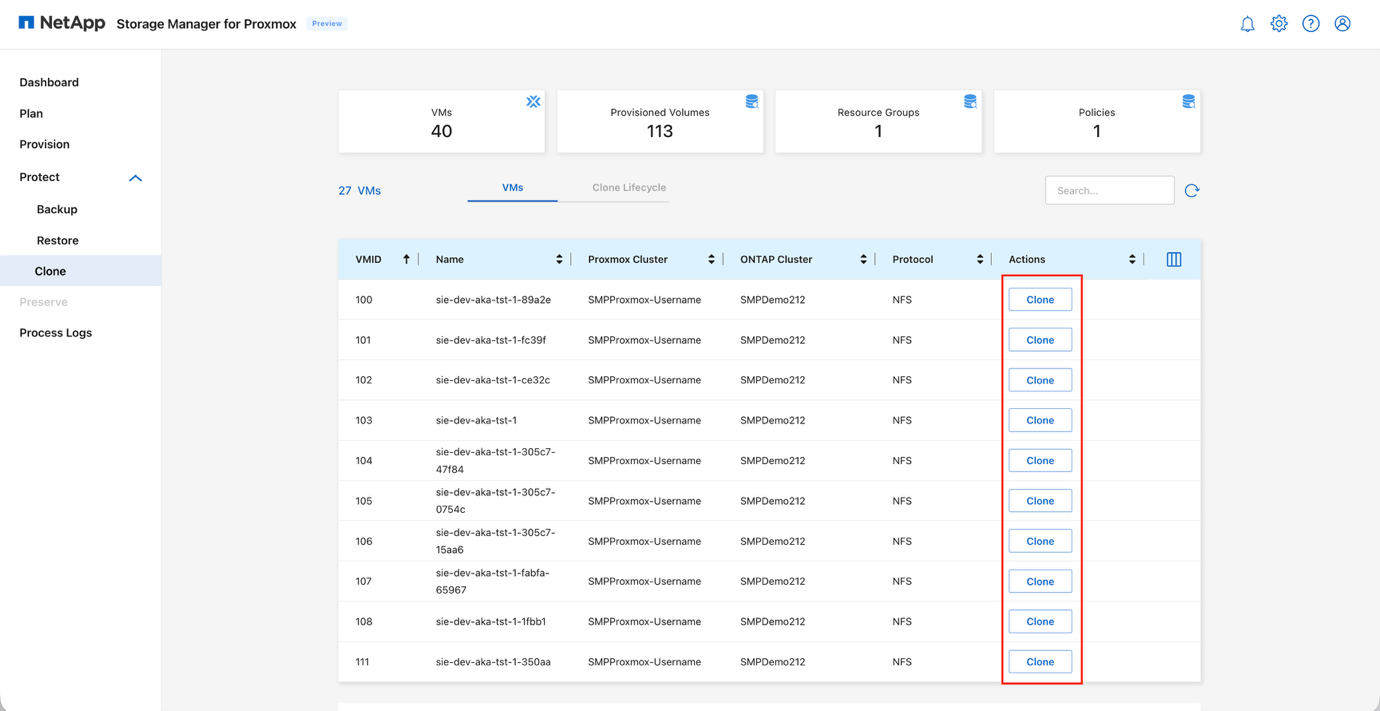
Open the Protect section and select Clone from the left navigation menu.
-
From the VM list, locate the required VM and click Clone in the Actions column.
-
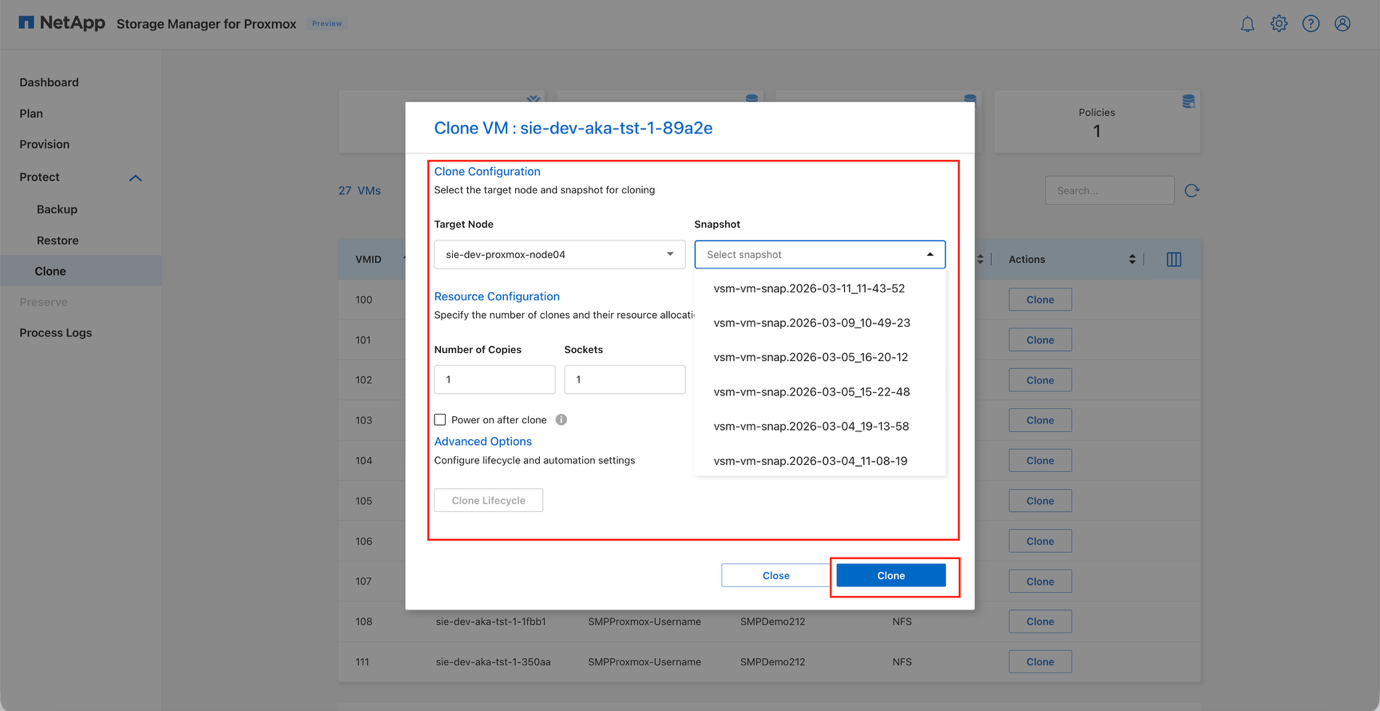
In the Clone VM window, choose the Target Node where the clone will be created.
View Clone VM dialog
-
Select the Snapshot to use as the source for the clone.
In the current release, clone is performed against the active file system. In an upcoming release, the clone workflow will allow selection of a snapshot, in which case file clones are performed using a new volume created from the selected snapshot. -
Specify the Number of Copies, CPU cores, Sockets, and Memory for the cloned VM.
-
(Optional) Enable Power on after clone if the cloned VM should start automatically after creation.
-
(Optional) Select Create a new datastore if the clone should be placed on a newly created datastore.
-
Under Advanced Options, enable Network Configuration if network settings should be applied automatically to the clone.
-
Click Clone to begin the cloning process.
The clone workflow provisions the new VM using ONTAP's rapid-cloning APIs and assigns a unique five-digit GUID to the cloned instance.
View Clone operation
|
|
The cloned VM appears in both the Backup and Clone lists and can be protected using existing backup policies. To make the cloned VMs visible in these lists, run a discovery against the Proxmox and ONTAP plans. |
View Cloned VMs in lists
Clone workflow details
SMP automates rapid VM cloning by offloading the heavy lifting to ONTAP to perform storage-side clones instead of host-side file copies. Under the covers, SMP taps ONTAP FlexClone semantics (snapshot-based, writable, space-efficient clones) so clones are created quickly and consume little capacity initially; it avoids data reads/writes through the Proxmox host where possible.
This approach accelerates VM provisioning by pushing clone work into ONTAP, delivering fast, thin, storage-efficient clones suitable for Dev/Test, labs, and rapid refresh cycles.
By default, clone is performed against the active file system. The clone workflow also allows selection of a snapshot, in which case file clones are performed using a new volume created from the selected snapshot.
Monitor operations
Use the Process Logs and Dashboard views to monitor and track SMP operations.
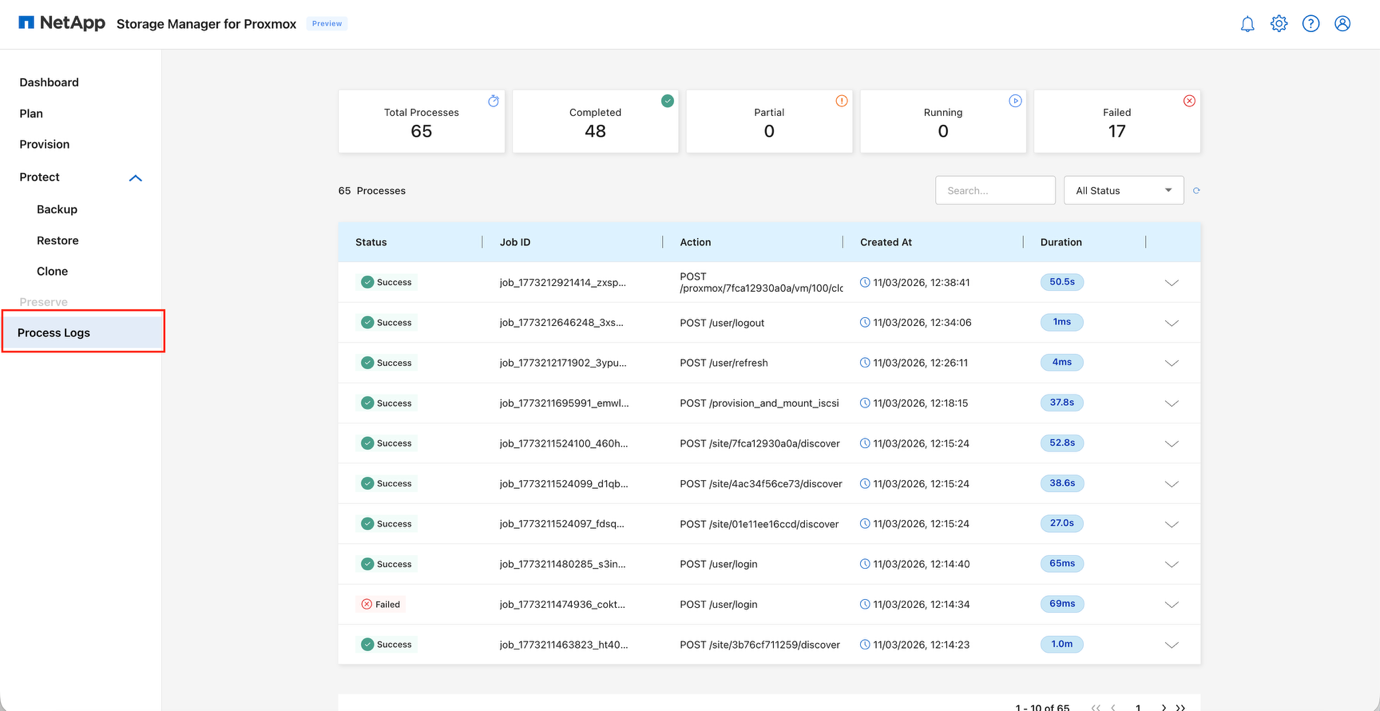
Process logs
The Process Logs view provides a consolidated record of all operations performed through Storage Manager for Proxmox. Each entry displays the job status, job ID, action performed, start time, and duration. This makes it easy to track completed tasks, identify any failed or partial operations, and review the sequence of actions executed in the environment.
Filters and search options are available to quickly locate specific jobs or narrow the list by status.
View Process Logs view
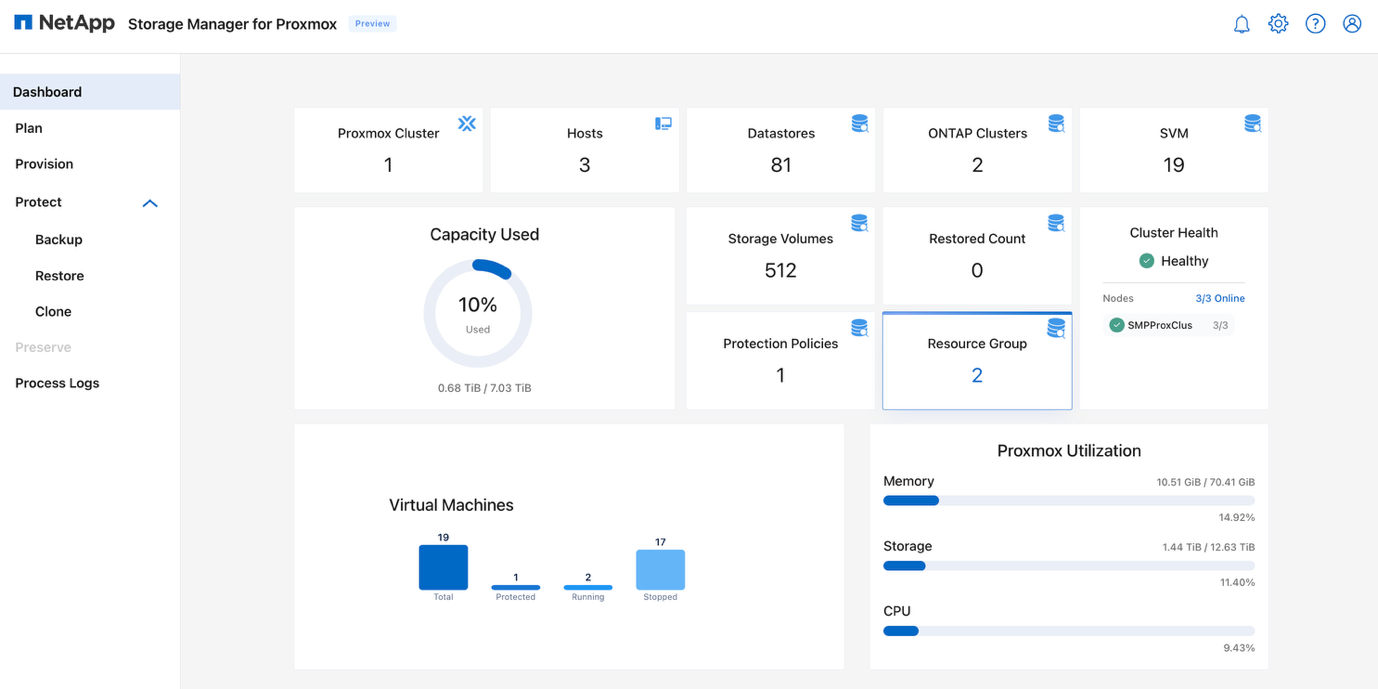
Dashboard
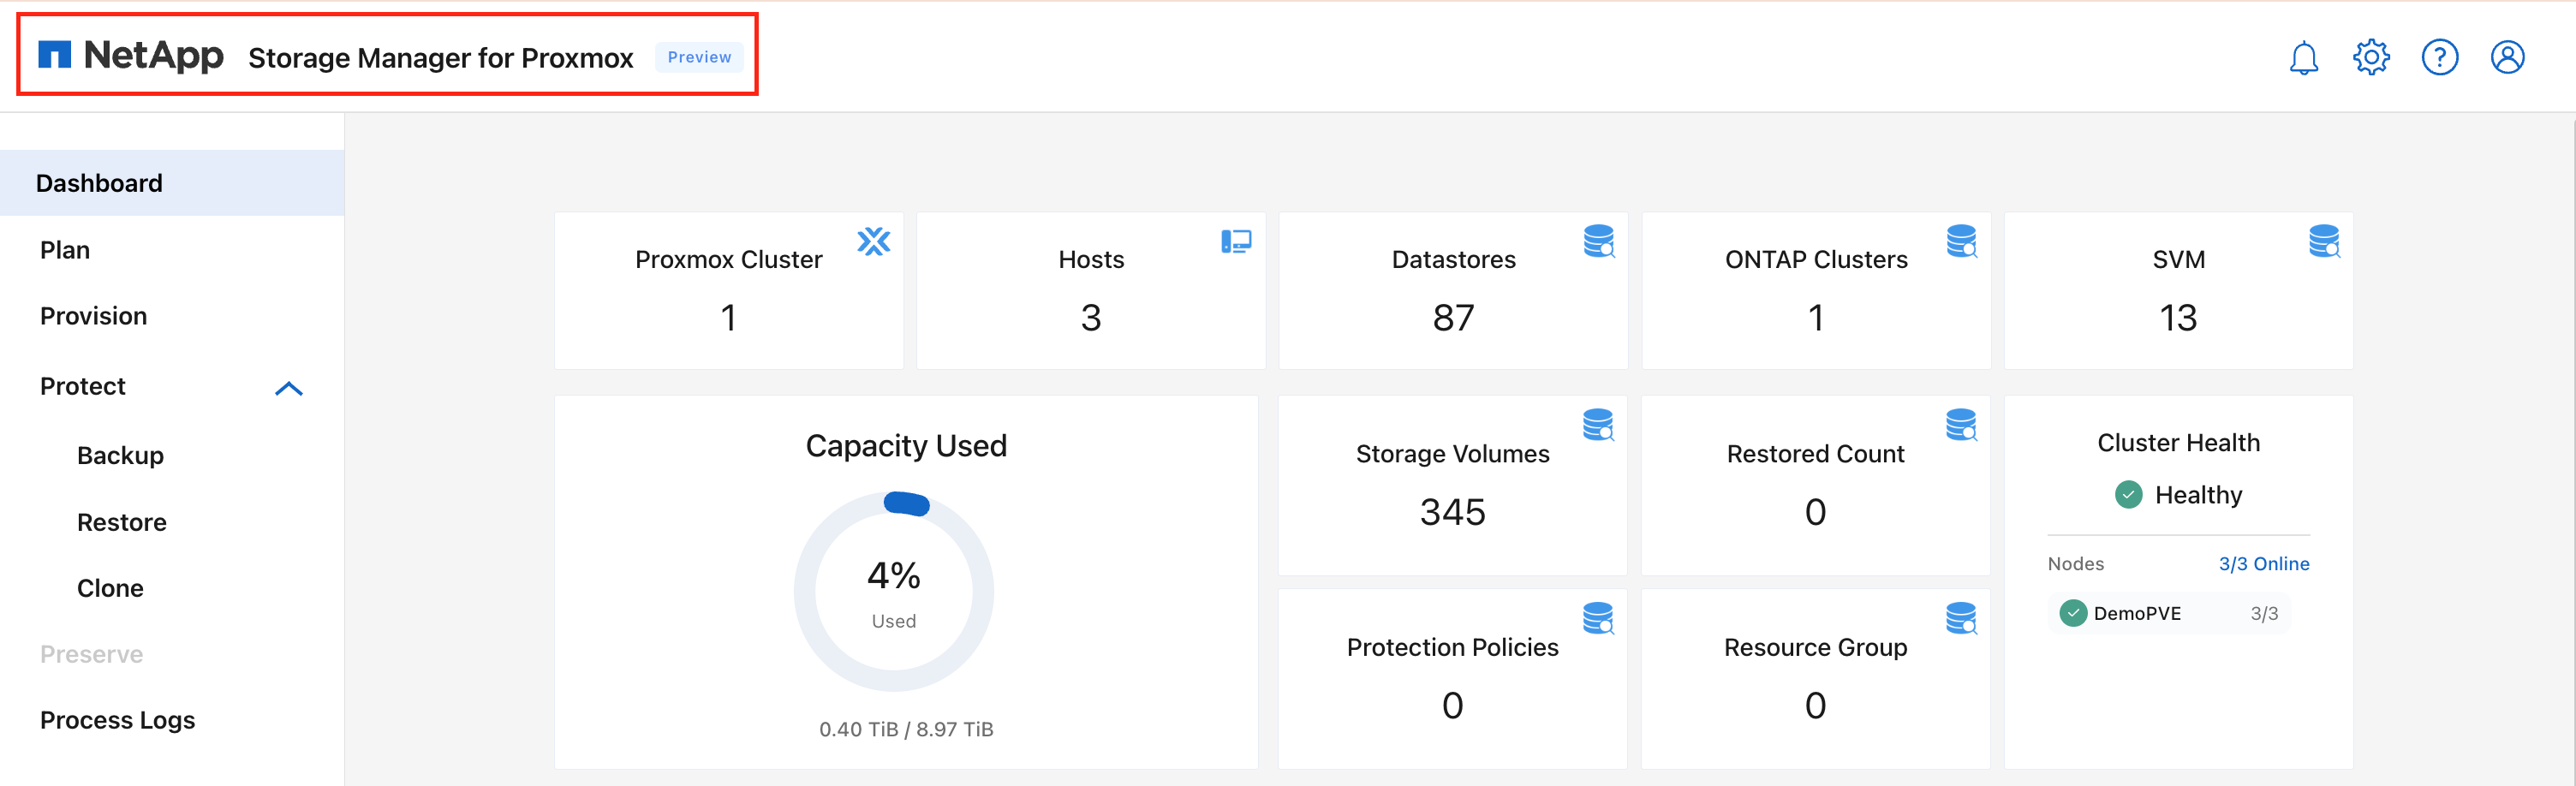
The Dashboard provides an at-a-glance overview of the entire Storage Manager for Proxmox environment. It summarizes key inventory such as the number of Proxmox clusters, hosts, datastores, ONTAP clusters, and protected virtual machines. Capacity usage, total storage volumes, protection policies, and resource groups are also displayed to give a clear picture of system utilization.
Cluster health is shown prominently, indicating the status of all connected nodes. The lower section of the dashboard highlights VM distribution (total, running, and stopped) and provides real-time Proxmox resource utilization for memory, storage, and CPU. This view helps quickly assess system health, identify resource pressures, and monitor overall operational state.
View Dashboard
Summary
Storage Manager for Proxmox delivers a streamlined and unified way to manage protection, cloning, and recovery operations across Proxmox environments. By integrating directly with ONTAP, the solution brings the efficiency, reliability, and performance of enterprise-class storage into everyday VM workflows. ONTAP's space-efficient snapshots, rapid cloning capabilities, and built-in replication provide consistent and predictable data protection, while SMP simplifies these capabilities into an intuitive, task-focused interface.