

Hyper-V storage infrastructure on NetApp
 Suggest changes
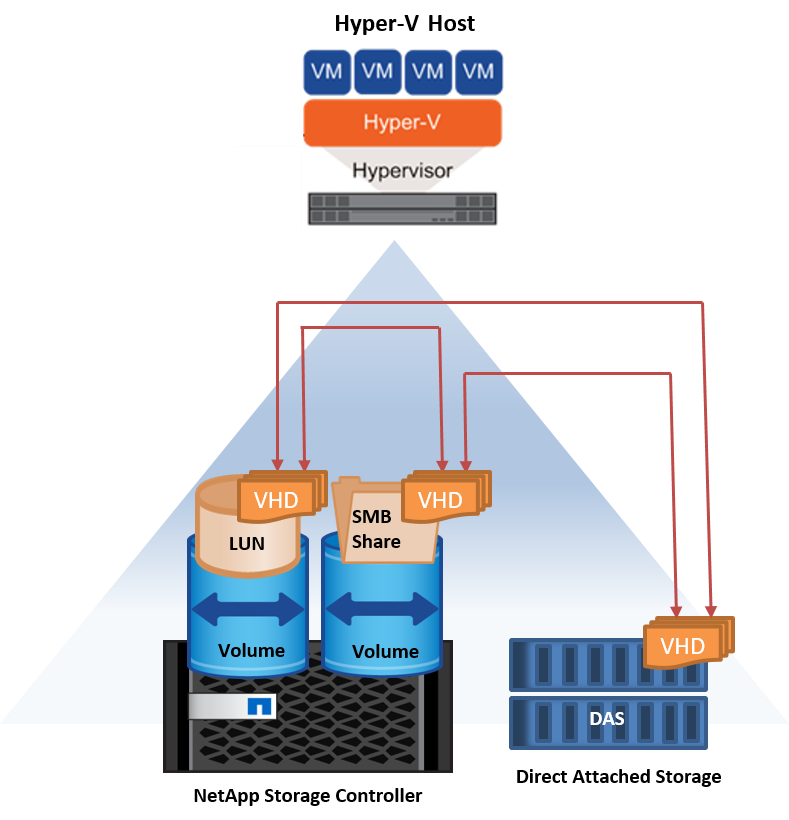
A Hyper-V storage infrastructure can be hosted on ONTAP storage systems. Storage for Hyper-V to store the VM files and its disks can be provided using NetApp LUNs or NetApp CIFS shares, as shown in the following figure.
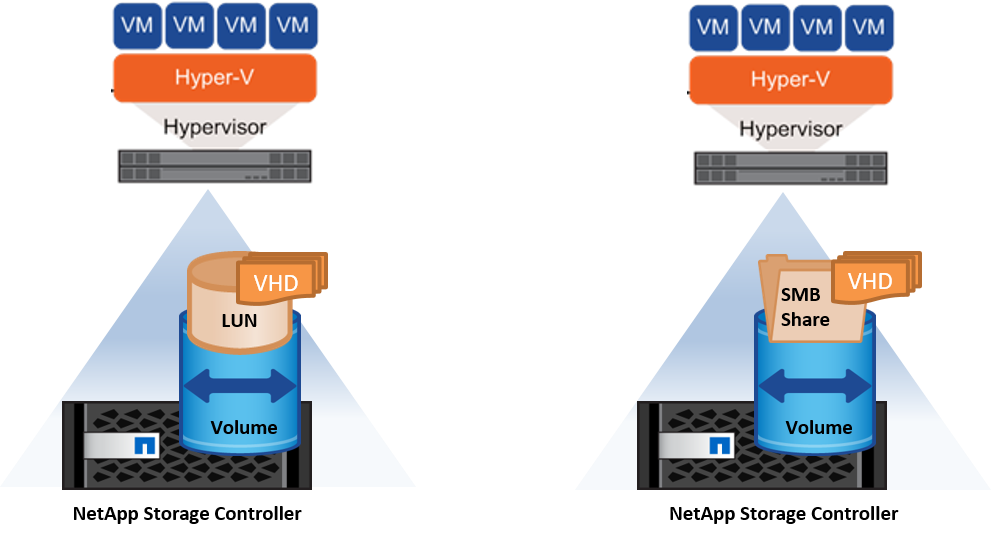
Hyper-V Storage on NetApp LUNs
-
Provision a NetApp LUN on the Hyper-V server machine. For more information, see the section "Provisioning in SAN Environments."
-
Open Hyper-V Manager from the Tools section of Server Manager.
-
Select the Hyper-V server and click Hyper-V Settings.
-
Specify the default folder to store the VM and its disk as the LUN. Doing so sets the default path as the LUN for the Hyper-V storage. If you want to specify the path explicitly for a VM, then you can do so during VM creation.
Hyper-V Storage on NetApp CIFS
Before beginning the steps listed in this section, review the section "Provisioning in SMB Environments." To configure Hyper-V storage on the NetApp CIFS share, complete the following steps:
-
Open Hyper-V Manager from the Tools section of Server Manager.
-
Select the Hyper-V server and click Hyper-V Settings.
-
Specify the default folder to store the VM and its disk as the CIFS share. Doing so sets the default path as the CIFS share for the Hyper-V storage. If you want to specify the path explicitly for a VM, then you can do so during VM creation.
Each VM in Hyper-V can in turn be provided with the NetApp LUNs and CIFS shares that were provided to the physical host. This procedure is the same as for any physical host. The following methods can be used to provision storage to a VM:
-
Adding a storage LUN by using the FC initiator within the VM
-
Adding a storage LUN by using the iSCSI initiator within the VM
-
Adding a pass-through physical disk to a VM
-
Adding VHD/VHDX to a VM from the host
Best practices
-
When a VM and its data are stored on NetApp storage, NetApp recommends running NetApp deduplication at the volume level at regular intervals. This practice results in significant space savings when identical VMs are hosted on a CSV or SMB share. Deduplication runs on the storage controller and it does not affect the host system and VM performance.
-
When using iSCSI LUNs for Hyper-V, make sure to enable 'iSCSI Service (TCP-In) for Inbound' and 'iSCSI Service (TCP-Out) for Outbound' in the firewall settings on the Hyper-V host. Doing so allows iSCSI traffic to pass to and from the Hyper-V host and the NetApp controller.
-
NetApp recommends unchecking the option Allow Management Operating System to Share This Network Adapter for the Hyper-V virtual switch. Doing so creates a dedicated network for the VMs.
Things to remember
-
Provisioning a VM by using virtual Fibre Channel requires an N_Port ID Virtualization enabled FC HBA. A maximum of four FC ports is supported.
-
If the host system is configured with multiple FC ports and presented to the VM, then MPIO must be installed in the VM to enable multipathing.
-
Pass-through disks cannot be provisioned to the host if MPIO is being used on that host, because pass-through disks do not support MPIO.
-
Disk used for VHD/VHDx files should use 64K formatting for allocation.
Further reading
-
For information about FC HBAs, see the Interoperability Matrix Tool (IMT).
-
For more information about virtual Fibre Channel, see the Microsoft Hyper-V Virtual Fibre Channel Overview page.
Offloaded data transfer
Microsoft ODX, also known as copy offload, enables direct data transfers within a storage device or between compatible storage devices without transferring the data through the host computer. ONTAP supports the ODX feature for both CIFS and SAN protocols. ODX can potentially improve performance if copies are within same volume, reduce utilization of CPU and memory on the client, and reduce network I/O bandwidth utilization.
With ODX, it is faster and efficient to copy files within the SMB shares, within the LUNs, and between the SMB shares and LUNs if it's in same volume. This approach is more helpful in a scenario for which multiple copies of the golden image of an OS (VHD/VHDX) are required within same volume. Several copies of the same golden image can be made in significantly less time if copies are within same volume. ODX is also applied in Hyper-V storage live migration for moving VM storage.
If copy is across volumes, there may not be significant performance gains compared to host-based copies.
To enable the ODX feature on CIFS, run the following CLI commands on the NetApp storage controller:
-
Enable ODX for CIFS.
#set the privilege level to diagnostic
cluster::> set -privilege diagnostic#enable the odx feature cluster::> vserver cifs options modify -vserver <vserver_name> -copy-offload-enabled true
#return to admin privilege level
cluster::> set privilege admin
-
To enable the ODX feature on SAN, run the following CLI commands on the NetApp storage controller:
#set the privilege level to diagnostic
cluster::> set -privilege diagnostic#enable the odx feature cluster::> copy-offload modify -vserver <vserver_name> -scsi enabled
#return to admin privilege level
cluster::> set privilege admin
Things to remember
-
For CIFS, ODX is available only when both the client and the storage server support SMB 3.0 and the ODX feature.
-
For SAN environments, ODX is available only when both the client and the storage server support the ODX feature.
Further reading
For information about ODX, see Improving Microsoft Remote Copy Performance and Microsoft Offloaded Data Transfers .
Hyper-V clustering: High availability and scalability for virtual machines
Failover clusters provide high availability and scalability to Hyper-V servers. A failover cluster is a group of independent Hyper-V servers that work together to increase availability and scalability for the VMs.
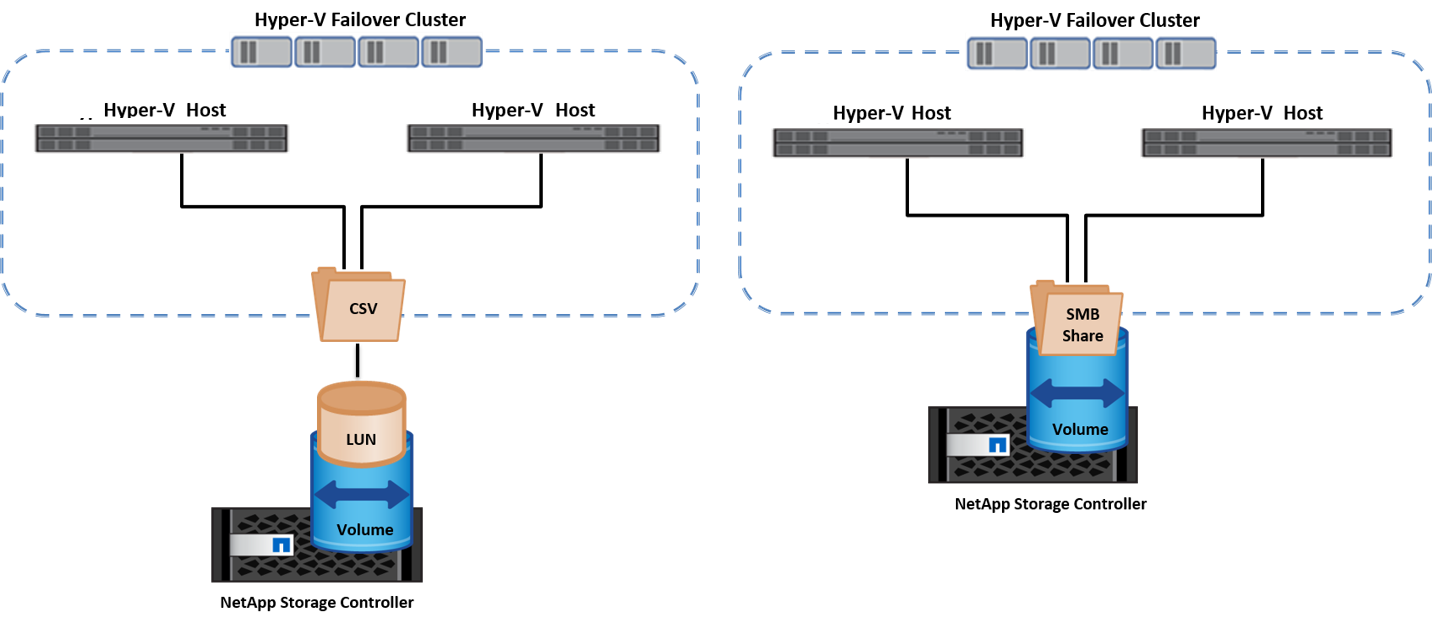
Hyper-V clustered servers (called nodes) are connected by the physical network and by cluster software. These nodes use shared storage to store the VM files, which include configuration, virtual hard disk (VHD) files, and snapshots. The shared storage can be a NetApp SMB/CIFS share or a CSV on top of a NetApp LUN, as shown below. This shared storage provides a consistent and distributed namespace that can be accessed simultaneously by all the nodes in the cluster. Therefore, if one node fails in the cluster, the other node provides service by a process called failover. Failover clusters can be managed by using the Failover Cluster Manager snap-in and the failover clustering Windows PowerShell cmdlets.
Cluster Shared Volumes
CSVs enable multiple nodes in a failover cluster to simultaneously have read/write access to the same NetApp LUN that is provisioned as an NTFS or ReFS volume. With CSVs, clustered roles can fail over quickly from one node to another without requiring a change in drive ownership or dismounting and remounting a volume. CSVs also simplify the management of a potentially large number of LUNs in a failover cluster. CSVs provide a general-purpose clustered file system that is layered above NTFS or ReFS.
Best practices
-
NetApp recommends turning off cluster communication on the iSCSI network to prevent internal cluster communication and CSV traffic from flowing over the same network.
-
NetApp recommends having redundant network paths (multiple switches) to provide resiliency and QoS.
Things to remember
-
Disks used for CSV must be partitioned with NTFS or ReFS. Disks formatted with FAT or FAT32 cannot be used for a CSV.
-
Disks used for CSVs should use 64K formatting for allocation.
Further reading
For information about deploying a Hyper-V cluster, see Appendix B: Deploy Hyper-V Cluster.
Hyper-V Live Migration: Migration of VMs
It is sometimes necessary during the lifetime of VMs to move them to a different host on the Windows cluster. Doing so might be required if the host is running out of system resources or if the host is required to reboot for maintenance reasons. Similarly, it might be necessary to move a VM to a different LUN or SMB share. This might be required if the present LUN or share is running out of space or yielding lower than expected performance. Hyper-V live migration moves running VMs from one physical Hyper-V server to another with no effect on VM availability to users. You can live migrate VMs between Hyper-V servers that are part of a failover cluster or between independent Hyper-V servers that are not part of any cluster.
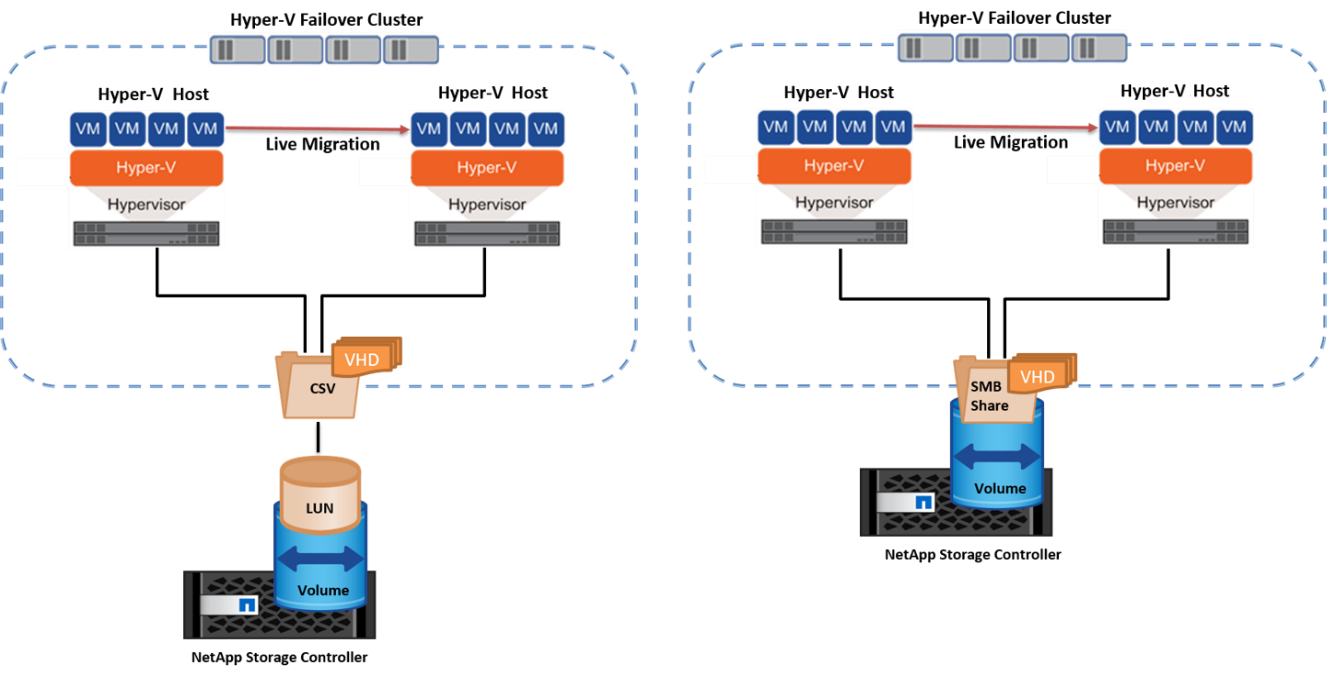
Live Migration in a clustered environment
VMs can be moved seamlessly between the nodes of a cluster. VM migration is instantaneous because all the nodes in the cluster share the same storage and have access to the VM and its disk. The following figure depicts live migration in a clustered environment.
Best practice
-
Have a dedicated port for live migration traffic.
-
Have a dedicated host live migration network to avoid network-related issues during migration.
Further reading
For information about deploying live migration in a clustered environment, see Appendix C: Deploy Hyper-V Live Migration in a Clustered Environment.
Live Migration outside a clustered environment
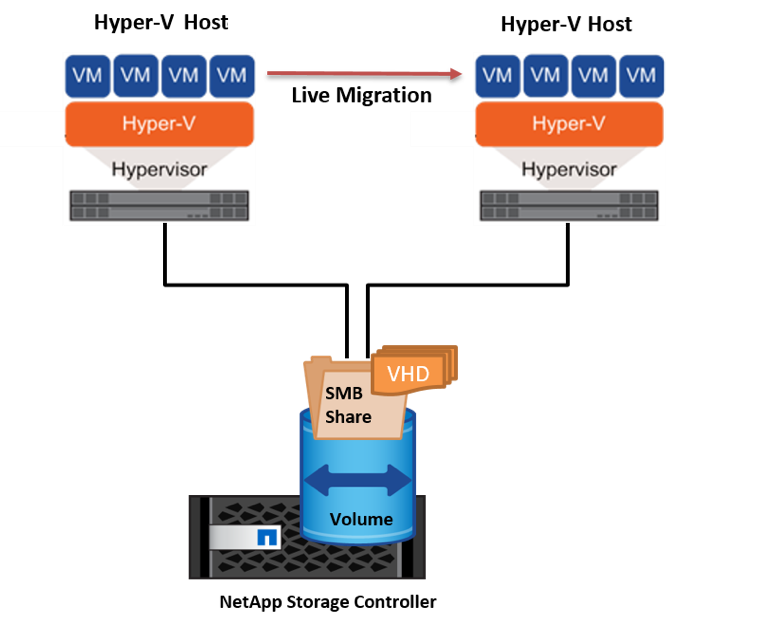
You can live migrate a VM between two nonclustered, independent Hyper-V servers. This process can use either shared or shared nothing live migration.
-
In shared live migration, the VM is stored on an SMB share. Therefore, when you live migrate a VM, the VM's storage remains on the central SMB share for instant access by the other node, as shown below.
-
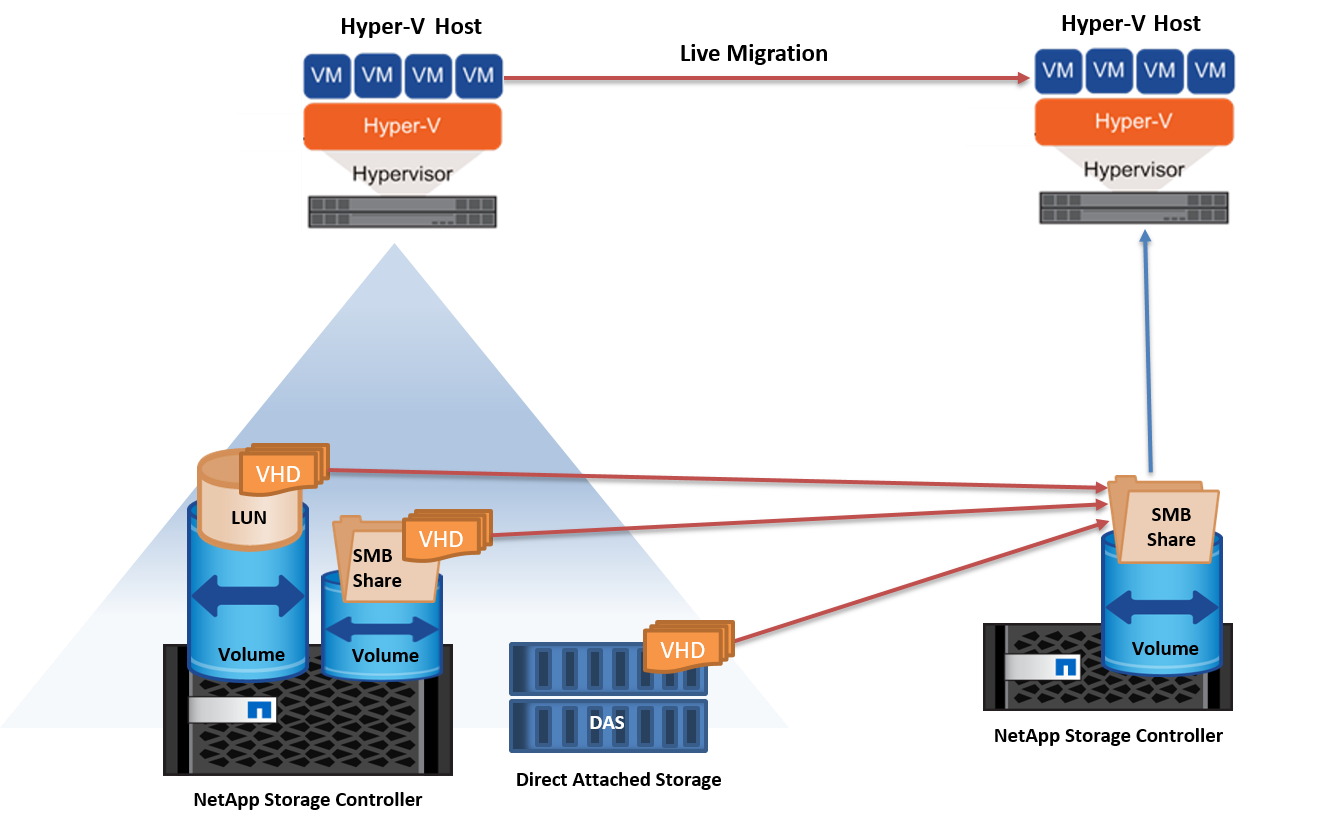
In shared nothing live migration, each Hyper-V server has its own local storage (it can be an SMB share, a LUN, or DAS), and the VM's storage is local to its Hyper-V server. When a VM is live migrated, the VM's storage is mirrored to the destination server over the client network and then the VM is migrated. The VM stored on DAS, a LUN, or an SMB/CIFS share can be moved to an SMB/CIFS share on the other Hyper-V server, as shown in the following figure. It can also be moved to a LUN, as shown in the second figure.

Further reading
For information about deploying live migration outside a clustered environment, see Appendix D: Deploy Hyper-V Live Migration Outside of a Clustered Environment.
Hyper-V Storage Live Migration
During the lifetime of a VM, you might need to move the VM storage (VHD/VHDX) to a different LUN or SMB share. This might be required if the present LUN or share is running out of space or yielding lower than expected performance.
The LUN or the share that currently hosts the VM can run out of space, be repurposed, or provide reduced performance. Under these circumstances, the VM can be moved without downtime to another LUN or share on a different volume, aggregate, or cluster. This process is faster if the storage system has copy-offload capabilities. NetApp storage systems are copy-offload enabled by default for CIFS and SAN environments.
The ODX feature performs full-file or sub-file copies between two directories residing on remote servers. A copy is created by copying data between the servers (or the same server if both the source and the destination files are on the same server). The copy is created without the client reading the data from the source or writing to the destination. This process reduces processor and memory use for the client or server and minimizes network I/O bandwidth. The copy is faster if its within same volume. If copy is across volumes, there may not be significant performance gains compared to host-based copies. Before proceeding with a copy operation on the host, confirm that the copy offload settings are configured on the storage system.
When VM storage live migration is initiated from a host, the source and the destination are identified, and the copy activity is offloaded to the storage system. Because the activity is performed by the storage system, there is negligible use of the host CPU, memory, or network.
NetApp storage controllers support the following different ODX scenarios:
-
IntraSVM. The data is owned by the same SVM:
-
Intravolume, intranode. The source and destination files or LUNs reside within the same volume. The copy is performed with FlexClone file technology, which provides additional remote copy performance benefits.
-
Intervolume, intranode. The source and destination files or LUNs are on different volumes that are on the same node.
-
Intervolume, internodes. The source and destination files or LUNs are on different volumes that are located on different nodes.
-
InterSVM. The data is owned by different SVMs.
-
Intervolume, intranode. The source and destination files or LUNs are on different volumes that are on the same node.
-
Intervolume, internodes. The source and destination files or LUNs are on different volumes that are on different nodes.
-
Intercluster. Beginning with ONTAP 9.0, ODX is also supported for intercluster LUN transfers in SAN environments. Intercluster ODX is supported for SAN protocols only, not for SMB.
After the migration is complete, the backup and replication policies must be reconfigured to reflect the new volume holding the VMs. Any previous backups that were taken cannot be used.
VM storage (VHD/VHDX) can be migrated between the following storage types:
-
DAS and the SMB share
-
DAS and LUN
-
An SMB share and a LUN
-
Between LUNs
-
Between SMB shares
Further reading
For information about deploying storage live migration, see Appendix E: Deploy Hyper-V Storage Live Migration.
Hyper-V Replica: Disaster recovery for virtual machines
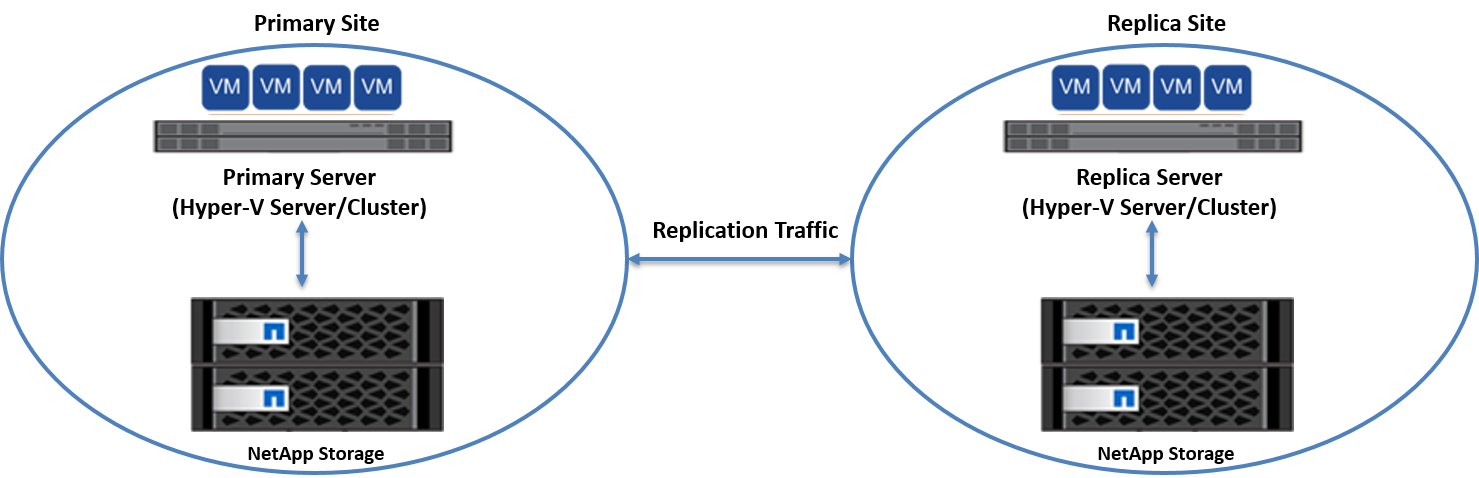
Hyper-V Replica replicates the Hyper-V VMs from a primary site to replica VMs on a secondary site, asynchronously providing disaster recovery for the VMs. The Hyper-V server at the primary site hosting the VMs is known as the primary server; the Hyper-V server at the secondary site that receives replicated VMs is known as the replica server. A Hyper-V Replica example scenario is shown in the following figure. You can use Hyper-V Replica for VMs between Hyper-V servers that are part of a failover cluster or between independent Hyper-V servers that are not part of any cluster.
Replication
After Hyper-V Replica is enabled for a VM on the primary server, initial replication creates an identical VM on the replica server. After the initial replication, Hyper-V Replica maintains a log file for the VHDs of the VM. The log file is replayed in reverse order to the replica VHD in accordance with the replication frequency. This log and the use of reverse order make sure that the latest changes are stored and replicated asynchronously. If replication does not occur in line with the expected frequency, an alert is issued.
Extended replication
Hyper-V Replica supports extended replication in which a secondary replica server can be configured for disaster recovery. A secondary replica server can be configured for the replica server to receive the changes on the replica VMs. In an extended replication scenario, the changes on the primary VMs on the primary server are replicated to the replica server. Then the changes are replicated to the extended replica server. The VMs can be failed over to the extended replica server only when both primary and replica servers go down.
Failover
Failover is not automatic; the process must be manually triggered. There are three types of failover:
-
Test failover. This type is used to verify that a replica VM can start successfully on the replica server and is initiated on the replica VM. This process creates a duplicate test VM during failover and does not affect regular production replication.
-
Planned failover. This type is used to fail over VMs during planned downtime or expected outages. This process is initiated on the primary VM, which must be turned off on the primary server before a planned failover is run. After the machine fails over, Hyper-V Replica starts the replica VM on the replica server.
-
Unplanned failover. This type is used when unexpected outages occur. This process is initiated on the replica VM and should be used only if the primary machine fails.
Recovery
When you configure replication for a VM, you can specify the number of recovery points. Recovery points represent points in time from which data can be recovered from a replicated machine.
Further reading
-
For information about deploying Hyper-V Replica outside a clustered environment, see the section "Deploy Hyper-V Replica Outside of a Clustered Environment."
-
For information about deploying Hyper-V Replica in a clustered environment, see the section "Deploy Hyper-V Replica in a Clustered Environment."