

KVM host configuration and preparation checklist for ONTAP Select
 Suggest changes
Prepare each KVM hypervisor host where an ONTAP Select node is deployed. As you prepare the hosts, you carefully assess the deployment environment to make sure that the hosts are correctly configured and ready to support the deployment of an ONTAP Select cluster.

|
The ONTAP Select Deploy administration utility doesn't perform the required network and storage configuration of the hypervisor hosts. You must manually prepare each host before deploying an ONTAP Select cluster. |
Step 1: Prepare the KVM hypervisor host
You need to prepare each of the Linux KVM servers where an ONTAP Select node is deployed. You must also prepare the server where the ONTAP Select Deploy administration utility is deployed.
-
Install Red Hat Enterprise Linux (RHEL).
Install the RHEL operating system using the ISO image. See the software compatibility information for hypervisors for a list of the supported RHEL versions. During installation, configure the system as follows:
-
Select Default as the security policy.
-
Choose the Virtualized Host software selection.
-
Verify that the destination is the local boot disk and not a RAID LUN used by ONTAP Select.
-
Verify that the host management interface is up after you boot the system.
You can edit the correct network configuration file under /etc/sysconfig/network-scripts and then bring up the interface by using the ifupcommand.
-
-
Install additional packages required for ONTAP Select.
ONTAP Select requires several additional software packages. The exact list of packages varies based on the version of Linux that you're using. As a first step, verify that the yum repository is available on your server. If it isn't available, you can retrieve it by using the
wget your_repository_locationcommand.
Some of the required packages might already be installed if you chose Virtualized Host for the software selection during installation of the Linux server. You might need to install the openvswitch package from source code as described in the Open vSwitch documentation. For additional information about the necessary packages and other configuration requirements, see the Interoperability Matrix Tool.
-
Configure the storage pools.
An ONTAP Select storage pool is a logical data container that abstracts the underlying physical storage. You must manage the storage pools on the KVM hosts where ONTAP Select is deployed.
Step 2: Create a storage pool
Create at least one storage pool at each ONTAP Select node. If you use software RAID instead of a local hardware RAID, storage disks are attached to the node for the root and data aggregates. In this case, you must still create a storage pool for the system data.
Verify that you can sign in to the Linux CLI on the host where ONTAP Select is deployed.
The ONTAP Select Deploy administration utility expects the target location for the storage pool to be specified as /dev/<pool_name>, where <pool_name> is a unique pool name on the host.
|
|
The entire capacity of the LUN is allocated when a storage pool is created. |
-
Display the local devices on the Linux host and choose the LUN that will contain the storage pool:
lsblkThe appropriate LUN is likely to be the device with the largest storage capacity.
-
Define the storage pool on the device:
virsh pool-define-as <pool_name> logical --source-dev <device_name> --target=/dev/<pool_name>For example:
virsh pool-define-as select_pool logical --source-dev /dev/sdb --target=/dev/select_pool
-
Build the storage pool:
virsh pool-build <pool_name> -
Start the storage pool:
virsh pool-start <pool_name> -
Configure the storage pool to automatically start at system boot:
virsh pool-autostart <pool_name> -
Verify that the storage pool has been created:
virsh pool-list
Step 3: Optionally, delete a storage pool
You can delete a storage pool when it's no longer needed.
Verify that you can sign in to the Linux CLI where ONTAP Select is deployed.
The ONTAP Select Deploy administration utility expects the target location for the storage pool to be specified as /dev/<pool_name>, where <pool_name> is a unique pool name on the host.
-
Verify that the storage pool is defined:
virsh pool-list -
Destroy the storage pool:
virsh pool-destroy <pool_name> -
Undefine the configuration for the inactive storage pool:
virsh pool-undefine <pool_nanme> -
Verify that the storage pool has been removed from the host:
virsh pool-list -
Verify that all logical volumes for the storage pool volume group have been deleted.
-
Display the logical volumes:
lvs -
If any logical volumes exist for the pool, delete them:
lvremove <logical_volume_name>
-
-
Verify that the volume group has been deleted:
-
Display the volume groups:
vgs -
If a volume group exists for the pool, delete it:
vgremove <volume_group_name>
-
-
Verify that the physical volume has been deleted:
-
Display the physical volumes:
pvs -
If a physical volume exists for the pool, delete it:
pvremove <physical_volume_name>
-
Step 4: Review the ONTAP Select cluster configuration
You can deploy ONTAP Select as either a multi-node cluster or a single-node cluster. In many cases, a multi-node cluster is preferable because of the additional storage capacity and high-availability (HA) capability.
The following figures illustrate the ONTAP Select networks used with a single-node cluster and four-node cluster for an ESXi host.
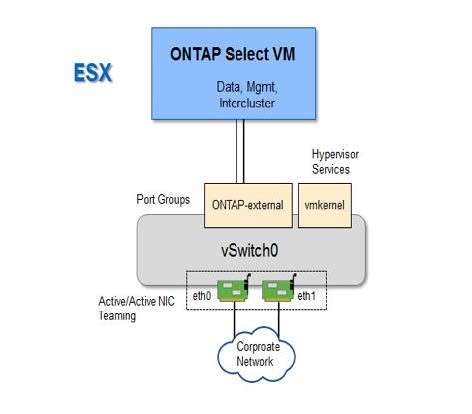
The following figure illustrates a single-node cluster. The external network carries client, management, and cross-cluster replication traffic (SnapMirror/SnapVault).
The following figure illustrates a four-node cluster showing two networks. The internal network enables communication among the nodes in support of the ONTAP cluster network services. The external network carries client, management, and cross-cluster replication traffic (SnapMirror/SnapVault).
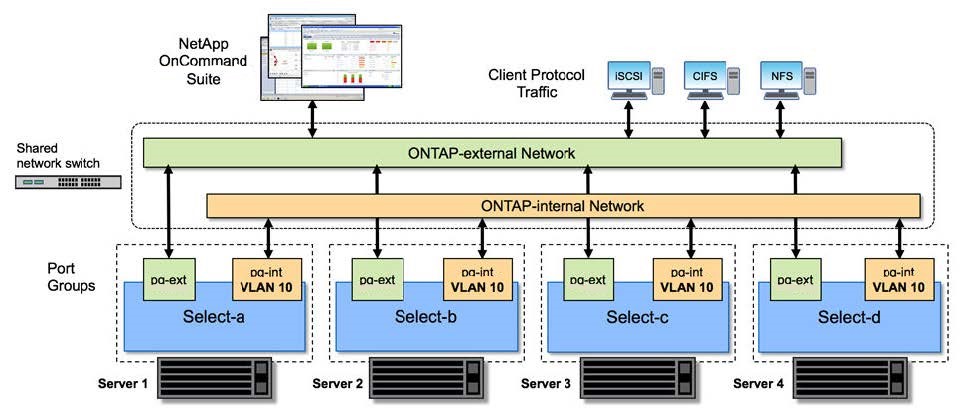
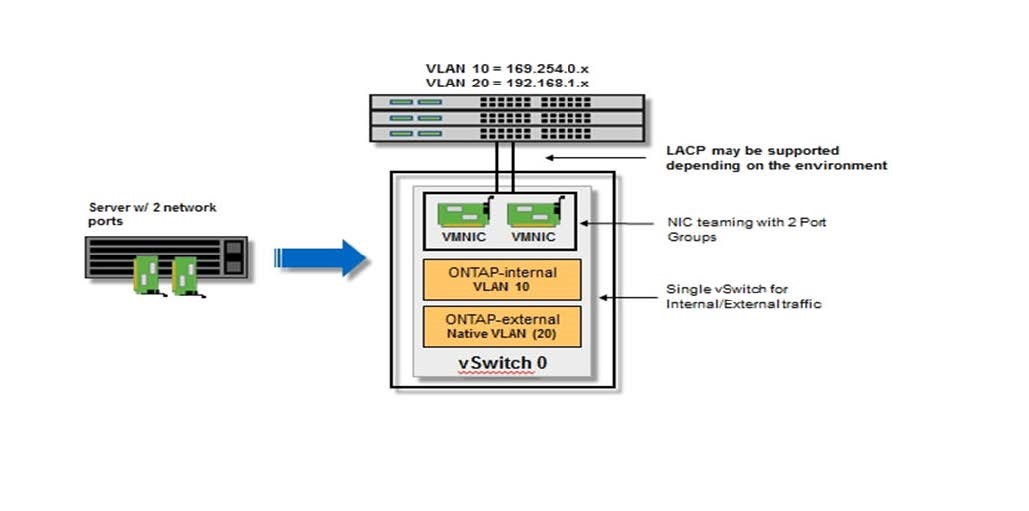
The following figure illustrates the typical network configuration for a single ONTAP Select virtual machine within a four-node cluster. There are two separate networks: ONTAP-internal and ONTAP-external.
Step 5: Configure Open vSwitch
Use Open vSwitch to configure a software-defined switch on each KVM host node.
Verify that the network manager is disabled and the native Linux network service is enabled.
ONTAP Select requires two separate networks, both of which utilize port bonding to provide HA capability for the networks.
-
Verify that Open vSwitch is active on the host:
-
Determine if Open vSwitch is running:
systemctl status openvswitch -
If Open vSwitch is not running, start it:
systemctl start openvswitch
-
-
Display the Open vSwitch configuration:
ovs-vsctl showThe configuration appears empty if Open vSwitch has not already been configured on the host.
-
Add a new vSwitch instance:
ovs-vsctl add-br <bridge_name>For example:
ovs-vsctl add-br ontap-br -
Bring the network interfaces down:
ifdown <interface_1> ifdown <interface_2> -
Combine the links using the Link Aggregation Control Protocol (LACP):
ovs-vsctl add-bond <internal_network> bond-br <interface_1> <interface_2> bond_mode=balance-slb lacp=active other_config:lacp-time=fast
You only need to configure a bond if there is more than one interface. -
Bring the network interfaces up:
ifup <interface_1>
ifup <interface_2>