ONTAP Select software RAID configuration services for local attached storage
 Suggest changes


Software RAID is a RAID abstraction layer implemented within the ONTAP software stack. It provides the same functionality as the RAID layer within a traditional ONTAP platform such as FAS. The RAID layer performs drive parity calculations and provides protection against individual drive failures within an ONTAP Select node.
Independent of the hardware RAID configurations, ONTAP Select also provides a software RAID option. A hardware RAID controller might not be available or might be undesirable in certain environments, such as when ONTAP Select is deployed on a small form-factor commodity hardware. Software RAID expands the available deployment options to include such environments. To enable software RAID in your environment, here are some points to remember:
-
It is available with a Premium or Premium XL license.
-
It only supports SSD or NVMe (requires Premium XL license) drives for ONTAP root and data disks.
-
It requires a separate system disk for the ONTAP Select VM boot partition.
-
Choose a separate disk, either an SSD or an NVMe drive, to create a datastore for the system disks (NVRAM, Boot/CF card, Coredump, and Mediator in a multi-node setup).
-

|
|
Software RAID configuration for local attached storage
When using software RAID, the absence of a hardware RAID controller is ideal, but, if a system does have an existing RAID controller, it must adhere to the following requirements:
-
You must disable the hardware RAID controller so that disks can be presented directly to the system (a JBOD). You can usually make this change in the RAID controller BIOS.
-
Or the hardware RAID controller should be in the SAS HBA mode. For example, some BIOS configurations allow an “AHCI” mode in addition to RAID, which you could choose to enable the JBOD mode. This enables a passthrough, so that the physical drives can be seen as is on the host.
Depending on the maximum number of drives supported by the controller, an additional controller might be required. With the SAS HBA mode, ensure that the I/O controller (SAS HBA) is supported with a minimum of 6Gbps speed. However, NetApp recommends a 12Gbps speed.
No other hardware RAID controller modes or configurations is supported. For example, some controllers allow a RAID 0 support that can artificially enable disks to pass-through but the implications can be undesirable. The supported size of physical disks (SSD only) is between 200GB and 16TB.

|
Administrators need to keep track of which drives are in use by the ONTAP Select VM and prevent inadvertent use of those drives on the host. |
ONTAP Select virtual and physical disks
For configurations with hardware RAID controllers, physical disk redundancy is provided by the RAID controller. ONTAP Select is presented with one or more VMDKs from which the ONTAP admin can configure data aggregates. These VMDKs are striped in a RAID 0 format because using ONTAP software RAID is redundant, inefficient, and ineffective due to resiliency provided at the hardware level. Furthermore, the VMDKs used for system disks are in the same datastore as the VMDKs used to store user data.
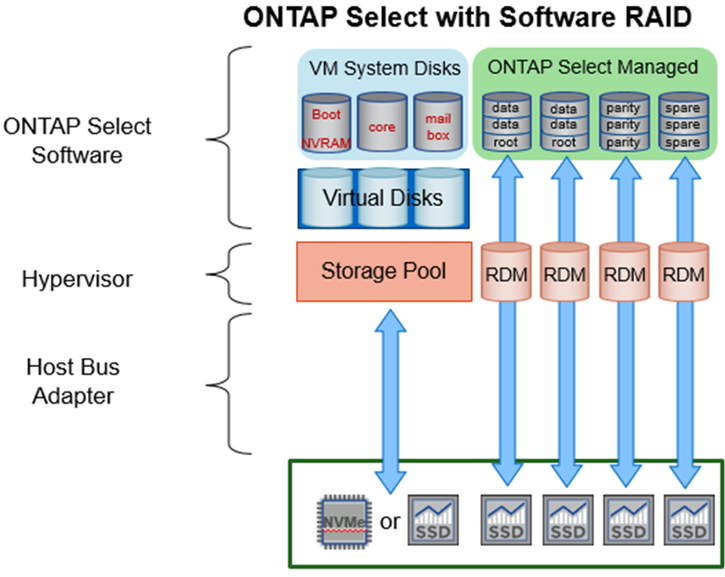
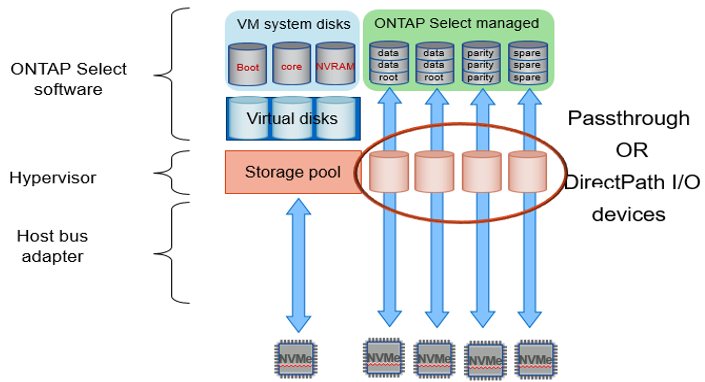
When using software RAID, ONTAP Deploy presents ONTAP Select with a set of VMDKs and physical disks Raw Device Mappings [RDMs] for SSDs and passthrough or DirectPath IO devices for NVMe.
The following figures show this relationship in more detail, highlighting the difference between the virtualized disks used for the ONTAP Select VM internals and the physical disks used to store user data.
ONTAP Select software RAID: use of virtualized disks and RDMs
The system disks (VMDKs) reside in the same datastore and on the same physical disk. The virtual NVRAM disk requires a fast and durable media. Therefore, only NVMe and SSD-type datastores are supported.
The system disks (VMDKs) reside in the same datastore and on the same physical disk. The virtual NVRAM disk requires a fast and durable media. Therefore, only NVMe and SSD-type datastores are supported. When using NVMe drives for data, the system disk should also be an NVMe device for performance reasons. A good candidate for the system disk in an all NVMe configuration is an INTEL Optane card.

|
With the current release, it is not possible to further separate the ONTAP Select system disks across multiple datastores or multiple physical drives. |
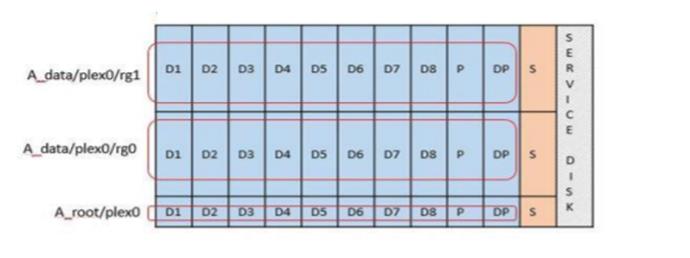
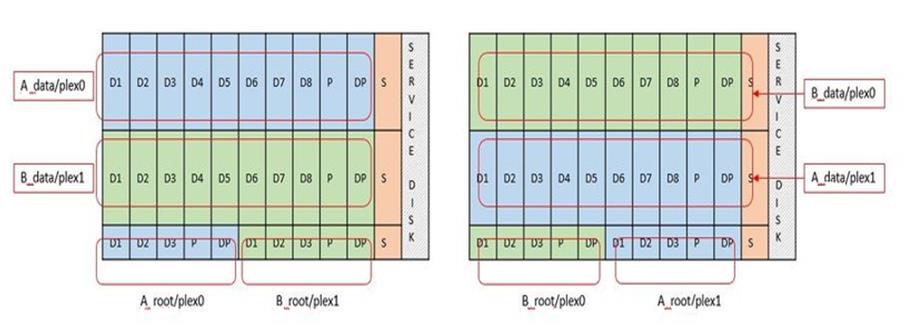
Each data disk is divided into three parts: a small root partition (stripe) and two equal-sized partitions to create two data disks seen within the ONTAP Select VM. Partitions use the Root Data Data (RD2) schema as shown in the following figures for a single node cluster and for a node in an high-availability (HA) pair.
P denotes a parity drive, DP denotes a dual parity drive, and S denotes a spare drive.
RDD disk partitioning for single-node clusters

RDD disk partitioning for multinode clusters (HA pairs)

ONTAP software RAID supports the following RAID types: RAID 4, RAID-DP, and RAID-TEC. These are the same RAID constructs used by FAS and AFF platforms. For root provisioning, ONTAP Select supports only RAID 4 and RAID-DP. When using RAID-TEC for the data aggregate, the overall protection is RAID-DP. ONTAP Select HA uses a shared-nothing architecture that replicates each node’s configuration to the other node. That means each node must store its root partition and a copy of its peer’s root partition. A data disk has a single root partition. This means that the minimum number of data disks varies depending on whether the ONTAP Select node is part of an HA pair.
For single node clusters, all data partitions are used to store local (active) data. For nodes that are part of an HA pair, one data partition is used to store local (active) data for that node and the second data partition is used to mirror active data from the HA peer.
Passthrough (DirectPath IO) devices vs. Raw Device Maps (RDMs)
ESX and KVM hypervisors don't support NVMe disks as Raw Device Maps (RDMs). To allow ONTAP Select to take direct control of NVMe disks, you must configure these drives as passthrough devices within ESX or KVM. When configuring an NVMe device as a passthrough device, it requires support from the server BIOS and you might need to reboot the host. Additionally, there are limits to the number of passthrough devices that can be assigned per host, which might vary depending on the platform. However, ONTAP Deploy limits this to 14 NVMe devices per ONTAP Select node. This means that the NVMe configuration provides a very high IOPs density (IOPs/TB) at the expense of total capacity. Alternatively, if you desire a high performance configuration with larger storage capacity, the recommended configuration is a large ONTAP Select VM size, an INTEL Optane card for the system disk, and a nominal number of SSD drives for data storage.

|
To take full advantage of NVMe performance, consider the large ONTAP Select VM size. |
There is an additional difference between passthrough devices and RDMs. RDMs can be mapped to a running VM. Passthrough devices require a VM reboot. This means that any NVMe drive replacement or capacity expansion (drive addition) procedure will require an ONTAP Select VM reboot. The drive replacement and capacity expansion (drive addition) operation is driven by a workflow in ONTAP Deploy. ONTAP Deploy manages the ONTAP Select reboot for single node clusters and failover / failback for HA pairs. However, it is important to note the difference between working with SSD data drives (no ONTAP Select reboot / failovers are required) and working with NVMe data drives (ONTAP Select reboot / failover is required).
Physical and virtual disk provisioning
To provide a more streamlined user experience, ONTAP Deploy automatically provisions the system (virtual) disks from the specified datastore (physical system disk) and attaches them to the ONTAP Select VM. This operation occurs automatically during the initial setup so that the ONTAP Select VM can boot. The RDMs are partitioned and the root aggregate is automatically built. If the ONTAP Select node is part of an HA pair, the data partitions are automatically assigned to a local storage pool and a mirror storage pool. This assignment occurs automatically during both cluster-creation operations and storage-add operations.
Because the data disks on the ONTAP Select VM are associated with the underlying physical disks, there are performance implications for creating configurations with a larger number of physical disks.

|
The root aggregate’s RAID group type depends on the number of disks available. ONTAP Deploy picks the appropriate RAID group type. If it has sufficient disks allocated to the node, it uses RAID-DP, otherwise it creates a RAID-4 root aggregate. |
When adding capacity to an ONTAP Select VM using software RAID, the administrator must consider the physical drive size and the number of drives required. For details, see Increase storage capacity.
Similar to FAS and AFF systems, you can only add drives with equal or larger capacities to an existing RAID group. Larger capacity drives are right sized. If you are creating new RAID groups, the new RAID group size should match the existing RAID group size to make sure that the overall aggregate performance does not deteriorate.
Match an ONTAP Select disk to the corresponding ESX or KVM disk
ONTAP Select disks are usually labeled NET x.y. You can use the following ONTAP command to obtain the disk UUID:
<system name>::> disk show NET-1.1
Disk: NET-1.1
Model: Micron_5100_MTFD
Serial Number: 1723175C0B5E
UID: *500A0751:175C0B5E*:00000000:00000000:00000000:00000000:00000000:00000000:00000000:00000000
BPS: 512
Physical Size: 894.3GB
Position: shared
Checksum Compatibility: advanced_zoned
Aggregate: -
Plex: -This UID can be matched with the device UID displayed in the ‘storage devices’ tab for the ESX host
In the ESXi or KVM shell, you can enter the following command to blink the LED for a given physical disk (identified by its naa.unique-id).
esxcli storage core device set -d <naa_id> -l=locator -L=<seconds>cat /sys/block/<block_device_id>/device/wwidMultiple drive failures when using software RAID
It is possible for a system to encounter a situation in which multiple drives are in a failed state at the same time. The behavior of the system depends on the aggregate RAID protection and the number of failed drives.
A RAID4 aggregate can survive one disk failure, a RAID-DP aggregate can survive two disk failures, and a RAID-TEC aggregate can survive three disks failures.
If the number of failed disks is less than the maximum number of failures that RAID type supports, and if a spare disk is available, the reconstruction process starts automatically. If spare disks are not available, the aggregate serves data in a degraded state until spare disks are added.
If the number of failed disks is more than the maximum number of failures that the RAID type supports, then the local plex is marked as failed, and the aggregate state is degraded. Data is served from the second plex residing on the HA partner. This means that any I/O requests for node 1 are sent through cluster interconnect port e0e (iSCSI) to the disks physically located on node 2. If the second plex also fails, then the aggregate is marked as failed and data is unavailable.
A failed plex must be deleted and recreated for the correct mirroring of data to resume. Note that a multi-disk failure resulting in a data aggregate being degraded also results in a root aggregate being degraded. ONTAP Select uses the root-data-data (RDD) partitioning schema to split each physical drive into a root partition and two data partitions. Therefore, losing one or more disks might impact multiple aggregates, including the local root or the copy of the remote root aggregate, as well as the local data aggregate and the copy of the remote data aggregate.
A failed plex is deleted and recreated in the following example output:
C3111E67::> storage aggregate plex delete -aggregate aggr1 -plex plex1
Warning: Deleting plex "plex1" of mirrored aggregate "aggr1" in a non-shared HA configuration will disable its synchronous mirror protection and disable
         negotiated takeover of node "sti-rx2540-335a" when aggregate "aggr1" is online.
Do you want to continue? {y|n}: y
[Job 78] Job succeeded: DONE

C3111E67::> storage aggregate mirror -aggregate aggr1
Info: Disks would be added to aggregate "aggr1" on node "sti-rx2540-335a" in the following manner:
      Second Plex
        RAID Group rg0, 5 disks (advanced_zoned checksum, raid_dp)
                                                            Usable Physical
          Position   Disk                      Type           Size     Size
          ---------- ------------------------- ---------- -------- --------
          shared     NET-3.2                   SSD               -        -
          shared     NET-3.3                   SSD               -        -
          shared     NET-3.4                   SSD         208.4GB  208.4GB
          shared     NET-3.5                   SSD         208.4GB  208.4GB
          shared     NET-3.12                  SSD         208.4GB  208.4GB

      Aggregate capacity available for volume use would be 526.1GB.
      625.2GB would be used from capacity license.
Do you want to continue? {y|n}: y

C3111E67::> storage aggregate show-status -aggregate aggr1
Owner Node: sti-rx2540-335a
 Aggregate: aggr1 (online, raid_dp, mirrored) (advanced_zoned checksums)
  Plex: /aggr1/plex0 (online, normal, active, pool0)
   RAID Group /aggr1/plex0/rg0 (normal, advanced_zoned checksums)
                                                              Usable Physical
     Position Disk                        Pool Type     RPM     Size     Size Status
     -------- --------------------------- ---- ----- ------ -------- -------- ----------
     shared   NET-1.1                      0   SSD        -  205.1GB  447.1GB (normal)
     shared   NET-1.2                      0   SSD        -  205.1GB  447.1GB (normal)
     shared   NET-1.3                      0   SSD        -  205.1GB  447.1GB (normal)
     shared   NET-1.10                     0   SSD        -  205.1GB  447.1GB (normal)
     shared   NET-1.11                     0   SSD        -  205.1GB  447.1GB (normal)
  Plex: /aggr1/plex3 (online, normal, active, pool1)
   RAID Group /aggr1/plex3/rg0 (normal, advanced_zoned checksums)
                                                              Usable Physical
     Position Disk                        Pool Type     RPM     Size     Size Status
     -------- --------------------------- ---- ----- ------ -------- -------- ----------
     shared   NET-3.2                      1   SSD        -  205.1GB  447.1GB (normal)
     shared   NET-3.3                      1   SSD        -  205.1GB  447.1GB (normal)
     shared   NET-3.4                      1   SSD        -  205.1GB  447.1GB (normal)
     shared   NET-3.5                      1   SSD        -  205.1GB  447.1GB (normal)
     shared   NET-3.12                     1   SSD        -  205.1GB  447.1GB (normal)
10 entries were displayed..

|
In order to test or simulate one or multiple drive failures, use the set advanced disk unfail -disk NET-x.y -spare true disk show -broken The output for the last command should be empty. |
Virtualized NVRAM
NetApp FAS systems are traditionally fitted with a physical NVRAM PCI card. This card is a high-performing card containing nonvolatile flash memory that provides a significant boost in write performance. It does this by granting ONTAP the ability to immediately acknowledge incoming writes back to the client. It can also schedule the movement of modified data blocks back to slower storage media in a process known as destaging.
Commodity systems are not typically fitted with this type of equipment. Therefore, the functionality of the NVRAM card has been virtualized and placed into a partition on the ONTAP Select system boot disk. It is for this reason that placement of the system virtual disk of the instance is extremely important.


