

Manage ONTAP Mediator
 Suggest changes
Manage ONTAP Mediator, including changing user credentials, stopping and re-enabling the service, verifying its health, and installing or uninstalling SCST for host maintenance. You can also manage certificates, such as regenerating self-signed certificates, replacing them with trusted third-party certificates, and troubleshooting certificate-related issues.
Change the username
You can change the username using the following procedure.
Perform this task on the Linux host where you installed ONTAP Mediator.
If you are unable to reach this command, you might need to run the command using the full path as shown in the following example:
/usr/local/bin/mediator_username
Change the username by choosing one of the following options:
-
Option (a): Run the command
mediator_change_userand respond to the prompts as shown in the following example:[root@mediator-host ~]# mediator_change_user Modify the Mediator API username by entering the following values: Mediator API User Name: mediatoradmin Password: New Mediator API User Name: mediator The account username has been modified successfully. [root@mediator-host ~]# -
Option (b): Run the following command:
MEDIATOR_USERNAME=mediator MEDIATOR_PASSWORD=mediator2 MEDIATOR_NEW_USERNAME=mediatoradmin mediator_change_user[root@mediator-host ~]# MEDIATOR_USERNAME=mediator MEDIATOR_PASSWORD='mediator2' MEDIATOR_NEW_USERNAME=mediatoradmin mediator_change_user The account username has been modified successfully. [root@mediator-host ~]#
Change the password
You can change the password using the following procedure.
Perform this task on the Linux host where you installed ONTAP Mediator.
If you are unable to reach this command, you might need to run the command using the full path as shown in the following example:
/usr/local/bin/mediator_change_password
Change the password by choosing one of the following options:
-
Option (a): Run the
mediator_change_passwordcommand and respond to the prompts as shown in the following example:[root@mediator-host ~]# mediator_change_password Change the Mediator API password by entering the following values: Mediator API User Name: mediatoradmin Old Password: New Password: Confirm Password: The password has been updated successfully. [root@mediator-host ~]# -
Option (b): Run the following command:
MEDIATOR_USERNAME=mediatoradmin MEDIATOR_PASSWORD=mediator1 MEDIATOR_NEW_PASSWORD=mediator2 mediator_change_passwordThe example shows that the password is changed from "mediator1" to "mediator2".
 [root@mediator-host ~]# MEDIATOR_USERNAME=mediatoradmin MEDIATOR_PASSWORD=mediator1 MEDIATOR_NEW_PASSWORD=mediator2 mediator_change_password
 The password has been updated successfully.
 [root@mediator-host ~]#
Stop ONTAP Mediator
To stop ONTAP Mediator, perform the following steps:
-
Stop ONTAP Mediator:
systemctl stop ontap_mediator -
Stop SCST:
systemctl stop mediator-scst -
Disable ONTAP Mediator and SCST:
systemctl disable ontap_mediator mediator-scst
Re-enable ONTAP Mediator
To re-enable ONTAP Mediator, perform the following steps:
-
Enable ONTAP Mediator and SCST:
systemctl enable ontap_mediator mediator-scst -
Start SCST:
systemctl start mediator-scst -
Start ONTAP Mediator:
systemctl start ontap_mediator
Verify ONTAP Mediator is healthy
After you install ONTAP Mediator, verify that it is running successfully.
-
View the status of ONTAP Mediator:
-
systemctl status ontap_mediator[root@mediator_host ~]# systemctl status ontap_mediator ontap_mediator.service - ONTAP Mediator Loaded: loaded (/etc/systemd/system/ontap_mediator.service; enabled; vendor preset: disabled) Active: active (running) since Mon 2022-04-18 10:41:49 EDT; 1 weeks 0 days ago Process: 286710 ExecStop=/bin/kill -s INT $MAINPID (code=exited, status=0/SUCCESS) Main PID: 286712 (uwsgi) Status: "uWSGI is ready" Tasks: 3 (limit: 49473) Memory: 139.2M CGroup: /system.slice/ontap_mediator.service ├─286712 /opt/netapp/lib/ontap_mediator/pyenv/bin/uwsgi --ini /opt/netapp/lib/ontap_mediator/uwsgi/ontap_mediator.ini ├─286716 /opt/netapp/lib/ontap_mediator/pyenv/bin/uwsgi --ini /opt/netapp/lib/ontap_mediator/uwsgi/ontap_mediator.ini └─286717 /opt/netapp/lib/ontap_mediator/pyenv/bin/uwsgi --ini /opt/netapp/lib/ontap_mediator/uwsgi/ontap_mediator.ini [root@mediator_host ~]# -
systemctl status mediator-scst[root@mediator_host ~]# systemctl status mediator-scst Loaded: loaded (/etc/systemd/system/mediator-scst.service; enabled; vendor preset: disabled) Active: active (running) since Mon 2022-04-18 10:41:47 EDT; 1 weeks 0 days ago Process: 286595 ExecStart=/etc/init.d/scst start (code=exited, status=0/SUCCESS) Main PID: 286662 (iscsi-scstd) Tasks: 1 (limit: 49473) Memory: 1.2M CGroup: /system.slice/mediator-scst.service └─286662 /usr/local/sbin/iscsi-scstd [root@mediator_host ~]#
-
-
Confirm the ports that are used by ONTAP Mediator:
netstat[root@scspr1905507001 ~]# netstat -anlt | grep -E '3260|31784' tcp 0 0 0.0.0.0:31784 0.0.0.0:* LISTEN tcp 0 0 0.0.0.0:3260 0.0.0.0:* LISTEN tcp6 0 0 :::3260 :::* LISTEN
Uninstall ONTAP Mediator
If necessary, you can remove ONTAP Mediator.
You must disconnect ONTAP Mediator from ONTAP before removing it.
Perform this task on the Linux host where you installed ONTAP Mediator.
If you are unable to reach this command, you might need to run the command using the full path as shown in the following example:
/usr/local/bin/uninstall_ontap_mediator
-
Uninstall ONTAP Mediator:
uninstall_ontap_mediator[root@mediator-host ~]# uninstall_ontap_mediator ONTAP Mediator: Self Extracting Uninstaller + Removing ONTAP Mediator. (Log: /tmp/ontap_mediator.GmRGdA/uninstall_ontap_mediator/remove.log) + Remove successful. [root@mediator-host ~]#
Regenerate a temporary self-signed certificate
Beginning with ONTAP Mediator 1.7, you can regenerate a temporary self-signed certificate using the following procedure.

|
This procedure is only supported on systems running ONTAP Mediator 1.7 or later. |
-
Perform this task on the Linux host where you installed ONTAP Mediator.
-
You can perform this task only if the generated self-signed certificates have become obsolete due to changes to the hostname or IP address of the host after installing ONTAP Mediator.
-
After the temporary self-signed certificate has been replaced by a trusted third-party certificate, you do not use this task to regenerate a certificate. The absence of a self-signed certificate will cause this procedure to fail.
To regenerate a new temporary self-signed certificate for the current host, perform the following step:
-
Restart ONTAP Mediator:
./make_self_signed_certs.sh overwrite[root@xyz000123456 ~]# cd /opt/netapp/lib/ontap_mediator/ontap_mediator/server_config [root@xyz000123456 server_config]# ./make_self_signed_certs.sh overwrite Adding Subject Alternative Names to the self-signed server certificate # # OpenSSL example configuration file. Generating self-signed certificates Generating RSA private key, 4096 bit long modulus (2 primes) ..................................................................................................................................................................++++ ........................................................++++ e is 65537 (0x010001) Generating a RSA private key ................................................++++ .............................................................................................................................................++++ writing new private key to 'ontap_mediator_server.key' ----- Signature ok subject=C = US, ST = California, L = San Jose, O = "NetApp, Inc.", OU = ONTAP Core Software, CN = ONTAP Mediator, emailAddress = support@netapp.com Getting CA Private Key
Replace self-signed certificates with trusted third-party certificates
If supported, you can replace self-signed certificates with trusted third-party certificates.

|
|
-
Perform this task on the Linux host where you installed ONTAP Mediator.
-
You can perform this task if the generated self-signed certificates need to be replaced by certificates obtained from a trusted subordinate certificate authority (CA). To accomplish this, you should have access to a trusted public-key infrastructure (PKI) authority.
-
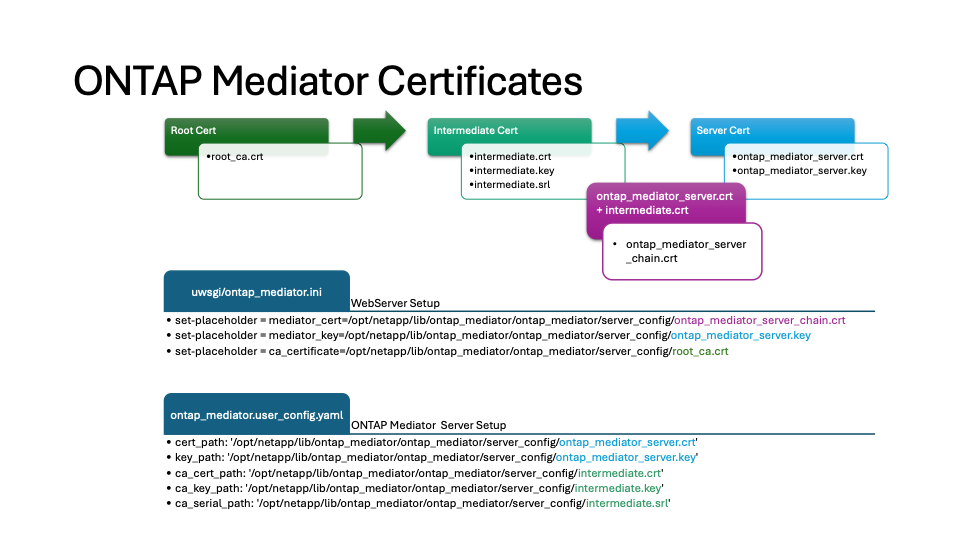
The following image shows the purposes of each ONTAP Mediator certificate.

-
The following image shows configuration for the web server setup and ONTAP Mediator setup.
Step 1: Obtain a certificate from a third-party issuing a CA certificate
You can obtain a certificate from a PKI authority using the following procedure.
The following example demonstrates replacing the self-signed certificate actors with the third-party certificate actors located at /opt/netapp/lib/ontap_mediator/ontap_mediator/server_config/.
|
|
The example illustrates the necessary criteria for the certificates required for ONTAP Mediator. You can obtain the certificates from a PKI authority in a way that might be different to this procedure. Adjust the procedure according to your business need. |
-
Create a private key
intermediate.keyand a configuration fileopenssl_ca.cnfthat will be consumed by the PKI authority to generate a certificate.-
Generate the private key
intermediate.key:Example
openssl genrsa -aes256 -out intermediate.key 4096 -
The configuration file
openssl_ca.cnf(located at/opt/netapp/lib/ontap_mediator/ontap_mediator/server_config/openssl_ca.cnf) defines the properties that the generated certificate must have.
-
-
Use the private key and configuration file to create a certificate signing request
intermediate.csr:Example:
openssl req -key <private_key_name>.key -new -out <certificate_csr_name>.csr -config <config_file_name>.cnf[root@mediator_host server_config]# openssl req -key intermediate.key -new -config openssl_ca.cnf -out intermediate.csr Enter pass phrase for intermediate.key: [root@mediator_host server_config]# cat intermediate.csr -----BEGIN CERTIFICATE REQUEST----- <certificate_value> -----END CERTIFICATE REQUEST-----
-
Send the certificate signing request
intermediate.csrto a PKI authority for their signature.The PKI authority verifies the request and signs the
.csr, generating the certificateintermediate.crt. Additionally, you need to obtain theroot_ca.crtcertificate that signed theintermediate.crtcertificate from the PKI authority.
For SnapMirror Business Continuity (SM-BC) clusters, you must add the intermediate.crtandroot_ca.crtcertificates to an ONTAP cluster. See Configure ONTAP Mediator and clusters for SnapMirror active sync.
-
Create a private key
ca.keyand a configuration fileopenssl_ca.cnfthat will be consumed by the PKI authority to generate a certificate.-
Generate the private key
ca.key:Example
openssl genrsa -aes256 -out ca.key 4096 -
The configuration file
openssl_ca.cnf(located at/opt/netapp/lib/ontap_mediator/ontap_mediator/server_config/openssl_ca.cnf) defines the properties that the generated certificate must have.
-
-
Use the private key and configuration file to create a certificate signing request
ca.csr:Example:
openssl req -key <private_key_name>.key -new -out <certificate_csr_name>.csr -config <config_file_name>.cnf[root@mediator_host server_config]# openssl req -key ca.key -new -config openssl_ca.cnf -out ca.csr Enter pass phrase for ca.key: [root@mediator_host server_config]# cat ca.csr -----BEGIN CERTIFICATE REQUEST----- <certificate_value> -----END CERTIFICATE REQUEST-----
-
Send the certificate signing request
ca.csrto a PKI authority for their signature.The PKI authority verifies the request and signs the
.csr, generating the certificateca.crt. Additionally, you need to obtain theroot_ca.crt that signed the `ca.crtcertificate from the PKI authority.
For SnapMirror Business Continuity (SM-BC) clusters, you must add the ca.crtandroot_ca.crtcertificates to an ONTAP cluster. See Configure ONTAP Mediator and clusters for SnapMirror active sync.
Step 2: Generate a server certificate by signing with a third-party CA certification
A server certificate must be signed by the private key intermediate.key and the third-party certificate intermediate.crt. Additionally, the configuration file /opt/netapp/lib/ontap_mediator/ontap_mediator/server_config/openssl_server.cnf contains certain attributes that specify the properties required for server certificates issued by OpenSSL.
The following commands can generate a server certificate.
-
To generate a server certificate signing request (CSR), run the following command from the
/opt/netapp/lib/ontap_mediator/ontap_mediator/server_configfolder:openssl req -config openssl_server.cnf -extensions v3_req -nodes -newkey rsa:4096 -sha512 -keyout ontap_mediator_server.key -out ontap_mediator_server.csr -
To generate a server certificate from the CSR, run the following command from the
/opt/netapp/lib/ontap_mediator/ontap_mediator/server_configfolder:
These files were obtained from a PKI authority. If you are using a different certificate name, replace intermediate.crtandintermediate.keywith the relevant file names.openssl x509 -extfile openssl_server.cnf -extensions v3_req -CA intermediate.crt -CAkey intermediate.key -CAcreateserial -sha512 -days 1095 -req -in ontap_mediator_server.csr -out ontap_mediator_server.crt-
The
-CAcreateserialoption is used to generate theintermediate.srlfiles.
-
A server certificate must be signed by the private key ca.key and the third-party certificate ca.crt. Additionally, the configuration file /opt/netapp/lib/ontap_mediator/ontap_mediator/server_config/openssl_server.cnf contains certain attributes that specify the properties required for server certificates issued by OpenSSL.
The following commands can generate a server certificate.
-
To generate a server certificate signing request (CSR), run the following command from the
/opt/netapp/lib/ontap_mediator/ontap_mediator/server_configfolder:openssl req -config openssl_server.cnf -extensions v3_req -nodes -newkey rsa:4096 -sha512 -keyout ontap_mediator_server.key -out ontap_mediator_server.csr -
To generate a server certificate from the CSR, run the following command from the
/opt/netapp/lib/ontap_mediator/ontap_mediator/server_configfolder:
These files were obtained from a PKI authority. If you are using a different certificate name, replace ca.crtandca.keywith the relevant file names.openssl x509 -extfile openssl_server.cnf -extensions v3_req -CA ca.crt -CAkey ca.key -CAcreateserial -sha512 -days 1095 -req -in ontap_mediator_server.csr -out ontap_mediator_server.crt-
The
-CAcreateserialoption is used to generate theca.srlfiles.
-
Step 3: Replace new third-party CA certificate and server certificate in ONTAP Mediator configuration
The certificate configuration is supplied to ONTAP Mediator in the configuration file located at /opt/netapp/lib/ontap_mediator/ontap_mediator/server_config/ontap_mediator.config.yaml. The file includes the following attributes:
cert_path: '/opt/netapp/lib/ontap_mediator/ontap_mediator/server_config/ontap_mediator_server.crt'
key_path: '/opt/netapp/lib/ontap_mediator/ontap_mediator/server_config/ontap_mediator_server.key'
ca_cert_path: '/opt/netapp/lib/ontap_mediator/ontap_mediator/server_config/intermediate.crt'
ca_key_path: '/opt/netapp/lib/ontap_mediator/ontap_mediator/server_config/intermediate.key'
ca_serial_path: '/opt/netapp/lib/ontap_mediator/ontap_mediator/server_config/intermediate.srl'
-
cert_pathandkey_pathare server certificate variables. -
ca_cert_path,ca_key_path, andca_serial_pathare CA certificate variables.
-
Replace all
intermediate.*files with the third-party certificates. -
Create a certificate chain from the
intermediate.crtandontap_mediator_server.crtcertificates:cat ontap_mediator_server.crt intermediate.crt > ontap_mediator_server_chain.crt -
Update the
/opt/netapp/lib/ontap_mediator/uvicorn/config.jsonfile.Update the values of
ssl_keyfile,ssl_certfile, andssl_ca_certs:ssl_keyfile:/opt/netapp/lib/ontap_mediator/ontap_mediator/server_config/ontap_mediator_server.keyssl_certfile:/opt/netapp/lib/ontap_mediator/ontap_mediator/server_config/ontap_mediator_server_chain.crtssl_ca_certs:/opt/netapp/lib/ontap_mediator/ontap_mediator/server_config/root_ca.crt-
The
ssl_keyfilevalue is the key path in theontap_mediator_server.crtfile, which isontap_mediator_server.key. -
The
ssl_certfilevalue is the path of theontap_mediator_server_chain.crtfile. -
The
ssl_ca_certsvalue is the path of theroot_ca.crtfile.
-
-
Verify that the following attributes of the newly generated certificates are set correctly:
-
Linux Group Owner:
netapp:netapp -
Linux permissions:
600
-
-
Restart ONTAP Mediator:
systemctl restart ontap_mediator
The certificate configuration is supplied to ONTAP Mediator in the configuration file located at /opt/netapp/lib/ontap_mediator/ontap_mediator/server_config/ontap_mediator.config.yaml. The file includes the following attributes:
cert_path: '/opt/netapp/lib/ontap_mediator/ontap_mediator/server_config/ontap_mediator_server.crt'
key_path: '/opt/netapp/lib/ontap_mediator/ontap_mediator/server_config/ontap_mediator_server.key'
ca_cert_path: '/opt/netapp/lib/ontap_mediator/ontap_mediator/server_config/intermediate.crt'
ca_key_path: '/opt/netapp/lib/ontap_mediator/ontap_mediator/server_config/intermediate.key'
ca_serial_path: '/opt/netapp/lib/ontap_mediator/ontap_mediator/server_config/intermediate.srl'
-
cert_pathandkey_pathare server certificate variables. -
ca_cert_path,ca_key_path, andca_serial_pathare CA certificate variables.
-
Replace all
intermediate.*files with the third-party certificates. -
Create a certificate chain from the
intermediate.crtandontap_mediator_server.crtcertificates:cat ontap_mediator_server.crt intermediate.crt > ontap_mediator_server_chain.crt -
Update the
/opt/netapp/lib/ontap_mediator/uwsgi/ontap_mediator.inifile.Update the values of
mediator_cert,mediator_key, andca_certificate:set-placeholder = mediator_cert = /opt/netapp/lib/ontap_mediator/ontap_mediator/server_config/ontap_mediator_server_chain.crtset-placeholder = mediator_key = /opt/netapp/lib/ontap_mediator/ontap_mediator/server_config/ontap_mediator_server.keyset-placeholder = ca_certificate = /opt/netapp/lib/ontap_mediator/ontap_mediator/server_config/root_ca.crt-
The
mediator_certvalue is the path of theontap_mediator_server_chain.crtfile. -
The
mediator_key valueis the key path in theontap_mediator_server.crtfile, which isontap_mediator_server.key. -
The
ca_certificatevalue is the path of theroot_ca.crtfile.
-
-
Verify that the following attributes of the newly generated certificates are set correctly:
-
Linux Group Owner:
netapp:netapp -
Linux permissions:
600
-
-
Restart ONTAP Mediator:
systemctl restart ontap_mediator
The certificate configuration is supplied to ONTAP Mediator in the configuration file located at /opt/netapp/lib/ontap_mediator/ontap_mediator/server_config/ontap_mediator.config.yaml. The file includes the following attributes:
cert_path: '/opt/netapp/lib/ontap_mediator/ontap_mediator/server_config/ontap_mediator_server.crt'
key_path: '/opt/netapp/lib/ontap_mediator/ontap_mediator/server_config/ontap_mediator_server.key'
ca_cert_path: '/opt/netapp/lib/ontap_mediator/ontap_mediator/server_config/ca.crt'
ca_key_path: '/opt/netapp/lib/ontap_mediator/ontap_mediator/server_config/ca.key'
ca_serial_path: '/opt/netapp/lib/ontap_mediator/ontap_mediator/server_config/ca.srl'
-
cert_pathandkey_pathare server certificate variables. -
ca_cert_path,ca_key_path, andca_serial_pathare CA certificate variables.
-
Replace all
ca.*files with the third-party certificates. -
Create a certificate chain from the
ca.crtandontap_mediator_server.crtcertificates:cat ontap_mediator_server.crt ca.crt > ontap_mediator_server_chain.crt -
Update the
/opt/netapp/lib/ontap_mediator/uwsgi/ontap_mediator.inifile.Update the values of
mediator_cert,mediator_key, andca_certificate:set-placeholder = mediator_cert = /opt/netapp/lib/ontap_mediator/ontap_mediator/server_config/ontap_mediator_server_chain.crtset-placeholder = mediator_key = /opt/netapp/lib/ontap_mediator/ontap_mediator/server_config/ontap_mediator_server.keyset-placeholder = ca_certificate = /opt/netapp/lib/ontap_mediator/ontap_mediator/server_config/root_ca.crt-
The
mediator_certvalue is the path of theontap_mediator_server_chain.crtfile. -
The
mediator_key valueis the key path in theontap_mediator_server.crtfile, which isontap_mediator_server.key. -
The
ca_certificatevalue is the path of theroot_ca.crtfile.
-
-
Verify that the following attributes of the newly generated certificates are set correctly:
-
Linux Group Owner:
netapp:netapp -
Linux permissions:
600
-
-
Restart ONTAP Mediator:
systemctl restart ontap_mediator
Step 4: Optionally, use a different path or name for your third-party certificates
You can use third-party certificates with a different name other than intermediate.* or store the third-party certificates in a different location.
-
Configure the
/opt/netapp/lib/ontap_mediator/ontap_mediator/server_config/ontap_mediator.user_config.yamlfile to override the default variable values in theontap_mediator.config.yamlfile.If you obtained
intermediate.crtfrom a PKI authority and you store its private keyintermediate.keyat the location/opt/netapp/lib/ontap_mediator/ontap_mediator/server_config, theontap_mediator.user_config.yamlfile should look like the following example:
If you used intermediate.crtto sign theontap_mediator_server.crtcertificate, theintermediate.srlfile is generated. See Step 2: Generate a server certificate by signing with a third-party CA certification for more information.[root@mediator_host server_config]# cat ontap_mediator.user_config.yaml # This config file can be used to override the default settings in ontap_mediator.config.yaml # To override a setting, copy the property key from ontap_mediator.config.yaml to this file and # set the property to the desired value. e.g., # # The default value for 'default_mailboxes_per_target' is 4 in ontap_mediator.config.yaml # # To override this value with 6 mailboxes per target, add the following key/value pair # below this comment: # # 'default_mailboxes_per_target': 6 # cert_path: '/opt/netapp/lib/ontap_mediator/ontap_mediator/server_config/ontap_mediator_server.crt' key_path: '/opt/netapp/lib/ontap_mediator/ontap_mediator/server_config/ontap_mediator_server.key' ca_cert_path: '/opt/netapp/lib/ontap_mediator/ontap_mediator/server_config/intermediate.crt' ca_key_path: '/opt/netapp/lib/ontap_mediator/ontap_mediator/server_config/intermediate.key' ca_serial_path: '/opt/netapp/lib/ontap_mediator/ontap_mediator/server_config/intermediate.srl'
-
If you are using a certificate structure where the
root_ca.crtcertificate provides anintermediate.crtcertificate that signs theontap_mediator_server.crtcertificate, create a certificate chain from theintermediate.crtandontap_mediator_server.crtcertificates:
You should have obtained the intermediate.crtandontap_mediator_server.crtcertificates from a PKI authority earlier in the procedure.cat ontap_mediator_server.crt intermediate.crt > ontap_mediator_server_chain.crt -
Update the
/opt/netapp/lib/ontap_mediator/uvicorn/config.jsonfile.Update the values of
ssl_keyfile,ssl_certfile, andssl_ca_certs:ssl_keyfile:/opt/netapp/lib/ontap_mediator/ontap_mediator/server_config/ontap_mediator_server.keyssl_certfile:/opt/netapp/lib/ontap_mediator/ontap_mediator/server_config/ontap_mediator_server_chain.crtssl_ca_certs:/opt/netapp/lib/ontap_mediator/ontap_mediator/server_config/root_ca.crt-
The
ssl_keyfilevalue is the key path in theontap_mediator_server.crtfile, which isontap_mediator_server.key. -
The
ssl_certfilevalue is the path of theontap_mediator_server_chain.crtfile. -
The
ssl_ca_certsvalue is the path of theroot_ca.crtfile.
For SnapMirror Business Continuity (SM-BC) clusters, you must add the intermediate.crtandroot_ca.crtcertificates to an ONTAP cluster. See Configure ONTAP Mediator and clusters for SnapMirror active sync.
-
-
Verify that the following attributes of the newly generated certificates are set correctly:
-
Linux Group Owner:
netapp:netapp -
Linux permissions:
600
-
-
-
Restart ONTAP Mediator when the certificates are updated in the configuration file:
systemctl restart ontap_mediator
You can use third-party certificates with a different name other than intermediate.* or store the third-party certificates in a different location.
-
Configure the
/opt/netapp/lib/ontap_mediator/ontap_mediator/server_config/ontap_mediator.user_config.yamlfile to override the default variable values in theontap_mediator.config.yamlfile.If you obtained
intermediate.crtfrom a PKI authority and you store its private keyintermediate.keyat the location/opt/netapp/lib/ontap_mediator/ontap_mediator/server_config, theontap_mediator.user_config.yamlfile should look like the following example:
If you used intermediate.crtto sign theontap_mediator_server.crtcertificate, theintermediate.srlfile is generated. See Step 2: Generate a server certificate by signing with a third-party CA certification for more information.[root@mediator_host server_config]# cat ontap_mediator.user_config.yaml # This config file can be used to override the default settings in ontap_mediator.config.yaml # To override a setting, copy the property key from ontap_mediator.config.yaml to this file and # set the property to the desired value. e.g., # # The default value for 'default_mailboxes_per_target' is 4 in ontap_mediator.config.yaml # # To override this value with 6 mailboxes per target, add the following key/value pair # below this comment: # # 'default_mailboxes_per_target': 6 # cert_path: '/opt/netapp/lib/ontap_mediator/ontap_mediator/server_config/ontap_mediator_server.crt' key_path: '/opt/netapp/lib/ontap_mediator/ontap_mediator/server_config/ontap_mediator_server.key' ca_cert_path: '/opt/netapp/lib/ontap_mediator/ontap_mediator/server_config/intermediate.crt' ca_key_path: '/opt/netapp/lib/ontap_mediator/ontap_mediator/server_config/intermediate.key' ca_serial_path: '/opt/netapp/lib/ontap_mediator/ontap_mediator/server_config/intermediate.srl'
-
If you are using a certificate structure where the
root_ca.crtcertificate provides anintermediate.crtcertificate that signs theontap_mediator_server.crtcertificate, create a certificate chain from theintermediate.crtandontap_mediator_server.crtcertificates:
You should have obtained the intermediate.crtandontap_mediator_server.crtcertificates from a PKI authority earlier in the procedure.cat ontap_mediator_server.crt intermediate.crt > ontap_mediator_server_chain.crt -
Update the
/opt/netapp/lib/ontap_mediator/uwsgi/ontap_mediator.inifile.Update the values of
mediator_cert,mediator_key, andca_certificate:set-placeholder = mediator_cert = /opt/netapp/lib/ontap_mediator/ontap_mediator/server_config/ontap_mediator_server_chain.crtset-placeholder = mediator_key = /opt/netapp/lib/ontap_mediator/ontap_mediator/server_config/ontap_mediator_server.keyset-placeholder = ca_certificate = /opt/netapp/lib/ontap_mediator/ontap_mediator/server_config/root_ca.crt-
The
mediator_certvalue is the path of theontap_mediator_server_chain.crtfile. -
The
mediator_keyvalue is the key path in theontap_mediator_server.crtfile, which isontap_mediator_server.key. -
The
ca_certificatevalue is the path of theroot_ca.crtfile.
For SnapMirror Business Continuity (SM-BC) clusters, you must add the intermediate.crtandroot_ca.crtcertificates to an ONTAP cluster. See Configure ONTAP Mediator and clusters for SnapMirror active sync.
-
-
Verify that the following attributes of the newly generated certificates are set correctly:
-
Linux Group Owner:
netapp:netapp -
Linux permissions:
600
-
-
-
Restart ONTAP Mediator when the certificates are updated in the configuration file:
systemctl restart ontap_mediator
You can use third-party certificates with a different name other than ca.* or store the third-party certificates in a different location.
-
Configure the
/opt/netapp/lib/ontap_mediator/ontap_mediator/server_config/ontap_mediator.user_config.yamlfile to override the default variable values in theontap_mediator.config.yamlfile.If you obtained
ca.crtfrom a PKI authority and you store its private keyca.keyat the location/opt/netapp/lib/ontap_mediator/ontap_mediator/server_config, theontap_mediator.user_config.yamlfile should look like the following example:
If you used ca.crtto sign theontap_mediator_server.crtcertificate, theca.srlfile is generated. See Step 2: Generate a server certificate by signing with a third-party CA certification for more information.[root@mediator_host server_config]# cat ontap_mediator.user_config.yaml # This config file can be used to override the default settings in ontap_mediator.config.yaml # To override a setting, copy the property key from ontap_mediator.config.yaml to this file and # set the property to the desired value. e.g., # # The default value for 'default_mailboxes_per_target' is 4 in ontap_mediator.config.yaml # # To override this value with 6 mailboxes per target, add the following key/value pair # below this comment: # # 'default_mailboxes_per_target': 6 # cert_path: '/opt/netapp/lib/ontap_mediator/ontap_mediator/server_config/ontap_mediator_server.crt' key_path: '/opt/netapp/lib/ontap_mediator/ontap_mediator/server_config/ontap_mediator_server.key' ca_cert_path: '/opt/netapp/lib/ontap_mediator/ontap_mediator/server_config/ca.crt' ca_key_path: '/opt/netapp/lib/ontap_mediator/ontap_mediator/server_config/ca.key' ca_serial_path: '/opt/netapp/lib/ontap_mediator/ontap_mediator/server_config/ca.srl'
-
If you are using a certificate structure where the
root_ca.crtcertificate provides anca.crtcertificate that signs theontap_mediator_server.crtcertificate, create a certificate chain from theca.crtandontap_mediator_server.crtcertificates:
You should have obtained the ca.crtandontap_mediator_server.crtcertificates from a PKI authority earlier in the procedure.cat ontap_mediator_server.crt ca.crt > ontap_mediator_server_chain.crt -
Update the
/opt/netapp/lib/ontap_mediator/uwsgi/ontap_mediator.inifile.Update the values of
mediator_cert,mediator_key, andca_certificate:set-placeholder = mediator_cert = /opt/netapp/lib/ontap_mediator/ontap_mediator/server_config/ontap_mediator_server_chain.crtset-placeholder = mediator_key = /opt/netapp/lib/ontap_mediator/ontap_mediator/server_config/ontap_mediator_server.keyset-placeholder = ca_certificate = /opt/netapp/lib/ontap_mediator/ontap_mediator/server_config/root_ca.crt-
The
mediator_certvalue is the path of theontap_mediator_server_chain.crtfile. -
The
mediator_keyvalue is the key path in theontap_mediator_server.crtfile, which isontap_mediator_server.key. -
The
ca_certificatevalue is the path of theroot_ca.crtfile.
For SnapMirror Business Continuity (SM-BC) clusters, you must add the ca.crtandroot_ca.crtcertificates to an ONTAP cluster. See Configure ONTAP Mediator and clusters for SnapMirror active sync.
-
-
Verify that the following attributes of the newly generated certificates are set correctly:
-
Linux Group Owner:
netapp:netapp -
Linux permissions:
600
-
-
-
Restart ONTAP Mediator when the certificates are updated in the configuration file:
systemctl restart ontap_mediator
Troubleshoot certificate-related issues
You can check certain properties of the certificates.
Verify certificate expiration
Use the following command to identify the certificate validity range.
[root@mediator_host server_config]# openssl x509 -in intermediate.crt -text -noout
Certificate:
    Data:
...
        Validity
            Not Before: Feb 22 19:57:25 2024 GMT
            Not After : Feb 15 19:57:25 2029 GMT
[root@mediator_host server_config]# openssl x509 -in ca.crt -text -noout
Certificate:
    Data:
...
        Validity
            Not Before: Feb 22 19:57:25 2024 GMT
            Not After : Feb 15 19:57:25 2029 GMT
Verify X509v3 extensions in CA certification
Use the following command to verify the X509v3 extensions in the CA certification.
The properties defined within v3_ca in openssl_ca.cnf are displayed as X509v3 extensions in intermediate.crt.
[root@mediator_host server_config]# pwd
/opt/netapp/lib/ontap_mediator/ontap_mediator/server_config

[root@mediator_host server_config]# cat openssl_ca.cnf
...
[ v3_ca ]
subjectKeyIdentifier = hash
authorityKeyIdentifier = keyid:always,issuer
basicConstraints = critical, CA:true
keyUsage = critical, cRLSign, digitalSignature, keyCertSign

[root@mediator_host server_config]# openssl x509 -in intermediate.crt -text -noout
Certificate:
    Data:
...
        X509v3 extensions:
            X509v3 Subject Key Identifier:
                9F:06:FA:47:00:67:BA:B2:D4:82:70:38:B8:48:55:B5:24:DB:FC:27
            X509v3 Authority Key Identifier:
                keyid:9F:06:FA:47:00:67:BA:B2:D4:82:70:38:B8:48:55:B5:24:DB:FC:27

            X509v3 Basic Constraints: critical
                CA:TRUE
            X509v3 Key Usage: critical
                Digital Signature, Certificate Sign, CRL Sign
The properties defined within v3_ca in openssl_ca.cnf are displayed as X509v3 extensions in ca.crt.
[root@mediator_host server_config]# pwd
/opt/netapp/lib/ontap_mediator/ontap_mediator/server_config

[root@mediator_host server_config]# cat openssl_ca.cnf
...
[ v3_ca ]
subjectKeyIdentifier = hash
authorityKeyIdentifier = keyid:always,issuer
basicConstraints = critical, CA:true
keyUsage = critical, cRLSign, digitalSignature, keyCertSign

[root@mediator_host server_config]# openssl x509 -in ca.crt -text -noout
Certificate:
    Data:
...
        X509v3 extensions:
            X509v3 Subject Key Identifier:
                9F:06:FA:47:00:67:BA:B2:D4:82:70:38:B8:48:55:B5:24:DB:FC:27
            X509v3 Authority Key Identifier:
                keyid:9F:06:FA:47:00:67:BA:B2:D4:82:70:38:B8:48:55:B5:24:DB:FC:27

            X509v3 Basic Constraints: critical
                CA:TRUE
            X509v3 Key Usage: critical
                Digital Signature, Certificate Sign, CRL Sign
Verify X509v3 extensions in server certificate and subject Alt Names
The v3_req properties defined in the openssl_server.cnf configuration file are displayed as X509v3 extensions in the certificate.
In the following example, you can obtain the variables in the alt_names sections by running the commands hostname -A and hostname -I on the Linux VM on which ONTAP Mediator is installed.
Check with your network administrator for the correct values of the variables.
[root@mediator_host server_config]# pwd
/opt/netapp/lib/ontap_mediator/ontap_mediator/server_config

[root@mediator_host server_config]# cat openssl_server.cnf
...
[ v3_req ]
basicConstraints       = CA:false
extendedKeyUsage       = serverAuth
keyUsage               = keyEncipherment, dataEncipherment
subjectAltName         = @alt_names

[ alt_names ]
DNS.1 = abc.company.com
DNS.2 = abc-v6.company.com
IP.1 = 1.2.3.4
IP.2 = abcd:abcd:abcd:abcd:abcd:abcd

[root@mediator_host server_config]# openssl x509 -in intermediate.crt -text -noout
Certificate:
    Data:
...

        X509v3 extensions:
            X509v3 Basic Constraints:
                CA:FALSE
            X509v3 Extended Key Usage:
                TLS Web Server Authentication
            X509v3 Key Usage:
                Key Encipherment, Data Encipherment
            X509v3 Subject Alternative Name:
                DNS:abc.company.com, DNS:abc-v6.company.com, IP Address:1.2.3.4, IP Address:abcd:abcd:abcd:abcd:abcd:abcd
[root@mediator_host server_config]# pwd
/opt/netapp/lib/ontap_mediator/ontap_mediator/server_config

[root@mediator_host server_config]# cat openssl_server.cnf
...
[ v3_req ]
basicConstraints       = CA:false
extendedKeyUsage       = serverAuth
keyUsage               = keyEncipherment, dataEncipherment
subjectAltName         = @alt_names

[ alt_names ]
DNS.1 = abc.company.com
DNS.2 = abc-v6.company.com
IP.1 = 1.2.3.4
IP.2 = abcd:abcd:abcd:abcd:abcd:abcd

[root@mediator_host server_config]# openssl x509 -in ca.crt -text -noout
Certificate:
    Data:
...

        X509v3 extensions:
            X509v3 Basic Constraints:
                CA:FALSE
            X509v3 Extended Key Usage:
                TLS Web Server Authentication
            X509v3 Key Usage:
                Key Encipherment, Data Encipherment
            X509v3 Subject Alternative Name:
                DNS:abc.company.com, DNS:abc-v6.company.com, IP Address:1.2.3.4, IP Address:abcd:abcd:abcd:abcd:abcd:abcd
Verify that a private key matches with a certificate
You can verify whether a particular private key matches with a certificate.
Use the following OpenSSL commands on the key and certificate respectively.
[root@mediator_host server_config]# openssl rsa -noout -modulus -in intermediate.key | openssl md5
Enter pass phrase for intermediate.key:
(stdin)= 14c6b98b0c7c59012b1de89eee4a9dbc
[root@mediator_host server_config]# openssl x509 -noout -modulus -in intermediate.crt | openssl md5
(stdin)= 14c6b98b0c7c59012b1de89eee4a9dbc
[root@mediator_host server_config]# openssl rsa -noout -modulus -in ca.key | openssl md5
Enter pass phrase for ca.key:
(stdin)= 14c6b98b0c7c59012b1de89eee4a9dbc
[root@mediator_host server_config]# openssl x509 -noout -modulus -in ca.crt | openssl md5
(stdin)= 14c6b98b0c7c59012b1de89eee4a9dbc
If the -modulus attribute for both match, it indicates that the private key and certificate pair are compatible and can work with each other.
Verify that a server certificate is created from a particular CA certificate
You can use the following command to verify that the server certificate is created from a particular CA certificate.
[root@mediator_host server_config]# openssl verify -CAfile root_ca.crt --untrusted intermediate.crt ontap_mediator_server.crt
ontap_mediator_server.crt: OK
[root@mediator_host server_config]#
[root@mediator_host server_config]# openssl verify -CAfile ca.crt ontap_mediator_server.crt
ontap_mediator_server.crt: OK
If the Online Certificate Status Protocol (OCSP) validation is being used, use the command openssl-verify.