

Configure the ONTAP Mediator for SnapMirror active sync
 Suggest changes
SnapMirror active sync uses peered clusters to protect your data in the event of a failover scenario. ONTAP Mediator is a key resource that enables business continuity by monitoring the health of each cluster. To configure SnapMirror active sync, you must first install ONTAP Mediator and verify that your primary and secondary clusters are configured properly.
Once you have installed ONTAP Mediator and configured your clusters, initialize ONTAP Mediator for SnapMirror active sync using self-signed certificates. You must then create, initialize, and map the consistency group for SnapMirror active sync.
ONTAP Mediator
ONTAP Mediator provides a persistent and fenced store for high availability (HA) metadata used by the ONTAP clusters in a SnapMirror active sync relationship. Additionally, ONTAP Mediator provides a synchronous node health query functionality to aid in quorum determination and serves as a ping proxy for controller liveliness detection.
Each cluster peer relationship can only be associated with a single ONTAP Mediator instance. HA Mediator instances aren't supported. When a cluster is in several peer relationships with other clusters, the following ONTAP Mediator options are available:
-
If SnapMirror active sync is configured on each relationship, each cluster peer relationship can have its own unique ONTAP Mediator instance.
-
The cluster can use the same ONTAP Mediator instance for all peer relationships.
For example, if cluster B has a peer relationship with cluster A, cluster C, and cluster D, all three cluster peer relationships can have a unique associated ONTAP Mediator instance when SnapMirror active sync is configured on each relationship. Alternatively, cluster B can use the same ONTAP Mediator instance for all three peer relationships. In this scenario, the same instance of ONTAP Mediator is listed three times for the cluster.
Beginning with ONTAP 9.19.1 and ONTAP Mediator 1.12, you can use the same ONTAP Mediator instance to monitor a four-node MetroCluster IP configuration and a SnapMirror active sync cluster peer relationship simultaneously. Your configuration must meet the following requirements:
-
ONTAP Mediator 1.12.1 or later is installed on a host with a 2-core CPU.
-
The ONTAP Mediator instance is configured with the HTTPS protocol.

You can only monitor one four-node MetroCluster IP configuration and one SnapMirror active sync peer relationship using the same ONTAP Mediator instance.
Beginning with ONTAP 9.17.1, you can configure ONTAP Cloud Mediator to monitor the health of your cluster in a SnapMirror active sync configuration, however, you cannot use both Mediators at the same time.

|
If you are using SnapMirror active sync and ONTAP Mediator or ONTAP Cloud Mediator with ONTAP 9.17.1, you should review the Known problems and limitations in the ONTAP Release Notes for important information about these configurations. |
-
ONTAP Mediator includes its own set of prerequisites. You must meet these prerequisites before installing ONTAP Mediator.
For more information, see Prepare to install the ONTAP Mediator service.
-
By default, the ONTAP Mediator provides service through TCP port 31784. You should make sure that port 31784 is open and available between the ONTAP clusters and the ONTAP Mediator.
Install ONTAP Mediator and confirm cluster configuration
Perform each of the following steps to install ONTAP Mediator and verify the cluster configuration. For each step, you should confirm that the specific configuration has been performed. Each step includes a link to the specific procedure that you need to follow.
-
Install ONTAP Mediator before verifying that your source and destination clusters are configured correctly.
-
Confirm that a cluster peering relationship exists between the clusters.
The default IPspace is required by SnapMirror active sync for cluster peer relationships. A custom IPspace isn't supported.
Initialize ONTAP Mediator for SnapMirror active sync using self-signed certificates
Once you have installed ONTAP Mediator and confirmed you cluster configuration, you must initialize ONTAP Mediator for cluster monitoring. You can initialize ONTAP Mediator using System Manager or the ONTAP CLI.
System Manager
With System Manager, you can configure ONTAP Mediator for automated failover. You can also replace the self-signed SSL and CA with the third party validated SSL Certificate and CA if you have not already done so.
|
|
From ONTAP 9.8 through ONTAP 9.14.1, SnapMirror active sync is referred to as SnapMirror Business Continuity (SM-BC). |
-
Navigate to Protection > Overview > Mediator > Configure.
-
Select Add, and enter the following ONTAP Mediator information:
-
IPv4 address
-
Username
-
Password
-
Certificate
-
-
You can provide the Certificate input in two ways:
-
Option (a): Select Import to navigate to the
intermediate.crtfile and import it. -
Option (b): Copy the content of the
intermediate.crtfile and paste it in the Certificate field.When all details are entered correctly, the provided certificate is installed on all the peer clusters.
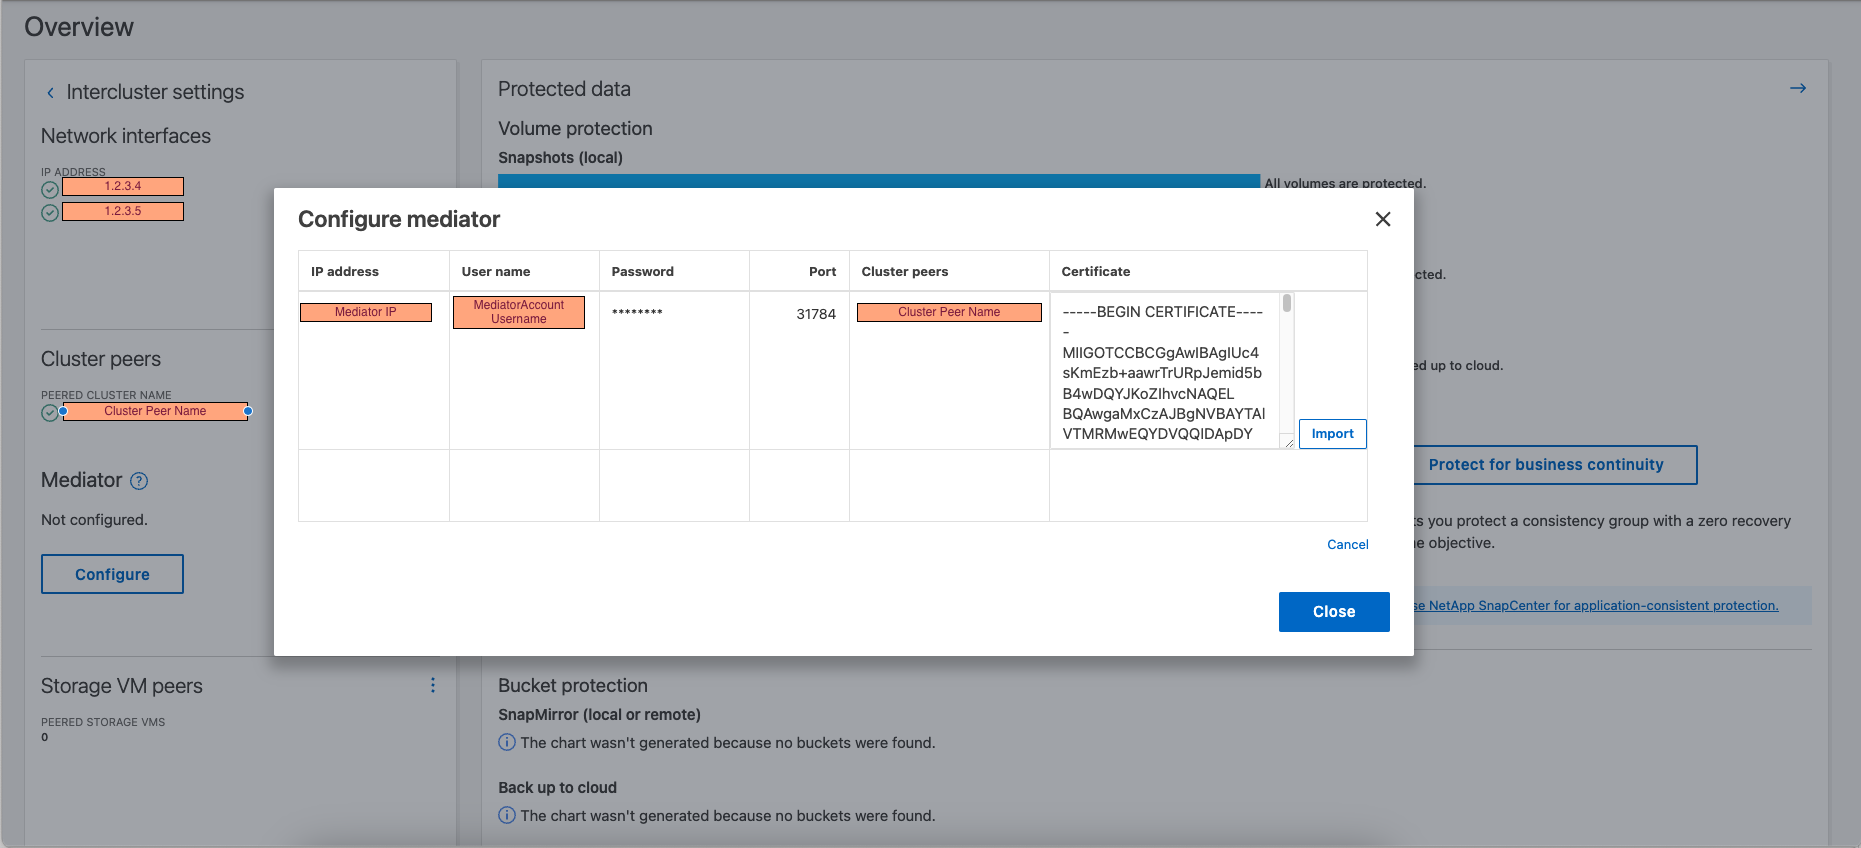
When the certificate addition is complete, ONTAP Mediator is added to the ONTAP cluster.
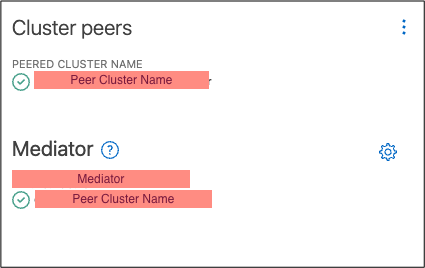
The following image demonstrates a successful ONTAP Mediator configuration:
 .
.
-
-
Navigate to Protection > Overview > Mediator > Configure.
-
Select Add, and enter the following ONTAP Mediator information:
-
IPv4 address
-
Username
-
Password
-
Certificate
-
-
You can provide the Certificate input in two ways:
-
Option (a): Select Import to navigate to the
ca.crtfile and import it. -
Option (b): Copy the content of the
ca.crtfile and paste it in the Certificate field.When all details are entered correctly, the provided certificate is installed on all the peer clusters.
When the certificate addition is complete, ONTAP Mediator is added to the ONTAP cluster.
The following image demonstrates a successful ONTAP Mediator configuration:
.
-
CLI
You can initialize ONTAP Mediator from either the primary or secondary cluster using the ONTAP CLI. When you issue the mediator add command on one cluster, ONTAP Mediator is automatically added on the other cluster.
When using ONTAP Mediator to monitor a SnapMirror active sync relationship, ONTAP Mediator cannot be initialized in ONTAP without a valid self-signed or certificate authority (CA) certificate. You add a valid certificate to the certificate store for peered clusters.
-
Locate the ONTAP Mediator CA certificates from the ONTAP Mediator Linux VM/host software installation location:
[root@ontap-mediator ~] cd /opt/netapp/lib/ontap_mediator/ontap_mediator/server_configYou should see output similar to the following example:
1-ontap-mediator.rules  intermediate.crt   make_self_signed_certs.sh      ontap_mediator_server_chain.crt  ontap_mediator.user_config.yaml  root_ca.crt
config_migration        intermediate.key   netapp_sudoers                 ontap_mediator_server.crt        openssl_ca.cnf                   root_ca.key
config.pyc              intermediate.srl   ontap_mediator.config.yaml     ontap_mediator_server.csr        openssl_intermediate.cnf
__init__.pyc            logging.conf.yaml  ontap_mediator.constants.yaml  ontap_mediator_server.key        openssl_server.cnf
-
Display the contents of the root CA certificate:
[root@ontap-mediator ~] cat root_ca.crt-----BEGIN CERTIFICATE----- <certificate_value> -----END CERTIFICATE-----
-
Display the contents of the intermediate CA certificate:
[root@ontap-mediator ~] cat intermediate.crt-----BEGIN CERTIFICATE----- <certificate_value> -----END CERTIFICATE-----
-
Install the root and intermediate CA certificates on the primary or secondary cluster:
-
Install the root CA certificate:
security certificate install -type server-ca -vserver <vserver_name>Enter the
root.crtwhen prompted, as shown in the following example:C1_test_cluster::*> security certificate install -type server-ca -vserver C1_test_cluster Enter certificate: Press <Enter> when done -----BEGIN CERTIFICATE----- <certificate_value> -----END CERTIFICATE----- You should keep a copy of the CA-signed digital certificate for future reference. The installed certificate's CA and serial number for reference: CA: ONTAP Mediator CA serial: <serial_value> The certificate's generated name for reference: ONTAPMediatorCA C1_test_cluster::*>
-
-
Install the intermediate CA certificate:
security certificate install -type server-ca -vserver <vserver_name>Enter the
intermediate.crtwhen prompted, as shown in the following example:C1_test_cluster::*> security certificate install -type server-ca -vserver C1_test_cluster Enter certificate: Press <Enter> when done -----BEGIN CERTIFICATE----- <certificate_value> -----END CERTIFICATE----- You should keep a copy of the CA-signed digital certificate for future reference. The installed certificate's CA and serial number for reference: CA: ONTAP Mediator CA serial: <serial_value> The certificate's generated name for reference: ONTAPMediatorCA C1_test_cluster::*>
-
Repeat the previous step to install the root and intermediate CA certificates on the peered cluster.
-
View the self-signed CA certificates installed using the generated name of the certificate:
security certificate show -common-name <common_name>Example:
C1_test_cluster::*> security certificate show -common-name ONTAPMediatorCA Vserver Serial Number Certificate Name Type ---------- --------------- -------------------------------------- ------------ C1_test_cluster <serial_number> ONTAPMediatorCA server-ca Certificate Authority: ONTAP Mediator CA Expiration Date: Thu Nov 28 05:26:07 2030 C1_test_cluster <serial_number> ONTAPMediatorCA server-ca Certificate Authority: ONTAP Mediator CA Expiration Date: Thu Nov 28 05:26:07 2030 2 entries were displayed. -
Initialize ONTAP Mediator on one of the clusters. ONTAP Mediator is automatically added for the other cluster:
snapmirror mediator add -mediator-address <ip_address> -peer-cluster <peer_cluster_name> -username user_nameExample:
C1_test_cluster::*> snapmirror mediator add -mediator-address 1.2.3.4 -peer-cluster C2_test_cluster -username mediatoradmin
Notice: Enter the mediator password.

Enter the password: ******
Enter the password again: ******
-
Optionally, check the job ID status
job show -idto verify if the SnapMirror Mediator add command is successful.Example:
C1_test_cluster::*> snapmirror mediator show This table is currently empty. C1_test_cluster::*> snapmirror mediator add -peer-cluster C2_test_cluster -type on-prem -mediator-address 1.2.3.4 -username mediatoradmin Notice: Enter the mediator password. Enter the password: Enter the password again: Info: [Job: 87] 'mediator add' job queued C1_test_cluster::*> job show -id 87 Owning Job ID Name Vserver Node State ------ -------------------- ----------------- -------------- ---------- 87 mediator add C1_test_cluster C2_test Running Description: Creating a mediator entry C1_test_cluster::*> job show -id 87 Owning Job ID Name Vserver Node State ------ -------------------- ----------------- -------------- ---------- 87 mediator add C1_test_cluster C2_test Success Description: Creating a mediator entry C1_test_cluster::*> snapmirror mediator show Mediator Address Peer Cluster Connection Status Quorum Status Type ---------------- ---------------- ----------------- ------------- ------- 1.2.3.4 C2_test_cluster connected true on-prem C1_test_cluster::*> -
Check the status of the ONTAP Mediator configuration:
snapmirror mediator showMediator Address Peer Cluster Connection Status Quorum Status ---------------- ---------------- ----------------- ------------- 1.2.3.4 C2_test_cluster connected true
Quorum Statusindicates whether the SnapMirror consistency group relationships are synchronized with ONTAP Mediator; a status oftrueindicates successful synchronization.
-
Find the ONTAP Mediator CA certificate from the ONTAP Mediator Linux VM/host software installation location
cd /opt/netapp/lib/ontap_mediator/ontap_mediator/server_config. -
Add a valid certificate authority to the certificate store on the peered cluster.
Example:
[root@ontap-mediator_config]# cat ca.crt
-----BEGIN CERTIFICATE-----
<certificate_value>
-----END CERTIFICATE-----
-
Add the ONTAP Mediator CA certificate to an ONTAP cluster. When prompted, insert the CA certificate obtained from the ONTAP Mediator. Repeat the steps on all of the peer clusters:
security certificate install -type server-ca -vserver <vserver_name>Example:
[root@ontap-mediator ~]# cd /opt/netapp/lib/ontap_mediator/ontap_mediator/server_config

[root@ontap-mediator_config]# cat ca.crt
-----BEGIN CERTIFICATE-----
<certificate_value>
-----END CERTIFICATE-----
C1_test_cluster::*> security certificate install -type server-ca -vserver C1_test_cluster

Please enter Certificate: Press when done
-----BEGIN CERTIFICATE-----
<certificate_value>
-----END CERTIFICATE-----

You should keep a copy of the CA-signed digital certificate for future reference.

The installed certificate's CA and serial number for reference:
CA: ONTAP Mediator CA
serial: D86D8E4E87142XXX

The certificate's generated name for reference: ONTAPMediatorCA

C1_test_cluster::*>
-
View the self-signed CA certificate installed using the generated name of the certificate:
security certificate show -common-name <common_name>Example:
C1_test_cluster::*> security certificate show -common-name ONTAPMediatorCA Vserver Serial Number Certificate Name Type ---------- --------------- -------------------------------------- ------------ C1_test_cluster 6BFD17DXXXXX7A71BB1F44D0326D2DEEXXXXX ONTAPMediatorCA server-ca Certificate Authority: ONTAP Mediator CA Expiration Date: Thu Feb 15 14:35:25 2029 -
Initialize ONTAP Mediator on one of the clusters. ONTAP Mediator is automatically added for the other cluster:
snapmirror mediator add -mediator-address <ip_address> -peer-cluster <peer_cluster_name> -username user_nameExample:
C1_test_cluster::*> snapmirror mediator add -mediator-address 1.2.3.4 -peer-cluster C2_test_cluster -username mediatoradmin
Notice: Enter the mediator password.

Enter the password: ******
Enter the password again: ******
-
Optionally, check the job ID status
job show -idto verify if the SnapMirror Mediator add command is successful.Example:
C1_test_cluster::*> snapmirror mediator show This table is currently empty. C1_test_cluster::*> snapmirror mediator add -peer-cluster C2_test_cluster -type on-prem -mediator-address 1.2.3.4 -username mediatoradmin Notice: Enter the mediator password. Enter the password: Enter the password again: Info: [Job: 87] 'mediator add' job queued C1_test_cluster::*> job show -id 87 Owning Job ID Name Vserver Node State ------ -------------------- ----------------- -------------- ---------- 87 mediator add C1_test_cluster C2_test Running Description: Creating a mediator entry C1_test_cluster::*> job show -id 87 Owning Job ID Name Vserver Node State ------ -------------------- ----------------- -------------- ---------- 87 mediator add C1_test_cluster C2_test Success Description: Creating a mediator entry C1_test_cluster::*> snapmirror mediator show Mediator Address Peer Cluster Connection Status Quorum Status Type ---------------- ---------------- ----------------- ------------- ------- 1.2.3.4 C2_test_cluster connected true on-prem C1_test_cluster::*> -
Check the status of the ONTAP Mediator configuration:
snapmirror mediator showMediator Address Peer Cluster Connection Status Quorum Status ---------------- ---------------- ----------------- ------------- 1.2.3.4 C2_test_cluster connected true
Quorum Statusindicates whether the SnapMirror consistency group relationships are synchronized with ONTAP Mediator; a status oftrueindicates successful synchronization.
Re-initialize ONTAP Mediator with third-party certificates
You might need to re-initialize ONTAP Mediator. There might be situations that require the re-initialization of ONTAP Mediator such as a change in the ONTAP Mediator IP address, certificate expiration, and so on.
The following procedure illustrates the re-initialization of ONTAP Mediator for a specific case when a self-signed certificate needs to be replaced by a third-party certificate.
You need to replace the SnapMirror active sync cluster's self-signed certificates with third-party certificates, remove the ONTAP Mediator configuration from ONTAP, and then add ONTAP Mediator.
System Manager
With System Manager, you need to remove the ONTAP Mediator version configured with the old self-signed certificate from the ONTAP cluster and re-configure the ONTAP cluster with the new third-party certificate.
-
Select the menu options icon and select Remove to remove ONTAP Mediator.
This step does not remove the self-signed server-ca from the ONTAP cluster. NetApp recommends navigating to the Certificate tab and removing it manually before performing the next step below to add a third-party certificate: 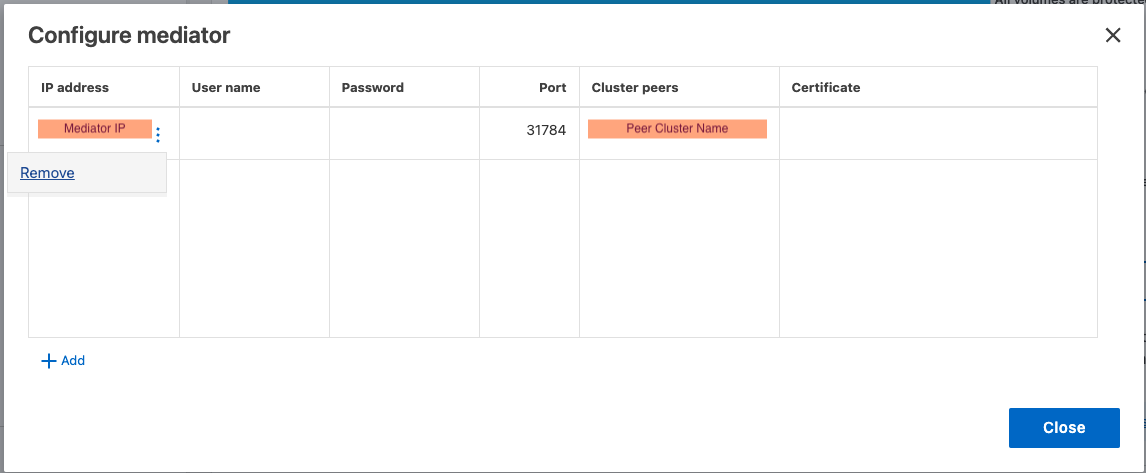
-
Add ONTAP Mediator again with the correct certificate.
ONTAP Mediator is now configured with the new third-party self-signed certificate.
CLI
You can re-initialize ONTAP Mediator from either the primary or secondary cluster by using the ONTAP CLI to replace the self-signed certificate with the third-party certificate.
-
Remove the self-signed
intermediate.crtinstalled earlier when you used self-signed certificates for all clusters. In the example below, there are two clusters:Example:
 C1_test_cluster::*> security certificate delete -vserver C1_test_cluster -common-name ONTAPMediatorCA
 2 entries were deleted.

 C2_test_cluster::*> security certificate delete -vserver C2_test_cluster -common-name ONTAPMediatorCA *
 2 entries were deleted.
-
Remove the previously configured ONTAP Mediator from the SnapMirror active sync cluster using
-force true:Example:
C1_test_cluster::*> snapmirror mediator show Mediator Address Peer Cluster Connection Status Quorum Status ---------------- ---------------- ----------------- ------------- 1.2.3.4 C2_test_cluster connected true C1_test_cluster::*> snapmirror mediator remove -mediator-address 1.2.3.4 -peer-cluster C2_test_cluster -force true Warning: You are trying to remove the ONTAP Mediator configuration with force. If this configuration exists on the peer cluster, it could lead to failure of a SnapMirror failover operation. Check if this configuration exists on the peer cluster C2_test_cluster and remove it as well. Do you want to continue? {y|n}: y Info: [Job 136] 'mediator remove' job queued C1_test_cluster::*> snapmirror mediator show This table is currently empty. -
Refer to the steps described in Replace self-signed certificates with trusted third-party certificates for instructions on how to obtain certificates from a subordinate CA, referred to as
intermediate.crt.
Replace self-signed certificates with trusted third-party certificates
The intermediate.crthas certain properties that it derives from the request that need to be sent to the PKI authority, defined in the file/opt/netapp/lib/ontap_mediator/ontap_mediator/server_config/openssl_ca.cnf -
Add the new third-party ONTAP Mediator CA certificate
intermediate.crtfrom the ONTAP Mediator Linux VM/host software installation location:Example:
[root@ontap-mediator ~]# cd /opt/netapp/lib/ontap_mediator/ontap_mediator/server_config
[root@ontap-mediator_config]# cat intermediate.crt
-----BEGIN CERTIFICATE-----
<certificate_value>
-----END CERTIFICATE-----
-
Add the
intermediate.crtfile to the peered cluster. Repeat this step for all peer clusters:Example:
C1_test_cluster::*> security certificate install -type server-ca -vserver C1_test_cluster

Please enter Certificate: Press when done
-----BEGIN CERTIFICATE-----
<certificate_value>
-----END CERTIFICATE-----

You should keep a copy of the CA-signed digital certificate for future reference.

The installed certificate's CA and serial number for reference:
CA: ONTAP Mediator CA
serial: D86D8E4E87142XXX

The certificate's generated name for reference: ONTAPMediatorCA

C1_test_cluster::*>
-
Remove the previously configured ONTAP Mediator from the SnapMirror active sync cluster:
Example:
C1_test_cluster::*> snapmirror mediator show
Mediator Address Peer Cluster     Connection Status Quorum Status
---------------- ---------------- ----------------- -------------
1.2.3.4          C2_test_cluster  connected         true

C1_test_cluster::*> snapmirror mediator remove -mediator-address 1.2.3.4 -peer-cluster C2_test_cluster

Info: [Job 86] 'mediator remove' job queued
C1_test_cluster::*> snapmirror mediator show
This table is currently empty.
-
Add ONTAP Mediator again:
Example:
C1_test_cluster::*> snapmirror mediator add -mediator-address 1.2.3.4 -peer-cluster C2_test_cluster -username mediatoradmin

Notice: Enter the mediator password.

Enter the password:
Enter the password again:

Info: [Job: 87] 'mediator add' job queued

C1_test_cluster::*> snapmirror mediator show
Mediator Address Peer Cluster     Connection Status Quorum Status
---------------- ---------------- ----------------- -------------
1.2.3.4          C2_test_cluster  connected         true
Quorum Statusindicates whether the SnapMirror consistency group relationships are synchronized with the mediator; a status oftrueindicates successful synchronization.
-
Remove the self-signed
ca.crtinstalled earlier when you used self-signed certificates for all clusters. In the example below, there are two clusters:Example:
 C1_test_cluster::*> security certificate delete -vserver C1_test_cluster -common-name ONTAPMediatorCA
 2 entries were deleted.

 C2_test_cluster::*> security certificate delete -vserver C2_test_cluster -common-name ONTAPMediatorCA *
 2 entries were deleted.
-
Remove the previously configured ONTAP Mediator from the SnapMirror active sync cluster using
-force true:Example:
C1_test_cluster::*> snapmirror mediator show Mediator Address Peer Cluster Connection Status Quorum Status ---------------- ---------------- ----------------- ------------- 1.2.3.4 C2_test_cluster connected true C1_test_cluster::*> snapmirror mediator remove -mediator-address 1.2.3.4 -peer-cluster C2_test_cluster -force true Warning: You are trying to remove the ONTAP Mediator configuration with force. If this configuration exists on the peer cluster, it could lead to failure of a SnapMirror failover operation. Check if this configuration exists on the peer cluster C2_test_cluster and remove it as well. Do you want to continue? {y|n}: y Info: [Job 136] 'mediator remove' job queued C1_test_cluster::*> snapmirror mediator show This table is currently empty. -
Refer to the steps described in Replace self-signed certificates with trusted third-party certificates for instructions on how to obtain certificates from a subordinate CA, referred to as
ca.crt.
Replace self-signed certificates with trusted third-party certificates
The ca.crthas certain properties that it derives from the request that need to be sent to the PKI authority, defined in the file/opt/netapp/lib/ontap_mediator/ontap_mediator/server_config/openssl_ca.cnf -
Add the new third-party ONTAP Mediator CA certificate
ca.crtfrom the ONTAP Mediator Linux VM/host software installation location:Example:
[root@ontap-mediator ~]# cd /opt/netapp/lib/ontap_mediator/ontap_mediator/server_config
[root@ontap-mediator_config]# cat ca.crt
-----BEGIN CERTIFICATE-----
<certificate_value>
-----END CERTIFICATE-----
-
Add the
intermediate.crtfile to the peered cluster. Repeat this step for all peer clusters:Example:
C1_test_cluster::*> security certificate install -type server-ca -vserver C1_test_cluster

Please enter Certificate: Press when done
-----BEGIN CERTIFICATE-----
<certificate_value>
-----END CERTIFICATE-----

You should keep a copy of the CA-signed digital certificate for future reference.

The installed certificate's CA and serial number for reference:
CA: ONTAP Mediator CA
serial: D86D8E4E87142XXX

The certificate's generated name for reference: ONTAPMediatorCA

C1_test_cluster::*>
-
Remove the previously configured ONTAP Mediator from the SnapMirror active sync cluster:
Example:
C1_test_cluster::*> snapmirror mediator show
Mediator Address Peer Cluster     Connection Status Quorum Status
---------------- ---------------- ----------------- -------------
1.2.3.4          C2_test_cluster  connected         true

C1_test_cluster::*> snapmirror mediator remove -mediator-address 1.2.3.4 -peer-cluster C2_test_cluster

Info: [Job 86] 'mediator remove' job queued
C1_test_cluster::*> snapmirror mediator show
This table is currently empty.
-
Add ONTAP Mediator again:
Example:
C1_test_cluster::*> snapmirror mediator add -mediator-address 1.2.3.4 -peer-cluster C2_test_cluster -username mediatoradmin

Notice: Enter the mediator password.

Enter the password:
Enter the password again:

Info: [Job: 87] 'mediator add' job queued

C1_test_cluster::*> snapmirror mediator show
Mediator Address Peer Cluster     Connection Status Quorum Status
---------------- ---------------- ----------------- -------------
1.2.3.4          C2_test_cluster  connected         true
Quorum Statusindicates whether the SnapMirror consistency group relationships are synchronized with the mediator; a status oftrueindicates successful synchronization.