

Configure SAML authentication for remote ONTAP users
 Suggest changes
Beginning with ONTAP 9.3, you can configure Security Assertion Markup Language (SAML) authentication for web services. When SAML authentication is configured and enabled, users are authenticated by an external Identity Provider (IdP) instead of the directory service providers such as Active Directory and LDAP. When SAML authentication is disabled, the configured directory service providers such as Active Directory and LDAP are used for authentication.
Enable SAML authentication
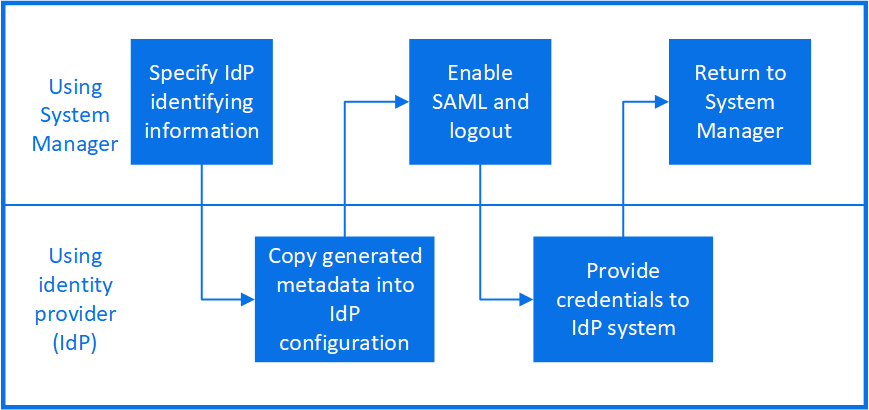
To enable SAML authentication with System Manager or with the CLI, perform the following steps. If your cluster is running ONTAP 9.7 or earlier, the System Manager steps you need to follow are different. Refer to the System Manager online help available on your system.

|
After you enable SAML authentication, only remote users configured for SAML authentication can access the System Manager GUI. Local users cannot access the System Manager GUI after SAML authentication is enabled. |
-
SAML authentication applies only to the ONTAP
httpandontapiapplications.The
httpandontapiapplications are used by the following web services: Service Processor Infrastructure, ONTAP APIs, and System Manager. -
SAML authentication is applicable only for accessing the admin SVM.
-
Beginning with ONTAP 9.17.1, IdP-provided group information can be mapped to ONTAP roles. This allows you to assign roles to users based on groups that are defined in the IdP. For more information, see Working with OAuth 2.0 or SAML IdP groups in ONTAP.
The following IdPs have been validated with System Manager:
-
Microsoft Entra ID (validated with ONTAP 9.17.1 and later)
-
Active Directory Federation Services
-
Cisco Duo (validated with the following ONTAP versions:)
-
9.7P21 and later 9.7 releases (refer to the System Manager Classic documentation)
-
9.8P17 and later 9.8 patch releases
-
9.9.1P13 and later 9.9.1 patch releases
-
9.10.1P9 and later 9.10.1 patch releases
-
9.11.1P4 and later 9.11.1 patch releases
-
9.12.1 and later releases
-
-
Shibboleth
-
The IdP that you plan to use for remote authentication must be configured. You must have the URI of the IdP. The IdP URI is the web address that ONTAP sends authentication requests to and receive responses from.
-
Port 443 must be open between the ONTAP cluster and the IdP.
-
The ONTAP cluster and the IdP must each be able to ping the other's fully qualified domain name. Ensure DNS is properly configured and the cluster certificate is not expired.
-
If needed, add the IdP's trusted certificate authority (CA) to ONTAP. You can manage ONTAP certificates with System Manager. You might need to configure the ONTAP cluster certificate in the IdP.
-
You must be able to access the ONTAP cluster's Service Processor (SP) console. If SAML is misconfigured, you will need to disable it from the SP console.
-
If you are using Entra ID (validated beginning with ONTAP 9.17.1), you must configure Entra ID with the ONTAP metadata before creating the ONTAP SAML configuration. Entra ID will not provide the IdP URI until it is configured with the ONTAP metadata. The IdP URI is required to create the ONTAP SAML configuration.
-
If you are using System Manager to configure SAML, leave the IdP URI field blank until System Manager provides the ONTAP metadata. Configure Entra ID with the ONTAP metadata, and then copy the IdP URI into System Manager before enabling the SAML configuration.
-
If you are using the ONTAP CLI to configure SAML, you must generate the ONTAP metadata before enabling the ONTAP SAML configuration. You can generate the ONTAP metadata file with the following command:
security saml-sp default-metadata create -sp-host <ontap_host_name>ontap_host_nameis the host name or IP address of the SAML service provider host, which in this case is the ONTAP system. By default, the cluster-management IP address is used. You can optionally provide the ONTAP server certificate information. By default, the ONTAP web server certificate information is used.Configure Entra ID with the provided metadata. You must configure Entra ID before creating the ONTAP SAML configuration. After Entra is configured, proceed with the below CLI procedure.
-
You cannot generate the ONTAP metadata for Entra ID until all nodes in the cluster are on version 9.17.1.
-
Perform the following steps depending on your environment:
-
Click Cluster > Settings.
-
Next to SAML Authentication, click
 .
. -
Ensure there is a check in the Enable SAML Authentication checkbox.
-
Enter the URL of the IdP URI (including "https://"). If you are using Entra ID, skip this step.
-
Modify the host system address, if needed. This is the address that the IdP will direct to after authentication. The default is the cluster-management IP address.
-
Ensure the correct certificate is being used:
-
If your system was mapped with only one certificate with type "server", then that certificate is considered the default and it isn't displayed.
-
If your system was mapped with multiple certificates as type "server", then one of the certificates is displayed. To select a different certificate, click Change.
-
-
Click Save. A confirmation window displays the metadata information, which has been automatically copied to your clipboard.
-
Go to the IdP system you specified and copy the metadata from your clipboard to update the system metadata. If you are using Entra ID, copy the IdP URI into ONTAP after you have configured Entra ID with the system metadata.
-
Return to the confirmation window (in System Manager) and check the checkbox I have configured the IdP with the host URI or metadata.
-
Click Logout to enable SAML-based authentication. The IdP system will display an authentication screen.
-
In the IdP sign-on page, enter your SAML-based credentials. After your credentials are verified, you will be directed to the System Manager home page.
-
Create a SAML configuration so that ONTAP can access the IdP metadata:
security saml-sp create -idp-uri <idp_uri> -sp-host <ontap_host_name>idp_uriis the FTP or HTTP address of the IdP host from where the IdP metadata can be downloaded.
Some URLs include the question mark (?) character. The question mark activates the ONTAP command line active help. In order to enter a URL with a question mark, you need to first disable active help with the command set -active-help false. Active help can later be re-enabled with the commandset -active-help true. Learn more in the ONTAP command reference.ontap_host_nameis the host name or IP address of the SAML service provider host, which in this case is the ONTAP system. By default, the IP address of the cluster-management LIF is used.You can optionally provide the ONTAP server certificate information. By default, the ONTAP web server certificate information is used.
cluster_12::> security saml-sp create -idp-uri https://example.url.net/idp/shibboleth

Warning: This restarts the web server. Any HTTP/S connections that are active
         will be disrupted.
Do you want to continue? {y|n}: y
[Job 179] Job succeeded: Access the SAML SP metadata using the URL:
https://10.0.0.1/saml-sp/Metadata

Configure the IdP and ONTAP users for the same directory server domain to ensure that users are the same for different authentication methods. See the "security login show" command for the ONTAP user configuration.
The URL to access the ONTAP host metadata is displayed.
-
From the IdP host, configure the IdP with the ONTAP host metadata. If you are using Entra ID, you have already completed this step.
-
Once the IdP is configured, enable SAML configuration:
security saml-sp modify -is-enabled trueAny existing user that accesses the
httporontapiapplication is automatically configured for SAML authentication. -
If you want to create users for the
httporontapiapplication after SAML is configured, specify SAML as the authentication method for the new users. Prior to ONTAP 9.17.1, a SAML login is automatically created for existinghttporontapiusers when SAML is enabled. New users must be configured for SAML. Beginning with ONTAP 9.17.1, all users created withpassword,domain, ornsswitchauthentication methods are automatically authenticated against the IdP when SAML is enabled.-
Create a login method for new users with SAML authentication. The
user_namemust match the username configured in the IdP:
The user_namevalue is case-sensitive. Unless you are using Entra ID, include only the user name, and do not include any portion of the domain. If you are using Entra ID, you can create the user name with the domain, for example user_name@domain.com.security login create -user-or-group-name <user_name> -application [http | ontapi] -authentication-method saml -vserver <svm_name>Example:
cluster_12::> security login create -user-or-group-name admin1 -application http -authentication-method saml -vserver cluster_12
-
Verify that the user entry is created:
security login showExample:
cluster_12::> security login show

Vserver: cluster_12
                                                                 Second
User/Group                 Authentication                 Acct   Authentication
Name           Application Method        Role Name        Locked Method
-------------- ----------- ------------- ---------------- ------ --------------
admin          console     password      admin            no     none
admin          http        password      admin            no     none
admin          http        saml          admin            -      none
admin          ontapi      password      admin            no     none
admin          ontapi      saml          admin            -      none
admin          service-processor
                           password      admin            no     none
admin          ssh         password      admin            no     none
admin1         http        password      backup           no     none
admin1         http        saml          backup           -      none
Learn more about
security login showin the ONTAP command reference.
-
Disable SAML authentication
You can disable SAML authentication when you want to stop authenticating remote System Manager users with an external Identity Provider (IdP). When SAML authentication is disabled, local user authentication or the configured directory service providers such as Active Directory and LDAP are used to authenticate users.
Perform the following steps depending on your environment:
-
Click Cluster > Settings.
-
Under SAML Authentication, click the Enabled toggle button.
-
Optional: You can also click
next to SAML Authentication, and then uncheck the Enable SAML Authentication checkbox.
-
Disable SAML authentication:
security saml-sp modify -is-enabled false -
If you no longer want to use SAML authentication or if you want to modify the IdP, delete the SAML configuration:
security saml-sp delete
Configure third-party IdP
In order to authenticate with ONTAP, you might need to change the settings for your IdP. The following sections provide configuration information for supported IdPs.
When configuring Entra ID, create a new application and configure SAML sign-on with the metadata provided by ONTAP. After the application is created, edit the "Attributes & Claims" section of the application SAML settings to match the following:
| Setting | Value |
|---|---|
Name |
urn:oid:0.9.2342.19200300.100.1.1 |
Namespace |
Leave blank |
Name format |
URI |
Source |
Attribute |
Source attribute |
user.userprincipalname |
If you want to use groups with Entra ID, add a group claim with the following settings:
| Setting | Value |
|---|---|
Name |
urn:oid:1.3.6.1.4.1.5923.1.5.1.1 |
Namespace |
Leave blank |
Source attribute |
Group ID |
Entra ID provides group information in UUID format. For more information on using groups with Entra ID, refer to Manage groups with UUIDs.
The App Federation Metadata URL provided in the "SAML certificate" section of the application SAML settings is the IdP URI that you will enter in ONTAP.
For information on configuring Entra ID multifactor authentication, refer to Plan a Microsoft Entra multifactor authentication deployment.
For more information, refer to the Entra ID documentation.
When configuring Active Directory Federation Services (AD FS), you must add a new claims-aware Relying Party Trust with the service provider metadata provided by ONTAP. Once the Relying Party Trust is created, add the following claim rules to the Relying Party Trust's Claim Issuance Policy using the "Send LDAP Attributes as Claims" template:
| Attribute store | LDAP attribute | Outgoing claim type |
|---|---|---|
Active Directory |
SAM-account-name |
Name ID |
Active Directory |
SAM-account-name |
urn:oid:0.9.2342.19200300.100.1.1 |
Active Directory |
Name Format |
urn:oasis:names:tc:SAML:2.0:attrname-format:uri |
Active Directory |
Token groups - Qualified by Domain Name |
urn:oid:1.3.6.1.4.1.5923.1.5.1.1 |
Active Directory |
sAMAccountName |
urn:oid:1.2.840.113556.1.4.221 |
AD FS provides group information in name format. For more information on using groups with AD FS, refer to Manage groups with names.
For more information, refer to the AD FS documentation.
Refer to the Cisco Duo documentation for configuration information.
Prior to configuring the Shibboleth IdP, you must have configured an LDAP server.
When enabling SAML on ONTAP, save the provided host metadata XML. On the host where Shibboleth is installed, replace the contents of metadata/sp-metadata.xml with the host metadata XML within the Shibboleth IdP home directory.
For more information, refer to Shibboleth.
Troubleshoot issues with SAML configuration
If configuring Security Assertion Markup Language (SAML) authentication fails, you can manually repair each node on which the SAML configuration failed and recover from the failure. During the repair process, the web server is restarted and any active HTTP connections or HTTPS connections are disrupted.
When you configure SAML authentication, ONTAP applies SAML configuration on a per-node basis. When you enable SAML authentication, ONTAP automatically tries to repair each node if there are configuration issues. If there are issues with SAML configuration on any node, you can disable SAML authentication and then reenable SAML authentication. There can be situations when SAML configuration fails to apply on one or more nodes even after you reenable SAML authentication. You can identify the node on which SAML configuration has failed and then manually repair that node.
-
Log in to the advanced privilege level:
set -privilege advanced -
Identify the node on which SAML configuration failed:
security saml-sp status show -instanceExample:
cluster_12::*> security saml-sp status show -instance

                         Node: node1
                Update Status: config-success
               Database Epoch: 9
   Database Transaction Count: 997
                   Error Text:
SAML Service Provider Enabled: false
        ID of SAML Config Job: 179

                         Node: node2
                Update Status: config-failed
               Database Epoch: 9
   Database Transaction Count: 997
                   Error Text: SAML job failed, Reason: Internal error. Failed to receive the SAML IDP Metadata file.
SAML Service Provider Enabled: false
        ID of SAML Config Job: 180
2 entries were displayed.
Learn more about
security saml-sp status showin the ONTAP command reference. -
Repair the SAML configuration on the failed node:
security saml-sp repair -node <node_name>Example:
cluster_12::*> security saml-sp repair -node node2

Warning: This restarts the web server. Any HTTP/S connections that are active
         will be disrupted.
Do you want to continue? {y|n}: y
[Job 181] Job is running.
[Job 181] Job success.
The web server is restarted and any active HTTP connections or HTTPS connections are disrupted.
Learn more about
security saml-sp repairin the ONTAP command reference. -
Verify that SAML is successfully configured on all of the nodes:
security saml-sp status show -instanceExample:
cluster_12::*> security saml-sp status show -instance

                         Node: node1
                Update Status: config-success
               Database Epoch: 9
   Database Transaction Count: 997
                   Error Text:
SAML Service Provider Enabled: false
        ID of SAML Config Job: 179

                         Node: node2
                Update Status: config-success
               Database Epoch: 9
   Database Transaction Count: 997
                   Error Text:
SAML Service Provider Enabled: false
        ID of SAML Config Job: 180
2 entries were displayed.
Learn more about
security saml-sp status showin the ONTAP command reference.