

Upgrade from NetApp Data Broker
 Suggest changes
If you want to use the new features provided by SnapCenter Plug-in for VMware vSphere, you must upgrade from NetApp Data Broker 1.0.x to SnapCenter Plug-in for VMware vSphere.
-
The VM that you want to upgrade must have 12GB of RAM available.
-
The VM that you want to upgrade must be powered on.
-
A best practice is to back up the VM that contains NetApp Data Broker before the upgrade.
There are three basic upgrade steps:
-
Prepare for the upgrade.
-
Download the upgrade .
isofile. -
Install the upgrade.
-
Upload the .
isofile to a datastore. -
Connect the VM to the .
isofile in the datastore. -
Run the upgrade.
-
-
Prepare for the upgrade by disabling SnapCenter Plug-in for VMware vSphere.
-
Log in to the NetApp Data Broker management GUI.
The IP is displayed when you deploy NetApp Data Broker.
-
Click Configuration in the left navigation pane, and then click the Service option in the Plug-in Details section to disable the plug-in.
-
-
Download the upgrade .
isofile.-
Log in to the NetApp Support Site ( https://mysupport.netapp.com/products/index.html).
-
From the list of products, select SnapCenter Plug-in for VMware vSphere, then click the DOWNLOAD LATEST RELEASE button.
-
Download the SnapCenter Plug-in for VMware vSphere upgrade .
isofile to any location.
-
-
Install the upgrade.
-
In your browser, navigate to the VMware vSphere vCenter.
-
On the vCenter GUI, click vSphere Web Client (HTML5).
-
Log in to the VMware vCenter Single Sign-On page.
-
On the Navigator pane, click the NetApp Data Broker VM that you want to upgrade and then click the Summary tab.
-
On the Related Objects pane, click on any datastore in the list and then click the Summary tab.
-
On the Files tab for the selected datastore, click on any folder in the list, and then click the storage icon (Upload a file to the Datastore).
-
On the upgrade pop-up screen, navigate to the location where you downloaded the
.isofile, then click on the.isofile image, and then click Open.The file is uploaded to the datastore.
-
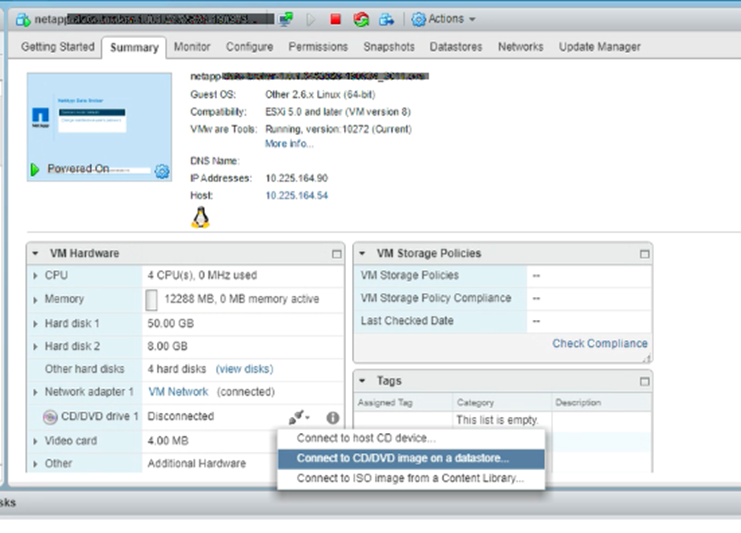
Navigate back to the NetApp Data Broker VM that you want to upgrade, and click the Summary tab.
In the VM Hardware pane, in the CD/DVD field, the value should be “Disconnected”.
-
Click the connection icon in the CD/DVD field and select Connect to CD/DVD image on a datastore.
-
In the wizard, do the following:
In the Datastores column, select the datastore where you uploaded the .
isofile.In the Contents column, navigate to the
.isofile you uploaded, make sure “ISO image” is selected in the File Type field, and then click OK.Wait until the field shows the “Connected” status.
-
Log onto the Maintenance console by accessing the Summary tab of the virtual appliance and then click the start icon to start the maintenance console.
-
Enter 2 for System Configuration, then enter 8 for Upgrade.
-
Enter y to continue and start the upgrade.
-
After the system displays the “upgrade successful” message, the system attempts to start the services.
-
Wait until the “Press ENTER to continue” message displays, and then log into the SnapCenter Plug-in for VMware vSphere management GUI.
The IP address is the same as the former NetApp Data Broker address.
-
In the Plug-in Details section, enable the SnapCenter Plug-in for VMware vSphere service and make sure the Status shows as “Connected”.
If you are using the SnapCenter Plug-in for VMware vSphere to support application-based data protection and the plug-in cannot communicate with the SnapCenter Server, refresh the connection to the SnapCenter Server: On the SnapCenter GUI, click Hosts, then select the VMware host, then click Push Server Credentials.