Add resources to SnapCenter Custom Plug-ins
 Suggest changes


You must add the resources that you want to back up or clone. Depending on your environment, resources might be either database instances or collections that you want to back up or clone.
-
You must have completed tasks such as installing the SnapCenter Server, adding hosts, creating storage system connections, and adding credentials.
-
You must have created a custom plug-in for your application.
-
You must have uploaded the plug-ins to SnapCenter Server.
-
In the left navigation pane, select Resources, and then select the appropriate plug-in from the list.
-
In the Resources page, select Add Resource.
-
In the Provide Resource Details page, perform the following actions:
For this field… Do this… Name
Enter the name of the resource.
Host name
Select the host.
Type
Select the type. Type is user defined as per the plug-in description file. For example, database and instance.
In case the type selected has a parent, enter the details of the parent. For example, if the type is Database and the parent is Instance, enter the details of the Instance.
Credential name
Select Credential or create a new credential.
Mount Paths
Enter the mount paths where the resource is mounted. This is applicable only for a Windows host.
-
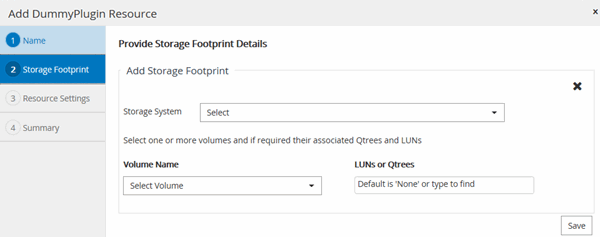
In the Provide Storage Footprint page, select a storage system and choose one or more volumes, LUNs, and qtrees, and then select Save.
Optional: Select the
 icon to add more volumes, LUNs, and qtrees from other storage systems.
SnapCenter Custom Plug-ins does not support automatic discovery of the resources and the storage details for physical and virtual environments. You must provide the storage information for physical and virtual environments while creating the resources. 
-
In the Resource Settings page, provide custom key-value pairs for the resource.
Use the custom key-value pairs if you want to pass resource-specific information. For example, when you are using the MySQL plug-in, you must specify a HOST as HOST=hostname, PORT =port-no used for MySQL and master-slave configuration as MASTER_SLAVE = “YES” or “NO” (name is MASTER_SLAVE and value is “YES” or “NO”).
Ensure that the words HOST and PORT are in uppercase. 
-
Review the summary, and then select Finish.
The resources are displayed along with information such as type, host or cluster name, associated resource groups and policies, and overall status.

|
You must refresh the resources if the databases are renamed outside of SnapCenter. |
If you want to provide access to the assets to other users, the SnapCenter administrator must assign assets to those users. This enables users to perform the actions for which they have permissions on the assets that are assigned to them.
After adding the resources, you can modify the resource details. If a custom plug-in resource has backups associated with it, the following fields cannot be modified: resource name, resource type, and host name.


