

Create resource groups and attach policies
 Suggest changes
A resource group is the container to which you must add resources that you want to back up and protect. A resource group enables you to back up all the data that is associated with a given application simultaneously. A resource group is required for any data protection job. You must also attach one or more policies to the resource group to define the type of data protection job that you want to perform.
-
To create SAP HANA system replication backups, it is recommended to add all the resources of the SAP HANA system into one resource group. This ensures a seamless backup during takeover-failback mode.
-
For ONTAP 9.12.1 and earlier, the clones created from the SnapLock Vault snapshots as part of restore inherit the SnapLock Vault expiry time. The storage administrator should manually cleanup the clones post the SnapLock expiry time.
-
Adding new databases without SnapMirror active sync to an existing resource group which contains resources with SnapMirror active sync, is not supported.
-
Adding new databases to an existing resource group in failover mode of SnapMirror active sync is not supported. You can add resources to the resource group only in regular or fail-back state.
-
In the left navigation pane, select Resources, and then select the appropriate plug-in from the list.
-
In the Resources page, select New Resource Group.
-
In the Name page, perform the following actions:
For this field… Do this… Name
Enter a name for the resource group.

The resource group name should not exceed 250 characters. Tags
Enter one or more labels that will help you later search for the resource group.
For example, if you add HR as a tag to multiple resource groups, you can later find all resource groups associated with the HR tag.
Use custom name format for snapshots.
Select this check box, and enter a custom name format that you want to use for the snapshot name.
For example, customtext_resourcegroup_policy_hostname or resource group_hostname. By default, a timestamp is appended to the snapshot name.
-
In the Resources page, select a host name from the Host drop-down list and resource type from the Resource Type drop-down list.
This helps to filter information on the screen.
-
Select the resources from the Available Resources section, and then select the right arrow to move them to the Selected Resources section.
-
In the Application Settings page, do the following:
-
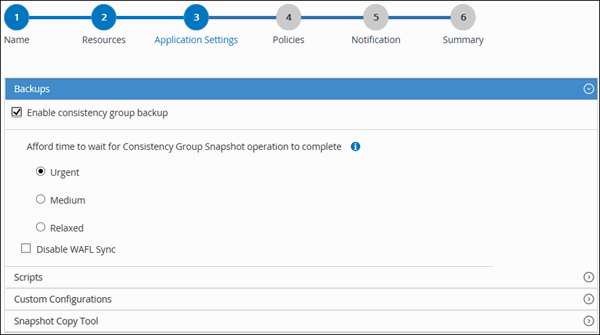
Select the Backups arrow to set additional backup options:
Enable consistency group backup and perform the following tasks:
For this field… Do this… Afford time to wait for Consistency Group snapshot operation to complete
Select Urgent, Medium, or Relaxed to specify the wait time for snapshot operation to complete.
Urgent = 5 seconds, Medium = 7 seconds, and Relaxed = 20 seconds.
Disable WAFL Sync
Select this to avoid forcing a WAFL consistency point.
-
Select the Scripts arrow and enter the pre and post commands for quiesce, snapshot, and unquiesce operations. You can also enter the pre commands to be executed before exiting in the event of a failure.
-
Select the Custom Configurations arrow and enter the custom key-value pairs required for all data protection operations using this resource.
Parameter Setting Description ARCHIVE_LOG_ENABLE
(Y/N)
Enables the archive log management to delete the archive logs.
ARCHIVE_LOG_RETENTION
number_of_days
Specifies the number of days the archive logs are retained.
This setting must be equal to or greater than NTAP_SNAPSHOT_RETENTIONS.
ARCHIVE_LOG_DIR
change_info_directory/logs
Specifies the path to the directory that contains the archive logs.
ARCHIVE_LOG_EXT
file_extension
Specifies a regular expression that matches the file name extensions of the log files.
For log files ending in a number of digits, use a regular expression, such as
[0-9+]or (from 6.0)\d+(any length of digits of at least one character) as the value for the parameter, which represents any log sequence number in SAP HANA.ARCHIVE_LOG_RECURSIVE_SEARCH
(Y/N)
Enables the management of archive logs within subdirectories.
You should use this parameter if the archive logs are located under subdirectories.
Custom key-value pairs are supported for the SnapCenter Plug-in for SAP HANA Database on Linux systems, but not for SAP HANA databases registered with the SnapCenter Plug-in for Microsoft Windows. -
Select the Snapshot Copy Tool arrow to select the tool to create snapshots:
If you want… Then… SnapCenter to use the plug-in for Windows and put the file system into a consistent state before creating a snapshot. For Linux resources, this option is not applicable.
Select SnapCenter with File System Consistency.
This option is not applicable for SnapCenter Plug-in for SAP HANA Database.
SnapCenter to create a storage level snapshot
Select SnapCenter without File System Consistency.
To enter the command to be executed on the host to create snapshot copies.
Select Other, and then enter the command to be executed on the host to create a snapshot.
-
-
In the Policies page, perform the following steps:
-
Select one or more policies from the drop-down list.
You can also create a policy by selecting  .
.
The policies are listed in the Configure schedules for selected policies section.
-
In the Configure Schedules column, select
for the policy you want to configure. -
In the Add schedules for policy policy_name dialog box, configure the schedule, and then select OK.
Where, policy_name is the name of the policy that you have selected.
The configured schedules are listed in the Applied Schedules column.
Third party backup schedules are not supported when they overlap with SnapCenter backup schedules.
-
-
In the Notification page, from the Email preference drop-down list, select the scenarios in which you want to send the emails.
You must also specify the sender and receiver email addresses, and the subject of the email. The SMTP server must be configured in Settings > Global Settings.
-
Review the summary, and then select Finish.