

Create backup policies for Oracle databases
 Suggest changes
Before you use SnapCenter to back up Oracle database resources, you must create a backup policy for the resource or the resource group that you want to back up. A backup policy is a set of rules that governs how you manage, schedule, and retain backups. You can also specify the replication, script, and backup type settings. Creating a policy saves time when you want to reuse the policy on another resource or resource group.
Before you begin
-
You must have defined your backup strategy.
-
You must have prepared for data protection by completing tasks such as installing SnapCenter, adding hosts, discovering databases, and creating storage system connections.
-
If you are replicating Snapshots to a mirror or vault secondary storage, the SnapCenter administrator must have assigned the SVMs to you for both the source and destination volumes.
-
If you have installed the plug-in as a non-root user, you should manually assign the execute permissions to the prescript and postscript directories.
-
Review the SnapMirror active sync specific prerequisites and limitations. For information, refer Object limits for SnapMirror active sync.
If 'Retain the backup copies for a specific number of days' option is selected, then the SnapLock retention period must be lesser than or equal to the mentioned retention days.
Specifying a Snapshot locking period prevents deletion of the Snapshots until the retention period expires. This could lead to retaining a larger number of Snapshots than the count specified in the policy.
For ONTAP 9.12.1 and below version, the clones created from the SnapLock Vault Snapshots as part of restore will inherit the SnapLock Vault expiry time. Storage admin should manually cleanup the clones post the SnapLock expiry time.
Steps
-
In the left navigation pane, click Settings.
-
In the Settings page, click Policies.
-
Select Oracle Database from the drop-down list.
-
Click New.
-
In the Name page, enter the policy name and details.
-
In the Policy type page, perform the following steps:
-
Select your storage type.
-
Select policy scope:
-
If you want to create an online backup, select Online backup.
You must specify whether you want to back up all the datafiles, control files, and archive log files, only datafiles and control files, or only archive log files.
-
If you want to create an offline backup, select Offline backup, and then select one of the following options:
-
If you want to create an offline backup when the database is in mounted state, select Mount.
-
If you want to create an offline shutdown backup by changing the database to shutdown state, select Shutdown.
If you are having pluggable databases (PDBs), and want to save the state of the PDBs before creating the backup, you must select Save state of PDBs. This enables you to bring the PDBs to their original state after the backup is created.
-
-
-
If you want to catalog backup using Oracle Recovery Manager (RMAN), select Catalog backup with Oracle Recovery Manager (RMAN).
You can perform deferred cataloging for one backup at a time either using the GUI or using the SnapCenter CLI command Catalog-SmBackupWithOracleRMAN.

If you want to catalog backups of a RAC database, ensure that no other job is running for that database. If another job is running, the cataloging operation fails instead of getting queued. -
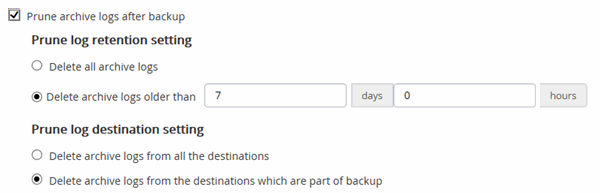
If you want to prune archive logs after backup, select Prune archive logs after backup.
Pruning of archive logs from the archive log destination that is unconfigured in the database, will be skipped. 
If you are using Oracle Standard Edition, you can use LOG_ARCHIVE_DEST and LOG_ARCHIVE_DUPLEX_DEST parameters while performing archive log backup. -
You can delete archive logs only if you have selected the archive log files as part of your backup.
You must ensure that all the nodes in an RAC environment can access all the archive log locations for the delete operation to be successful. If you want to… Then… Delete all archive logs
Select Delete all archive logs.
Delete archive logs that are older
Select Delete archive logs older than, and then specify the age of the archive logs that are to be deleted in days and hours.
Delete archive logs from all destinations
Select Delete archive logs from all the destinations.
Delete the archive logs from the log destinations that are part of the backup
Select Delete archive logs from the destinations which are part of backup.
-
-
-
In the Snapshot and Replication page, perform the following steps:
-
Specify the schedule frequency by selecting On demand, Hourly, Daily, Weekly, or Monthly.
You can specify the schedule (start date and end date) for the backup operation while creating a resource group. This enables you to create resource groups that share the same policy and backup frequency, but enables you to assign different backup schedules to each policy.
If you have scheduled for 2:00 a.m., the schedule will not be triggered during daylight saving time (DST). -
In the Data snapshot retention settings section, specify the retention settings for the backup type and the schedule type selected in the Backup Type page:
If you want to…
Then…
Keep a certain number of Snapshots
Select Copies to keep, and then specify the number of Snapshots that you want to keep.
If the number of Snapshots exceeds the specified number, the Snapshots are deleted with the oldest copies deleted first.
The maximum retention value is 1018. Backups will fail if retention is set to a value higher than what the underlying ONTAP version supports.
You must set the retention count to 2 or higher if you plan to enable SnapVault replication. If you set the retention count to 1, the retention operation might fail because the first Snapshot is the reference Snapshot for the SnapVault relationship until a newer Snapshot is replicated to the target. Keep the Snapshots for a certain number of days
Select Retain copies for, and then specify the number of days for which you want to keep the Snapshots before deleting them.
Snapshot copy locking period
Select the Snapshot copy locking period and specify the duration in days, months, or years.
SnapLock retention period should be less than 100 years.
-
In the Archive Log snapshot retention settings section, specify the retention settings for the backup type and the schedule type selected in the Backup Type page:
If you want to…
Then…
Keep a certain number of Snapshots
Select Copies to keep, and then specify the number of Snapshots that you want to keep.
If the number of Snapshots exceeds the specified number, the Snapshots are deleted with the oldest copies deleted first.
The maximum retention value is 1018. Backups will fail if retention is set to a value higher than what the underlying ONTAP version supports.
You must set the retention count to 2 or higher if you plan to enable SnapVault replication. If you set the retention count to 1, the retention operation might fail because the first Snapshot is the reference Snapshot for the SnapVault relationship until a newer Snapshot is replicated to the target. Keep the Snapshots for a certain number of days
Select Retain copies for, and then specify the number of days for which you want to keep the Snapshots before deleting them.
Snapshot copy locking period
Select the Snapshot copy locking period and specify the duration in days, months, or years.
SnapLock retention period should be less than 100 years.
-
Select policy label.
You can assign SnapMirror labels to primary snapshots for remote replication, allowing the primary snapshots to offload the snapshot replication operation from SnapCenter to ONTAP secondary systems. This can be done without enabling SnapMirror or SnapVault option in the policy page.
-
-
In the Select secondary replication options section, select one or both of the following secondary replication options:
You must select the secondary replication options for Secondary snapshot copy locking period to be effective. For this field… Do this… Update SnapMirror after creating a local Snapshot
Select this field to create mirror copies of the backup sets on another volume (SnapMirror replication).
This option should be enabled for SnapMirror active sync.
During secondary replication, the SnapLock expiry time loads the primary SnapLock expiry time.
Clicking the Refresh button in the Topology page refreshes the secondary and primary SnapLock expiry time that are retrieved from ONTAP.
Update SnapVault after creating a local Snapshot
Select this option to perform disk-to-disk backup replication (SnapVault backups).
When SnapLock is configured only on the secondary from ONTAP known as SnapLock Vault, clicking the Refresh button in the Topology page refreshes the locking period on the secondary that is retrieved from ONTAP.
For more information on SnapLock Vault see Commit Snapshot copies to WORM on a vault destination
Error retry count
Enter the maximum number of replication attempts that can be allowed before the operation stops.
You should configure SnapMirror retention policy in ONTAP for the secondary storage to avoid reaching the maximum limit of Snapshots on the secondary storage. -
In the Script page, enter the path and the arguments of the prescript or postscript that you want to run before or after the backup operation, respectively.
You must store the prescripts and postscripts either in /var/opt/snapcenter/spl/scripts or in any folder inside this path. By default, the /var/opt/snapcenter/spl/scripts path is populated. If you have created any folders inside this path to store the scripts, you must specify those folders in the path.
You can also specify the script timeout value. The default value is 60 seconds.
SnapCenter allows you to use the predefined environment variables when you execute the prescript and postscript. Learn more
-
In the Verification page, perform the following steps:
-
Select the backup schedule for which you want to perform the verification operation.
-
In the Verification script commands section, enter the path and the arguments of the prescript or postscript that you want to run before or after the verification operation, respectively.
You must store the prescripts and postscripts either in /var/opt/snapcenter/spl/scripts or in any folder inside this path. By default, the /var/opt/snapcenter/spl/scripts path is populated. If you have created any folders inside this path to store the scripts, you must specify those folders in the path.
You can also specify the script timeout value. The default value is 60 seconds.
-
-
Review the summary, and then click Finish.