View related backups and clones in the Topology page
 Suggest changes
When you are preparing to back up or clone a resource, you can view a graphical representation of all backups and clones on the primary and secondary storage. In the Topology page, you can see all of the backups and clones that are available for the selected resource or resource group. You can view the details of those backups and clones, and then select them to perform data protection operations.
You can review the following icons in the Manage Copies view to determine whether the backups and clones are available on the primary or secondary storage (Mirror copies or Vault copies).
-
 displays the number of backups and clones that are available on the primary storage.
 -
 displays the number of backups and clones that are mirrored on the secondary storage using SnapMirror technology.
Clones of a backup of a version-flexible mirror on a mirror-vault type volume are displayed in the topology view but the mirror backup count in the topology view does not include the version-flexible backup. -
 displays the number of backups and clones that are replicated on the secondary storage using SnapVault technology.
-
The number of backups displayed includes the backups deleted from the secondary storage. For example, if you have created 6 backups using a policy to retain only 4 backups, the number of backups displayed are 6.
-
|
|
Clones of a backup of a version-flexible mirror on a mirror-vault type volume are displayed in the topology view but the mirror backup count in the topology view does not include the version-flexible backup. |
If you have secondary relationship as SnapMirror active sync (initially released as SnapMirror Business Continuity [SM-BC]), you can see following additional icons:
-
 The replica site is up.
 -
 The replica site is down.
 -
 The secondary mirror or vault relationship has not been re-established.
-
In the left navigation pane, click Resources, and then select the appropriate plug-in from the list.
-
In the Resources page, either select the resource or resource group from the View drop-down list.
-
Select the resource either from the resource details view or from the resource group details view.
If the resource is protected, the topology page of the selected resource is displayed.
-
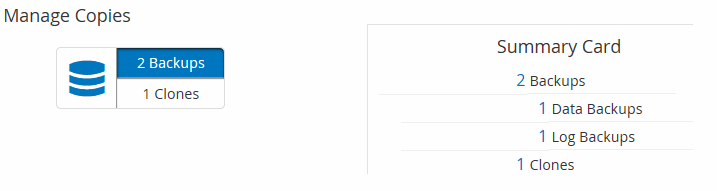
Review the Summary card to see a summary of the number of backups and clones available on the primary and secondary storage.
The Summary Card section displays the total number of backups and clones. For Oracle database only, the Summary Card section also displays the total number of log backups.
Clicking the Refresh button starts a query of the storage to display an accurate count.
If SnapLock enabled backup is taken, then clicking the Refresh button refreshes the primary and secondary SnapLock expiry time retrieved from ONTAP. A weekly schedule also refreshes the primary and secondary SnapLock expiry time retrieved from ONTAP.
When the application resource is spread across multiple volumes, the SnapLock expiry time for the backup will be the longest SnapLock expiry time that is set for a Snapshot in a volume. The longest SnapLock expiry time is retrieved from ONTAP.
For SnapMirror active sync, clicking the Refresh button refreshes the SnapCenter backup inventory by querying ONTAP for both primary and replica sites. A weekly schedule also performs this activity for all databases containing SnapMirror active sync relationship.
-
For SnapMirror active sync and only for ONTAP 9.14.1, Async Mirror or Async MirrorVault relationships to the new primary destination should be manually configured after failover. From ONTAP 9.15.1 onwards Async Mirror or Async MirrorVault is auto configured to the new primary destination.
-
After failover, a backup should be created for SnapCenter to be aware of the failover. You can click Refresh only after a backup has been created.
-
-
In the Manage Copies view, click Backups or Clones from the primary or secondary storage to see details of a backup or clone.
The details of the backups and clones are displayed in a table format.
-
Select the backup from the table, and then click the data protection icons to perform restore, clone, rename, and delete operations.
You cannot rename or delete backups that are on the secondary storage system. -
If you want to delete a clone, then select the clone from the table and click
 to delete the clone.