

Add or update display names
 Suggest changes
You can use this procedure to add or update the display names used for your grid, sites, and nodes. You can rename a single item, multiple items, or even all items at the same time. Defining or updating a display name does not affect StorageGRID operations in any way.
-
From the primary Admin Node, you are signed in to the Grid Manager using a supported web browser.

You can add or update display names from a non-primary Admin Node, but you must be signed in to the primary Admin Node to download a Recovery Package. -
You have the Maintenance or Root access permission.
-
You have the provisioning passphrase.
-
You understand the requirements and best practices for display names. See Rename grid, sites, and nodes: Overview.
How to rename grid, sites, or nodes
You can rename your StorageGRID system, one or more sites, or one or more nodes.
You can use a display name that was previously used by a different node, as long as the rename doesn't result in a duplicate display name or system name.
Select items to rename
To start, select the items you want to rename.
-
Select MAINTENANCE > Tasks > Rename grid, sites, and nodes.
-
For the Select names step, select the items you want to rename.
Item to change Instruction Names of everything (or almost everything) in your system
-
Select Select all.
-
Optionally clear any items you don't want to rename.
Name of the grid
Select the checkbox for the grid.
Name of a site and some or all of its nodes
-
Select the checkbox in the table header for the site.
-
Optionally, clear any nodes you don't want to rename.
Name of a site
Select the checkbox for the site.
Name of a node
Select the checkbox for the node.
-
-
Select Continue.
-
Review the table, which includes the items you selected.
-
The Display name column shows the current name for each item. If the item has never been renamed, its display name is the same as its system name.
-
The System name column shows the name you entered for each item during installation. System names are used for internal StorageGRID operations and can't be changed. For example, the system name for a node might be its hostname.
-
The Type column indicates the item's type: Grid, Site, or the specific type of node.
-
Propose new names
For the Propose new names step, you can enter a display name for each item individually, or you can rename items in bulk.
Follow these steps to enter a display name for each item you want to rename.
-
In the Display name field, enter a proposed display name for each item in the list.
See Rename grid, sites, and nodes: Overview to learn the naming requirements.
-
To remove any items you don't want to rename, select
 in the Remove from list column.
If you will not be proposing a new name for an item, you must remove it from the table.
-
When you have proposed new names for all items in the table, select Rename.
A success message appears. The new display names are now used throughout Grid Manager.
Use the bulk rename tool if item names share a common string that you want to replace with a different string.
-
For the Propose new names step, select Use bulk rename tool.
The Rename preview includes all items that were shown for the Propose new names step. You can use the preview to see how display names will look after you replace a shared string.
-
In the Existing string field, enter the shared string you want to replace. For example, if the string you want to replace is
Data-Center-1, enter Data-Center-1.As you type, your text is highlighted wherever it is found in the names on the left.
-
Select
to remove any items that you don't want to rename with this tool.For example, suppose you want to rename all nodes that contain the string
Data-Center-1, but you don't want to rename theData-Center-1site itself. Select to remove the site from the rename preview.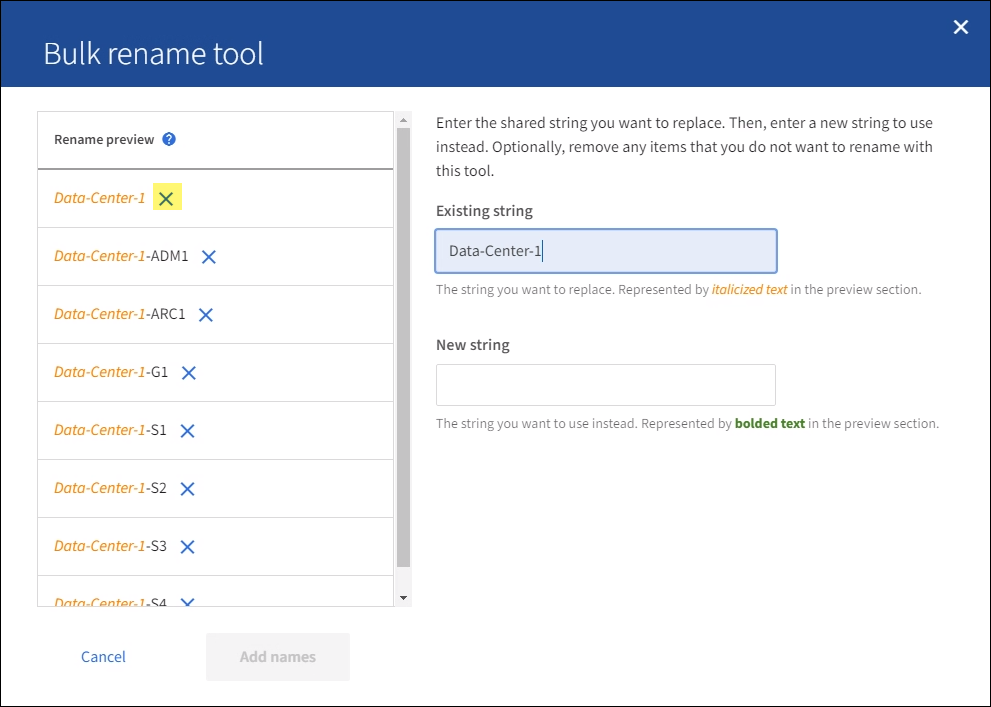
-
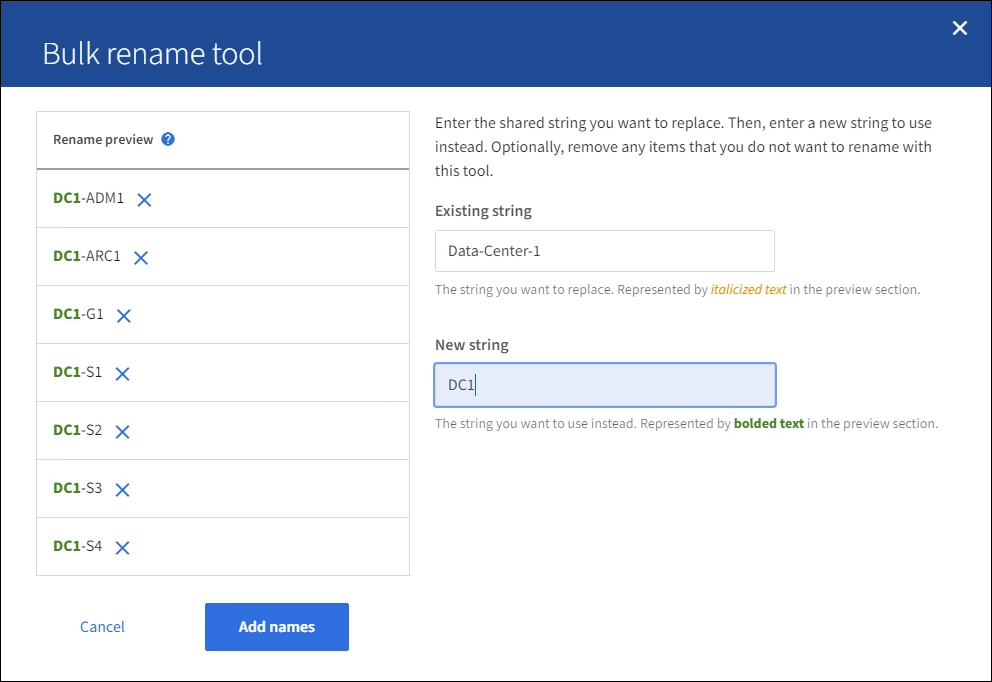
In the New string field, enter the replacement string you want to use instead. For example, enter DC1.
See Rename grid, sites, and nodes: Overview to learn the naming requirements.
As you enter the replacement string, the names on the left are updated, so you can verify that the new names will be correct.
-
When you are satisfied with the names shown in the preview, select Add names to add the names to the table for the Propose new names step.
-
Make any additional changes required, or select
to remove any items that you don't want to rename. -
When you are ready to rename all items in the table, select Rename.
A success message is shown. The new display names are now used throughout Grid Manager.
Download the recovery package
When you are done renaming items, download and save a new Recovery Package. The new display names for the items you renamed are included in the Passwords.txt file.
-
Enter the provisioning passphrase.
-
Select Download Recovery Package.
The download starts immediately.
-
When the download completes, open the
Passwords.txtfile to see the server name for all nodes and the display names for any renamed nodes. -
Copy the
sgws-recovery-package-id-revision.zipfile to two safe, secure, and separate locations.
The Recovery Package file must be secured because it contains encryption keys and passwords that can be used to obtain data from the StorageGRID system. -
Select Finish to return to the first step.
Revert display names back to system names
You can revert a renamed grid, site, or node back to its original system name. When you revert an item back to its system name, Grid Manager pages and other StorageGRID locations no longer show a Display name for that item. Only the item's system name is shown.
-
Select MAINTENANCE > Tasks > Rename grid, sites, and nodes.
-
For the Select names step, select any items you want to revert back to system names.
-
Select Continue.
-
For the Propose new names step, revert display names back to system names individually or in bulk.
Revert to system names individually-
Copy each item's original system name and paste it into the Display name field, or select
to remove any items you don't want to revert.To revert a display name, the system name must appear in the Display name field, but the name is case insensitive.
-
Select Rename.
A success message appears. The display names for these items are no longer used.
Revert to system names in bulk-
For the Propose new names step, select Use bulk rename tool.
-
In the Existing string field, enter the display name string you want to replace.
-
In the New string field, enter the system name string you want to use instead.
-
Select Add names to add the names to the table for the Propose new names step.
-
Confirm that each entry in the Display name field matches the name in the System name field. Make any changes or select
to remove any items that you don't want to revert.To revert a display name, the system name must appear in the Display name field, but the name is case insensitive.
-
Select Rename.
A success message is shown. The display names for these items are no longer used.
-
-
Download and save a new Recovery Package.
Display names for the items you reverted are no longer included in the
Passwords.txtfile.