

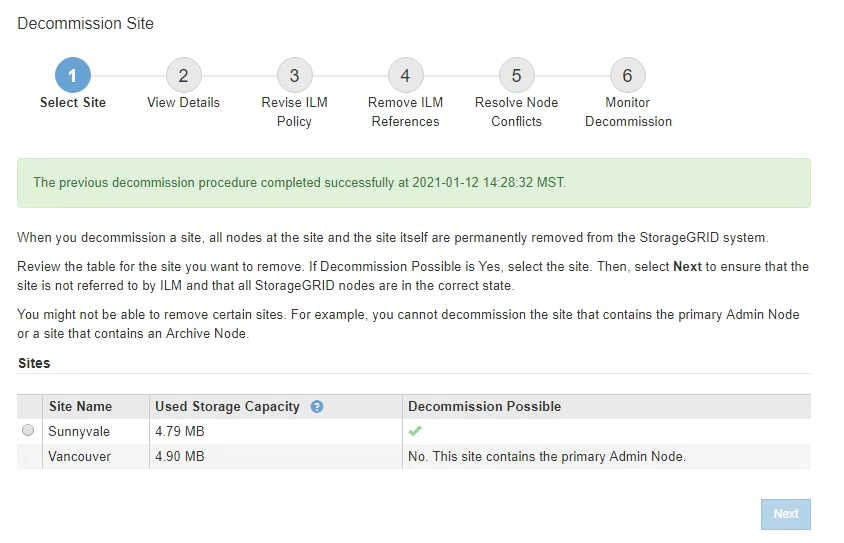
Step 6: Monitor Decommission
 Suggest changes
From Step 6 (Monitor Decommission) of the Decommission Site page wizard, you can monitor the progress as the site is removed.
When StorageGRID removes a connected site, it removes nodes in this order:
-
Gateway Nodes
-
Admin Nodes
-
Storage Nodes
When StorageGRID removes a disconnected site, it removes nodes in this order:
-
Gateway Nodes
-
Storage Nodes
-
Admin Nodes
Each Gateway Node or Admin Node might only require a few minutes or an hour to remove; however, Storage Nodes might take days or weeks.
-
As soon as a new Recovery Package has been generated, download the file.
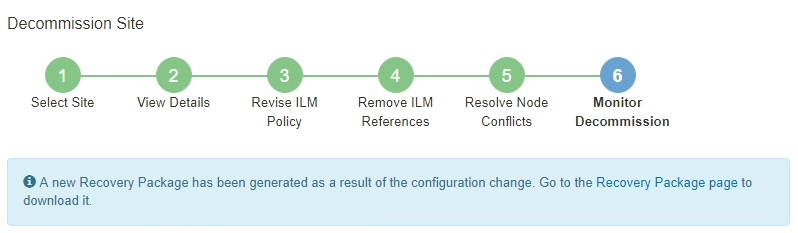

Download the Recovery Package as soon as possible to ensure you can recover your grid if something goes wrong during the decommission procedure. -
Select the link in the message, or select MAINTENANCE > System > Recovery package.
-
Download the
.zipfile.See the instructions for downloading the Recovery Package.
The Recovery Package file must be secured because it contains encryption keys and passwords that can be used to obtain data from the StorageGRID system. -
-
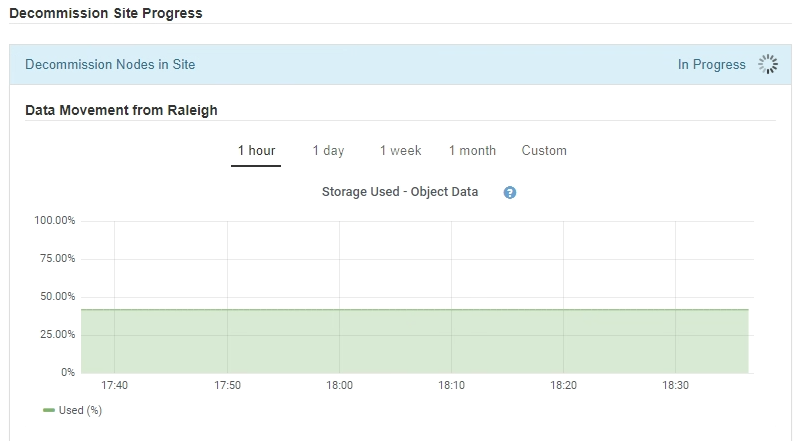
Using the Data Movement chart, monitor the movement of object data from this site to other sites.
Data movement started when you activated the new ILM policy in Step 3 (Revise ILM Policy). Data movement will occur throughout the decommission procedure.
-
In the Node Progress section of the page, monitor the progress of the decommission procedure as nodes are removed.
When a Storage Node is removed, each node goes through a series of stages. Although most of these stages occur quickly or even imperceptibly, you might need to wait days or even weeks for other stages to complete, based on how much data needs to moved. Additional time is required to manage erasure-coded data and re-evaluate ILM.
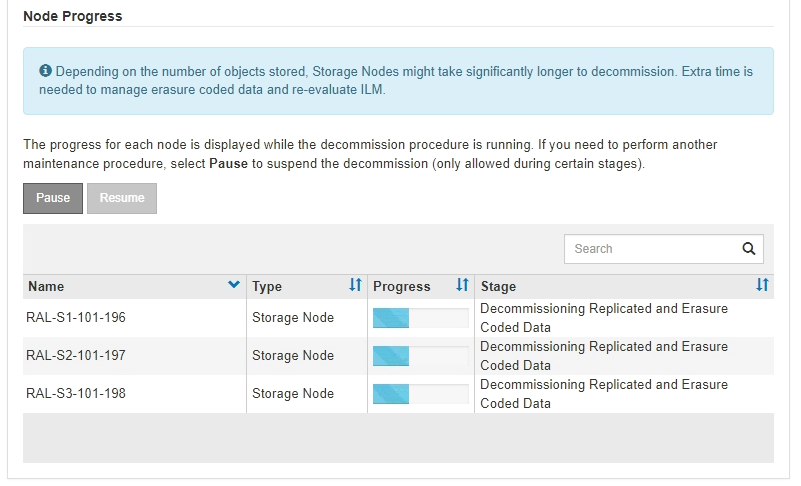
If you are monitoring the progress of a connected site decommission, refer to this table to understand the decommission stages for a Storage Node:
Stage Estimated duration Pending
Minute or less
Wait for Locks
Minutes
Prepare Task
Minute or less
Marking LDR Decommissioned
Minutes
Decommissioning Replicated and Erasure Coded Data
Hours, days, or weeks based on the amount of data
Note: If you need to perform other maintenance activities, you can pause the site decommission during this stage.
LDR Set State
Minutes
Flush Audit Queues
Minutes to hours, based on the number of messages and network latency.
Complete
Minutes
If you are monitoring the progress of a disconnected site decommission, refer to this table to understand the decommission stages for a Storage Node:
Stage Estimated duration Pending
Minute or less
Wait for Locks
Minutes
Prepare Task
Minute or less
Disable External Services
Minutes
Certificate Revocation
Minutes
Node Unregister
Minutes
Storage Grade Unregister
Minutes
Storage Group Removal
Minutes
Entity Removal
Minutes
Complete
Minutes
-
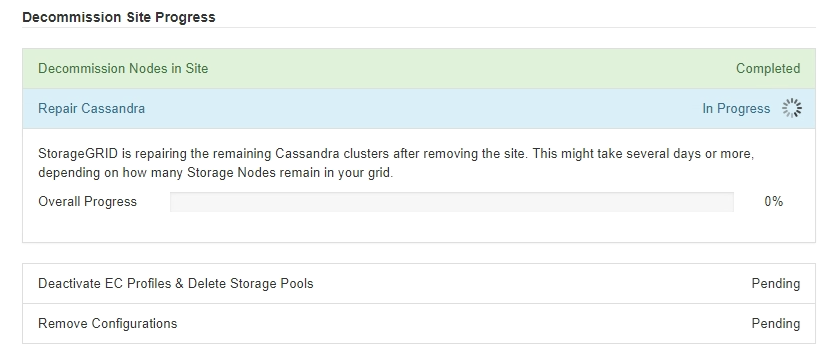
After all nodes have reached the Complete stage, wait for the remaining site decommission operations to complete.
-
During the Repair Cassandra step, StorageGRID makes any necessary repairs to the Cassandra clusters that remain in your grid. These repairs might take several days or more, depending on how many Storage Nodes remain in your grid.
-
During the Deactivate EC Profiles & Delete Storage Pools step, the following ILM changes are made:
-
Any erasure coding profiles that referred to the site are deactivated.
-
Any Storage Pools that referred to the site are deleted.

The All Storage Nodes storage pool (StorageGRID 11.6 and earlier) is also removed because it uses the All Sites site.
-
-
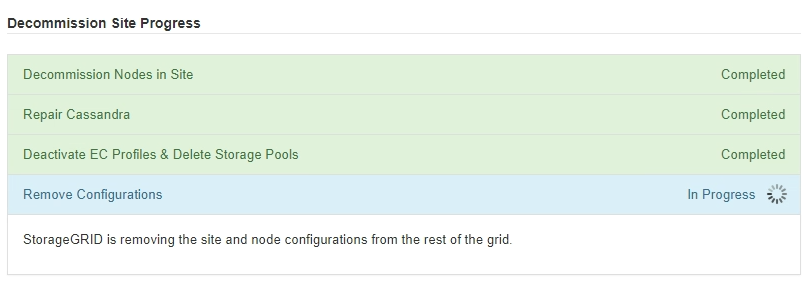
Finally, during the Remove Configuration step, any remaining references to the site and its nodes are removed from the rest of the grid.
-
-
When the decommission procedure has completed, the Decommission Site page shows a success message, and the removed site is no longer shown.
Complete these tasks after you complete the site decommission procedure:
-
Ensure that the drives of all Storage Nodes in the decommissioned site are wiped clean. Use a commercially available data wiping tool or service to permanently and securely remove data from the drives.
-
If the site included one or more Admin Nodes and single sign-on (SSO) is enabled for your StorageGRID system, remove all relying party trusts for the site from Active Directory Federation Services (AD FS).
-
After the nodes have been gracefully powered off automatically as part of the connected site decommission procedure, remove the associated virtual machines.