

Replace the drives in an SGF6112
 Suggest changes
The SGF6112 storage appliance contains 12 SSD drives. Data on the drives is protected by a RAID scheme that enables the appliance to recover from any single drive failure without having to copy data from another node.
The failure of a second drive before an initial drive failure has been corrected might require data be copied from other nodes to restore redundancy. This restoration of redundancy can take longer, and might be impossible, if single-copy ILM rules are in use or were used in the past, or if data redundancy has been impacted by failures on other nodes. Therefore, if one of the SGF6112 drives fails, you must replace it as soon as possible to ensure redundancy.
-
You have physically located the appliance.
-
You have verified which drive has failed by noting that the drive's left LED is solid amber or using the Grid Manager to view the alert caused by the failed drive.

See the information about viewing status indicators to verify the failure. -
You have obtained the replacement drive.
-
You have obtained proper ESD protection.
-
Verify that the drive's left fault LED is amber or use the drive slot ID from the alert to locate the drive.
The twelve drives are in the following positions in the chassis (front of chassis with bezel removed shown):
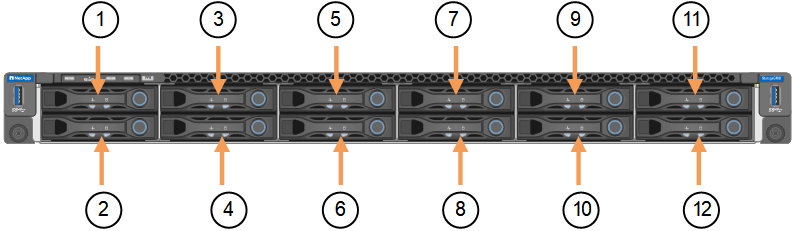
Position Drive 1
HDD00
2
HDD01
3
HDD02
4
HDD03
5
HDD04
6
HDD05
7
HDD06
8
HDD07
9
HDD08
10
HDD09
11
HDD10
12
HDD11
You can also use the Grid Manager to monitor the status of the SSD drives. Select Nodes. Then select
Storage Node> Hardware. If a drive has failed, the Storage RAID Mode field contains a message about which drive has failed.
-
Wrap the strap end of the ESD wristband around your wrist, and secure the clip end to a metal ground to prevent static discharge.
-
Unpack the replacement drive, and set it on a static-free, level surface near the appliance.
Save all packing materials.
-
Press the release button on the failed drive.
The handle on the drive springs open partially, and the drive releases from the slot.
-
Open the handle, slide the drive out, and place it on a static-free, level surface.
-
Press the release button on the replacement drive before you insert it into the drive slot.
The latch springs open.
-
Insert the replacement drive in the slot, and then close the drive handle.
Don't use excessive force while closing the handle. When the drive is fully inserted, you hear a click.
The replaced drive is automatically rebuilt with mirrored data from the working drives. The drive LED should blink initially, but then stop blinking as soon as the system determines that the drive has enough capacity and is functional.
You can check the status of the rebuild by using the Grid Manager.
-
If more than one drive failed and has been replaced, you might have alerts indicating that some volumes need to have data restored to them. If you receive an alert, before attempting volume recovery, select Nodes >
appliance Storage Node> Hardware. In the StorageGRID Appliance section of the page, verify that the Storage RAID mode is healthy or rebuilding. If the status lists one or more failed drives, correct this condition before attempting volume restoration. -
In the Grid Manager, go to Nodes >
appliance Storage Node> Hardware. In the StorageGRID Appliance section of the page, verify that the Storage RAID mode is healthy.
After replacing the part, return the failed part to NetApp, as described in the RMA instructions shipped with the kit. See the Parts Return & Replacements page for further information.