使用 Trident Protect 为 OpenShift Container Platform 中的 Container Apps 提供数据保护
 建议更改
建议更改
参考文档的这一部分提供了使用 Trident Protect 创建容器应用程序的快照和备份的详细信息。NetApp Trident Protect 提供高级应用程序数据管理功能,可增强由 NetApp ONTAP 存储系统和 NetApp Trident CSI 存储配置程序支持的有状态 Kubernetes 应用程序的功能和可用性。Trident Protect 创建应用程序快照和备份。这意味着不仅要为持久卷中的应用程序数据创建快照和备份,还要为应用程序元数据创建快照和备份。Trident Protect 创建的快照和备份可以存储在以下任何对象存储中,并在稍后从中恢复。
-
AWS S3
-
Azure Blob 存储
-
Google Cloud Storage
-
ONTAP S3
-
存储网格
-
任何其他与 S3 兼容的存储
Trident Protect 使用基于角色的访问控制 (RBAC) 的 Kubernetes 模型。默认情况下,Trident Protect 提供称为 trident-protect 的单个系统命名空间及其关联的默认服务帐户。如果您的组织有很多用户或特定的安全需求,您可以使用 Trident Protect 的 RBAC 功能对资源和命名空间的访问进行更精细的控制。
有关 Trident Protect 中的 RBAC 的更多信息,请参见 "Trident Protect 文档"

|
集群管理员可以访问默认的 trident-protect 命名空间中的资源,也可以访问所有其他命名空间中的资源。用户无法在 trident-protect 命名空间中创建应用程序数据管理自定义资源 (CR),如快照和备份 CR。作为最佳实践,用户需要在应用程序命名空间中创建这些 CR。 |
Trident Protect 可以使用文档中提供的说明进行安装"此处"。本节将显示使用 Trident Protect 的容器应用程序的数据保护和应用程序恢复的工作流程。1.快照创建(按需或预定)2.从快照还原(还原到相同和不同的命名空间)3.备份创建 4.从备份还原
前提条件
在为应用程序创建快照和备份之前,必须在 Trident Protect 中配置对象存储以存储快照和备份。这是使用 bucket CR 完成的。只有管理员可以创建 bucket CR 并进行配置。bucket CR 在 Trident Protect 中称为 AppVault。AppVault 对象是存储桶的声明性 Kubernetes 工作流表示。AppVault CR 包含在保护操作中使用存储桶所需的配置,例如备份、快照、还原操作和 SnapMirror 复制。
在本示例中,我们将演示使用 ONTAP S3 作为对象存储。以下是为 ONTAP S3 创建 AppVault CR 的工作流程:1.在 ONTAP 集群的 SVM 中创建 S3 对象存储服务器。2.在对象存储服务器中创建存储桶。3.在 SVM 中创建 S3 用户。请将访问密钥和秘密密钥存放在安全的地方。4.在 OpenShift 中,创建一个密钥来存储 ONTAP S3 凭据。5.为 ONTAP S3 创建 AppVault 对象
为 ONTAP S3 配置 Trident Protect AppVault
使用 ONTAP S3 作为 AppVault 配置 Trident Protect 的示例 YAML 文件
# alias tp='tridentctl-protect'

appvault-secret.yaml

apiVersion: v1
stringData:
  accessKeyID: "<access key id created for a user to access ONTAP S3 bucket>"
  secretAccessKey: "corresponding Secret Access Key"
#data:
# base 64 encoded values
#  accessKeyID: <base64 access key id created for a user to access ONTAP S3 bucket>
#  secretAccessKey: <base 64  Secret Access Key>
kind: Secret
metadata:
  name: appvault-secret
  namespace: trident-protect
type: Opaque

appvault.yaml

apiVersion: protect.trident.netapp.io/v1
kind: AppVault
metadata:
  name: ontap-s3-appvault
  namespace: trident-protect
spec:
  providerConfig:
    azure:
      accountName: ""
      bucketName: ""
      endpoint: ""
    gcp:
      bucketName: ""
      projectID: ""
    s3:
      bucketName: <bucket-name for storing the snapshots and backups>
      endpoint: <endpoint IP for S3>
      secure: "false"
      skipCertValidation: "true"
  providerCredentials:
    accessKeyID:
      valueFromSecret:
        key: accessKeyID
        name: appvault-secret
    secretAccessKey:
      valueFromSecret:
        key: secretAccessKey
        name: appvault-secret
  providerType: OntapS3

# oc create -f appvault-secret.yaml -n trident-protect
# oc create -f appvault.yaml -n trident-protect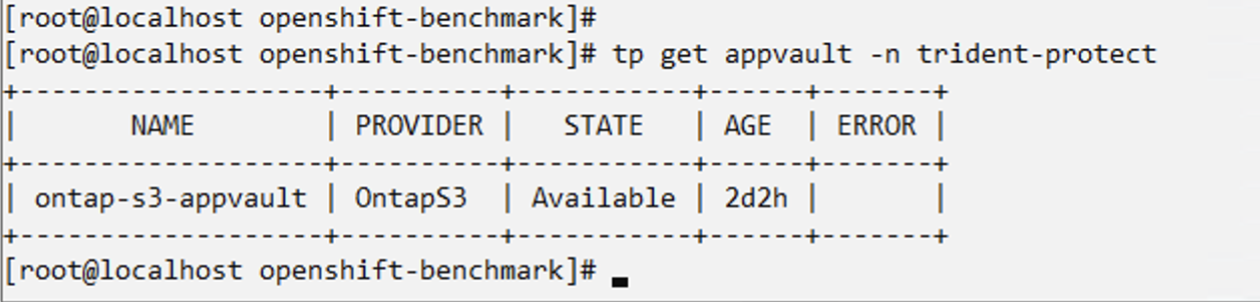
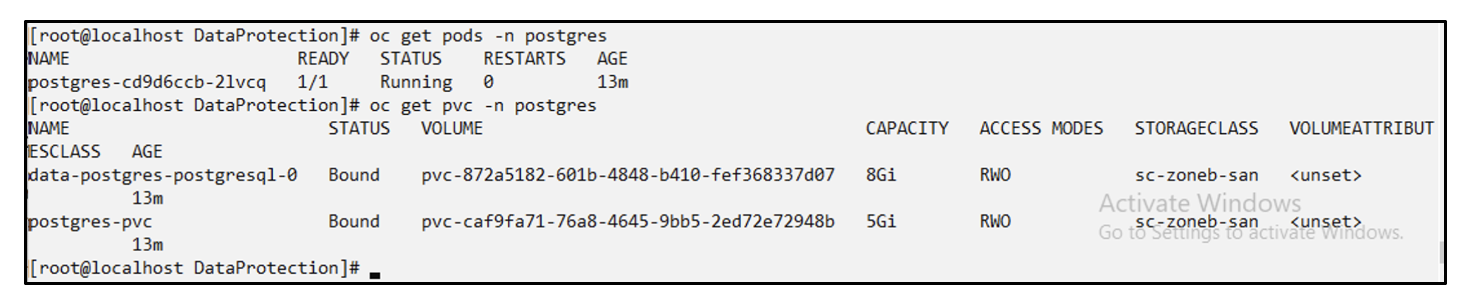
用于安装 postgresql 应用程序的示例 yaml 文件
postgres.yaml
apiVersion: apps/v1
kind: Deployment
metadata:
name: postgres
spec:
replicas: 1
selector:
matchLabels:
app: postgres
template:
metadata:
labels:
app: postgres
spec:
containers:
- name: postgres
image: postgres:14
env:
- name: POSTGRES_USER
#value: "myuser"
value: "admin"
- name: POSTGRES_PASSWORD
#value: "mypassword"
value: "adminpass"
- name: POSTGRES_DB
value: "mydb"
- name: PGDATA
value: "/var/lib/postgresql/data/pgdata"
ports:
- containerPort: 5432
volumeMounts:
- name: postgres-storage
mountPath: /var/lib/postgresql/data
volumes:
- name: postgres-storage
persistentVolumeClaim:
claimName: postgres-pvc
---
apiVersion: v1
kind: PersistentVolumeClaim
metadata:
name: postgres-pvc
spec:
accessModes:
- ReadWriteOnce
resources:
requests:
storage: 5Gi
---
apiVersion: v1
kind: Service
metadata:
name: postgres
spec:
selector:
app: postgres
ports:
- protocol: TCP
port: 5432
targetPort: 5432
type: ClusterIP
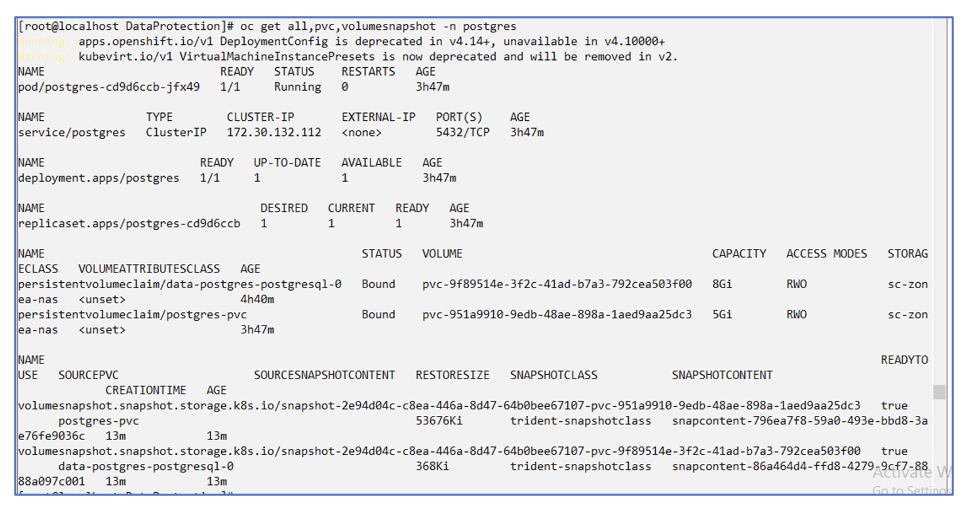
Now create the Trident Protect application CR for the postgres app. Include the objects in the namespace postgres and create it in the postgres namespace.
# tp create app postgres-app --namespaces postgres -n postgres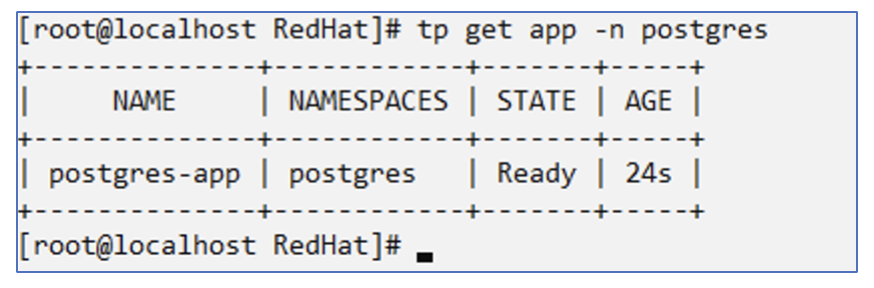
创建快照
创建按需快照
# tp create snapshot postgres-snap1 --app postgres-app --appvault ontap-s3-appvault -n postgres
Snapshot "postgres-snap1" created.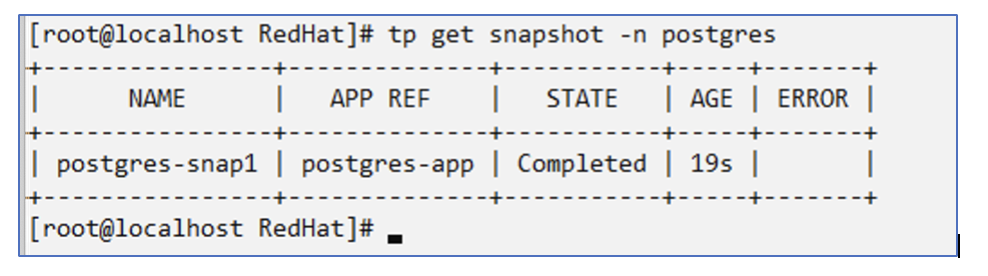
创建计划 使用以下命令,将每天 15:33 创建快照,并保留两个快照和备份。
# tp create schedule schedule1 --app postgres-app --appvault ontap-s3-appvault --backup-retention 2 --snapshot-retention 2 --granularity Daily --hour 15 --minute 33 --data-mover Restic -n postgres
Schedule "schedule1" created.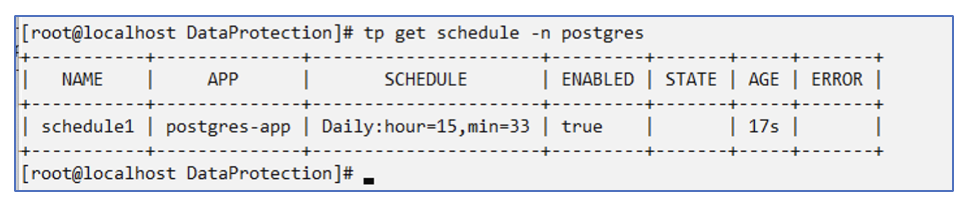
使用 yaml 创建计划
# tp create schedule schedule2 --app postgres-app --appvault ontap-s3-appvault --backup-retention 2 --snapshot-retention 2 --granularity Daily --hour 15 --minute 33 --data-mover Restic -n postgres --dry-run > hourly-snapshotschedule.yaml

cat hourly-snapshotschedule.yaml

apiVersion: protect.trident.netapp.io/v1
kind: Schedule
metadata:
  creationTimestamp: null
  name: schedule2
  namespace: postgres
spec:
  appVaultRef: ontap-s3-appvault
  applicationRef: postgres-app
  backupRetention: "2"
  dataMover: Restic
  dayOfMonth: ""
  dayOfWeek: ""
  enabled: true
  granularity: Hourly
  #hour: "15"
  minute: "33"
  recurrenceRule: ""
  snapshotRetention: "2"
status: {}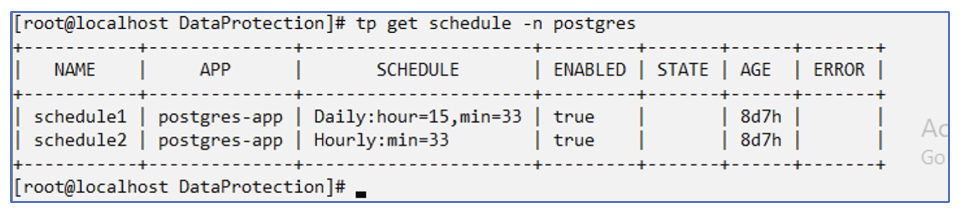
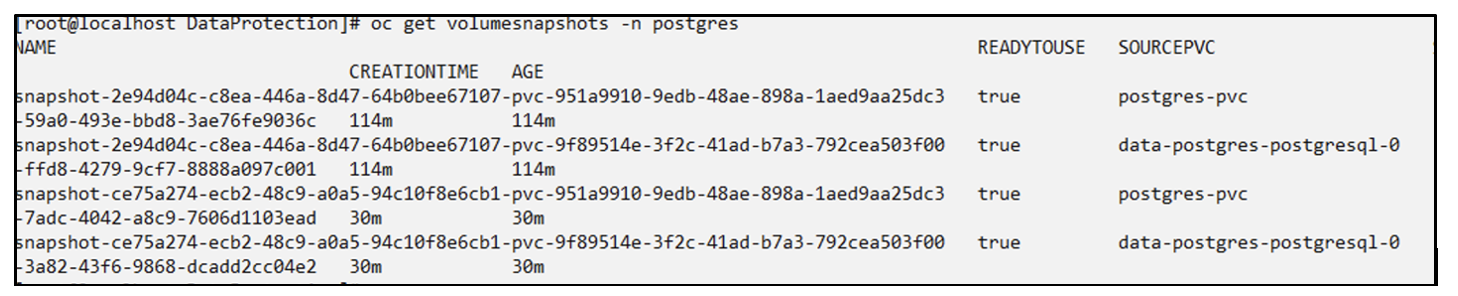
您可以看到按照此计划创建的快照。
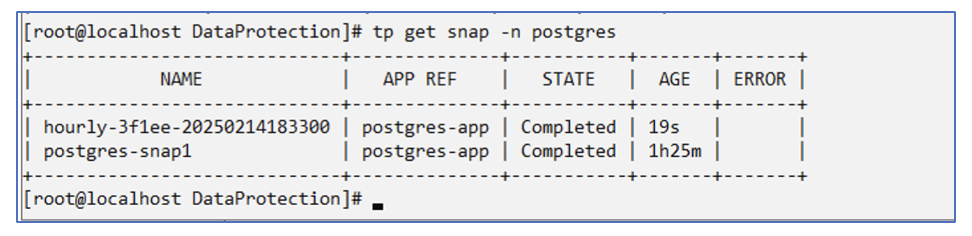
还创建了卷快照。
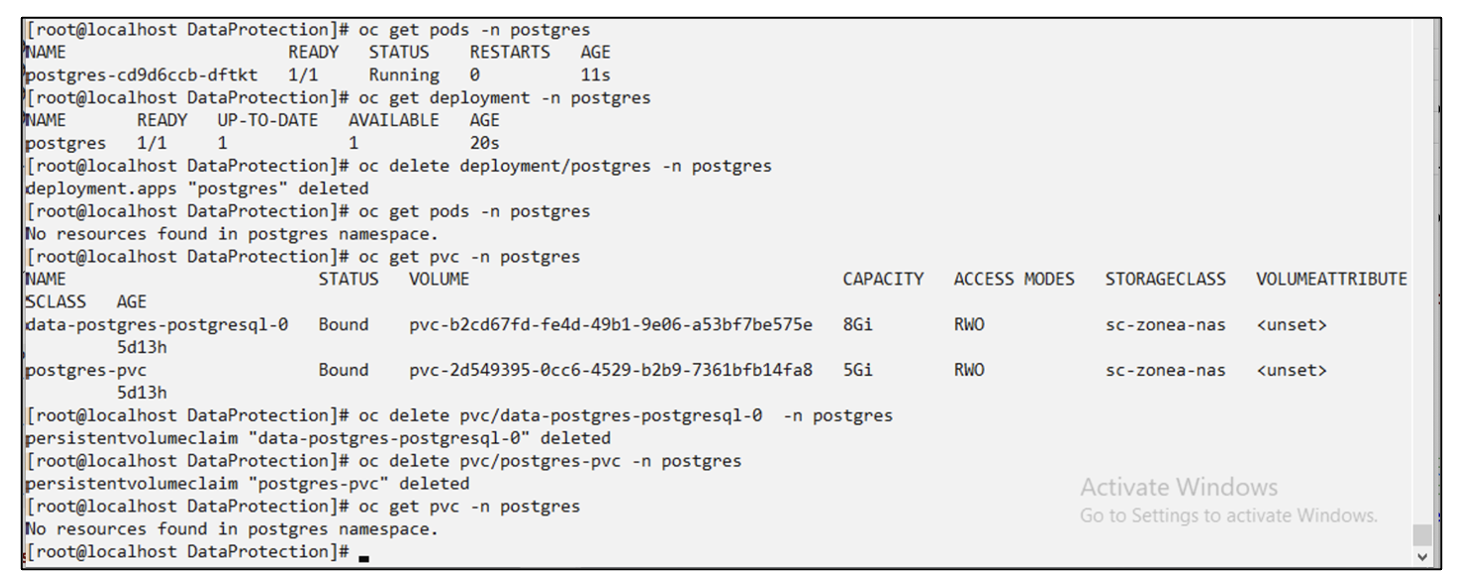
删除应用程序以模拟应用程序丢失
# oc delete deployment/postgres -n postgres
# oc get pod,pvc -n postgres
No resources found in postgres namespace.
从快照恢复到同一命名空间
# tp create sir postgres-sir --snapshot postgres/hourly-3f1ee-20250214183300 -n postgres
SnapshotInplaceRestore "postgres-sir" created.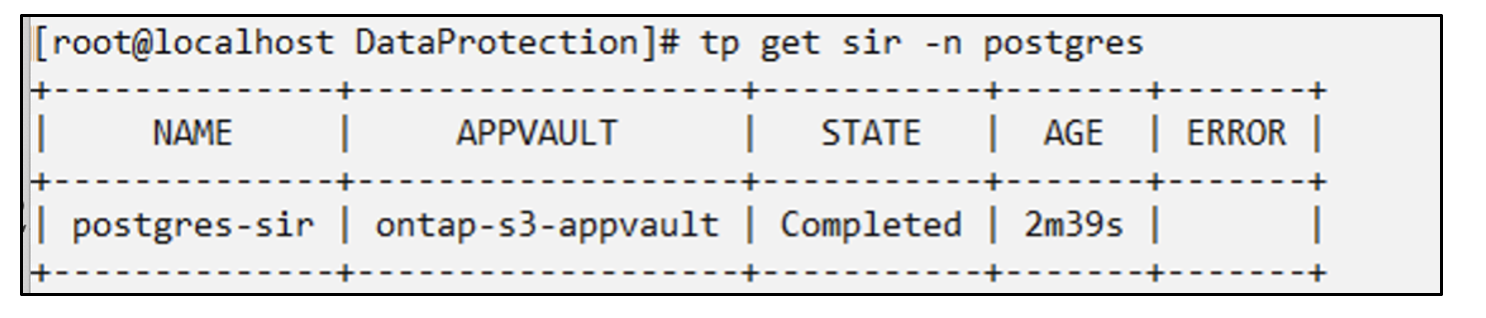
应用程序及其 PVC 恢复到同一个命名空间。

从快照还原到不同的命名空间
# tp create snapshotrestore postgres-restore --snapshot postgres/hourly-3f1ee-20250214183300 --namespace-mapping postgres:postgres-restore -n postgres-restore
SnapshotRestore "postgres-restore" created.
您可以看到应用程序已恢复到新的命名空间。

创建备份
创建按需备份
# tp create backup postgres-backup1 --app postgres-app --appvault ontap-s3-appvault -n postgres
Backup "postgres-backup1" created.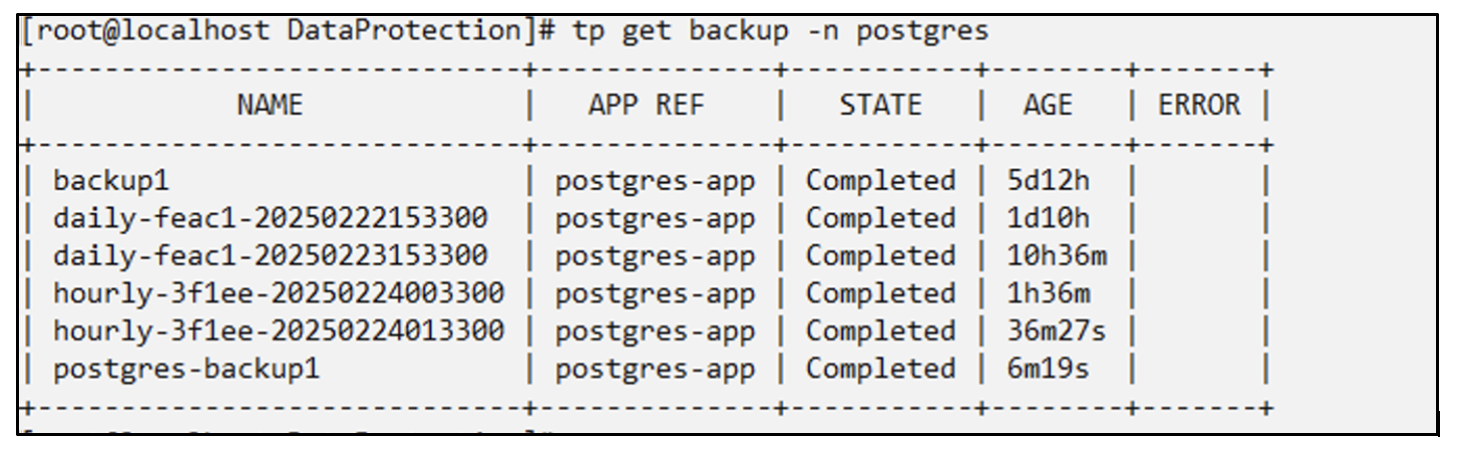
创建备份计划
上面列表中的每日和每小时备份是根据之前设置的计划创建的。
# tp create schedule schedule1 --app postgres-app --appvault ontap-s3-appvault --backup-retention 2 --snapshot-retention 2 --granularity Daily --hour 15 --minute 33 --data-mover Restic -n postgres
Schedule "schedule1" created.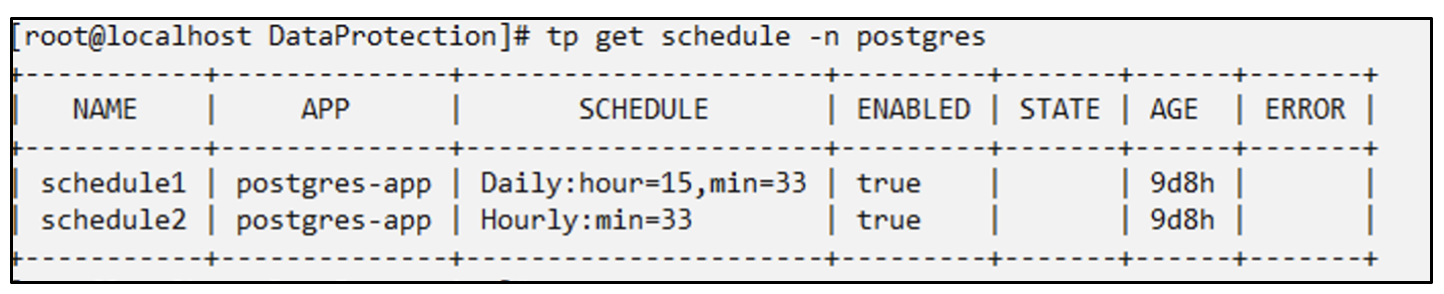
从备份恢复
删除应用程序和 PVC 以模拟数据丢失。
恢复到相同的命名空间 #tp create bir postgres-bir --backup postgres/hourly-3f1ee-20250224023300 -n postgres BackupInplaceRestore "postgres-bir" created。
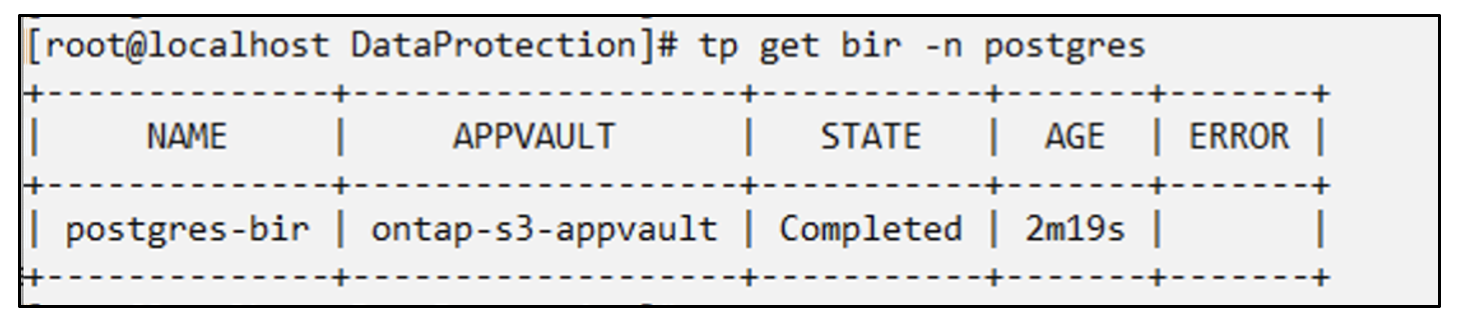
应用程序和 PVC 在同一个命名空间中恢复。

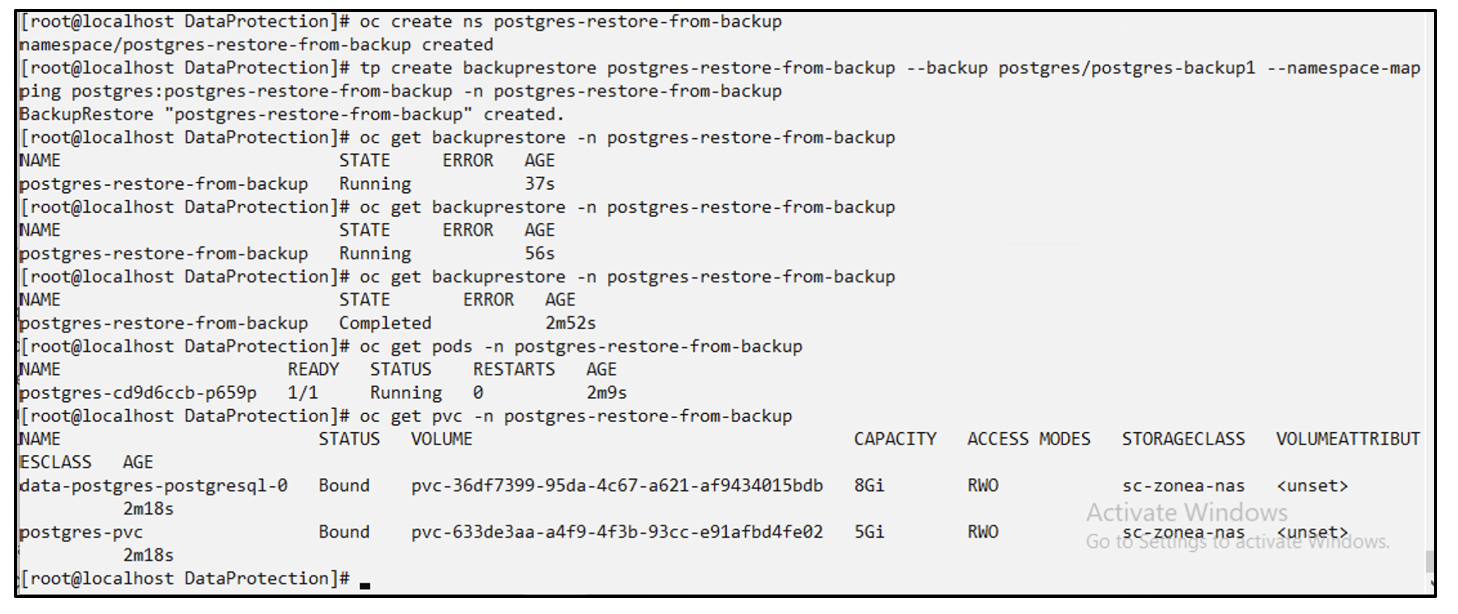
恢复到不同的命名空间 创建一个新的命名空间。从备份恢复到新的命名空间。
迁移应用程序
若要将应用程序克隆或迁移到其他群集(执行跨群集克隆),请在源群集上创建备份,然后将备份还原到其他群集。确保已在目标集群上安装 Trident Protect。
在源集群上,执行下图所示的步骤:

从源集群,将上下文切换到目标集群。然后,确保可以从目标集群上下文访问 AppVault,并从目标集群获取 AppVault 内容。
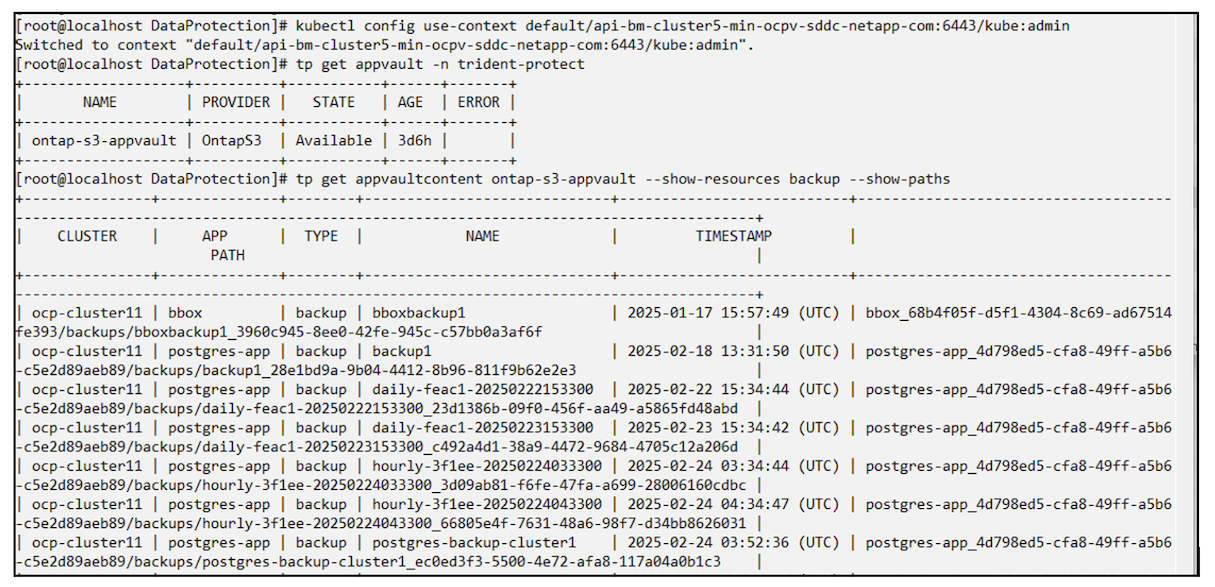
使用列表中的备份路径并创建一个备份恢复 CR 对象,如下面的命令所示。
# tp create backuprestore backup-restore-cluster2 --namespace-mapping postgres:postgres --appvault ontap-s3-appvault --path postgres-app_4d798ed5-cfa8-49ff-a5b6-c5e2d89aeb89/backups/postgres-backup-cluster1_ec0ed3f3-5500-4e72-afa8-117a04a0b1c3 -n postgres
BackupRestore "backup-restore-cluster2" created.
现在您可以看到应用程序 pod 和 PVC 已在目标集群中创建。