

測試程式
 建議變更
建議變更
本節描述完成驗證所需的任務。
先決條件
場景 1 – JupyterLab 中的按需推理
-
為 AI/ML 推理工作負載建立 Kubernetes 命名空間。
$ kubectl create namespace inference
namespace/inference created
-
使用NetApp DataOps Toolkit 配置持久卷,用於儲存您將執行推理的資料。
$ netapp_dataops_k8s_cli.py create volume --namespace=inference --pvc-name=inference-data --size=50Gi
Creating PersistentVolumeClaim (PVC) 'inference-data' in namespace 'inference'.
PersistentVolumeClaim (PVC) 'inference-data' created. Waiting for Kubernetes to bind volume to PVC.
Volume successfully created and bound to PersistentVolumeClaim (PVC) 'inference-data' in namespace 'inference'.
-
使用NetApp DataOps Toolkit 建立新的 JupyterLab 工作區。使用上一步建立的持久性卷 `--mount- pvc`選項。根據需要NVIDIA `-- nvidia-gpu`選項。
在以下範例中,持久卷
inference-data`被掛載到 JupyterLab 工作區容器中 `/home/jovyan/data。使用官方 Project Jupyter 容器鏡像時, `/home/jovyan`在 JupyterLab Web 介面中顯示為頂級目錄。$ netapp_dataops_k8s_cli.py create jupyterlab --namespace=inference --workspace-name=live-inference --size=50Gi --nvidia-gpu=2 --mount-pvc=inference-data:/home/jovyan/data Set workspace password (this password will be required in order to access the workspace): Re-enter password: Creating persistent volume for workspace... Creating PersistentVolumeClaim (PVC) 'ntap-dsutil-jupyterlab-live-inference' in namespace 'inference'. PersistentVolumeClaim (PVC) 'ntap-dsutil-jupyterlab-live-inference' created. Waiting for Kubernetes to bind volume to PVC. Volume successfully created and bound to PersistentVolumeClaim (PVC) 'ntap-dsutil-jupyterlab-live-inference' in namespace 'inference'. Creating Service 'ntap-dsutil-jupyterlab-live-inference' in namespace 'inference'. Service successfully created. Attaching Additional PVC: 'inference-data' at mount_path: '/home/jovyan/data'. Creating Deployment 'ntap-dsutil-jupyterlab-live-inference' in namespace 'inference'. Deployment 'ntap-dsutil-jupyterlab-live-inference' created. Waiting for Deployment 'ntap-dsutil-jupyterlab-live-inference' to reach Ready state. Deployment successfully created. Workspace successfully created. To access workspace, navigate to http://192.168.0.152:32721
-
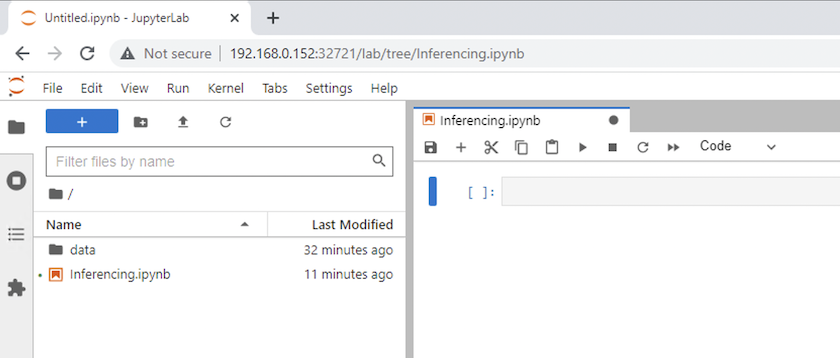
使用輸出中指定的 URL 存取 JupyterLab 工作區 `create jupyterlab`命令。資料目錄代表掛載到工作區的持久卷。

-
打開 `data`目錄並上傳要執行推理的檔案。當檔案上傳到資料目錄時,它們會自動儲存在掛載到工作區的持久性磁碟區上。要上傳文件,請點擊上傳文件圖標,如下圖所示。

-
返回頂級目錄並建立一個新的筆記本。
-
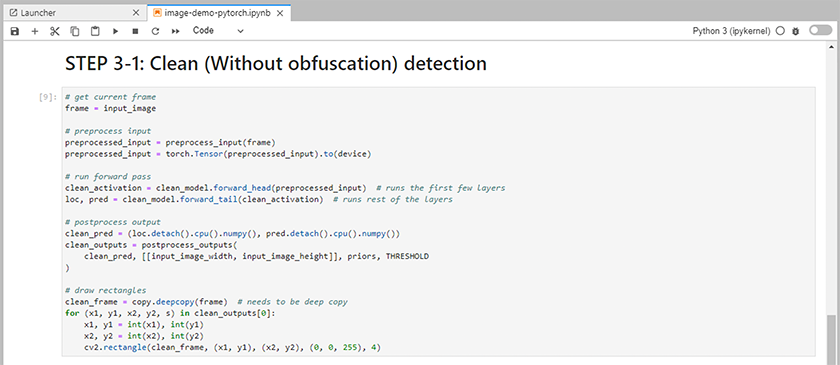
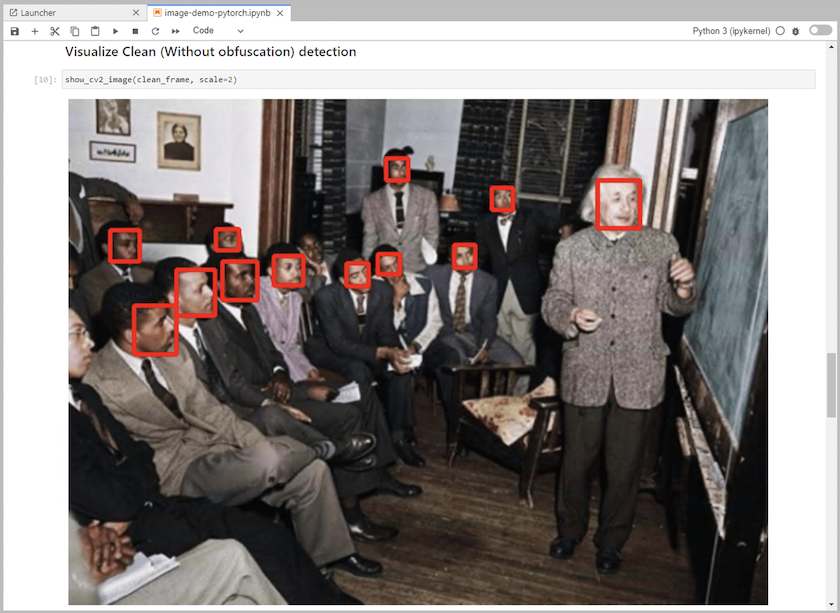
將推理代碼加入筆記本中。以下範例顯示了影像檢測用例的推理程式碼。
-
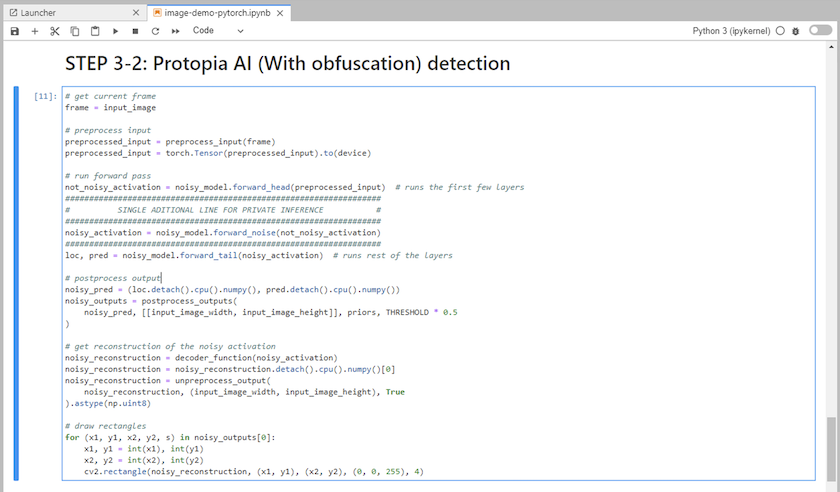
將 Protopia 混淆加入到您的推理程式碼中。 Protopia 直接與客戶合作提供特定用例的文檔,這超出了本技術報告的範圍。以下範例展示了新增了 Protopia 混淆的影像偵測用例的推理程式碼。
場景 2 – Kubernetes 上的批次推理
-
為 AI/ML 推理工作負載建立 Kubernetes 命名空間。
$ kubectl create namespace inference
namespace/inference created
-
使用NetApp DataOps Toolkit 配置持久卷,用於儲存您將執行推理的資料。
$ netapp_dataops_k8s_cli.py create volume --namespace=inference --pvc-name=inference-data --size=50Gi
Creating PersistentVolumeClaim (PVC) 'inference-data' in namespace 'inference'.
PersistentVolumeClaim (PVC) 'inference-data' created. Waiting for Kubernetes to bind volume to PVC.
Volume successfully created and bound to PersistentVolumeClaim (PVC) 'inference-data' in namespace 'inference'.
-
使用您將執行推理的資料填入新的持久卷。
有幾種方法可以將資料載入到 PVC 上。如果您的資料目前儲存在與 S3 相容的物件儲存平台(例如NetApp StorageGRID或 Amazon S3)中,那麼您可以使用 "NetApp DataOps Toolkit S3 Data Mover 功能"。另一種簡單的方法是建立一個 JupyterLab 工作區,然後透過 JupyterLab Web 介面上傳文件,如“場景 1 – JupyterLab 中的按需推理 “
-
為您的批次推理任務建立一個 Kubernetes 作業。以下範例展示了影像偵測用例的批次推理作業。此作業對一組影像中的每個影像執行推理,並將推理準確度指標寫入標準輸出。
$ vi inference-job-raw.yaml apiVersion: batch/v1 kind: Job metadata: name: netapp-inference-raw namespace: inference spec: backoffLimit: 5 template: spec: volumes: - name: data persistentVolumeClaim: claimName: inference-data - name: dshm emptyDir: medium: Memory containers: - name: inference image: netapp-protopia-inference:latest imagePullPolicy: IfNotPresent command: ["python3", "run-accuracy-measurement.py", "--dataset", "/data/netapp-face-detection/FDDB"] resources: limits: nvidia.com/gpu: 2 volumeMounts: - mountPath: /data name: data - mountPath: /dev/shm name: dshm restartPolicy: Never $ kubectl create -f inference-job-raw.yaml job.batch/netapp-inference-raw created -
確認推理作業已成功完成。
$ kubectl -n inference logs netapp-inference-raw-255sp
100%|██████████| 89/89 [00:52<00:00,  1.68it/s]
Reading Predictions : 100%|██████████| 10/10 [00:01<00:00,  6.23it/s]
Predicting ... : 100%|██████████| 10/10 [00:16<00:00,  1.64s/it]
==================== Results ====================
FDDB-fold-1 Val AP: 0.9491256561145955
FDDB-fold-2 Val AP: 0.9205024466101926
FDDB-fold-3 Val AP: 0.9253013871078468
FDDB-fold-4 Val AP: 0.9399781485863011
FDDB-fold-5 Val AP: 0.9504280149478732
FDDB-fold-6 Val AP: 0.9416473519339292
FDDB-fold-7 Val AP: 0.9241631566241117
FDDB-fold-8 Val AP: 0.9072663297546659
FDDB-fold-9 Val AP: 0.9339648715035469
FDDB-fold-10 Val AP: 0.9447707905560152
FDDB Dataset Average AP: 0.9337148153739079
=================================================
mAP: 0.9337148153739079
-
將 Protopia 混淆加入到您的推理工作中。您可以直接從 Protopia 找到有關新增 Protopia 混淆的用例特定說明,這超出了本技術報告的範圍。以下範例展示了針對人臉偵測用例的批量推理作業,其中新增了 Protopia 混淆,並使用 ALPHA 值 0.8。此作業在對一組影像中的每個影像執行推理之前應用 Protopia 混淆,然後將推理準確度指標寫入標準輸出。
我們對 ALPHA 值 0.05、0.1、0.2、0.4、0.6、0.8、0.9 和 0.95 重複了此步驟。您可以在"推理準確度比較。"
$ vi inference-job-protopia-0.8.yaml apiVersion: batch/v1 kind: Job metadata: name: netapp-inference-protopia-0.8 namespace: inference spec: backoffLimit: 5 template: spec: volumes: - name: data persistentVolumeClaim: claimName: inference-data - name: dshm emptyDir: medium: Memory containers: - name: inference image: netapp-protopia-inference:latest imagePullPolicy: IfNotPresent env: - name: ALPHA value: "0.8" command: ["python3", "run-accuracy-measurement.py", "--dataset", "/data/netapp-face-detection/FDDB", "--alpha", "$(ALPHA)", "--noisy"] resources: limits: nvidia.com/gpu: 2 volumeMounts: - mountPath: /data name: data - mountPath: /dev/shm name: dshm restartPolicy: Never $ kubectl create -f inference-job-protopia-0.8.yaml job.batch/netapp-inference-protopia-0.8 created -
確認推理作業已成功完成。
$ kubectl -n inference logs netapp-inference-protopia-0.8-b4dkz
100%|██████████| 89/89 [01:05<00:00,  1.37it/s]
Reading Predictions : 100%|██████████| 10/10 [00:02<00:00,  3.67it/s]
Predicting ... : 100%|██████████| 10/10 [00:22<00:00,  2.24s/it]
==================== Results ====================
FDDB-fold-1 Val AP: 0.8953066115834589
FDDB-fold-2 Val AP: 0.8819580264029936
FDDB-fold-3 Val AP: 0.8781107458462862
FDDB-fold-4 Val AP: 0.9085731346308461
FDDB-fold-5 Val AP: 0.9166445508275378
FDDB-fold-6 Val AP: 0.9101178994188819
FDDB-fold-7 Val AP: 0.8383443678423771
FDDB-fold-8 Val AP: 0.8476311547659464
FDDB-fold-9 Val AP: 0.8739624502111121
FDDB-fold-10 Val AP: 0.8905468076424851
FDDB Dataset Average AP: 0.8841195749171925
=================================================
mAP: 0.8841195749171925
場景 3 – NVIDIA Triton 推理伺服器
-
為 AI/ML 推理工作負載建立 Kubernetes 命名空間。
$ kubectl create namespace inference
namespace/inference created
-
使用NetApp DataOps Toolkit 配置持久性卷,用作NVIDIA Triton 推理伺服器的模型儲存庫。
$ netapp_dataops_k8s_cli.py create volume --namespace=inference --pvc-name=triton-model-repo --size=100Gi
Creating PersistentVolumeClaim (PVC) 'triton-model-repo' in namespace 'inference'.
PersistentVolumeClaim (PVC) 'triton-model-repo' created. Waiting for Kubernetes to bind volume to PVC.
Volume successfully created and bound to PersistentVolumeClaim (PVC) 'triton-model-repo' in namespace 'inference'.
-
將您的模型儲存在新的持久性卷中 "格式"NVIDIA Triton 推理伺服器可以識別它。
有幾種方法可以將資料載入到 PVC 上。一個簡單的方法是建立一個 JupyterLab 工作區,然後透過 JupyterLab Web 介面上傳文件,如“場景 1 – JupyterLab 中的按需推理 。 “
-
使用NetApp DataOps Toolkit 部署新的NVIDIA Triton Inference Server 實例。
$ netapp_dataops_k8s_cli.py create triton-server --namespace=inference --server-name=netapp-inference --model-repo-pvc-name=triton-model-repo
Creating Service 'ntap-dsutil-triton-netapp-inference' in namespace 'inference'.
Service successfully created.
Creating Deployment 'ntap-dsutil-triton-netapp-inference' in namespace 'inference'.
Deployment 'ntap-dsutil-triton-netapp-inference' created.
Waiting for Deployment 'ntap-dsutil-triton-netapp-inference' to reach Ready state.
Deployment successfully created.
Server successfully created.
Server endpoints:
http: 192.168.0.152: 31208
grpc: 192.168.0.152: 32736
metrics: 192.168.0.152: 30009/metrics
-
使用 Triton 客戶端 SDK 執行推理任務。以下 Python 程式碼摘錄使用 Triton Python 用戶端 SDK 執行人臉偵測用例的推理任務。此範例呼叫 Triton API 並傳入圖像進行推理。然後,Triton 推理伺服器接收請求,呼叫模型,並將推理輸出作為 API 結果的一部分傳回。
# get current frame frame = input_image # preprocess input preprocessed_input = preprocess_input(frame) preprocessed_input = torch.Tensor(preprocessed_input).to(device) # run forward pass clean_activation = clean_model_head(preprocessed_input) # runs the first few layers ###################################################################################### # pass clean image to Triton Inference Server API for inferencing # ###################################################################################### triton_client = httpclient.InferenceServerClient(url="192.168.0.152:31208", verbose=False) model_name = "face_detection_base" inputs = [] outputs = [] inputs.append(httpclient.InferInput("INPUT__0", [1, 128, 32, 32], "FP32")) inputs[0].set_data_from_numpy(clean_activation.detach().cpu().numpy(), binary_data=False) outputs.append(httpclient.InferRequestedOutput("OUTPUT__0", binary_data=False)) outputs.append(httpclient.InferRequestedOutput("OUTPUT__1", binary_data=False)) results = triton_client.infer( model_name, inputs, outputs=outputs, #query_params=query_params, headers=None, request_compression_algorithm=None, response_compression_algorithm=None) #print(results.get_response()) statistics = triton_client.get_inference_statistics(model_name=model_name, headers=None) print(statistics) if len(statistics["model_stats"]) != 1: print("FAILED: Inference Statistics") sys.exit(1) loc_numpy = results.as_numpy("OUTPUT__0") pred_numpy = results.as_numpy("OUTPUT__1") ###################################################################################### # postprocess output clean_pred = (loc_numpy, pred_numpy) clean_outputs = postprocess_outputs( clean_pred, [[input_image_width, input_image_height]], priors, THRESHOLD ) # draw rectangles clean_frame = copy.deepcopy(frame) # needs to be deep copy for (x1, y1, x2, y2, s) in clean_outputs[0]: x1, y1 = int(x1), int(y1) x2, y2 = int(x2), int(y2) cv2.rectangle(clean_frame, (x1, y1), (x2, y2), (0, 0, 255), 4) -
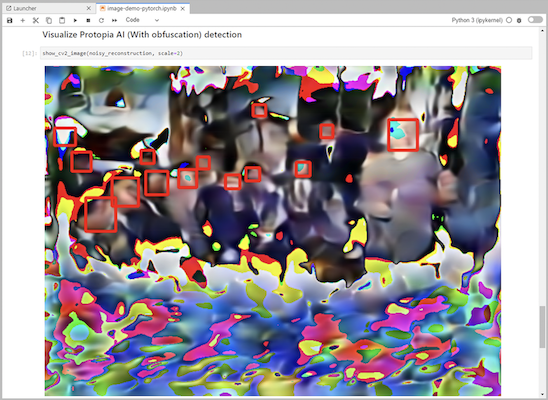
將 Protopia 混淆加入到您的推理程式碼中。您可以直接從 Protopia 找到有關新增 Protopia 混淆的特定用例說明;但是,此過程超出了本技術報告的範圍。以下範例顯示了與前面步驟 5 中所示的相同的 Python 程式碼,但添加了 Protopia 混淆。
請注意,在將影像傳遞給 Triton API 之前,會先進行 Protopia 混淆。因此,未混淆的影像永遠不會離開本機。只有經過混淆的圖像才會在網路上傳遞。此工作流程適用於在受信任區域內收集資料但隨後需要傳遞到該受信任區域之外進行推理的用例。如果沒有 Protopia 混淆技術,就不可能實現這種類型的工作流程,因為敏感資料永遠不會離開受信任的區域。
# get current frame
frame = input_image
# preprocess input
preprocessed_input = preprocess_input(frame)
preprocessed_input = torch.Tensor(preprocessed_input).to(device)
# run forward pass
not_noisy_activation = noisy_model_head(preprocessed_input)  # runs the first few layers
##################################################################
#          obfuscate image locally prior to inferencing          #
#          SINGLE ADITIONAL LINE FOR PRIVATE INFERENCE           #
##################################################################
noisy_activation = noisy_model_noise(not_noisy_activation)
##################################################################
###########################################################################################
#          pass obfuscated image to Triton Inference Server API for inferencing           #
###########################################################################################
triton_client = httpclient.InferenceServerClient(url="192.168.0.152:31208", verbose=False)
model_name = "face_detection_noisy"
inputs = []
outputs = []
inputs.append(httpclient.InferInput("INPUT__0", [1, 128, 32, 32], "FP32"))
inputs[0].set_data_from_numpy(noisy_activation.detach().cpu().numpy(), binary_data=False)
outputs.append(httpclient.InferRequestedOutput("OUTPUT__0", binary_data=False))
outputs.append(httpclient.InferRequestedOutput("OUTPUT__1", binary_data=False))
results = triton_client.infer(
    model_name,
    inputs,
    outputs=outputs,
    #query_params=query_params,
    headers=None,
    request_compression_algorithm=None,
    response_compression_algorithm=None)
#print(results.get_response())
statistics = triton_client.get_inference_statistics(model_name=model_name, headers=None)
print(statistics)
if len(statistics["model_stats"]) != 1:
    print("FAILED: Inference Statistics")
    sys.exit(1)

loc_numpy = results.as_numpy("OUTPUT__0")
pred_numpy = results.as_numpy("OUTPUT__1")
###########################################################################################

# postprocess output
noisy_pred = (loc_numpy, pred_numpy)
noisy_outputs = postprocess_outputs(
    noisy_pred, [[input_image_width, input_image_height]], priors, THRESHOLD * 0.5
)
# get reconstruction of the noisy activation
noisy_reconstruction = decoder_function(noisy_activation)
noisy_reconstruction = noisy_reconstruction.detach().cpu().numpy()[0]
noisy_reconstruction = unpreprocess_output(
    noisy_reconstruction, (input_image_width, input_image_height), True
).astype(np.uint8)
# draw rectangles
for (x1, y1, x2, y2, s) in noisy_outputs[0]:
    x1, y1 = int(x1), int(y1)
    x2, y2 = int(x2), int(y2)
    cv2.rectangle(noisy_reconstruction, (x1, y1), (x2, y2), (0, 0, 255), 4)